Follow the steps below to deploy a Blazor WebAssembly application to GitHub Pages.
Prerequisites:
.NET Core 3.1/.NET 5.0
GIT
GitHub Account
Create a Blazor WebAssembly project using the below command in the CLI.
| mkdir BlazorGitHubPagesDemo cd BlazorGitHubPagesDemo dotnet new blazorwasm |
Add the .gitignore file to ignore the bin/obj files.
| dotnet new gitignore |
Now, create a new GitHub repository according to GitHub’s instructions and run the following commands in the CLI to push an existing repository to the created GitHub repository page.
| // Create the Git repository git init // Track all files that are not ignore by .gitignore git add –all // Commit all changes to the repository git commit -m “Initial commit” // Push the changes to the existing repo master branch git remote add origin https://github.com/{{GitHub_User_Name}}/BlazorGitHubPagesDemo.git git push -u origin master |
Now the changes have been committed in the newly created GitHub repository.
After the source code has been pushed to the created GitHub repository, create a new GitHub action workflow to build the project, commit the output, and push the published code to a separate branch. To deploy in GitHub, GitHub Pages will use a separate branch (named gh-pages) as the static files for your site.
To achieve this, navigate to the Action tab in the GitHub repository and click the set up a workflow yourself option to create a new GitHub workflow action.

Clicking set up a workflow yourself will navigate to the Edit new file page. This file will instruct GitHub actions to build and deploy your project using YAML. Refer to “GitHub Actions” for the workflow of YAML files.
Copy this code and paste it in your YML file.
[main.yml]
name: Deploy to GitHub pages

# Run workflow on every push to the master branch
on:
push:
branches: [ master ]

jobs:
deploy-to-github-pages:
# Use Ubuntu-latest image to run steps on
runs-on: ubuntu-latest
steps:
# Uses GitHub’s checkout action to check out code from the master branch
– uses: actions/checkout@v2

# Sets up .NET Core SDK 3.1
– name: Setup .NET Core SDK
uses: actions/setup-dotnet@v1
with:
dotnet-version: 3.1

# Publishes the Blazor project to the release folder
– name: Publish .NET Core Project
run: dotnet publish BlazorGitHubPagesDemo.csproj -c Release -o release –nologo

# Changes the base tag in index.html from ‘/’ to ‘BlazorGitHubPagesDemo’ to match the GitHub Pages repository subdirectory
– name: Change base-tag in index.html from / to BlazorGitHubPagesDemo
run: sed -i ‘s/<base href=”\/” \/>/<base href=”\/BlazorGitHubPagesDemo\/” \/>/g’ release/wwwroot/index.html

# Copy index.html to 404.html to serve the same file when a file is not found
– name: copy index.html to 404.html
run: cp release/wwwroot/index.html release/wwwroot/404.html

# Add the .nojekyll file to tell GitHub pages to not treat this as a Jekyll project. (Allow files and folders starting with an underscore)
– name: Add .nojekyll file
run: touch release/wwwroot/.nojekyll

– name: Commit wwwroot to GitHub pages
uses: JamesIves/github-pages-deploy-action@3.7.1
with:
GITHUB_TOKEN: ${{ secrets.GITHUB_TOKEN }}
BRANCH: gh-pages
FOLDER: release/wwwroot
Now that all steps are in place, commit the file.

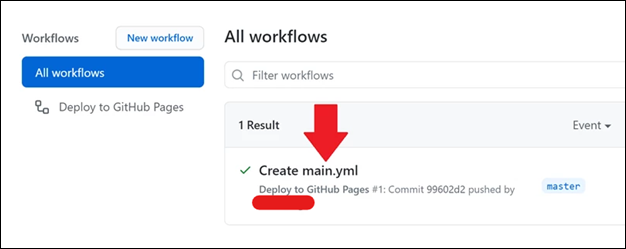
Navigate back to the GitHub Actions overview page by clicking the Actions tab.

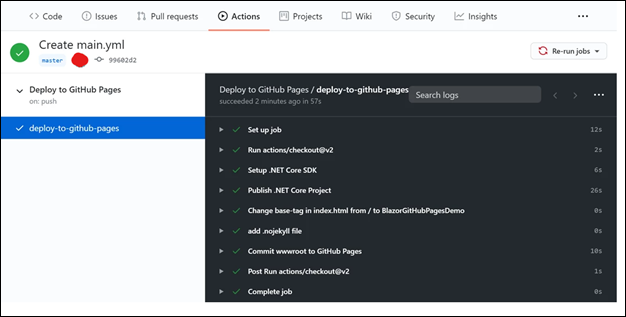
You can now find your GitHub Action Workflow and the workflow runs on this page. Click on the first run that was automatically created when you committed the workflow, and watch it publish your project to the gh-pages branch.

Once completed, you can see the result by navigating to the gh-pages branch in your repository.

To enable GitHub pages in the repository settings, navigate to the settings by clicking on the Settings tab. Scroll down to the “GitHub Pages” section and select the gh-pages branch in the Source dropdown.

Now, the GitHub Pages site should be available at in the below link. ‘[YOUR_USERNAME].github.io/[YOUR_REPOSITORY_NAME]’.
Refer to “How to deploy ASP.NET Blazor WebAssembly to GitHub Pages” for more details.


Share with