Blazor FAQ - General

Find answers for the most frequently asked questions
Expand All Collapse All

The Blazor framework includes synchronous and asynchronous lifecycle methods. You can load the full page asynchronously using the below methods,

  • OnInitializedAsync – It is invoked when the component is ready to start and has received its initial parameters from its parent in the render tree.
protected override async Task OnInitializedAsync()
{
await ...
}
  • OnParametersSetAsync – It is invoked when the component is initialized and has received its first set of parameters from its parent component.
protected override async Task OnParametersSetAsync()
{
    await ...
}
  • OnAfterRenderAsync – It is invoked after a component has finished rendering. The firstRender is set to true at first time when the component instance is rendered.
protected override async Task OnAfterRenderAsync(bool firstRender)
{
    if (firstRender)
    {
        await ...
    }
}

Permalink

A Progressive Web Application is a Single Page Application that uses modern browser APIs, and  performs like a desktop app. It can work offline and load instantly, and independent of network speed.

Find the steps for create PWA with blazor app:

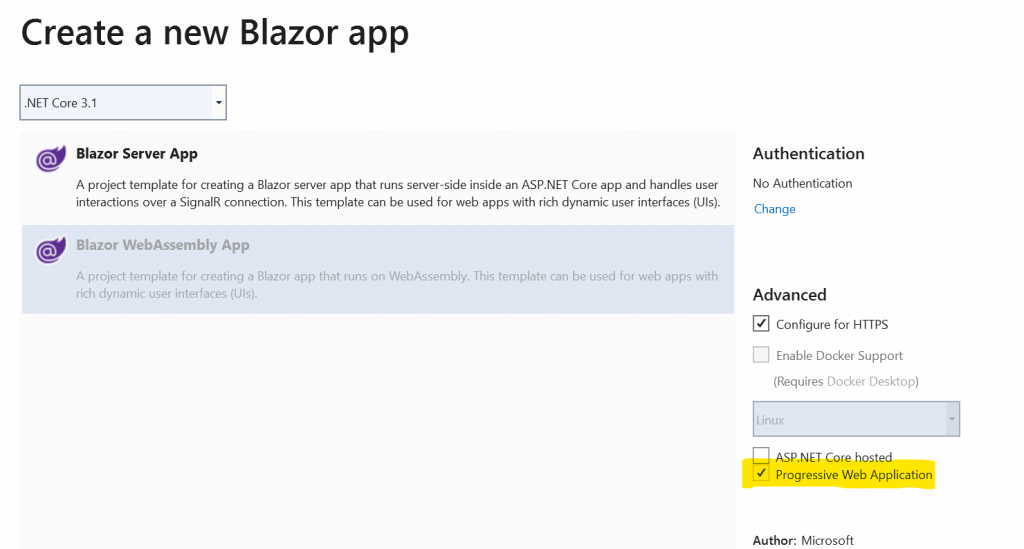
  • Create a project from the PWA template
  • Run the application, after creating the app
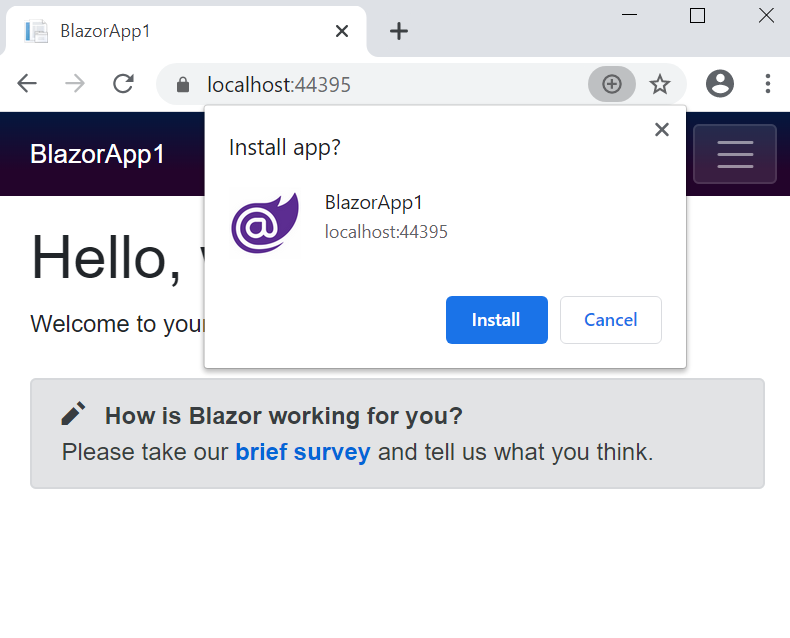
  • After it launched in the browser, there we have the option for installing the app (PWA)

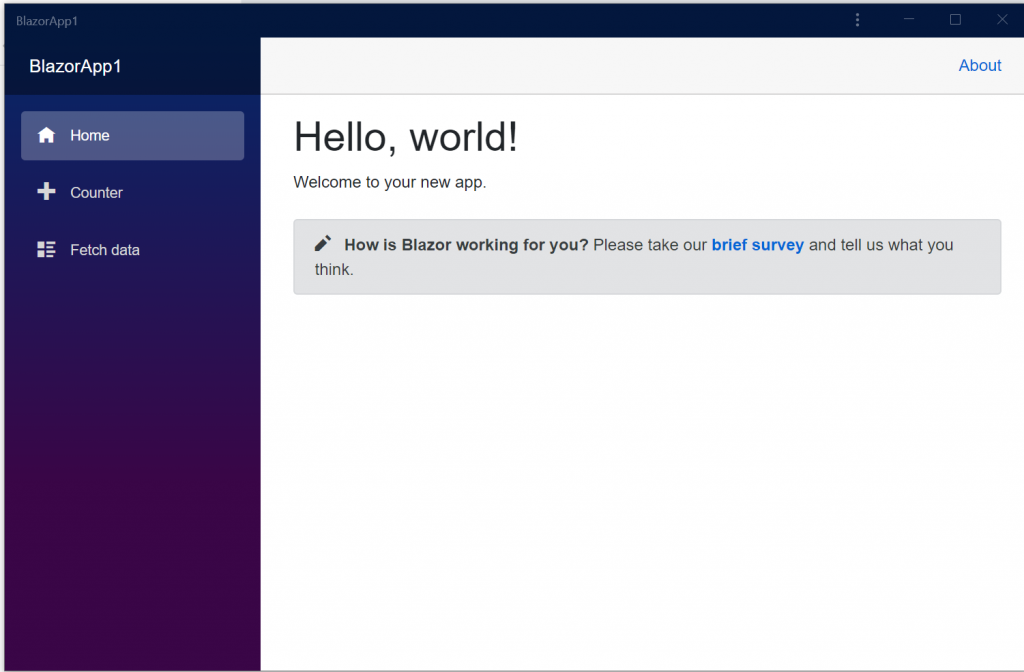
  • Once installed, the app appears in its own window without an address bar.

Please refer to the documentation link for more details: https://docs.microsoft.com/en-us/aspnet/core/blazor/progressive-web-app?view=aspnetcore-3.1&tabs=visual-studio#create-a-project-from-the-pwa-template

Permalink

You can refresh the Blazor component using the SignalR concept without reloading the page. When using SignalR, saving the changes in one page notifies the changes made to other clients. During the notification process, call the data loading method to reload the changes made to that component without reloading the entire page.

@code{

    public List<Order> Orders { get; set; }
    private HubConnection hubConnection;

    protected override void OnInitialized()
    {
        hubConnection = new HubConnectionBuilder()
        .WithUrl(NavigationManager.ToAbsoluteUri("/chathub"))
        .Build();

        hubConnection.On<string, string>("ReceiveMessage", (user, message) =>
        {
            LoadData(); //update the data
            StateHasChanged();//Refresh the component using updated data
        });

       await hubConnection.StartAsync();

    }

    protected async void LoadData()
    {
        //load all the orders from the server.
    }
}

Please refer to the documentation link for more details: https://docs.microsoft.com/en-us/aspnet/core/tutorials/signalr-blazor-webassembly?view=aspnetcore-3.1&tabs=visual-studio

Permalink

From .NET 5 Preview 7, Blazor components trim insignificant whitespaces to achieve better performance. This has been implemented as a result of the finding that 40% of the rendering time is consumed by whitespace nodes. If whitespace nodes removal causes unexpected behavior, you can simply enable it by using the @preservewhitespace directive.

@using System.Linq

@preservewhitespace true
 
<ul>
    @foreach (var item in forecasts)
    {
        <li>
            Temperature: @item.TemperatureC
        </li>
    }
</ul>
 
@code {
    private WeatherForecast[] forecasts;
 
    protected override void OnInitialized()
    {
        forecasts = Enumerable.Range(1, 10).Select(x => new WeatherForecast()
        {
            TemperatureC = x
        }).ToArray();
    }
 
    public class WeatherForecast
    {

        public int TemperatureC { get; set; }
 
    }
}

View Sample in GitHub

Permalink

You can use the IHttpContextAccessor.HttpContext.Response.HasStarted property to check whether the application is pre-rendering or not.  HasStarted specifies that the response header has been sent to the client. If HasStarted is set to false, it means that the application is still pre-rendering and client connection is not yet established.

Refer to the following code sample.

@using Microsoft.AspNetCore.Http;
 
<button @onclick="@onClick"> Click </button>
 
@code {
    [Inject]
    protected IHttpContextAccessor httpContextAccessor { get; set; }
 
    private void onClick()
    {
        var isPreRendering = !this.httpContextAccessor.HttpContext.Response.HasStarted;
    }
}

The HttpContextAccessor service should be registered by calling the AddHttpContextAccessor method in the Startup.cs.


public class Startup
{
    . . . . .
    public void ConfigureServices(IServiceCollection services)
    {
        services.AddRazorPages();
        services.AddServerSideBlazor();
        services.AddSingleton<WeatherForecastService>();
        services.AddHttpContextAccessor();
    }
    . . . . . 
}

Permalink

Configurations loaded by the Blazor WebAssembly can be accessed by injecting IConfiguration services. Using IConfiguration, the values from wwwroot/appsettings.json and wwwroot/appsettings.{ENVIRONMENT}.json files can be accessed.

wwwroot/appsettings.json

{
  "message":  "Blazor is awesome."   
}

Index.razor

@inject Microsoft.Extensions.Configuration.IConfiguration config
 
<span>@config["message"]</span>

More information about configuration can be found here.

Permalink

You can check whether the current app is Blazor server-side or web assembly using the “IJSInProcessRuntime” interface. In the following example, I have checked whether the app is a web assembly or server side on button click.

<button @onclick="@onClick"> Click </button>

@code {

    [Inject]
    protected IJSRuntime jsRuntime { get; set; }

    private void onClick()
    {
        var isWebAssembly = this.jsRuntime is IJSInProcessRuntime;
    }
}
Permalink

A page is reloaded/refreshed automatically at a specified interval using “NavigationManager” in OnAfterRender() method. Here the NavigateTo(“url”, forceLoad: true) method, is used to force load the browser based on the URI.

@inject NavigationManager uriHelper;

@using System.Threading;

<h1>Hello, world!</h1>

Welcome to your new app.

@code {
    protected override void OnAfterRender(bool firstRender)
    {
        if (firstRender)
        {
            var timer = new Timer(new TimerCallback(_ =>
            {
                uriHelper.NavigateTo(uriHelper.Uri, forceLoad: true);
            }), null, 2000, 2000);
        }
    }
}
Permalink

In Blazor, “StateHasChanged” is used to re-render a page. When changes are detected in components, a page is refreshed. In the following example, a button click increments the count on time interval automatically.

@using System.Threading;

<p>Current count: @currentCount</p>

<button class="btn btn-primary" @onclick="IncrementCount">Click me</button>

@code {

    private int currentCount = 0;

    private void IncrementCount()
    {
        var timer = new Timer(new TimerCallback(_ =>
        {
            currentCount++;
            InvokeAsync(() =>
            {
                StateHasChanged();
            });
        }), null, 1000, 1000);
    }
}
Permalink

Autocomplete enables the user to predict the value. The browser will show options to fill the field when a user starts typing in a field, based on earlier typed values. The code example shows how to enable autocomplete using an input element.

<input id="name" type="text" autocomplete="on" />

If you want to enable the autocomplete from your own database or own set of options, you can go with third party components such as Syncfusion Autocomplete.

Permalink

The HTML “progress” element is used to show the progress. In the following code example, start and stop of progress can be executed on button click.

<progress value="@progressValue" max="100" style="width: 100%">@(progressValue.ToString() + " %")</progress>

<button @onclick="@startProgress">Start</button>

@code {

    private int progressValue { get; set; }

    private void startProgress()
    {
            for (int i = 0; i < 1000; i++)
            {
                this.progressValue = i;
            }
    }
 
}
Permalink

In a Blazor server-side application, you can enable CircuitOptions detailed errors by using the AddServerSideBlazor().AddCircuitOptions() method. This option allows the detailed error information to be displayed in the browser, making it easier to diagnose and fix issues.

public void ConfigureServices(IServiceCollection services)
{
    services.AddRazorPages();
    services.AddServerSideBlazor().AddCircuitOptions(e=> {
        e.DetailedErrors = true;
    });
}
Permalink

You can show the confirmation dialog box before deleting a row in a table. The following code example shows the confirmation dialog box on delete button click.

<button @onclick="@onDelete">Delete</button>

@if (Show)
{
    <div class="modal" tabindex="-1" role="dialog" style="display: @(Show ? "block" : "none")">
        <div class="modal-dialog" role="document">
            <div class="modal-content">
                <div class="modal-header">
                    <h5 class="modal-title">Confirm Dialog</h5>
                </div>
                <div class="modal-body">
                    <p>You have unsaved changes in this page. Do you still want to leave this page? </p>
                </div>
                <div class="modal-footer">
                    <button type="button" class="btn btn-primary" @onclick="@(()=> this.Show=false)">Ok</button>
                    <button type="button" class="btn btn-secondary" data-dismiss="modal" @onclick="@(()=> this.Show=false)">Close</button>
                </div>
            </div>
        </div>
    </div>
}
@code {

    public bool Show { get; set; } = false;

    private void onDelete()
    {
        this.Show = true;
    }
}

View Sample in GitHub 

Permalink

To upload files in Blazor applications, install the NuGet package, BlazorInputFile. This package has the component, Blazor input file that is used to upload files.
You also need to include the input file scripts in HTML and add BlazorInputs to the _Imports.razor file.

[_Host.cshtml]

  <script src="_content/BlazorInputFile/inputfile.js"></script>
[index.razor]

@page "/upload"

<h3>Upload</h3>

<InputFile OnChange="HandleFileSelected"  class="btn-primary"/>

@if (file != null)
{
    <p>Name: @file.Name</p>
    <p>Size in bytes: @file.Size</p>
    <p>Last modified date: @file.LastModified.ToShortDateString()</p>
    <p>Content type (not always supplied by the browser): @file.Type</p>
}

@code {
    IFileListEntry file;

    void HandleFileSelected(IFileListEntry[] files)
    {
        file = files.FirstOrDefault();
    }
}

You can handle multiple file uploads by adding multiple attribute to the InputFile component.

@page "/multiupload"

<h3>Multiple File Upload</h3>

<InputFile multiple OnChange="HandleFileSelected"  class="btn-primary"/>

@if (file != null)
{
   <p>Name: @file.Name</p>
   <p>Size in bytes: @file.Size</p>
    <p>Last modified date: @file.LastModified.ToShortDateString()</p>
    <p>Content type (not always supplied by the browser): @file.Type</p>
}

@code {
    IFileListEntry file;

    void HandleFileSelected(IFileListEntry[] files)
    {
        file = files.FirstOrDefault();
    }
}

Please refer to this link here for more information on file uploading in Blazor.

Note: Syncfusion offers feature rich as well as easy to use file upload component. For more information, please check the link.

Permalink

Blazor detects the UI changes in common scenarios like EventCallback (button click, dropdown select, etc.), and refreshes the component. However, there are some situations in an app where a UI refresh needs to be triggered manually to re-render the component. The StateHasChanged method is used to force re-render a component UI.

@using System.Threading;

<h1>@Count</h1>

<button @onclick=@StartCountdown>Start Timer</button>

@functions {
    private int Count { get; set; } = 10;

    void StartCountdown()
    {
        var timer = new Timer(new TimerCallback(_ =>
        {
            if (Count > 0)
            {
                Count--;

                // Note that the following line is necessary because otherwise
                // Blazor would not recognize the state change and not refresh the UI
                InvokeAsync(() =>
                {

                    StateHasChanged();
                });
            }
        }), null, 1000, 1000);
    }
}
Permalink

Blazor application renders UI as HTML content in client-side (browser). So, you can determine whether it is a Desktop, or a Mobile device based on the viewport’s width.

The meta tag named “viewport” is used to design the webpage responsiveness and this is included in all Blazor applications, _Host.cshtml file in Blazor server-side application and index.html file in Blazor Web Assembly application. CSS styling makes designs responsive in Blazor apps.

Blazor app with responsive

Another way, you can create a responsive design using media queries that adjusts to the size of the user’s screen based on desktop or mobile browser.

For example, you define breakpoints for small, medium, and large screen sizes.  

<style>
    /* Default styles */ 
    @media (max-width: 576px) { 
        /* Styles for small screens */ 
    } 

    @media (min-width: 577px) and (max-width: 992px) { 
        /* Styles for medium screens */ 
    }  

    @media (min-width: 993px) { 
        /* Styles for large screens */ 
    } 
</style> 

For more details, refer to this link.

Permalink

To reconnect the Blazor server automatically you need to include the following code in the script of the Blazor application. This will refresh the Blazor server automatically when it is up again.

[_Host.cshtml]

<script>
   Blazor.defaultReconnectionHandler._reconnectCallback = function(d) {
        document.location.reload(); 
   }
</script>
Permalink

Raw HTML can be rendered in Blazor by using the MarkupString. You can set the raw HTML as a string to any parameter and cast it in a markup string.

@page "/"

@((MarkupString)myMarkup)

@code 
{
	string myMarkup = "<p class='markup'>This is a <em>markup string</em>.</p><button class='btn btn-primary'>Button</button>";
}
Permalink

String comparison with case insensitivity can be carried out using the  String.Compare method, where the first and second parameters are the strings to be compared and the third parameter is for ignoring case sensitivity (case insensitive comparison).

@page "/"

<h1>Case in-sensitive string comparision</h1>

<br />

<EditForm Model="@_stringCompare">
    String 1:
    <InputText id="string1" @bind-Value="_stringCompare.String1" />
    <br />
    String 2:
    <InputText id="string2" @bind-Value="_stringCompare.String2" />
    <br />
</EditForm>

<br />

<button @onclick="Compare">Compare</button>

<br />
<br />

<p>@Output</p>

<br />

@code {

    private StringCompare _stringCompare = new StringCompare();
    public string Output = "";

    public class StringCompare
    {
        public string String1 { get; set; }
        public string String2 { get; set; }
    }

    public async void Compare()
    {
        int CheckValue = String.Compare(_stringCompare.String1, _stringCompare.String2, true);
        Output = "Entered Strings are " + (CheckValue == 0 ? "" : "not ") + "Similar";
        await Task.Run(() => TimeOutMethod());
        Output = "";
        await Task.CompletedTask; 
    }

    void TimeOutMethod() => Task.Delay(3000).Wait();
}

View Sample in GitHub

Permalink

The value property in the HTML <select> control can be utilized to set the default value. 

@page "/dropdown" 

<select class="form-control" value="@defaultValue.." @onchange="@OnSelect" style="width:150px"> 

@foreach (var template in templates)
{ 
<option value=@template>@template</option> 
} 

</select> 

<h5>@selectedString</h5> 

@code  
{ 
List<string> templates = new List<string>() { "America", "China", "India", "Russia", "England" }; 
string defaultValue = "India"; 
string selectedString = ""; 
void OnSelect(ChangeEventArgs e) 
{ 
         selectedString = "Selected Country is: " + e.Value.ToString(); 
} 
} 
Permalink

To add Bing Maps to a Blazor application follow the steps.

  • Include the Bing Maps Web API scripts in the index.html/_Host.cshtml/_Layout.cshtml, This is used to retrieve the Bing Maps-related information by sending a request to the Bing Maps server and loading the same to the Blazor application. 
  • Initialize maps in a Blazor application by using a JavaScript interop in the razor file [index.razor].

[Script.js]

function loadBingMap() { 
    var map = new Microsoft.Maps.Map(document.getElementById('map'), {}); 
    var pushpin = new Microsoft.Maps.Pushpin(map.getCenter(), null); 
    map.entities.push(pushpin); 
    return ""; 
} 

[index.html/_Host.cshtml/_Layout.cshtml]

<script src='https://www.bing.com/api/maps/mapcontrol?callback=GetMap&key=api_key' type='text/javascript'></script> 

[Razor file] 

@page "/" 
@inject IJSRuntime JSRuntime 
<h1>Display Bing Map</h1> 
<div id="map" style="height:500px;width:100%;"> </div> 
@code { 
    protected override async Task OnAfterRenderAsync ( bool firstRender ) 
    { 
        if (firstRender) 
        { 
            await JSRuntime.InvokeVoidAsync("loadBingMap", null); 
        } 
    } 
}

View Sample in GitHub

Permalink

To use jQuery UI components in a Blazor application follow the steps:

  • Reference the source scripts for jQuery and its UI components.
  • Create the elements required for rendering jQuery UI components in the razor page [index.razor].
  • Initialize the jQuery components in the OnAfterRender lifecycle method in your Blazor application by using the JavaScript Interop’s InvokeVoidAsync method.

Refer to the following code sample.

[_Host.cshtml/_Layout.cshtml/index.html] 

….
<link rel="stylesheet" href="https://code.jquery.com/ui/1.12.1/themes/base/jquery-ui.css">
    <script src="https://code.jquery.com/jquery-1.12.4.js"></script>
    <script src="https://code.jquery.com/ui/1.12.1/jquery-ui.js"></script>
    <script src="~/script.js"></script>
….

[index.razor]

@page "/"
@inject IJSRuntime jsRuntime

<h1>jQuery UI Components in Blazor</h1>

<br />

<h2>jQuery Accordion Component</h2>

<br />

<div id="accordion">
    <h3>ASP.NET</h3>
    <div>
        <p>
            Microsoft ASP.NET is a set of technologies in the Microsoft .NET Framework for building Web applications and XML Web services.
            ASP.NET pages execute on the server and generate markup such as HTML, WML, or XML that is sent to a desktop or mobile browser.
            ASP.NET pages use a compiled,event-driven programming model that improves performance and enables the separation of application logic and user interface.
        </p>
    </div>
    <h3>ASP.NET MVC</h3>
    <div>
        <p>
            The Model-View-Controller (MVC) architectural pattern separates an application into three main components: the model, the view, and the controller.
            The ASP.NET MVC framework provides an alternative to the ASP.NET Web Forms pattern for creating Web applications.
            The ASP.NET MVC framework is a lightweight, highly testable presentation framework that (as with Web Forms-based applications) is integrated with existing ASP.NET features, such as master pages and membership-based authentication.
        </p>
    </div>
    <h3>JavaScript</h3>
    <div>
        <p>
            JavaScript (JS) is an interpreted computer programming language.
            It was originally implemented as part of web browsers so that client-side scripts could interact with the user, control the browser, communicate asynchronously, and alter the document content that was displayed.
            More recently, however, it has become common in both game development and the creation of desktop applications.
        </p>
    </div>
</div>

<br />

<div class="jquery-btn">
    <button>Click Me</button>
</div>

<br />

<p>Clicked: <span class="click-count">0</span></p>

<br />

@code {
    protected override async void OnAfterRenderAsync(bool firstRender)
    {
        await jsRuntime.InvokeVoidAsync("renderjQueryComponents");
        await base.OnAfterRenderAsync(firstRender);
    }
}

[script.js]

var clickCount = 0;

function renderjQueryComponents() {
    $("#accordion").accordion();
    $(".jquery-btn button").button();
    $(".jquery-btn button").click(function () {
        console.log('Clicked');
        $('.click-count')[0].innerText = ++clickCount;
    });
}

View Sample in GitHub

Permalink

First to access browser Session Storage in Blazor apps, write a custom code or use a third party package. The accessed data can be stored in the Local Storage and Session Storage.  The Local Storage is scoped to the user’s browser. If the user reloads the page or closes and reopens the browser, the state persists. Session storage is similar to Local Storage but the data in the session storage will be cleared after the session. 

Use the Blazored.SessionStorage package to store the session data in Blazor. For this install the package and add the service to the application.

[Program.cs] 

using Blazored.SessionStorage; 
…
builder.Services.AddBlazoredSessionStorage();

[index.razor]

@page "/"
@inject Blazored.SessionStorage.ISessionStorageService sessionStorage

<h2>@Name</h2>
<button @onclick="Clear">Clear Session</button>
@code {
    public string Name;
    protected override async Task OnAfterRenderAsync(bool firstRender)
    {
        await sessionStorage.SetItemAsync("ID", "20019");
        await sessionStorage.SetItemAsync("Name", "John Smith");
        Name = "ID: " + await sessionStorage.GetItemAsync<string>("ID") + "Name : " + await sessionStorage.GetItemAsync<string>("Name");
    }
   public async void Clear()
   { 
    //this will clear the session data 
     await sessionStorage.ClearAsync();
    }
}
Permalink

To access browser  localStorage in Blazor apps, write a custom code or use a third party package. The difference between localStorage and sessionStorage  is: The localStorage is scoped to the user’s browser. If the user reloads the page or closes and reopens the browser, the state persists. Session storage is similar to local storage but the data in the session storage will be cleared after the session.

The  Blazored.LocalStorage package can be used to access the browser’s local storage in Blazor. For this you need to install the package and add the service to the application.

[Program.cs]

using Blazored.LocalStorage; 
…
builder.Services.AddBlazoredLocalStorage(); 

[index.razor]

@page "/" 
@inject Blazored.LocalStorage.ILocalStorageService localStorage 
<h2>@Name</h2> 
<button @onclick="Clear">Clear LocalStorage</button> 

@code { 
    public string? Name; 
    protected override async Task OnAfterRenderAsync ( bool firstRender ) 
    { 
        await localStorage.SetItemAsync("ID", "20019"); 
        await localStorage.SetItemAsync("Name", "John Smith"); 
        Name = "ID: " + await localStorage.GetItemAsync<string>("ID") + "Name : " + await localStorage.GetItemAsync<string>("Name"); 
    } 
    public async void Clear () 
    { 
        //this will clear the local storage 
        await localStorage.ClearAsync(); 
    } 
} 

To access the local storage using the OnInitialized method, disable the ServerPrerender in _Host.cshtml. 

Reference link: https://chrissainty.com/blazored-local-storage-v0-3-0-released/ 

View Sample in GitHub

Permalink

In Blazor, there are three ways to use different CSS files in different pages .

1. Use direct links of the CSS file via the <link> HTML element with its local or online reference in the href attribute. 

<link href="StyleSheet.css" rel="stylesheet" />

2. Use inline <style></style> tag to define the custom styling for the page.

3. Include a new CSS file in the page by using a JavaScript interop in the OnInitialized method.

[script.js]

function includeCss(url) {

var element = document.createElement("link"); 
element.setAttribute("rel", "stylesheet"); 
element.setAttribute("type", "text/css"); 
element.setAttribute("href", url); 
document.getElementsByTagName("head")[0].appendChild(element); 

}

[Index.razor] 

@page "/" 
@inject IJSRuntime JSRuntime 
<h1>Blazor Application</h1> 

@code{ 
    @code { 
    protected override async void OnInitialized () 
    { 
        await JSRuntime.InvokeAsync<object>("includeCss"); 
    } 
}  

View Sample in GitHub

Permalink

To add Google Maps to a Blazor application, use the Google Maps API script. To initialize Google Maps in Blazor we need to use a JavaScript interop. 

Add the following scripts to ~/Pages/_Layout.cshtml /_Host.cshtml for Server Blazor app or ~/wwwroot/index.html for Blazor WebAssembly app. 

[_Host.cshtml/_Layout.cshtml/index.html] 

<head> 
      <script type="text/javascript" src="https://maps.googleapis.com/maps/api/js?key=&callback=initMap"></script> 
</head> 

[Script.js]

function initialize() { 
    var latlng = new google.maps.LatLng(40.716948, -74.003563); 
    var options = { 
        zoom: 14, center: latlng, 
        mapTypeId: google.maps.MapTypeId.ROADMAP 
    }; 
    var map = new google.maps.Map(document.getElementById("map"), options); 
} 

[index.razor]

@page "/" 
@inject IJSRuntime JSRuntime 

<h1>Display Google Map</h1> 
<div id="map" style="height:500px;width:100%;"> 
</div> 

@code { 
    protected override async Task OnAfterRenderAsync ( bool firstRender ) 
    { 
        if (firstRender) 
        { 
            await JSRuntime.InvokeVoidAsync("initialize", null); 
        } 
    } 
}

In the above example, Google Maps is initialized in the OnAfterRenderAsync life cycle method. By invoking it using a JavaScript interop, this will initialize Google Map API when the page is rendered. 

View Sample in GitHub 

Note: If you’d like to know how to render Google Maps in Syncfusion Blazor Map, take a look at our  documentation section

Permalink
  • Razor is a templating engine that combines C# with HTML to build dynamic web content. 
  • Blazor is a component-based, single-page app framework for building client-side web apps using .NET that works well with all modern browsers via WebAssembly  for client-side Blazor. Server-side Blazor ASP.NET Core app runs on server and makes use of SignalR connection to communicate with the client (browser). It works with all modern browsers. In other words, Blazor is a hosting model for Razor components. 

For detailed information, refer to these links:

Permalink

Blazor is a component-based, single-page web app framework build using .NET.  It works well with all modern browsers via WebAssembly for client-side Blazor. Server-side Blazor ASP.NET Core app runs on server and makes use of SignalR connection to communicate with the client (browser).

Permalink

We can perform asynchronous calls in a Blazor application using async and await keywords for calling any asynchronous Task or performing any operation.

[Index.razor]

@page "/" 
<button @onclick="Compare">Compare</button> 
<br /> 
<p>@content</p> 

@code { 
    public string content = "Some Text"; 
    public async void  Compare() 
    { 
        await Task.Run(() => TimeOutMethod()); 
        content = ""; 
        await Task.CompletedTask;      
    } 
    void TimeOutMethod() => Task.Delay(3000).Wait(); 
} 
Permalink

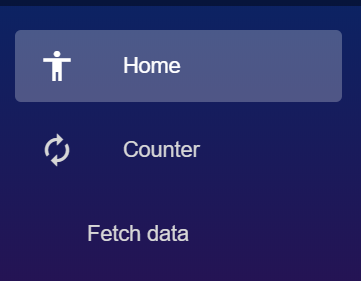
You can change the default icon provider for Blazor by importing the required icons in the site.css (\wwwroot\css\site.css or app.css). The imported icons can be used throughout the application. In the sample, I’ve imported the Material theme icons and used them.

[site.css/app.css]

@import url('https://fonts.googleapis.com/icon?family=Material+Icons');

[~/Shared/NavMenu.razor]

<li class="nav-item px-3"> 
	<NavLink class="nav-link" href="" Match="NavLinkMatch.All"> 
		<i class="material-icons"> accessibility </i>Home 
	</NavLink> 
</li> 

<li class="nav-item px-3"> 
	<NavLink class="nav-link" href="counter"> 
		<i class="material-icons">autorenew</i> Counter 
	</NavLink> 
 </li> 

<li class="nav-item px-3"> 
	<NavLink class="nav-link" href="fetchdata">Fetch data</NavLink> 
</li> 

In the sample, I have changed the default icons to the Material icons for the home page and counter. 

Permalink

You can remove the About section from a Blazor application in the MainLayout.razor page.
Remove the following code from the ~/Shared/MainLayout.razor page

<div class="top-row px-4">
<a href="https://docs.microsoft.com/aspnet/" target="_blank">About</a>
</div>
Permalink

To use HTML5 Canvas in Blazor, you can follow these steps: 

1.Add the necessary HTML markup for the Canvas element in your Blazor component. For example: 

<canvas id="myCanvas"></canvas> 

Here’s an example of using HTML5 Canvas in a Blazor component: 
[Index.razor] 

@page "/" 
@inject IJSRuntime JSRuntime 
<h1>Canvas Demo</h1> 
<canvas id="myCanvas"></canvas> 

@code { 
    protected override async Task OnAfterRenderAsync ( bool firstRender ) 
    { 
        if (firstRender) 
        { 
            await JSRuntime.InvokeVoidAsync("canvasInterop.setupCanvas"); 
        } 
    } 
}

2.Add the following script source to [_Host.cshtml/_Layout.cshtml/index.html]. 

<script> 
    window.canvasInterop = { 
		setupCanvas: function () { 
			var canvas = document.getElementById("myCanvas"); 
            var context = canvas.getContext("2d"); 
            // Perform various operations on the canvas using the context object 
            // Example: Draw a rectangle 
            context.fillStyle = "red"; 
            context.fillRect(10, 10, 100, 100); 
        } 
    }; 
</script>
Permalink

In Blazor, you can retrieve the IP address of the current request by utilizing the IHttpContextAccessor service. To do this, 

  1. Add builder.Services.AddHttpContextAccessor in your Program.cs file. 
  2. Then, inject IHttpContextAccessor into your component or service where you require the IP address. 
  3. Finally, obtain the client’s IP address using HttpContext.Connection.RemoteIpAddress
@page "/" 
@using Microsoft.AspNetCore.Http 
<h3> Here's an example of how to retrieve the IP address from HttpContext in Blazor</h3> 
<p>Localhost IP address: @ipAddress</p> 

@code { 
    private string? ipAddress; 
    [Inject] 
    private IHttpContextAccessor? httpContextAccessor { get; set; } 
    protected override void OnInitialized () 
    { 
        ipAddress = httpContextAccessor?.HttpContext?.Connection?.RemoteIpAddress?.ToString(); 
    } 
} 
Permalink

To bind properties to a list in Blazor, you can use the @foreach loop and the @bind directive. Here’s an example:

@page "/" 
<h3>List Binding Example</h3> 
<ul> 
    @foreach (var item in itemList) 
    { 
        <li> 
            <input type="text" @bind="@item.Name" /> 
        </li> 
    } 
</ul>   

<button @onclick="AddNewItem">Add Item</button>  

@code { 
    List<ItemModel> itemList = new List<ItemModel>(); 
    void AddNewItem () 
    { 
        itemList.Add(new ItemModel()); 
    }  

    public class ItemModel 
    { 
        public string? Name { get; set; } 
    } 
} 

View Sample in GitHub

Permalink

Blazor will check for an HTML ID on initializing the HTML element. If such an ID does not exist on the page, then it will use the default handler to display messages. To display custom messages  on connection loss, we can define a div element with the ID components-reconnect-modal in the body of _Host.cshtml to manipulate the overlay that shows up in the case of a connection loss. If this element exists, this element’s class will be :

components-reconnect-show: A lost connection. The client is attempting to reconnect. Show the modal. Then, you can apply your custom styling to the screen overlay with CSS. If you want to remove them all, you can just choose not to display them at all.

components-reconnect-hide: An active connection is re-established to the server. Hide the modal.

components-reconnect-failed: Reconnection failed, probably due to a network failure. To attempt reconnection, call window.Blazor.reconnect().

components-reconnect-rejected: Reconnection rejected. The server was reached but refused the connection, and the user’s state on the server is lost. To reload the app, call location.reload().

Refer to this link for more details: https://docs.microsoft.com/en-us/aspnet/core/blazor/hosting-model-configuration?view=aspnetcore-3.1#reflect-the-connection-state-in-the-ui

[_Host.cshmtl]

<body>
……

<div id="components-reconnect-modal" class="my-reconnect-modal components-reconnect-hide">
<div class="show">
    <p>
        // Message when attempting to connect to server
    </p>
</div>
<div class="failed">
    <p>
        // Message when failing to connect
    </p>
</div>
<div class="rejected">
    <p>
        // Message when refused
    </p>
</div>
</div>

……
<app>
    @(await Html.RenderComponentAsync<App>(RenderMode.ServerPrerendered))
</app>

</body>
[site.css]

    .my-reconnect-modal > div {
        position: fixed;
        top: 0;
        right: 0;
        bottom: 0;
        left: 0;
        z-index: 1000;
        overflow: hidden;
        background-color: #fff;
        opacity: 0.8;
        text-align: center;
        font-weight: bold;
    }

    .components-reconnect-hide > div {
        display: none;
    }

    .components-reconnect-show > div {
        display: none;
    }

    .components-reconnect-show > .show {
        display: block;
    }

    .components-reconnect-failed > div {
        display: none;
    }

    .components-reconnect-failed > .failed {
        display: block;
    }

    .components-reconnect-refused > div {
        display: none;
    }

    .components-reconnect-refused > .refused {
        display: block;
    }

You can download the reference sample here

Permalink

To set the focus to a HTML element in Blazor, use the JavaScript interop to pass the HTML element and then use focus JavaScript method.

[script.js]

window.SetFocusToElement = (element) => {
         element.focus();
};

[index.razor]

@inject IJSRuntime jsRuntime

<div tabindex="0" @ref="myDiv"> 
    To focus this div element when refreshing the page. 
</div> 

@code {
    string KeyPressed = "";
    protected ElementReference myDiv;  // set the @ref for attribute

    protected async override Task OnAfterRenderAsync(bool firstRender)
    {
        if (firstRender)
        {
            await jsRuntime.InvokeVoidAsync("SetFocusToElement", myDiv);
        }
    }
}

View Sample in GitHub

Permalink

While making an API call, create and run an asynchronous task with the Run method to notify the wait using a spinner. The completion of the task can be notified using the  CompletedTask property.

[index.razor]

@page "/" 

<style> 
    .loader { 
        border: 5px solid #f3f3f3; 
        border-radius: 50%; 
        border-top: 5px solid #f58205; 
        width: 30px; 
        height: 30px; 
        -webkit-animation: spin 2s linear infinite; /* Safari */ 
        animation: spin 2s linear infinite; 
    } 
    /* Safari */ 
    @@-webkit-keyframes spin { 
        0% { 
            -webkit-transform: rotate(0deg); 
        } 
        100% { 
            -webkit-transform: rotate(360deg); 
        } 
    } 
    @@keyframes spin { 
        0% { 
            transform: rotate(0deg); 
        } 
        100% { 
            transform: rotate(360deg); 
        } 
    } 
</style> 

<h1>Counter</h1> 

<p> 
    Current count: <div class="@(spin ? "loader" : "")"> @(spin ? "" : currentCount.ToString()) </div> 
</p> 

<button class="btn btn-primary" @onclick="@IncrementCount"> Click me </button> 
<button class="btn btn-dark" @onclick="@AsyncCallback"> API Callback </button> 

@code { 
    int currentCount = 0; 
    bool spin = false; 
    void IncrementCount () 
    { 
        currentCount++; 
    } 
    async Task AsyncCallback () 
    { 
        spin = true; 
        await Task.Run(() => APICallback());  //<==check this!!! 
        currentCount++; 
        spin = false; 
        await Task.CompletedTask; 
    } 

    void APICallback () => Task.Delay(1500).Wait(); 
}

Output:

View Sample in GitHub

Permalink

After the database is updated, StateHasChanged method can be called to refresh the page/UI. When called, this will rerender the component or the page based on the new changes from the database. 

Razor File

@page "/counter"  
<PageTitle>Counter</PageTitle>  
<h1>Counter</h1>  

<p role="status">Current count: @CurrentCount</p>  

<button class="btn btn-primary" @onclick="IncrementCount">Click me</button>  

@code {  
	[Parameter]  
    public int CurrentCount { get; set; } = 0;  

    private async Task IncrementCount ()  
    {  
        CurrentCount++;  
        await InvokeAsync(StateHasChanged);  
    }  
}
Permalink

The lifecycle methods OnAfterRenderAsync and OnAfterRender are called only when a component has finished rendering. The element and component references are populated at this point. By using these methods, the user can activate third-party JavaScript libraries that operate based on the DOM elements. 

Razor file 

@page "/" 
<input type="text" @bind="@message" /> 

@code{ 
    private string? message { get; set; } 
    protected override async Task OnAfterRenderAsync ( bool firstRender ) 
    { 
        // Perform any asynchronous operations after the component has been rendered 
        if (firstRender) 
        { 
            message = "Component rendering finished"; 
            await Task.Yield(); // Ensure the UI rendering is complete 
            StateHasChanged(); // Trigger UI update 
        } 
    } 

    protected override void OnAfterRender ( bool firstRender ) 
    { 
        // Perform any synchronous operations after the component has been rendered 
        Console.WriteLine("Component rendering completed"); 
        base.OnAfterRender(firstRender); 
    } 
} 
Permalink

Blazor notifies the UI changes automatically whenever the bound property is changed in a button click, input text, dropdown, etc.Blazor triggers the StateHasChanged() method to notify the change. However, there are some exceptional cases where the user has to manually call the StateHasChanged() method to notify that the UI has been updated. 

By calling the StateHasChanged(), Blazor can manually be notified when to rerender its UI. This method will tell Blazor when to refresh the UI.

@using System.Threading;

<h1>@Count</h1>

<button @onclick=@StartCountdown>Start Timer</button>

@functions {
    private int Count { get; set; } = 10;

    void StartCountdown()
    {
        var timer = new Timer(new TimerCallback(_ =>
        {
            if (Count > 0)
            {
                Count--;

                // Note that the following line is necessary because otherwise
                // Blazor would not recognize the state change and refresh the UI
                InvokeAsync(() =>
                {
                    StateHasChanged();
                });
            }
        }), null, 1000, 1000);
    }
}

In the above example, when the button is clicked, the UI will refresh for every count down of the timer since StateHasChanged method has been called to refresh the UI.

Permalink

You can delay a task in Blazor by using the Task.Delay() method where the time set for the task to be delayed before proceeding to the next.

<h3>Timer: @Timer</h3>
@code { 
    [Parameter]  
    public int Timer { get; set; } = 5; 
    public async void StartTimerAsync()
    { 
        while (Timer > 0) { 
            Timer--; 
            StateHasChanged(); 
            await Task.Delay(1000); 
        } 
    } 
    protected override void OnInitialized() 
        => StartTimerAsync(); 
}
Permalink

When StateHasChanged is called, it runs change detection on the current component and its descendants. Blazor is clever enough to rerender the components that have changes.

<h3>StateHasChanged</h3>

<button class="btn btn-primary" @onclick="Generate">Generate List</button>
<button class="btn btn-primary" @onclick="ChangeOneRow">Change State</button>

@if (list != null)
{
       @foreach (var item in list)
       {
               <li>@item</li>
       }
}

@code {
    List<int> list;
    const int cMaxNumbers = 10;

    protected void Generate()
    {
        list = new List<int>(cMaxNumbers);
        for (int i = 0; i < cMaxNumbers; i++)
        {
            list.Add(i);
        }
    }

    protected void ChangeOneRow()
    {
        list[0] = 123456;
        StateHasChanged();
    }
}

In the above example, only the first list item will be re-rendered.

Permalink

The StateHasChanged method is called whenever a bound property is changed or a UI event triggered for an instance. This notifies the Blazor that the component should rerender it.

For example, when a button is clicked in the index page, the index component rerenders (no need to call StateHasChanged) because the button’s parent is an index; but when it has a child component it has be notified to render as the parent has changed.

Permalink

Blazor provides both synchronous and asynchronous initialization lifecycle methods to perform additional operations on components during initialization and rendering. Initialization methods are:

  • OnInitialized:  Override this method in components for synchronous operations. 
  • OnInitializedAsync:  Override this method in components for asynchronous operations.

    OnInitialized and OnInitializedAsync are executed when the component is initialized after having received its initial parameters from its parent component in the render tree. 

    Use OnInitializedAsync when the component performs an asynchronous operation and the changes should refresh the component when the operation is completed.

    Refer to this link for more details. 

    Permalink

    You can call the preventDefault action in onclick event of an anchor tag. Refer to the following code sample to prevent opening a link when the link is clicked.

    <a href="https://www.syncfusion.com/" target="_blank" @onclick:preventDefault>Syncfusion</a>

    This feature was made available from .NET Core 3.1 Preview 2 for Blazor.

    You can also perform custom action for onclick in the anchor tag by defining the same onclick event and mapping it to custom action.

    <a href="https://www.syncfusion.com/" target="_blank" @onclick:preventDefault  @onclick="@OnClick">Syncfusion</a>
    @code {
             public void OnClick(){
                  //triggers on click
             }
    }
    
    Permalink

    State in Blazor:

    In Blazor, the user’s state is held in the server’s memory in a circuit. State Management refers to the persisting state of an application even after the connection is lost or disconnected.  The state held for a user’s circuit may be any of the following, 

    • UI related data- component instances, rendered output
    • Property/field values of the component instances
    • Dependency injection service instance data

    Need for State Management:

    In Blazor, the application is connected through a circuit to the  server, which holds the user’s state and this can be lost or disconnected due to multiple reasons. Some of the reasons are as follows,

    • Large number of users accessing the server and increasing the memory used causing the pressure to disconnect the circuit.
    • Users reloading the application/webpage leading to circuit disconnection/loss.

    Due to the above, user’s state may be lost and can also cause loss of crucial data gathered in the application such as,

    • Multistep webform
    • Shopping cart

    When data is lost after completing processes with multiple steps or creating a shopping list, it results in unnecessary time consumption.  So, in Blazor, the data is stored in the local cache and state persists even when the circuit gets disconnected.

    Persisting the State/State Management:

    The three locations for persisting state in a Blazor application are as follows,

    • Server-side (Database)
    • Client-side (Browser)
    • URL

    Server-side (Database):

    To store data/state permanently or any data that spans multiple users or devices, the server-side database should be used.

    Client-side (Browser):

    Most suited when the user is actively creating transient data, that can be stored in the browsers,  localStorage and sessionStorage.

    URL:

    This is best suited when the data/state needs to persist when navigating from one page of the application to another.

    For more information on state management, refer here.

    View Sample in GitHub

    Permalink
    No, Blazor WebAssembly (client-side Blazor) does not support any version of Internet Explorer due to the lack of WebAssembly support in IE. However, server-side Blazor can be made compatible with IE 11 by using additional polyfills to bridge the gaps in browser support.

    Permalink

    JSON (JavaScript Object Notation) is a lightweight data-interchange format and a text format that is language independent. In Blazor, the JsonSerializer class, found in the System.Text.Json namespace, assists with serializing and deserializing JSON data.

    [index.razor]

    @page "/" 
    
    @using System.Text.Json 
    <p>Sample demonstration of serializing and deserializing JSON in a Blazor application.</p> 
    <button @onclick="SerializeMethod">Serialize </button> 
    <button @onclick="DeserializeMethod">Deserialize</button> 
    
    @code {
        public class User
        { 
            public int ID { get; set; } 
            public string? Name { get; set; } 
            public string? Address { get; set; } 
        } 
        User user = new User() { ID = 1, Name = "Manas", Address = "India" }; 
        public string? serializedString { get; set; } 
        void SerializeMethod () 
        { 
            //for serialization 
            serializedString = System.Text.Json.JsonSerializer.Serialize(user); 
    
        } 
        void DeserializeMethod () 
        { 
            //for deserialization 
            User userCopy = System.Text.Json.JsonSerializer.Deserialize<User>(serializedString); 
        } 
    } 

    In the provided sample, JsonSerialize.Serialize(object) is used to serialize the user object of the User class into a string. Then, JsonSerialize.Deserialize<ClassName>(JsonObject) is used to deserialize the serializedString string into a new instance of the User class named userCopy

    Permalink

    Only server-side Blazor is supported by Microsoft’s Internet Explorer IE 11 when additional polyfills are used. Client-side Blazor is not supported by Internet Explorer due to incompatibility of WebAssembly. You need to add the following polyfills in the _Host.cshtml/_Layout.cshtml page to support Internet Explorer.

    [_Host.cshtml/_Layout.cshtml]

    //polyfills to be added for Internet Explorer 
    
    <script src="https://cdnjs.cloudflare.com/ajax/libs/core-js/2.6.5/core.min.js"></script>
    <script src="https://polyfill.io/v3/polyfill.min.js?features=fetch"></script> 
    Permalink

    To install Blazor project templates, update the .NET Core SDK to the latest version. Blazor server-side template is available by default when you create a new Blazor project in Visual Studio. To get the Blazor WebAssembly project template,  install them via the following command line.

    dotnet new -i Microsoft.AspNetCore.Blazor.Templates::3.2.0-preview1.20073.1

    Check this link for more information.

    Permalink

    Blazor WebAssembly is a client-side web development framework that allows you to build interactive web applications using C# and .NET. It enables you to write code in C# that runs directly in the browser using WebAssembly, providing a rich and interactive user experience. 

    Blazor WebAssembly offers a component-based architecture, enabling you to build reusable UI components, handle user interactions, perform data binding, and communicate with APIs and services.

    Permalink

    You can develop a native mobile app in Blazor using Experimental Mobile Blazor Bindings. This allows developers to develop mobile applications in C# and .NET for iOS and Android. It uses Razor syntax to define UI components and the underlying UI components are based on Xamarin.Forms native UI Components. Currently, it is in an experimental mode. 
    Check this link to understand the concept: Mobile Blazor Bindings

    Permalink

    Blazor server-side supports almost all modern browsers out of the box except Microsoft’s Internet Explorer (IE 11), which needs Polyfills to be supported.

    [_Layout.cshtml/_Host.cshtml]

    //polyfills to be added for IE 
    
    <script src="https://cdnjs.cloudflare.com/ajax/libs/core-js/2.6.5/core.min.js"></script> 
    <script src="https://polyfill.io/v3/polyfill.min.js?features=fetch"></script> 

    Blazor WebAssembly (client-side) supports all the modern browsers except the Internet Explorer.
    Check this link for more information.

    Permalink

    Blazor Server

    In server code, configure SignalR in the Startup.cs class file as follows.

    public void ConfigureServices(IServiceCollection services)
    {
        ... ... ... ...
        services.AddSignalR();
        ... ... ... ...
    
    }
    
    
    public void Configure(IApplicationBuilder app, IHostingEnvironment env)
    {
        ... ... ... ...
        app.UseSignalR(routes => routes.MapHub<Blazor.NetCore.Server.SignalRHub.SignalRHub>("/signalRHub"));
        ... ... ... ...
    }

    And then create a SignalR hub class as follows.

        public class SignalRHub : Hub
        {
            public override Task OnConnectedAsync()
            {
                Clients.All.SendAsync("ReceiveMessage", "system", $"{Context.ConnectionId} joined the conversation");
                return base.OnConnectedAsync();
            }
            public void SendMessage(string name, string message)
            {
                Clients.All.SendAsync("ReceiveMessage", name, message);
            }
    
            public override Task OnDisconnectedAsync(System.Exception exception)
            {
                Clients.All.SendAsync("ReceiveMessage", "system", $"{Context.ConnectionId} left the conversation");
                return base.OnDisconnectedAsync(exception);
            }
        }
    

    Blazor client

    Create a Blazor app and add the package Blazor.Extensions.SignalR to the client. Then write the code to connect the Hub and event handler as follows.

    @page "/signalr"
    @using Blazor.Extensions
    <div class="container">
        <input type="text" id="user" class="form-control" @bind="@userName" placeholder="User Name" /><br />
        <input type="text" id="message" class="form-control" @bind="@Message" placeholder="Message" /> <br />
        <input type="button" id="sendMessage" value="Send" class="btn btn-primary" @onclick="@SendMessage" />
        <ul id="discussion">
            @foreach (var message in messages)
            {
                <li>@message</li>
            }
        </ul>
    </div>
    
    @code {
        HubConnection connection;
        string userName = "";
        string Message = "";
        IList<string> messages = new List<string>();
    
        protected override async Task OnInitializedAsync()
        {
            connection = new HubConnectionBuilder().WithUrl("/signalRHub").Build();
            connection.On<string, string>("receiveMessage", this.ReceiveMessage);
            await connection.StartAsync();
        }
    
        Task ReceiveMessage(string name, string message)
        {
            messages.Add(name + " : " + message);
            StateHasChanged();
            return Task.CompletedTask;
        }
    
        async Task SendMessage()
        {
            await connection.InvokeAsync("SendMessage", userName, Message);
            Message = "";
        }
    }
    1. OnInitializedAsync method, connect to the Web API.
    2. ReceiveMessage method, used in the SignalRHub class.
    3. ReceiveMessage method, concatenate the name and message parameters, and append them to a list.

    The StateHasChanged method will update the bindings in the HTML. The SendMessage method will invoke the Send method in the hub with name and message parameters.

    Reference link: https://docs.microsoft.com/en-us/aspnet/core/tutorials/signalr-blazor-webassembly?view=aspnetcore-3.1&tabs=visual-studio#add-the-signalr-client-library

    Permalink

    Blazor updates the UI every time a parameter updates. Invoking an external StateHasChanged() might be required when updating parameters as a result of any async operation.

    [Counter.razor] 

    @page "/counter" 
    <PageTitle>Counter</PageTitle> 
    <h1>Counter</h1> 
    <p role="status">Current count: @currentCount</p> 
    <button class="btn btn-primary" @onclick="IncrementCount">Click me</button> 
    
    @code { 
        [Parameter] 
        public int currentCount { get; set; } = 0; 
        private async Task IncrementCount () 
        { 
            currentCount++; 
            // Call StateHasChanged to trigger a re-render of the page 
            await InvokeAsync(StateHasChanged); 
        } 
    } 

    StateHasChanged tells Blazor to update the UI when it is called. 
    https://stackoverflow.com/questions/55809117/blazor-page-not-rerendering-after-parameter-updated

    Permalink

    You have to use JS Interop to create a cookie in Blazor.

    [Razor Page]

    @page "/" 
    
    @inject IJSRuntime JSRuntime 
    <p>Here created cookies</p> 
    <button onclick="@(() => CreateCookie("myCookie", "myValue", 7))">Create Cookie</button> 
    
    @code { 
    
        private async void CreateCookie ( string name, string value, int days ) 
        { 
            var test = await JSRuntime.InvokeAsync<string>("methods.CreateCookie", name, value, days); 
        } 
    } 

    [index.html]

    <body> 
        …. 
        <script > 
            window.methods = { 
                CreateCookie: function (name, value, days) { 
                    var expires; 
                    if (days) { 
                        var date = new Date(); 
                        date.setTime(date.getTime() + (days * 24 * 60 * 60 * 1000)); 
                        expires = "; expires=" + date.toGMTString(); 
                    } 
                    else { 
                        expires = ""; 
                    } 
                    document.cookie = name + "=" + value + expires + "; path=/"; 
                } 
            } 
        </script> 
    </body> 

    View Sample in GitHub

    Permalink

    The NotFound template section in the App.razor can be used to handling 404 pages. The router shows this content if it hits a route that is not available, which is a 404 page.

    <Router AppAssembly="@typeof(Program).Assembly"> 
        <Found Context="routeData"> 
            <RouteView RouteData="@routeData" DefaultLayout="@typeof(MainLayout)" /> 
        </Found> 
    
        <NotFound> 
            <LayoutView Layout="@typeof(MainLayout)"> 
                <p>Handled 404 page</p> 
            </LayoutView> 
        </NotFound> 
    </Router> 

    Create a component Page/Error.razor to display the 404 contents. For more information, read about Blazor routing. 

    Permalink

    Solution 1: 
    Auto-rebuild functionality is now available for Blazor Projects in Visual Studio. To utilize this feature, run the project using the Ctrl + F5 shortcut (without the debugger) instead of F5 and on IIS Express. Whenever you modify and save .cs and .razor files within the solution, they will be automatically rebuilt, and the application will restart. This allows you to view the changes by simply refreshing the browser, eliminating the need for manual rebuilding and restarting the application. 

    Solution 2: 

    you can use the following command in the command prompt. 

    dotnet watch run debug

    Also, you must include the following file types in the .csproj file for which files you want to watch. 

    <ItemGroup> 
    
        <Watch Include="..\**\*.razor" /> 
    
        <Watch Include="..\**\*.scss" /> 
    
        <Watch Include="..\**\*.cs" /> 
    
    </ItemGroup> 

    Refer to this Link for more information. 

    Permalink

    To use existing JavaScript libraries with Blazor, you can utilize JavaScript Interop, which allows you to call JavaScript functions from your C# code and vice versa. 

    Here are the general steps: 

    1. Include the JavaScript library in your project either by downloading it and placing it in your project directory or by using a package manager like npm. 
    2. Create a JavaScript file (e.g. mylibrary.js) that references the library and contains JavaScript functions that you want to use in your Blazor component. 
    3. In your Blazor component, inject the IJSRuntime service: 
    @inject IJSRuntime jsRuntime

    4. Create a C# method that calls the JavaScript function. Use the InvokeAsync method of the IJSRuntime service to invoke the JavaScript function:

    private async Task CallMyLibraryFunction() 
    { 
        await jsRuntime.InvokeAsync<object>("myLibrary.myFunction", arg1, arg2); 
    } 

    In the example above, myLibrary refers to the JavaScript library and myFunction is the name of the JavaScript function that you want to call. arg1 and arg2 are the arguments that you want to pass to the JavaScript function. 

    Note that the first argument to the InvokeAsync method specifies the name of the JavaScript function that you want to call, followed by any arguments that you want to pass to the function.

    5. You can then call the CallMyLibraryFunction method in your component’s Razor markup or C# code. 

    Permalink

    To render raw HTML in Blazor, wrap the HTML content using the MarkupString type. This allows the HTML or SVG to be rendered as part of the DOM. 

     @page "/"
      
      
     @((MarkupString)myMarkup)
      
     @code {
         private string myMarkup =
             "<p class='markup'>This is a <em>markup string</em>.</p>";
     } 

    Refer to the Blazor documentation for more information. 

    Permalink

    To check if a browser supports WebAssembly, you can use the following code snippet in JavaScript: 

    <script> 
            if (typeof WebAssembly !== 'undefined') { 
            // WebAssembly is supported 
            console.log(' WebAssembly is supported') 
            } else { 
            // WebAssembly is not supported 
            console.log('WebAssembly is not supported') 
            } 
    </script> 
    Permalink

    Quoting Microsoft, “using .NET for client-side web development offers the following advantages:

    • Write code in C# instead of JavaScript.
    • Leverage the existing .NET ecosystem of .NET libraries.
    • Share app logic across the server and client.
    • Benefit from .NET’s performance, reliability, and security.
    • Stay productive with Visual Studio on Windows, Linux, and macOS.
    • Build on a common set of languages, frameworks, and tools that are stable, feature-rich, and easy to use.”

    Refer to this Blazor link for more information.

    Permalink

    No, the NavigateTo method in the UriHelper class of Blazor does not have built-in support for opening a URL in a new tab. It is primarily used to navigate within the same browser tab. 

    To open a URL in a new tab or window, you can use JavaScript interop in Blazor. Here’s an example of how you can achieve this: 

    [index.razor] 

    @page "/" 
    @inject IJSRuntime jsRuntime 
    @inject NavigationManager uriHelper 
    @using Microsoft.AspNetCore.Components 
    
    <h1>Navigate</h1> 
    <p>Enter a URL to navigate to:</p> 
    <input type="text" @bind="@url" /> 
    <br /> 
    <label> 
        <input type="checkbox" @bind="@openInNewTab" /> 
        Open in new tab 
    </label> 
    <br /> 
    <button @onclick="NavigateToUrl">Go</button> 
    
    @code { 
        private string? url { get; set; } 
        private bool openInNewTab { get; set; } 
        private void NavigateToUrl () 
        { 
            if (openInNewTab) 
            { 
                jsRuntime.InvokeVoidAsync("open", url, "_blank"); 
            } 
            else 
            { 
                uriHelper.NavigateTo(url); 
            } 
        } 
    } 

    Refer to this thread for more information. 
     
    View Sample in GitHub 

    Permalink

    Share with

    Couldn't find the FAQs you're looking for?

    Please submit your question and answer.