Yes, Syncfusion Blazor components are indeed mobile-friendly. They have been developed with a mobile-first approach, ensuring that they are responsive and adaptive across various devices. This means that whether users access applications built with Syncfusion Blazor components on desktops, tablets, or smartphones, they will experience consistent usability and functionality.
PermalinkInstead of using the DataAnnotationValidator in Blazor, you can use FluentValidation to implement form validation. FluentValidation is a common validation library for.NET Core that offers a few advantages over the built-in DataAnnotations validation library, such as a larger set of rules, simpler setup, and extensibility.
To use fluent validation in a Blazor application:
Create a Blazor application using the link.
Install the “FluentValidation” package using the NuGet package manager.
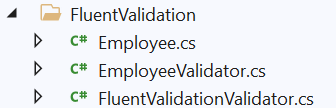
Create a new folder named FluentValidation in the main application and add the following *.cs files – Employee, EmployeeValidator, FluentValidationValidator to it as shown below.

Add a model Employee class name in the Employee.cs file.
  namespace {AppName}.FluentValidation
   {
       public class Employee
       {
           public string Name { get; set; }
           public string Organization { get; set; }
       }
}- To write a model validator, you must create a EmployeeValidator class that is inherited from the AbstractValidator<Employee> and then add all the validation rules for the respective model to the constructor.
In FluentValidationValidator.cs, create a new validator component named FluentValidationValidator to replace DataAnnonationsValidator, and add the code below to it.
The FluentValidationValidator receives an EditContext as a cascading parameter and hooks into the EditContext’s OnFieldChanged and OnValidationRequested events to know when something is happening in the UI. It can add or remove validation messages from a ValidationMessageStore at any time.using System;
using FluentValidation;
using Microsoft.AspNetCore.Components;
using Microsoft.AspNetCore.Components.Forms;
namespace {AppName}.FluentValidation
{
public class FluentValidationValidator<TValidator> : ComponentBase where TValidator : IValidator, new()
{
private readonly static char[] separators = new[] { '.', '[' };
private TValidator validator;
[CascadingParameter]
private EditContext EditContext { get; set; }
protected override void OnInitialized()
{
validator = new TValidator();
var messages = new ValidationMessageStore(EditContext);
/* Re-validate when any field changes or when the entire form requests validation.*/
EditContext.OnFieldChanged += (sender, eventArgs)
=> ValidateModel((EditContext)sender, messages);
EditContext.OnValidationRequested += (sender, eventArgs)
=> ValidateModel((EditContext)sender, messages);
}
private void ValidateModel(EditContext editContext, ValidationMessageStore messages)
{
var context = new ValidationContext<object>(editContext.Model);
var validationResult = validator.Validate(context);
messages.Clear();
foreach (var error in validationResult.Errors)
{
var fieldIdentifier = ToFieldIdentifier(editContext, error.PropertyName);
messages.Add(fieldIdentifier, error.ErrorMessage);
}
editContext.NotifyValidationStateChanged();
}
private static FieldIdentifier ToFieldIdentifier(EditContext editContext, string propertyPath)
{
var obj = editContext.Model;
while (true)
{
var nextTokenEnd = propertyPath.IndexOfAny(separators);
if (nextTokenEnd < 0)
{
return new FieldIdentifier(obj, propertyPath);
}
var nextToken = propertyPath.Substring(0, nextTokenEnd);
propertyPath = propertyPath.Substring(nextTokenEnd + 1);
object newObj;
if (nextToken.EndsWith("]"))
{
nextToken = nextToken.Substring(0, nextToken.Length - 1);
var prop = obj.GetType().GetProperty("Item");
var indexerType = prop.GetIndexParameters()[0].ParameterType;
var indexerValue = Convert.ChangeType(nextToken, indexerType);
newObj = prop.GetValue(obj, new object[] { indexerValue });
}
else
{
var prop = obj.GetType().GetProperty(nextToken);
if (prop == null)
{
throw new InvalidOperationException($"Could not find property named {nextToken} in object of type {obj.GetType().FullName}.");
}
newObj = prop.GetValue(obj);
}
if (newObj == null)
{
return new FieldIdentifier(obj, nextToken);
}
obj = newObj;
}
}
}
}Add the following code to the Index.razor page to perform fluent validation using the FluentValidationValidator component and its model validator (EmployeeValidator) in the EditForm component.
@page "/"
@using {AppName}.FluentValidation;
<EditForm Model="employee" OnValidSubmit="SubmitForm">
<FluentValidationValidator TValidator="EmployeeValidator" />
<ValidationSummary />
<div class="form-group">
<label for="name">Name:</label>
<InputText @bind-Value="employee.Name" class="form-control" id="name" />
</div>
<div class="form-group">
<label for="age">Organization:</label>
<InputText @bind-Value="employee.Organization" class="form-control" />
</div>
<button type="submit" class="btn btn-primary">Submit</button>
</EditForm>
@code {
Employee employee { get; set; } = new Employee();
public void SubmitForm()
{
}
}
View Sample in GitHub
using FluentValidation;
namespace {AppName}.FluentValidation
{
public class EmployeeValidator : AbstractValidator<Employee>
{
public EmployeeValidator()
{
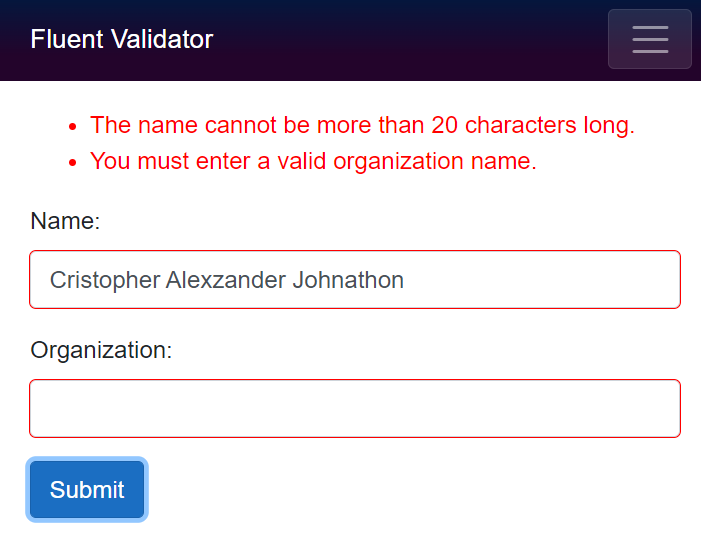
RuleFor(p => p.Name).NotEmpty().WithMessage("You must enter a valid name.");
RuleFor(p => p.Name).MaximumLength(20).WithMessage("The name cannot be more than 20 characters long.");
RuleFor(p => p.Organization).NotEmpty().WithMessage("You must enter a valid organization name.");
}
}
} By default, the System.ComponentModel.Annotations library provides different validation attributes. However, to add a new or custom validation, users can create a custom validation attribute and apply it to their model class. To create an attribute:
Create a Blazor Server Application with latest .NET support.
Install the System.ComponentModel.Annotations NuGet package to perform custom validation in Created project.
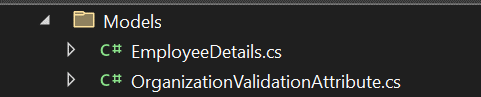
Create a new folder named Models in the main application and add the following *.cs files –EmployeeDetails, OrganizationValidationAttribute to it as shown below.
- Add a model EmployeeDetails class name in the EmployeeDetails.csfile.
- Create a new OrganizationValidationAttribute.cs file and then the OrganizationValidationAttribute class, which is derived from ValidationAttribute. The ValidationAttribute from System.ComponentModel.Annotations acts as the base class for validation. [OrganizationValidationAttribute.cs]
- Add the following custom validation attribute to the Organization property.
- Moving back to the Blazor Server application, add the following code to the Index.razor page to render a form with validation settings. [Index.razor]
 using System.ComponentModel.DataAnnotations;
namespace BlazorServerApp.Models
{
	public class EmployeeDetails
	{
		[Required]		public string? Name { get; set; }
		[Required]		public string? Organization { get; set; }
	}
}
using System.ComponentModel.DataAnnotations;
namespace BlazorServerApp.Models
{
public class OrganizationValidationAttribute : ValidationAttribute
{
public string? ValidOrganizationName { get; set; }
protected override ValidationResult? IsValid ( object? value, ValidationContext? validationContext )
{
string fieldValue = value!.ToString()!.ToLower();
if (fieldValue.Equals(ValidOrganizationName?.ToLower()))
return null;
return new ValidationResult(ErrorMessage, new[] { validationContext?.MemberName }.Cast());
}
}
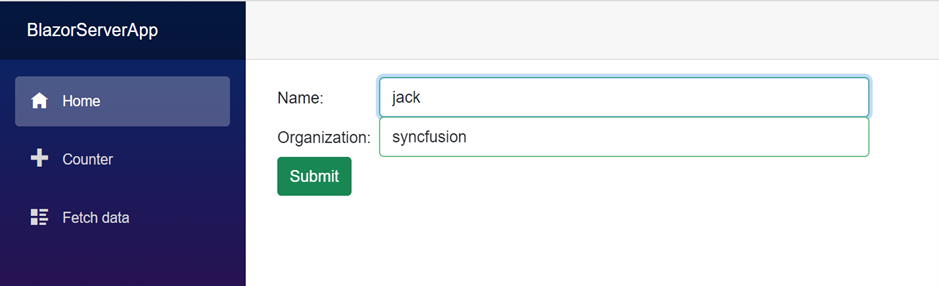
} The ValidOrganizationName property can be set from the model EmployeeDetails class. Following that, override the IsValid method, which takes two parameters, value and validationContext. The value parameter contains the value that the user entered in the Organization field. The validationContext parameter is used to explain the context in which validation is performed. If the value is equal to the ValidOrganizationName, no errors will be thrown; otherwise, an error message returns. using System.ComponentModel.DataAnnotations;
namespace BlazorServerApp.Models
{
public class EmployeeDetails
{
[Required]
public string? Name { get; set; }
//Here OrganizationValidation is a Customvalidation Attribute
[Required]
[OrganizationValidation(ErrorMessage = "Invalid customer log-in.", ValidOrganizationName = "Syncfusion")]
public string? Organization { get; set; }
}
} @page "/"
@using BlazorServerApp.Models
<EditForm Model="_product" OnValidSubmit="Submit" style="width:600px;">
<DataAnnotationsValidator />
<ValidationSummary/>
<div class="form-group row">
<label for="name" class="col-md-2 col-form-label">Name:
<label for="name" class="col-md-2 col-form-label">Name:
<div class="col-md-10">
<InputText id="name" class="form-control" @bind-Value="_product.Name" />
<ValidationMessage For="@(() => _product.Name)" />
</div>
</div>
<div class="form-group row">
<label for="organization" class="col-md-2 col-form-label">Organization:
<div class="col-md-10">
<InputText id="supplier" class="form-control" @bind-Value="_product.Organization" />
<ValidationMessage For="@(() => _product.Organization)" />
</div>
</div>
<div class="row">
<div class="col-md-12 text-right">
<button type="submit" class="btn btn-success">Submit</button>
</div>
</div>
</EditForm>
@code{
private EmployeeDetails _product = new EmployeeDetails();
public void Submit () =>
Console.WriteLine($"{_product.Name}, {_product.Organization}");
}The following outputs will be seen after submitting the form.
The built-in DataAnnotationsValidator allows you to validate form input using data annotations, but it only validates top-level properties bound to the form and not child or complex type properties. To validate the nested complex model, replace the DataAnnotationsValidator with the ObjectGraphDataAnnotationsValidator, which validates the entire object, including child and complex type properties in the form.
Install the following package via Package Manager Console in order to use the ObjectGraphDataAnnotationsValidator.
PM> Install-Package Microsoft.AspNetCore.Components.DataAnnotations.Validation -Version 3.2.0-rc1.20223.4 Create a new Folder named StudentDetails in the main application and add the class named Student.cs to the StudentDetails folder. In Student.cs file, create two model classes -Student and PersonalDetails. Here, add ValidateComplexType belonging to the ObjectGraphDataAnnotationsValidator above the complex type declaration.
using System.ComponentModel.DataAnnotations;
namespace Validating_Complex_Model_in_Blazor.StudentDetails
{
public class Student
{
public Student ()
{
Details = new PersonalDetails();
}
[Required]
public string Name { get; set; }
[Required]
public string Department { get; set; }
[ValidateComplexType]
public PersonalDetails Details { get; set; }
}
public class PersonalDetails { [Required] public int Age { get; set; }
[Required]
public string? Address { get; set; }
}
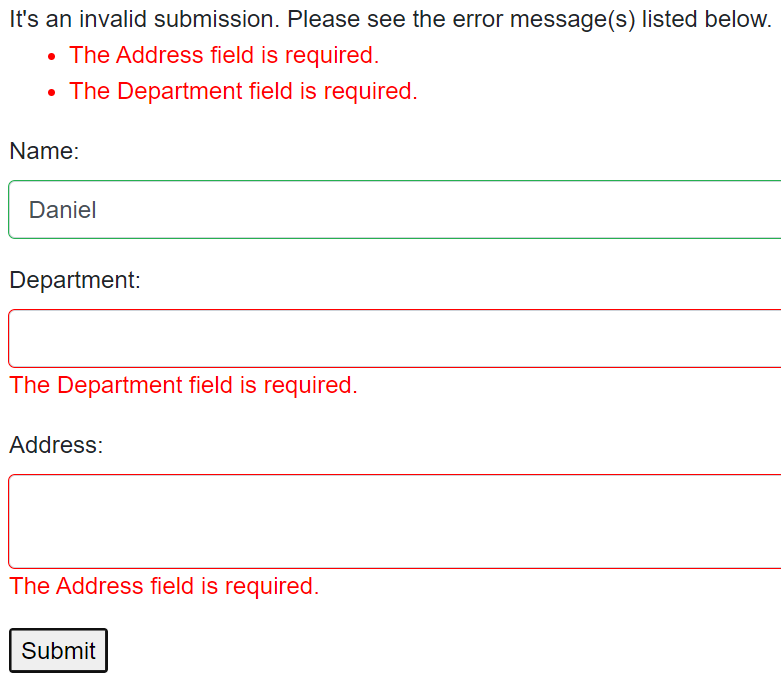
}Create an Index.razor page with the EditForm and Input components shown in the code sample below. Set the Model property of the EditForm component to the Student class instance. Additionally, the ObjectGraphDataAnnotationsValidator and ValidationSummary tags are used for validation and the display of validation summary, respectively.
 @page "/"
@using Validating_Complex_Model_in_Blazor.StudentDetails
<EditForm Model="@_student" OnValidSubmit="@HandleValidSubmit" OnInvalidSubmit="@HandleInvalidSubmit">
    <ObjectGraphDataAnnotationsValidator />
       <ValidationSummary />
       <div class="form-group">
           <label for="name">Name: </label>
           <InputText Id="name" Class="form-control" @bind-Value="@_student.Name"></InputText>
           <ValidationMessage For="@(()   => _student.Name)" />
       </div>
       <div class="form-group">
           <label for="department">Department: </label>
           <InputText Id="department" Class="form-control" @bind-Value="@_student.Department"></InputText>
           <ValidationMessage For="@(()   => _student.Department)" />
       </div>
       <div class="form-group">
           <label for="address">Address: </label>
           <InputTextArea Id="address" Class="form-control" @bind-Value="@_student.Details.Address"></InputTextArea>
           <ValidationMessage For="@(()   => _student.Details.Address)" />
       </div>
       <button type="submit">Submit</button>
   </EditForm>

   @code
   {
       public string StatusMessage;
       public Student _student = new Student();

       public void HandleValidSubmit()
       {
           StatusMessage = "It's a valid submission.";
       }

       public void HandleInvalidSubmit()
       {
           StatusMessage = "It's an invalid submission. Please see the   error message(s) listed below.";
       }
   }
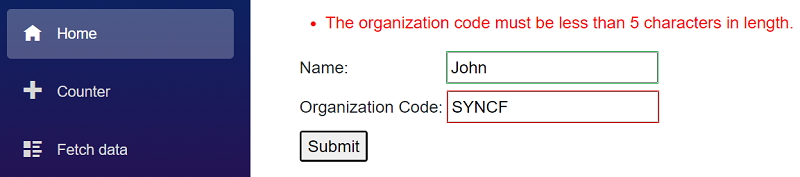
The EditContext of the form stores information about the editing process, such as which fields have been changed and which validation messages are currently displayed. To manually pass the EditContext to the EditForm, follow the steps below.
Create a new Customer.cs file and model Customer class.
public class Customer
   {
       [Required]
       public string Name { get; set; }

       [Required]
       [StringLength(4, ErrorMessage = "The organization code must be less than 5   characters in length.")]
       public string OrganizationCode { get; set; }
   }
Insert an EditForm component into the Index.razor page. Then, make instances of the Customer class and the EditContext, and assign the Customer class instance to the EditContext instance. Finally, bind the EditContext instance to the EditContext property in the EditForm component.
  @page "/"

   <EditForm EditContext="@editContext">
       <DataAnnotationsValidator />
       <ValidationSummary />

   </EditForm>

   @code {
       private Customer _customer = new Customer();
       private EditContext editContext;

       protected override void OnInitialized()
       {
           editContext = new(_customer);
       }
   }
As the EditContext stores all the form information, it can be used to validate the form components. Add the Razor code as given below with input texts and a button. When a form is submitted, the Validate() method is invoked to perform validation.
  @page "/"

   <EditForm EditContext="@editContext">
       <DataAnnotationsValidator />
       <ValidationSummary />
       <div class="form-group">
           <label for="name">Name:</>
           <InputText id="name" @bind-Value="_customer.Name" />
           <ValidationMessage For="="@(() => _customer.Name)" />
       </div>
         <div class="form-group">
           <label for="organizationCode">Organization Code:</>
           <InputText id="organizationCode" class="form-control" @bind-Value="_customer.OrganizationCode"/>
           <ValidationMessage For="="@(() => _customer.OrganizationCode)" />
         </div>
       <div style="margin-top: 10px;">
           <button type="submit" class="btn btn-primary" @onclick="Submit">Submit</button>
         </div>
   </EditForm>
To add custom CSS class names to input components despite bootstrap and other CSS framework styling, follow the steps below.
In the wwroot/css/site.css stylesheet, include the following styles.
 .validField {
       outline: 2px dotted green;
   }

   .invalidField {
       outline: 2px dotted red;
   }
Create a new Customer.cs and model Customer class.
 using System.ComponentModel.DataAnnotations;

   namespace CustomCSS_Validation_InputComponent
   {
       public class Customer
       {
           [Required]
           public string Name { get; set; }

           [Required]
           [StringLength(4, ErrorMessage = "The organization code must be less than 5   characters in length.")]
           public string OrganizationCode { get; set; }
       }
   }
Create a new CustomFieldCssClassProvider.cs and then the CustomFieldCssClassProvider class.Inherit the CustomFieldCssClassProvider class from FieldCssClassProvider and override the GetFieldCssClass method, which helps to check for validation messages with the EditContext and returns the “validField” or “invalidField” class name to the appropriate field.
   using Microsoft.AspNetCore.Components.Forms;
   using System.Linq;

   namespace FormBootstrapCSS.Data
   {
       public class CustomFieldCssClassProvider : FieldCssClassProvider
       {
           public override string GetFieldCssClass(EditContext editContext,
           in FieldIdentifier fieldIdentifier)
           {
               var isValid = !editContext.GetValidationMessages(fieldIdentifier).Any();

               return isValid ? "validField" : "invalidField";
           }
       }
   }
Add the form design code as well as the code for input components validation to the Index.razor page. Here, the SetFieldCssClassProvider method in the EditContext class is used to set the custom CSS name to the appropriate field based on the validation result returned by the CustomFieldCssClassProvider class, whose instance is passed into the method.
@page "/"

   <EditForm EditContext="@editContext" OnValidSubmit="@Submit">
       <DataAnnotationsValidator />
       <ValidationSummary />
       <div class="mt-2   col-md-12">
           Name: <InputText id="name" @bind-Value="_customer.Name" />
       </div>
       <div class="mt-2   col-md-12">
           Organization Code: <InputText id="organizationCode" @bind-Value="_customer.OrganizationCode" />
       </div>
       <div class="mt-2   col-md-12">
           <button type="submit">Submit</button>
       </div>
   </EditForm>

   @code {
       private Customer _customer = new Customer();
       private EditContext editContext;

       protected override void OnInitialized()
       {
           editContext = new(_customer);
           editContext.SetFieldCssClassProvider(new   CustomFieldCssClassProvider());
       }

       private void Submit()
       {
        …….. . .
       }
   }
View Sample in GitHub
To use .npm packages in a Blazor WebAssembly application, follow these steps:
Create a Blazor WebAssembly application in Visual Studio 2019 using this link.
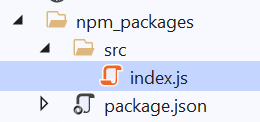
Right-click on the application and create a new folder named npm_packages.
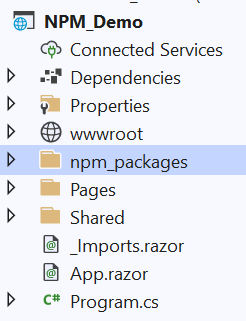
Open the npm_packages folder directory via command prompt and run the following command to initialize NPM in the application.
npm init -y
Once the command is executed, it will create a new package.json file in the npm_packages directory.Continue in the command prompt by executing the following command to install a JavaScript bundler named webpack and its CLI as development dependencies.
npm install webpack webpack-cli –save-dev Finally, install the required .npm package. In this demo, we installed Syncfusion Maps by running the following command.
npm install @syncfusion/ej2-maps Within the npm_packages folder, create a new folder called src, and then a JavaScript file called index.js.
Include the build script for the package.json file, as shown in the following, which uses webpack to bundle the JavaScript file. This script tells webpack to use the index.js file in the src folder as the source file. The output directory of the bundled file is then set to be created under the js folder in the wwwroot folder directory as index.bundle.js.
  {
   "name": "npm_packages",
   "version": "1.0.0",
   "description": "",
   "main": "index.js",
   "scripts": {
     "build": "webpack ./src/index.js --output-path ../wwwroot/js --output-filename index.bundle.js --mode=development"
   },
   "keywords": [],
   "author": "",
   "license": "ISC",
   "devDependencies": {
     "webpack": "^5.58.1",
     "webpack-cli": "^4.9.0"
   },
   "dependencies": {
     "@syncfusion/ej2-maps": "^19.3.44"
   }
 }
Navigate to the Index.razor page and insert a div tag with the id set as element to display the Syncfusion Maps component.
[Index.razor]@page "/"
<h1>NPM Packages Demo</h1>
<div id="element"></div>
In the index.js file, import and declare the Syncfusion Maps component. Finally, the component is appended to the div tag with the id set as element in the Index.razor page.
[index.js]import { Maps } from '@syncfusion/ej2-maps';
const map = new Maps({
layers: [
{
layerType: "OSM"
}
]
});
map.appendTo('#element');
Modify the index.html file with the following code to help Blazor inject a script after it starts.
Note: This step is primarily for including the Syncfusion Maps component; if you’re using something else, you can skip it.
[index.html]<!DOCTYPE html>
<html>
<head>
<title>NPM_Demo</title>
<link href="css/bootstrap/bootstrap.min.css" rel="stylesheet" />
<link href="css/app.css" rel="stylesheet" />
</head>
<body>
………………..
<script src="_framework/blazor.webassembly.js" autostart="false"></script>
<script>
Blazor.start().then(function () {
var customScript = document.createElement('script');
customScript.setAttribute('src', 'js/index.bundle.js');
document.head.appendChild(customScript);
});
</script>
</body>
</html>
Add a prebuild step to the *.csproj file that will run the .npm commands whenever you compile or build the application.
[.csproj]<Project Sdk="Microsoft.NET.Sdk.BlazorWebAssembly">
………………………..
<Target Name="PreBuild" BeforeTargets="PreBuildEvent">
<Exec Command="npm install" WorkingDirectory="npm_packages" />
<Exec Command="npm run build" WorkingDirectory=" npm_packages " />
</Target>
</Project>
Run the sample to see the demonstration.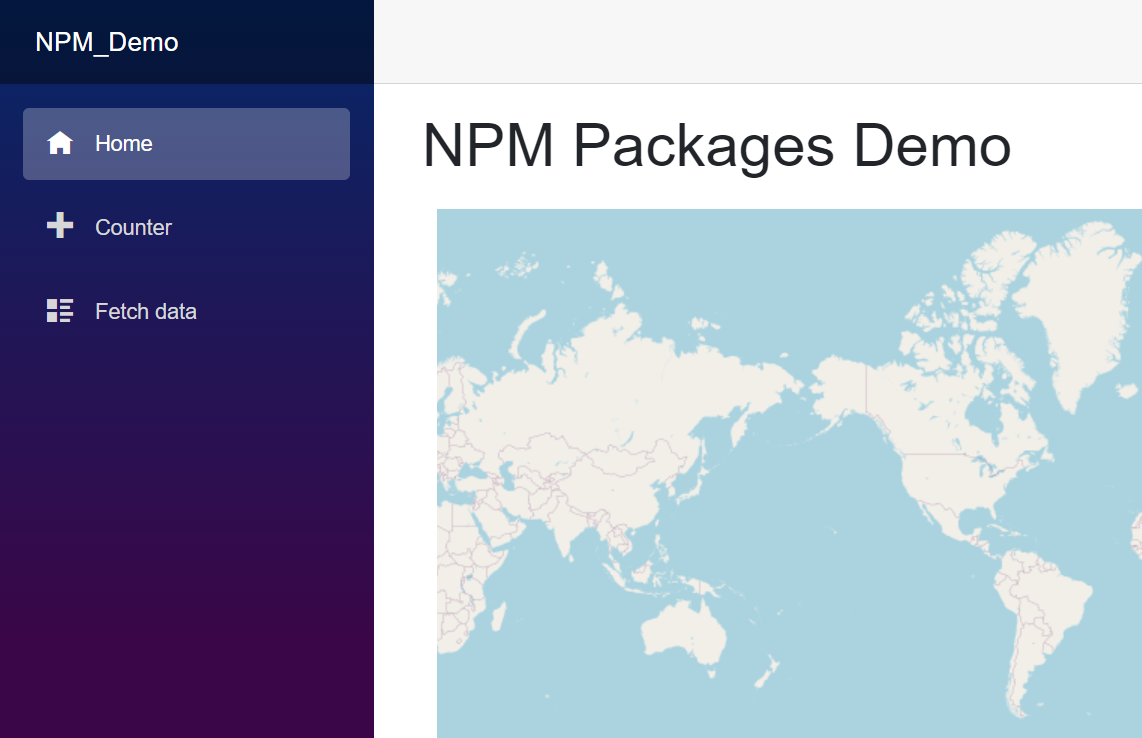
Bundling is the process of combining multiple files into a single file. Minifying is the process of removing unnecessary data such as comments and extra spaces, as well as converting a large variable name into a smaller name without affecting its functionalities.
To bundle and minify the CSS and JS files in a Blazor application, follow these steps:
Install the BuildBundlerMinifier NuGet package and reference it in the .csproj file, as shown.
[.csproj]<Project Sdk="Microsoft.NET.Sdk.Web">
……………
<ItemGroup>
<PackageReference Include="BuildBundlerMinifier" Version="3.2.449" />
……………
</ItemGroup>
</Project>Create a new .json file named bundleconfig.json and add the following code to bundle and minify the CSS and JS files.
[bundleconfig.json][
{
"outputFileName": "wwwroot/css/bundle.min.css",
"inputFiles": [
"wwwroot/css/app.css",
"wwwroot/css/site.css"
]
},
{
"outputFileName": "wwwroot/scripts/bundle.min.js",
"inputFiles": [
"wwwroot/scripts/core.js",
"wwwroot/scripts/index.js"
],
"minify": {
"enabled": true,
"renameLocals": true
},
"sourceMap": false
}
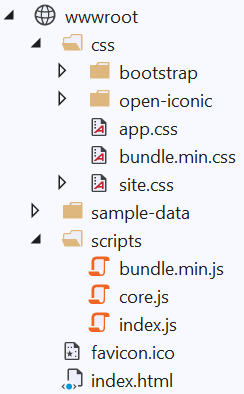
]After you build your application, the bundled and minified files are generated as shown in the following image. You can reference these files in your application based on the requirement.
View Sample in GitHub
SEO is an abbreviation for search-engine optimization, and it refers to the process of optimizing a website for search engines. In simpler words, it refers to the process of improving your website in order to increase its visibility when people use Google, Bing, and other search engines to find what they’re looking for.
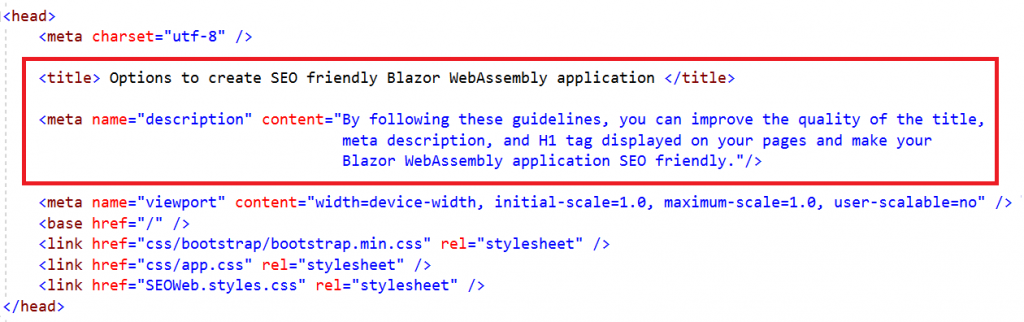
The best way to make your Blazor WebAssembly application SEO-friendly is to work on the title, meta description, and H1 tag in the index.html common page or in individual pages based on your requirements and development activities. If you include keywords in the title, meta description, and H1 tag of your Blazor WebAssembly application, the app will appear near the top of search engine results when people search for general information using those keywords.
Title: The title must be text-only and appears in the browser’s title bar or in the page’s tab.

H1 tag: The H1 tag will be displayed as the application’s top-level heading.

Meta description: The meta description will be displayed as compressed content just below the search-related link.

Meta keywords: If anyone searches for a keyword mentioned in your Blazor application, it will appear at the top of the search engine results. However, Googlebot no longer considers meta keywords to be SEO-friendly.

Note: Make sure that your title, H1 tag, and meta description are unique. If the description or title is too long, Google will limit the content to a specific range. Follow these guidelines to avoid unwanted content loss:
- Title: should be between 20 and 70 characters long.
- Meta description: should be between 100 and 160 characters long.
- H1: should be between 20 and 70 characters long.
SEO is an abbreviation for search-engine optimization, and it refers to the process of optimizing a website for search engines. In simpler words, it refers to the process of improving your website in order to increase its visibility when people use Google, Bing, and other search engines to find what they’re looking for.
The best way to make your Blazor Server application SEO-friendly is to work on the title, meta description, and H1 tag in the _Host.cshtml common page or in individual pages based on your requirements and development activities. If you include keywords in the title, meta description, and H1 tag of your Blazor Server application, the app will appear near the top of search engine results when people search for general information using those keywords.
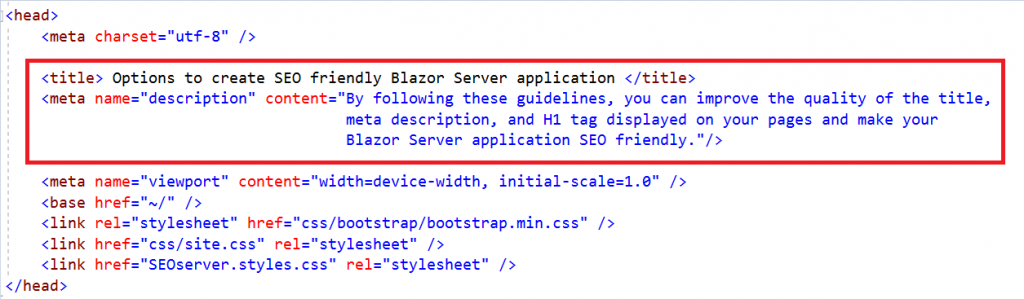
Title: The title must be text-only and appears in the browser’s title bar or in the page’s tab.

H1 tag: The H1 tag will be displayed as the application’s top-level heading.

Meta description: The meta description will be displayed as compressed content just below the search-related link.

Meta keywords: If anyone searches for a keyword mentioned in your Blazor application, the app will appear at the top of the search engine results. However, Googlebot no longer considers meta keywords to be SEO-friendly.

Note: Make sure that your title, H1 tag, and meta description are unique. If the description or title is too long, Google will limit the content to a specific range. Follow these guidelines to avoid unwanted content loss:
- Title: should be between 20 and 70 characters long.
- Meta description: should be between 100 and 160 characters long.
- H1: should be between 20 and 70 characters long.
You can change the CSS value in the Blazor application by using the following options.
- Internal CSS
- Inline CSS
- Declare and assign a variable to the respective DOM element.
NOTE: In CSS, the “!important” rule is used to give a property more weightage, that is, it will override all the previous styling rules applied to that element for that specific property.
[Index.razor]
@page "/"

<style>
    .divStyle {
        font-family: 'Courier New';
        color: red !important;
    }
</style>

<div class="divStyle"> This is internal CSS styling. </div>
<div style="font-family: 'Times New Roman'; color: green !important;"> This is inline CSS styling. </div>
<div style="@styleInfo"> This CSS styling is applied by declaring a variable. </div>

@code {
    public string styleInfo = "font-family: 'Calibri'; color: blue !important;";
}

Stored procedures are pieces of reusable code that you can save in a database data dictionary. They help you extract, edit, and remove data from a database without writing the code to do so again and again. It also saves your time, lessens your workload, and increases your productivity.
Follow these steps to use stored procedures in a Blazor application:
Create a new Blazor application and add the Microsoft.EntityFrameworkCore, Microsoft.EntityFrameworkCore.SqlServer, Microsoft.EntityFrameworkCore.Design, Microsoft.EntityFrameworkCore.Tools NuGet packages using the NuGet package manager.
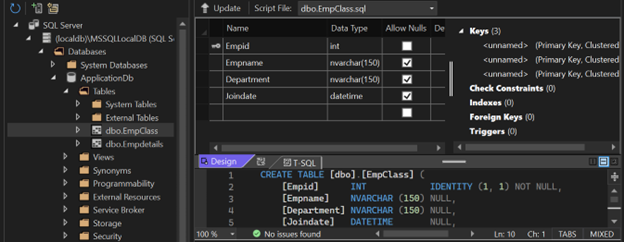
Create a class named EmpClass.cs in the Data folder and define the properties that are already in the database table.
[Empclass.cs]
[EmpClass table]public class EmpClass
{
[Key]
public int Empid { get; set; }
public string? Empname { get; set; }
public string? Department { get; set; }
public DateTime joinDate { get; set;}
}
Also Define inserted Employee Details in stored procedure.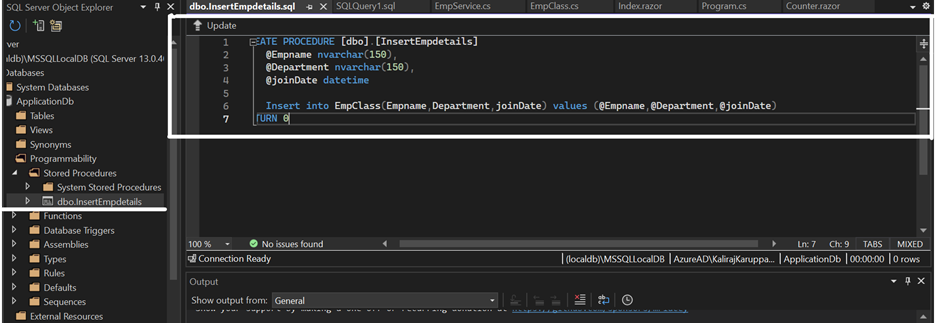
CREATE PROCEDURE [dbo].[InsertEmpdetails]
@Empname nvarchar(150),
@Department nvarchar(150),
@joinDate datetime
AS
Insert into EmpClass(Empname,Department,joinDate) values (@Empname,@Department,@Joindate)
RETURN 0
Add the virtual property for the DbSet from EmpClass to insert records in the database under the Data folder.
[ApplicationDbContext.cs]public class ApplicationDbContext:DbContext
{
public ApplicationDbContext(DbContextOptionsoptions ) : base(options)
{
}
public virtual DbSetInsertRecord { get; set; }
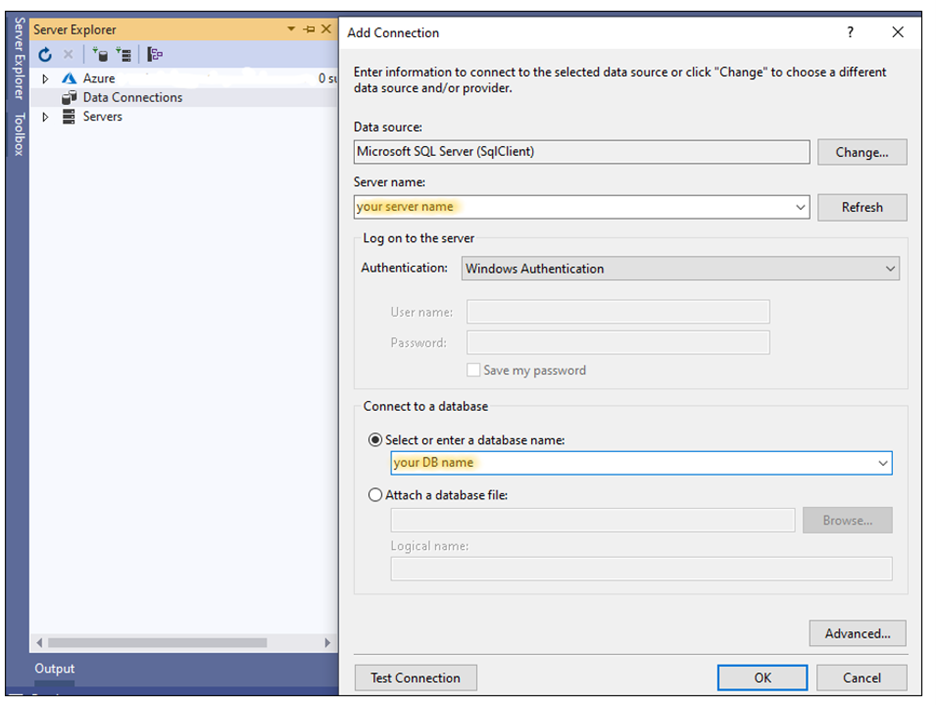
}Connect the SQL Server database to the Blazor application by choosing (View –> Server Explorer). Right-click the Data Connections and choose Add connection in Visual Studio. Add your server name and DB name to connect the database to the Blazor application.
The database is now connected to the Blazor application.Add the connection string configurations to the appsetting.json file.
[appsetting.json]{
"ConnectionStrings": {
"Myconnection": " "Data Source={{Server_Name}};Initial Catalog={{DataBase_Name}};Integrated Security=True""
},
"Logging": {
……
},
"AllowedHosts": "*"
}Create an EmpServices class in the Services folder and define the ExecuteSqlRaw extension method to execute a stored procedure.
[EmpServices.cs]using {Your App Name}.Data;
using Microsoft.EntityFrameworkCore;
namespace {Your App Name}.Services
{
public class EmpService
{
protected readonly ApplicationDbContext? _dbcontext;
public EmpService ( ApplicationDbContext? _db )
{
_dbcontext = _db;
}
public EmpClass AddNewRecord ( EmpClass? ec)
{
//Here define the ExecuteSqlRaw extension method to execute a stored procedure with InsertEmpdetails
_dbcontext!.Database.ExecuteSqlRaw("InsertEmpdetails {0},{1},{2}", ec?.Empname!, ec?.Department!, ec!.Joindate);
_dbcontext.SaveChanges();
return ec;
}
}
}Add the DbContext configuration to the Program.cs file.
builder.Services.AddDbContext(options => options.UseSqlServer("name=ConnectionStrings:Myconnection"));
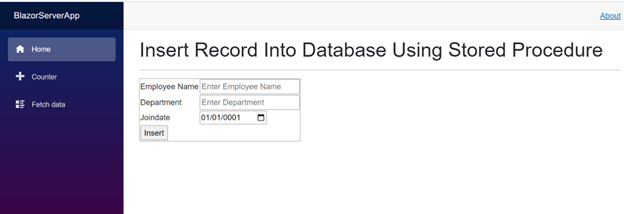
builder.Services.AddScoped(); Insert Record Into Database Using Stored Procedure implement in index.razor page
@page "/"
@using {Your App Name}.Data
@using {Your App Name}.Services
@inherits OwningComponentBase<EmpService>
<h1>Insert Record Into Database Using Stored Procedure</h1>
<hr/>
<EditForm Model="@ec" OnValidSubmit="@Insertdata">
	<table border="1">
		<tr>
			<td>Employee Name</td>
			<td><input type="text" placeholder="Enter Employee Name" @bind="ec.Empname"/></td>
		</tr>
		<tr>
			<td>Department</td>
			<td><input type="text" placeholder="Enter Department" @bind="ec.Department" /></td>
		</tr>
		<tr>
			<td>Joindate</td>
			<td><InputDate @bind-Value="ec.Joindate"></InputDate></td>
		</tr>
		<tr>
			<td>Joindate</td>
			<td><input type="submit" value="Insert"/></td>
		</tr>
	</table>
</EditForm>
@code{
	EmpClass ec = new EmpClass();
	void Insertdata ()
	{
		ec.Empid = 0;
		Service.AddNewRecord(ec);
	}
}
Press Ctrl + F5 to run the application and see the output in the following image.
A progressive web application (PWA) is usually a single-page application (SPA) used to create a Blazor WebAssembly application to work offline. It runs in its own app window and independent of network speed.
Follow these steps to create a Blazor WebAssembly PWA application to work offline.
Create a Blazor WebAssembly application with a progressive web application configuration.

Press Ctrl + F5 to run the application. Users have the option of installing the app.
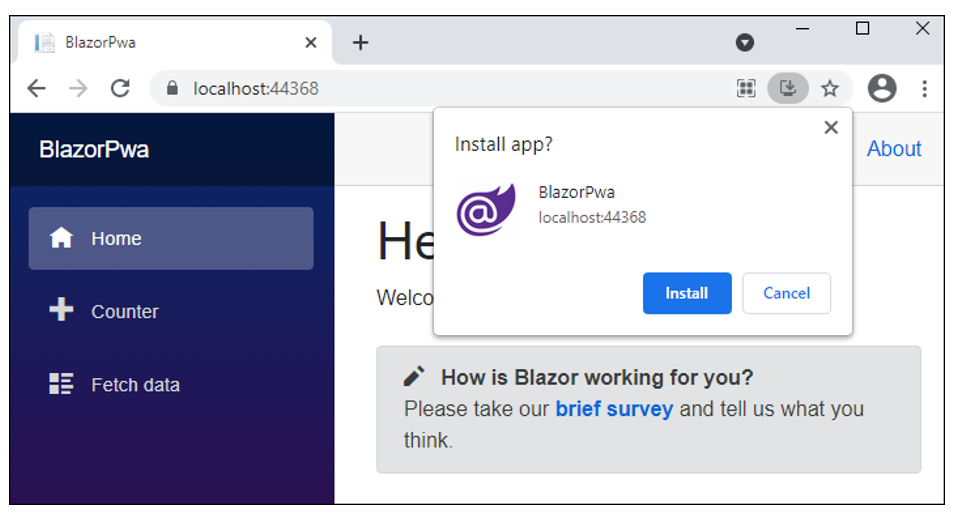
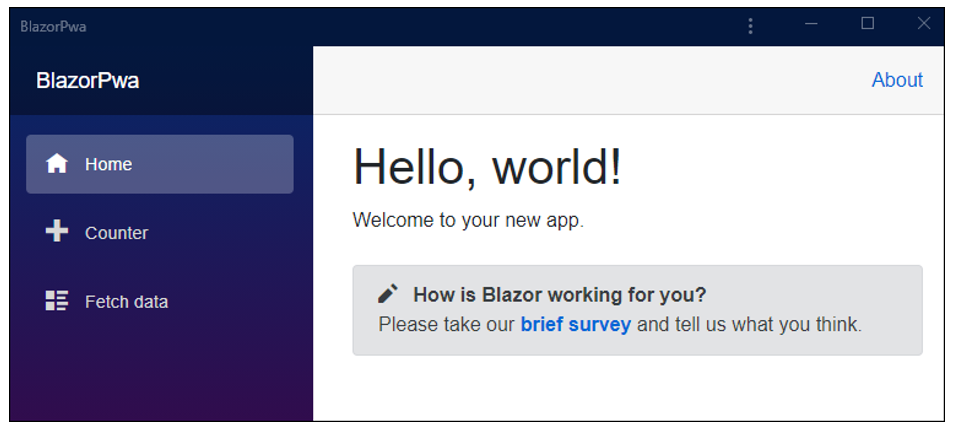
Once the app is installed, the app appears in its own window without an address bar.
To run the application offline:
- Publish the app using this documentation – https://learn.microsoft.com/en-us/aspnet/core/blazor/progressive-web-app?view=aspnetcore-7.0&tabs=visual-studio
- Deploy the app to a server that supports HTTPS and access the app in a browser at its secure HTTPS address.
- Run the deployed application in the browser and open the browser’s dev tools.
- Open the network tab in the browser dev tool and set the throttle setting to offline mode.
- Refresh the application. It still loads in offline mode, also.
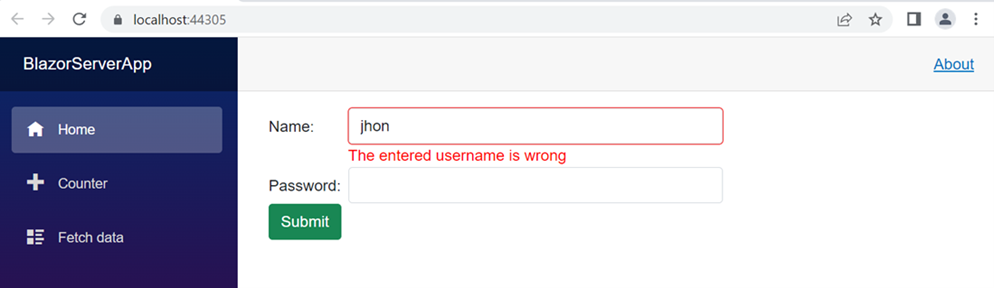
To create a custom validation component in Blazor, follow these code steps:
Create a Blazor Server or WebAssembly application and install the System.ComponentModel.Annotations NuGet package using NuGet Package Manager.
Now, create a new custom validation class in the Pages folder and restrict the user to enter only “admin” in the password field.
[CustomValidatorAttribute.cs]using System.ComponentModel.DataAnnotations;
namespace {{Your_App_Name}}.Pages
{
public class CustomValidationAttribute : ValidationAttribute
{
public string? ValidUserName { get; set; }
protected override ValidationResult? IsValid ( object? username, ValidationContext validationContext )
{
var content = username?.ToString()?.ToLower();
if (content!.Equals(ValidUserName?.ToLower()))
{
return null;
}
return new ValidationResult(ErrorMessage, new[] { validationContext.MemberName });
}
}
}Use the created custom validator attribute in the Razor component. Provide the error message and valid username properties for validation.
[Index.razor]@page "/"
@using System.ComponentModel.DataAnnotations
<EditForm style="width:470px;" Model="_login" OnValidSubmit="Submit">
<DataAnnotationsValidator />
<div class="form-group row">
<label for="name" class="col-md-2 col-form-label">Name:</label>
<div class="col-md-10">
<InputText id="name" class="form-control" @bind-Value="_login.UserName" />
<ValidationMessage For="@(() => _login.UserName)" />
</div>
</div>
<div class="form-group row">
<label for="supplier" class="col-md-2 col-form-label">Password:</label>
<div class="col-md-10">
<InputText id="supplier" class="form-control" @bind-Value="_login.Password" />
<ValidationMessage For="@(() => _login.Password)" />
</div>
</div>
<div class="row">
<div class="col-md-12 text-right">
<button type="submit" class="btn btn-success">Submit</button>
</div>
</div>
</EditForm>
@code {
private Login _login = new Login();
public void Submit()
{
Console.WriteLine($"User name is {_login.UserName} and password is {_login.Password}");
}
public class Login
{
[Required]
[CustomValidation(ErrorMessage = "The entered username is wrong ", ValidUserName = "admin")]
public string? UserName { get; set; }
[Required]
public string? Password { get; set; }
}
}Refer to the following output image for the custom validator.
Refer to this link for more details.
View Sample in GitHub
Cookies are created by the application and passed to the user’s web browser when the user submits the request. The web browser passes the cookie back to the application to indicate that the user is authenticated. When the user logs out, the cookie is removed.
Follow these steps to set a cookie and read that cookie with authentication in Blazor.
Configure the cookie authentication services in the Startup.cs file.
[Startup.cs]public class Startup
{
. . .
. . .
public void ConfigureServices(IServiceCollection services)
{
. . .
. . .
services.AddAuthentication("Cookies").AddCookie();
}
public void Configure(IApplicationBuilder app, IWebHostEnvironment env)
{
. . .
. . .
app.UseAuthentication();
app.UseAuthorization();
app.UseEndpoints(endpoints =>
{
endpoints.MapControllers();
. . .
. . .
});
}
}Now, add a controller page to set the cookie to the browser and redirect the URL.
[CookieController.cs]using Microsoft.AspNetCore.Authentication;
using Microsoft.AspNetCore.Http;
using Microsoft.AspNetCore.Mvc;
using System.Collections.Generic;
using System.Security.Claims;
using System.Threading.Tasks;
namespace blazorcookie
{
[Route("/[controller]")]
[ApiController]
public class CookieController : ControllerBase
{
[HttpPost]
public async Task<ActionResult> Login([FromForm] string name)
{
ClaimsIdentity claimsIdentity = new ClaimsIdentity(new List<Claim>
{
new Claim(ClaimTypes.NameIdentifier, name)
}, "auth");
ClaimsPrincipal claims = new ClaimsPrincipal(claimsIdentity);
await HttpContext.SignInAsync(claims);
return Redirect("/");
}
}
}To use the authorized view, configure the CascadingAuthenticationState component in the App.razor file. This will let you check the authentication state inside the Blazor application.
[ App.razor ]<CascadingAuthenticationState>
<Router AppAssembly="@typeof(Program).Assembly" PreferExactMatches="@true">
. . .
. . .
. . .
</Router>
</CascadingAuthenticationState>Use form action to call the cookie controller to set the cookie and have it read by AuthorizeView user name.
[Index.razor]@page "/"
<AuthorizeView>
<Authorized>
<h1>Hello @context.User.Claims.First().Value</h1>
</Authorized>
</AuthorizeView>
<form action="cookie" method="post">
<input type="text" name="name" />
<input type="submit" />
</form>Run the application and submit the form request. You will find an authentication cookie with the scheme “Cookies,” which was specified in the ConfigureServices() method of the Startup class.

Refer to this blog post for more details and download the sample on GitHub.
Google reCaptcha is a process that helps to protect websites form spam and abuse. To implement Google reCaptcha in Blazor, refer to the Google reCaptcha script link the WebAssembly app and render the reCaptcha by calling the JavaScript function.
Follow these steps to implement Google reCaptcha in Blazor WebAssembly.
Add the Google reCaptcha renderer function in a separate JavaScript file under the wwwroot folder.
[googlereCaptcha.js]function googleRecaptcha(dotNetObject, selector, sitekeyValue) {
return grecaptcha.render(selector, {
'sitekey': sitekeyValue,
'callback': (response) => { dotNetObject.invokeMethodAsync('CallbackOnSuccess', response); },
'expired-callback': () => { dotNetObject.invokeMethodAsync('CallbackOnExpired', response); }
});
};
function getResponse(response) {
return grecaptcha.getResponse(response);
}Add the reCaptcha script link and reference the reCaptcha.js file source in index.html.
[index.html]<body>
. . .
. . .
<script src="googlereCaptcha.js"></script>
<!-- reCaptcha rendering script -->
<script src="https://www.google.com/recaptcha/api.js"></script>
</body >Now call the rendering reCaptcha function in JavaScript from the Razor page using JavaScript Interop and show the reCaptcha response on button click.
Note: To start using reCaptcha, you need to generate the API site key for your site. Refer to this link to generate the site key.
[Index.razor]@page "/"
@inject IJSRuntime JSRuntime
@using System.ComponentModel
<h3>Google reCAPTCHA</h3>
<div id="google_recaptcha "></div>
<button class="btn btn-primary" @onclick="ShowResponse">Show Response</button>
<br />
<p>@captchaResponse</p>
@code {
private string captchaResponse;
protected override async Task OnAfterRenderAsync(bool firstRender)
{
if (firstRender)
{
await JSRuntime.InvokeAsync<int>("googleRecaptcha", DotNetObjectReference.Create(this), "google_recaptcha ", "your-sitekey");
}
await base.OnAfterRenderAsync(firstRender);
}
[JSInvokable, EditorBrowsable(EditorBrowsableState.Never)]
public void CallbackOnSuccess(string response)
{
captchaResponse = response;
}
[JSInvokable, EditorBrowsable(EditorBrowsableState.Never)]
public void CallbackOnExpired(string response)
{
//...
}
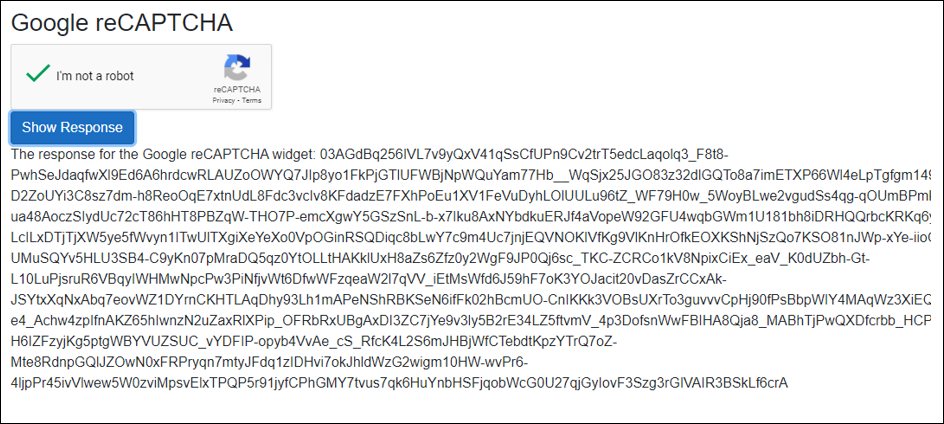
private void ShowResponse()
{
captchaResponse = $"The response for the Google reCAPTCHA widget: {captchaResponse}";
}
}
When we run a Blazor application with a SQL Server localdb for storing authentication data, by following these steps we can implement SQLite in it:
- Update the NuGet package.
- Modify the Startup.cs file and connection string.
- Modify the database migration code.
Updating the NuGet package:
Remove the Microsoft.EntityFrameWorkCore.SqlServer NuGet package from the current package manager and add the Microsoft.EntityFrameWorkCore.Sqlite package.
Modifying the Startup.cs file:
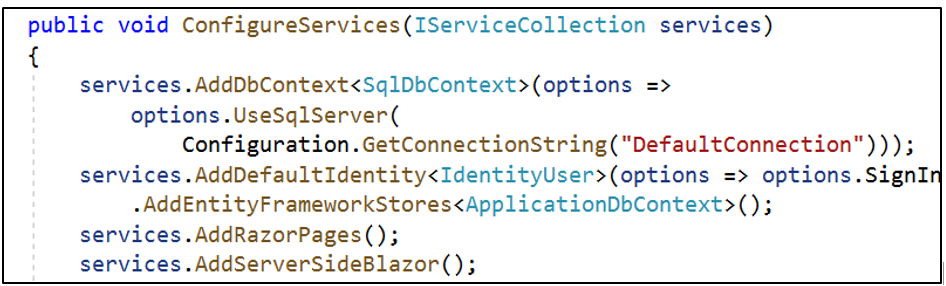
Change the Startup.cs file from options.UseSqlServer to options.UseSqlite.
using Microsoft.AspNetCore.Components.Authorization;
using Microsoft.AspNetCore.Hosting;
using Microsoft.AspNetCore.HttpsPolicy;
using Microsoft.EntityFrameworkCore;
…………………. . .
namespace BlazSqlite
{
    public class Startup
    {
………………… . .
public void ConfigureServices(IServiceCollection services)
        {
            services.AddDbContext<SqlDbContext>(options =>
                options.UseSqlite(
                    Configuration.GetConnectionString("DefaultConnection")));
            services.AddDefaultIdentity<IdentityUser>(options => options.SignIn.RequireConfirmedAccount = true)…………… . }
Modify the connection string in the AppSettings.json file.
| “DataSource=<yourdbname>.db” (points to your sqlite database file) |
Modifying the database migration code:
Modify the database migration code to avoid the errors that would occur after performing the previous steps.
Change the “00000000000000_CreateIdentitySchema.cs” file as follows.
“.HasAnnotation(“SqlServer:ValueGenerationStrategy”, SqlServerValueGenerationStrategy.IdentityColumn)” or “.Annotation(“SqlServer:ValueGenerationStrategy”, SqlServerValueGenerationStrategy.IdentityColumn)”

to “.HasAnnotation(“Sqlite:Autoincrement”, true)” or “.Annotation(“Sqlite:Autoincrement”, true)”
Run the app and start registering a new user for authentication.
Refer to this link to learn how to create a SQL database with a Blazor Server application.
Refer to this link for more information about authentication with SQLite and Blazor.
The routing interception concept is sometimes used to restrict user access to some page or link if they did some work or made some changes on a specific page.
In the following code, you can use the NavigateTo() method to intercept routing inside the If condition. The routing happens according to the values passed in the condition.
Create the class file [RouteData.cs].
 …………………. ..
 namespace BlazorApp.Data
 {
     public class RouteData
     {
         public string Textfield { get; set; }
     }
 }
To register the RouteData class as a scoped service in Program.cs, you can use the following code snippet.
[Program.cs]builder.Services.AddScoped<BlazorServerApp.Data.RouteData>();Add the following code to the [Index.razor] page.
 @page "/"
 @inject Data.RouteData RouteData
<p>Type the text below to allow Home page intercepting</p>
<textarea @bind="RouteData.Textfield"></textarea>
Check the condition and allow the navigation process in the [NavMenu.razor] page as shown.
@inject NavigationManager NavigationManager
@inject {Your App name}.Data.RouteData RouteData
<div class="@NavMenuCssClass" @onclick="ToggleNavMenu">
     <ul class="nav flex-column">
         <li class="nav-item px-3">
             <NavLink class="nav-link" @onclick="Navigate" Match="NavLinkMatch.All">
                 <span class="oi oi-home" aria-hidden="true"></span> Home
             </NavLink>
         </li>
                   ……………………. . .
     </ul>
 </div>
 @code {
     private bool collapseNavMenu = true;
     private string NavMenuCssClass => collapseNavMenu ? "collapse" : null;
     private void ToggleNavMenu()
     {
         collapseNavMenu = !collapseNavMenu;
     }
            private void Navigate()
     {
         if (RouteData.Textfield == null)
         NavigationManager.NavigateTo("");
     }
………………… . . .- Output
Home page routing is intercepted when you type text in the text area. When the text area value is null, the app navigates to the home page.
View Sample in GitHub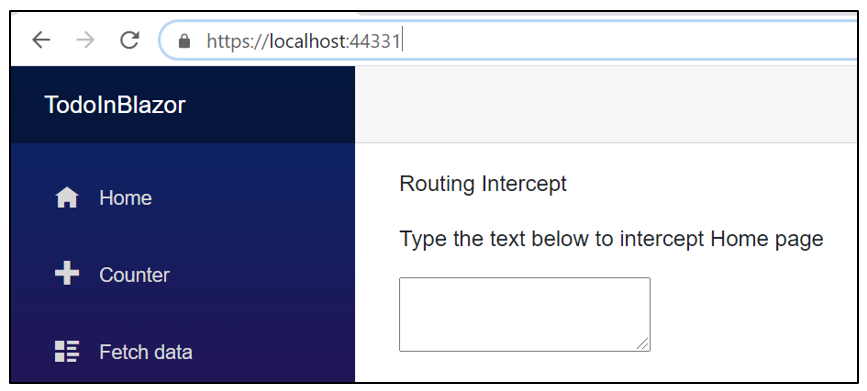
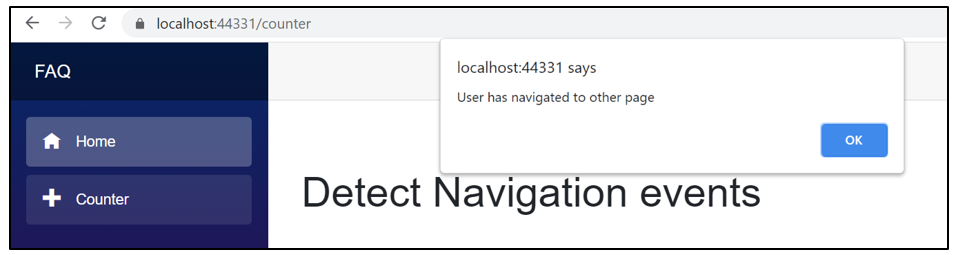
We can use NavigationManager, which has a built-in LocationChanged event that will be triggered when the user navigates away from the current page.
In the following code, we use an alert JS function by adding the IJSRuntime to show the user has navigated by overriding the OnInitialized() method through the alert message.
[Index.razor]
@page "/"
@inject NavigationManager nav
@inject IJSRuntime JSRuntime
<h1>Detect Navigation events</h1>
@code {
    protected override void OnInitialized()
    {
        nav.LocationChanged += (o, e) =>
        {
           JSRuntime.InvokeVoidAsync("alert", "User has navigated to other page");
        };  }}
When the user navigates from the home page to the counter page or vice versa, the alert message stating “User has navigated to other page” will be shown.
We generally use authentication for specific pages to prevent access by unauthorized users. In the case that we do want a specific page to be accessed by any users, not only authorized users, we will use the anonymous users category.
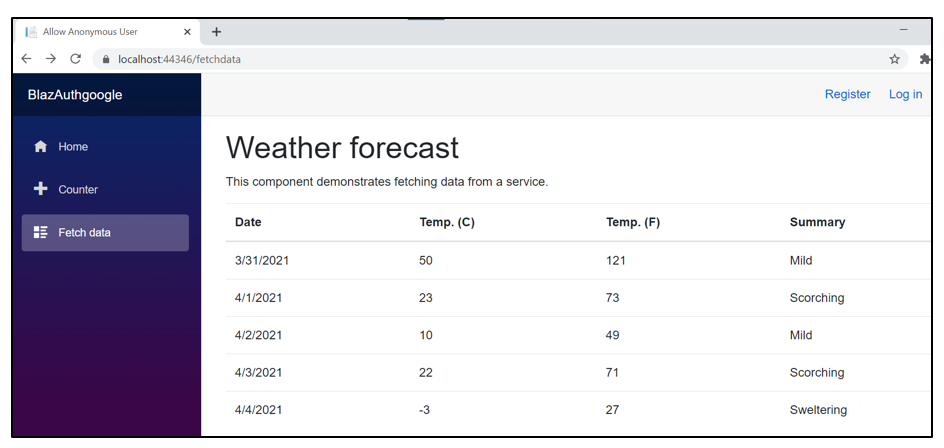
To make a Blazor page accessible by all users, use [AllowAnonymous] with @attribute code in the _Imports.razor file in your app.
[_Imports.razor]
@attribute [AllowAnonymous]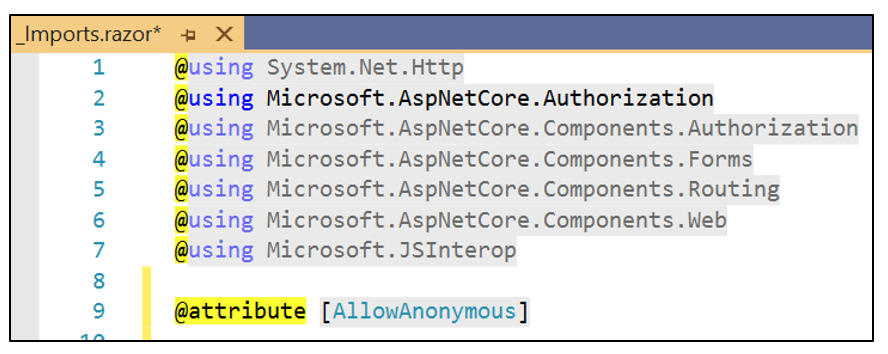
By doing this users can access the secured page (here we secured the fetch data) without a login.
As the Blazor client runs in the browser, both user authorization and authentication for WebAssembly will be completely handled by the back-end API.
The back-end web API must handle the authorization on every API call, and it tells the Blazor app whether the user is authenticated and has resource access. It enables your Blazor app to show the correct context to the user.
Create a Blazor WebAssembly app using Visual Studio 2019 with ASP.NET Core hosting enabled.
Reorganize the folder names according to usage:
- Sample.Server is renamed to Sample.Api as we are going to use this as our API.
- Sample.Client is renamed to Sample.WebApp.
- Sample.Shared is renamed to Sample.Common.
In the Sample.Common folder, create a Models folder, and move the generated WeatherForecast class to this folder and change its namespace to Sample.Models. Add the AuthorizedUser class in the Models folder under the Sample.Shared folder.
namespace Sample.Common
 {
     public class AuthorizedUser
     {
         public string Name { get; set; }
         public string Roles { get; set; }
     }
Add a new SettingsController file in the Sample.Api folder.
using Sample.Models;
using Microsoft.AspNetCore.Mvc;

namespace Sample.Api.Controllers
 {
     [Route("api/[controller]")]
     [ApiController]
     public class SettingsController : ControllerBase
     {
         [HttpGet("user")]
         public AuthorizedUser GetUser()
         {
             return new AuthorizedUser();

             // User signed in:
             //return new AuthorizedUser { Name = "UserName" };
         }
     }
 }
Prepare your Sample.WebApp
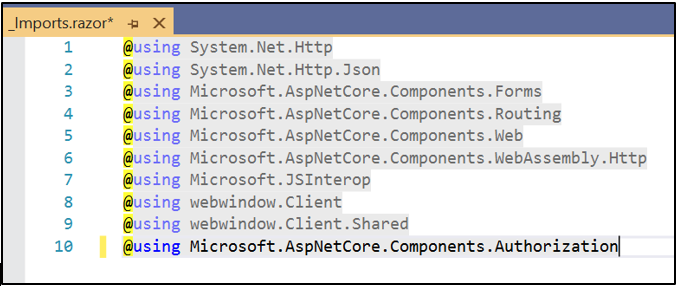
Install the NuGet package Microsoft.AspNetCore.Components.Authorization.
Add the installed package in the _Imports.razor file.
Wrap the <CascadingAuthenticationState> in the App.razor file.
Add a Service folder and add a ClientAuthorizationService class in it.
Add the following code in the Program.cs file.
Create a new Razor component SignInDisplay.razor in the shared folder.
In the Shared/MainLayout page, add the following code.
Run the app with Sample.Api as the startup file and see the output as follows.
Since Windows authorization is not yet implemented in the API, If you click the Sign In button, you will be rerouted to a page stating, “Sorry, there’s nothing at this address.” When you change the code in the GetUser() method in the SettingsController to include the name of the user, the app will be shown as follows.

 <CascadingAuthenticationState>
     <Router AppAssembly="@typeof(Program).Assembly">
         ...
     </Router>
</CascadingAuthenticationState> using Sample.Models;
using Microsoft.AspNetCore.Components;
using Microsoft.AspNetCore.Components.Authorization;
using System;
using System.Collections.Generic;
using System.Net.Http;
using System.Security.Claims;
using System.Threading.Tasks;
namespace Sample.WebApp.Services
{
public class ClientAuthorizationService : AuthenticationStateProvider
{
private const string AuthenticationType = "BackEnd";
private readonly HttpClient _httpClient;
public ClientAuthorizationService(HttpClient httpClient)
{
if (httpClient == null) throw new ArgumentNullException(nameof(httpClient));
_httpClient = httpClient;
}
public string ApiUriGetAuthorizedUser { get; set; }
public string ApiUriSignIn { get; set; }
public string ApiUriSignOut { get; set; }
public AuthorizedUser AuthorizedUser { get; private set; } = new AuthorizedUser();
public override async Task<AuthenticationState> GetAuthenticationStateAsync()
{
ClaimsPrincipal user;
if (!string.IsNullOrEmpty(ApiUriGetAuthorizedUser))
AuthorizedUser = await _httpClient.GetJsonAsync<AuthorizedUser>(ApiUriGetAuthorizedUser);
if (string.IsNullOrEmpty(AuthorizedUser.Name)) {
user = new ClaimsPrincipal();
}
else {
var identity = new ClaimsIdentity(CreateClaims(AuthorizedUser), AuthenticationType);
user = new ClaimsPrincipal(identity);
}
return new AuthenticationState(user);
}
private static IEnumerable<Claim> CreateClaims(AuthorizedUser authorizedUser)
{ yield return new Claim(ClaimTypes.Name, authorizedUser.Name);
var roles = authorizedUser.Roles?.Split(',') ?? new string[0];
foreach (var role in roles)
yield return new Claim(ClaimTypes.Role,role.Trim());
}
}
} using Microsoft.AspNetCore.Components.Authorization;
using System.Net.Http;
...
public static async Task Main(string[] args)
{
var builder = WebAssemblyHostBuilder.CreateDefault(args);
builder.Services.AddAuthorizationCore();
builder.Services.AddScoped<ClientAuthorizationService>(CreateAuthorizationService);
builder.Services.AddScoped<AuthenticationStateProvider>(sp => sp.GetRequiredService<ClientAuthorizationService>());
builder.Services.AddOptions();
...
private static ClientAuthorizationService CreateAuthorizationService(IServiceProvider serviceProvider){
var httpClient = serviceProvider.GetRequiredService<HttpClient>();
var service = new ClientAuthorizationService(httpClient)
{
ApiUriGetAuthorizedUser = "api/settings/user",
ApiUriSignIn = "AzureADB2C/Account/SignIn",
ApiUriSignOut = "AzureADB2C/Account/SignOut",
};
return service;
} @using Sample.WebApp.Services
@inject ClientAuthorizationService AuthorizationService
<AuthorizeView>
<Authorized>
<div>
<span class="form-control">@AuthorizationService.AuthorizedUser.Name</span>
</div>
<div>
<a class="btn btn-outline-primary" href="@AuthorizationService.ApiUriSignOut">Sign Out</a>
</div>
</Authorized>
<NotAuthorized>
<div>
<a class="btn btn-outline-primary" href="@AuthorizationService.ApiUriSignIn">Sign In</a>
</div>
</NotAuthorized>
</AuthorizeView> <div class="top-row px-4 auth">
<SignInDisplay />
</div>Refer to this link for more information.
Role-based authorization is a declarative way of limiting resource access that first appeared in ASP.NET (pre-Core). In order for the user to access certain resources, developers must specify a role that the user belongs to. This is done by using the [Authorize] attribute. Users can have a single role or multiple roles depending on the backing store used. The following procedure explains how to implement role-based authorization.
Create a Blazor WebAssembly app and add the following role service in the Startup class under ConfigureServices.
 public void ConfigureServices(IServiceCollection services)
         {
          ………………….. .
             services.AddDefaultIdentity<IdentityUser>()
                     .AddRoles<IdentityRole>()
                     .AddEntityFrameworkStores<ApplicationDbContext>();}
Add specific roles in your database by overriding the OnModelCreating method of ApplicationDBContext. The User and Admin roles are added in the following code.
Once the roles are added, generate a migration and apply it to your database.public class ApplicationDbContext : IdentityDbContext
{
public ApplicationDbContext(DbContextOptions options) : base(options)
{
}
protected override void OnModelCreating(ModelBuilder builder)
{
base.OnModelCreating(builder);
builder.Entity<IdentityRole>().HasData(new IdentityRole { Name = "User", NormalizedName = "USER", Id = Guid.NewGuid().ToString(), ConcurrencyStamp = Guid.NewGuid().ToString() });
builder.Entity<IdentityRole>().HasData(new IdentityRole { Name = "Admin", NormalizedName = "ADMIN", Id = Guid.NewGuid().ToString(), ConcurrencyStamp = Guid.NewGuid().ToString() });
}
}Add users to the roles by updating the action on the Accounts controller. All new users are added to the User role, except for the admin email.
[AccountsController.cs][HttpPost]
public async Task<IActionResult> Post([FromBody]RegisterModel model)
{
var newUser = new IdentityUser { UserName = model.Email, Email = model.Email };
var result = await _userManager.CreateAsync(newUser, model.Password);
if (!result.Succeeded)
{
var errors = result.Errors.Select(x => x.Description);
return BadRequest(new RegisterResult { Successful = false, Errors = errors });
}
await _userManager.AddToRoleAsync(newUser, "User");
if (newUser.Email.StartsWith("admin"))
{
await _userManager.AddToRoleAsync(newUser, "Admin");
}
return Ok(new RegisterResult { Successful = true });
}Update the Login method in the LoginController.
Add roles as claims to the JSON web token (JWT) since we are assigning new users to roles at signup, so we need to pass this information to Blazor. Add the following code in the Login method. Current users can be taken through UserManager, which is used to get their roles.Add roles in client-side Blazor.
Once the new users are signed up, we have to get those roles via JWT. To do this, we add the following code in the ParseClaimsFromJwt method, which will take JWT, decode it, extract claims, and return it.
We have to check that the first character is [, indicating it’s a JSON array. If the role claim is present and if the [ character is found, then we have to extract the individual role names from the roles entered. We have to loop these role names and add each as a claim, but if the role is not an array, then it is added as a single role claim.private IEnumerable<Claim> ParseClaimsFromJwt(string jwt)
{
var claims = new List<Claim>();
var payload = jwt.Split('.')[1];
var jsonBytes = ParseBase64WithoutPadding(payload);
var keyValuePairs = JsonSerializer.Parse<Dictionary<string, object>>(jsonBytes);
keyValuePairs.TryGetValue(ClaimTypes.Role, out object roles);
if (roles != null)
{
if (roles.ToString().Trim().StartsWith("["))
{
var parsedRoles = JsonSerializer.Parse<string[]>(roles.ToString());
foreach (var parsedRole in parsedRoles)
{
claims.Add(new Claim(ClaimTypes.Role, parsedRole));
}
}
else
{
claims.Add(new Claim(ClaimTypes.Role, roles.ToString()));
}
keyValuePairs.Remove(ClaimTypes.Role);
}
claims.AddRange(keyValuePairs.Select(kvp => new Claim(kvp.Key, kvp.Value.ToString())));
return claims;
}
private byte[] ParseBase64WithoutPadding(string base64)
{
switch (base64.Length % 4)
{
case 2: base64 += "=="; break;
case 3: base64 += "="; break;
}
return Convert.FromBase64String(base64);
}
To call ParseClaimsFromJwt, we need to update the MarkUserAsAuthenticated method as shown.public void MarkUserAsAuthenticated(string token)
{
var authenticatedUser = new ClaimsPrincipal(new ClaimsIdentity(ParseClaimsFromJwt(token), "jwt"));
var authState = Task.FromResult(new AuthenticationState(authenticatedUser));
NotifyAuthenticationStateChanged(authState);
}Update the Login method on the AuthService to pass the token rather than the email when calling MarkUserAsAuthenticated.
public async Task<LoginResult> Login(LoginModel loginModel)
{
……………. .
var result = await _httpClient.PostJsonAsync<LoginResult>("api/Login", loginModel);
if (result.Successful)
{
await _localStorage.SetItemAsync("authToken", result.Token);
((ApiAuthenticationStateProvider)_authenticationStateProvider).MarkUserAsAuthenticated(result.Token);
_httpClient.DefaultRequestHeaders.Authorization = new AuthenticationHeaderValue("bearer", result.Token);
return result;
}
return result;
}Apply role-based authentication to the API.
We can allow access to a specific page by an admin user alone through the Authorize attribute as shown.namespace BlazorWebAssembly.Server.Controllers
{
…………. . .
public class SampleDataController : Controller
{
…… . .
[Authorize(Roles = "Admin")]
[HttpGet("[action]")]
public IEnumerable<WeatherForecast> WeatherForecasts()
{
var rng = new Random();
return Enumerable.Range(1, 5).Select(index => new WeatherForecast
{
Date = DateTime.Now.AddDays(index),
TemperatureC = rng.Next(-20, 55),
Summary = Summaries[rng.Next(Summaries.Length)]
});
}
}Apply role-based authentication in the Blazor page.
Use the @attribute directive with the [Authorize] attribute in a Blazor page to restrict the user access to specific pages.
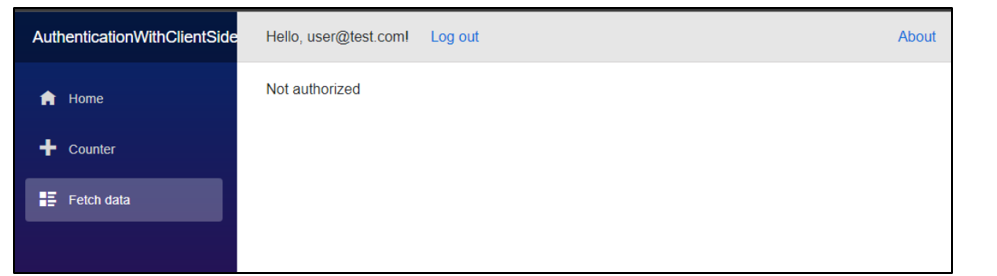
The following code allows the admin user alone to see the fetchdata page.@page "/fetchdata"
@attribute [Authorize(Roles = "Admin")]
@using BlazorAuthorization.Shared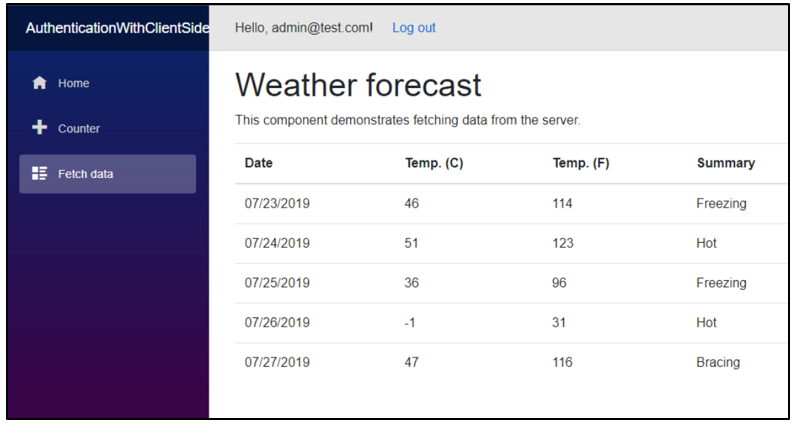
When we log in using accounts other than admin, we are unable to load the fetchdata page.
We can also add role-based authorization using the AuthorizeView component in the Index.razor page as shown in the following code.
<AuthorizeView Roles="User">
<p>You can only see this if you satisfy the IsUser policy.</p>
</AuthorizeView>
<AuthorizeView Roles="Admin">
<p>You can only see this if you satisfy the IsAdmin policy.</p>
</AuthorizeView>The output text is shown according to the accounts (admin/user) the user is signed in as.
Refer to this link for further information about role-based authorization in Blazor WebAssembly.
| Add – Migration SeedRoles Update-Database |
public async Task<IActionResult> Login([FromBody] LoginModel login)
{
 …………….. .
 var user = await _signInManager.UserManager.FindByEmailAsync(login.Email);
             var roles = await _signInManager.UserManager.GetRolesAsync(user);
             var claims = new List<Claim>();

             claims.Add(new Claim(ClaimTypes.Name, login.Email));

              foreach (var role in roles)
             {
                 claims.Add(new Claim(ClaimTypes.Role, role));
             }
 …………….. . .
}Google authentication is a process by which the user can use their Google accounts to get authorized to access particular data. Follow this procedure to implement Google authentication.
- Prerequisites
- Visual Studio latest version
- .NET Core SDK latest version.
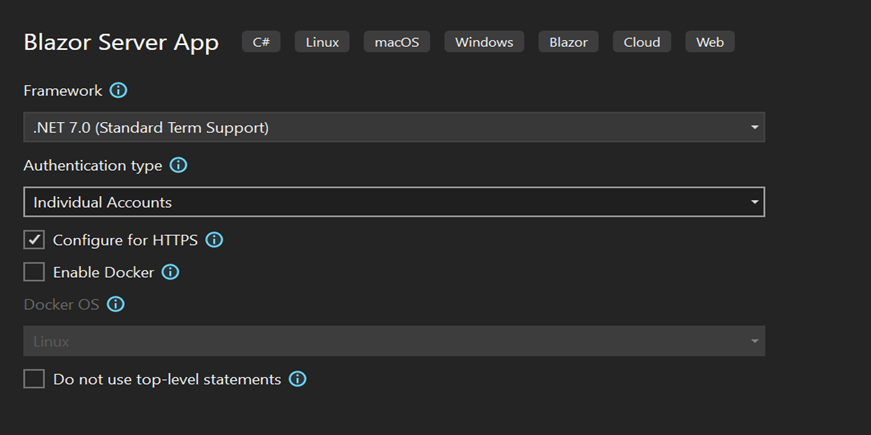
Create a Blazor Server app with the latest .NET support.
Set the Authentication Type as Individual Accounts and then click Create.
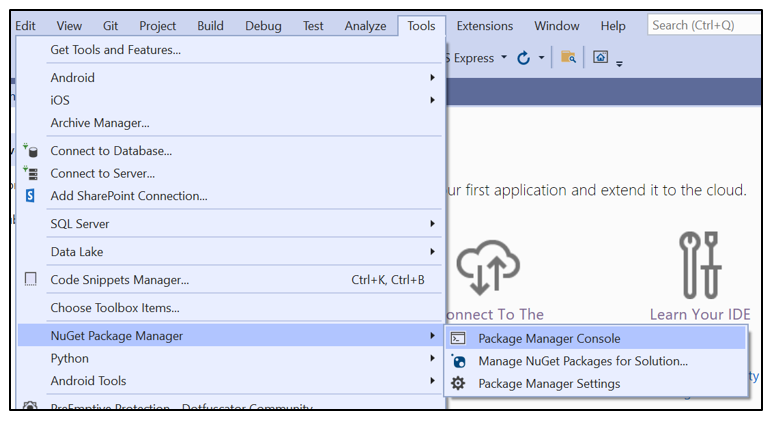
Go to Tools > NuGet Package Manager > Package Manager Console. Before running the app, we have to perform migration by running the following command in the Package Manager Console.
To create a Google API Console project, follow these steps.
Go to https://developers.google.com/identity/sign-in/web/sign-in#before_you_begin.
Click the Credentials page link under the topic “Create authorization credentials.” Sign in with your Google account and create a project by providing a project name.
Click Create Credentials and select OAuth client ID.

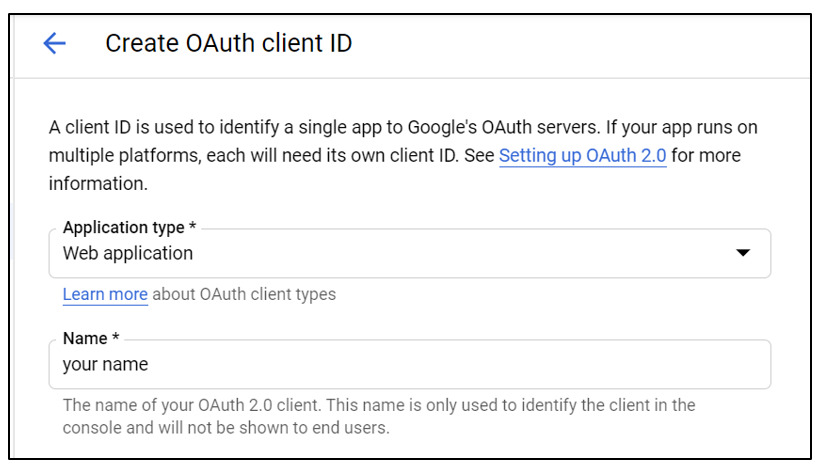
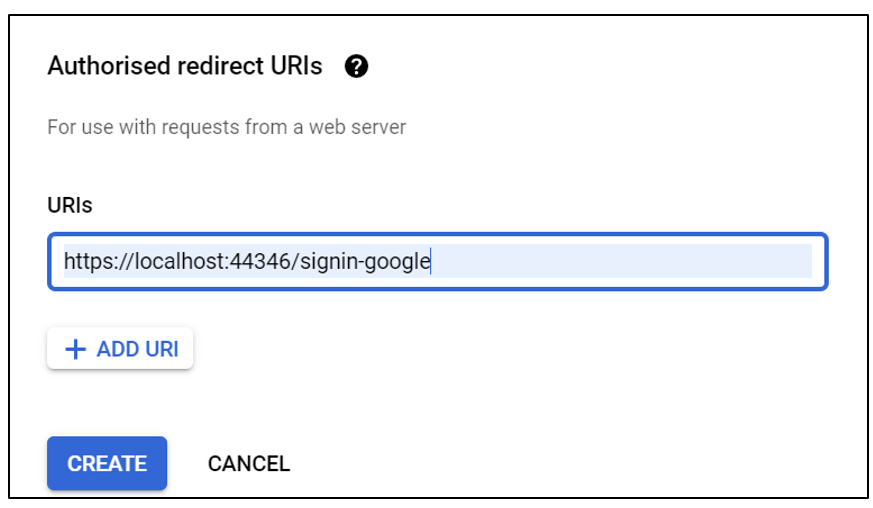
Select the Application type and type the name of the OAuth ID and the redirect URI (localhost URL given to enable SSL in your app) as shown.
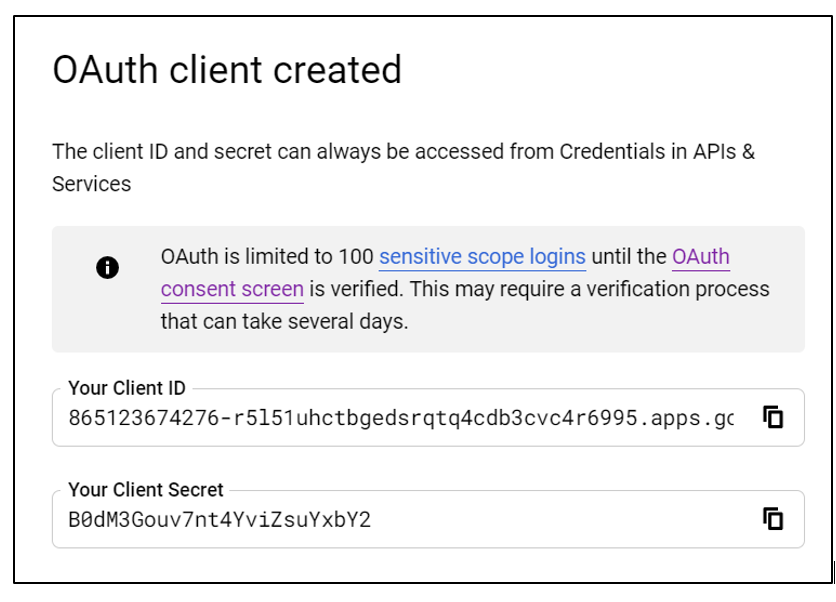
Click Create and note your client ID and client secret, which are important for Google authentication.
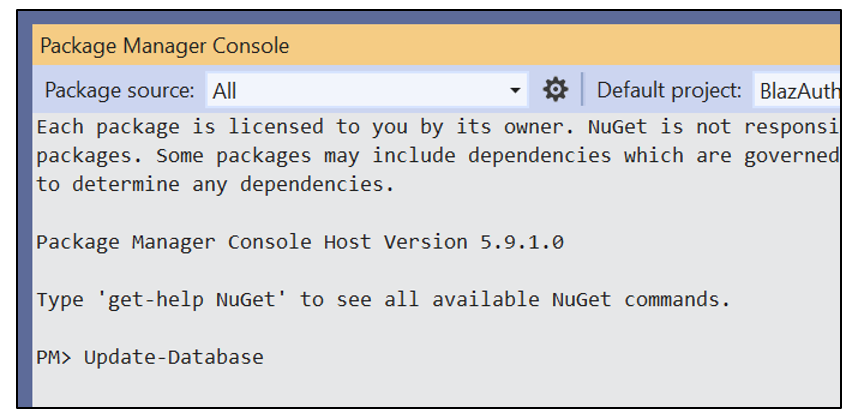
| Update-Database |
To configure a Google API Console project, check whether SSL is enabled by right-clicking the project name, selecting Properties, and selecting the Debug property. I need this URL for configuration.
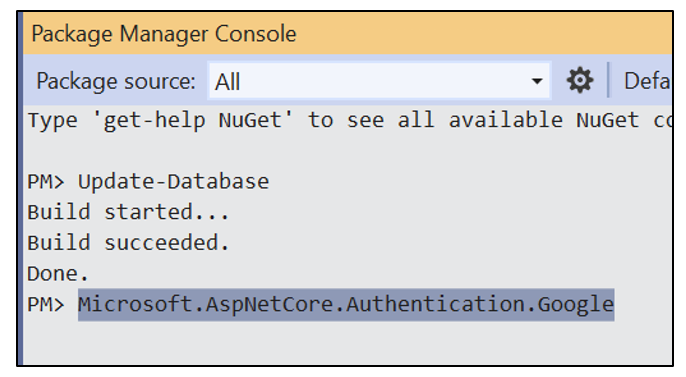
Install the Google Authentication middleware NuGet package by typing the following command in the Package Manager Console.
| NuGet\Install-Package Microsoft.AspNetCore.Authentication.Google -Version 7.0.9 |
Configure the Blazor app to use Google authentication. Right-click the project, select Manage User Secrets, and type the following code.
{  "Authentication:Google:ClientId": "your Google client ID",
   "Authentication:Google:ClientSecret": "your Google client secret"}
Open the Program.cs file and add the following code under the ConfigureServices method.
builder.Services.AddAuthentication().AddGoogle(googleOptions =>
{
	googleOptions.ClientId = "Authentication:Google:Your Google ClientId";
	googleOptions.ClientSecret ="Authentication:Google:Your Google ClientSecret here";
});
Note the following about this code:
The AddGoogle() method is used to configure the authentication process in our application.
- ClientID and ClientSecret will be read from the secrets.json file by the code.
Add Google authorization to the Blazor page.
Use the Authorize attribute by using the @ directive in a Blazor page to restrict unauthorized users.
 @page "/fetchdata"
 @attribute [Authorize]
@using Microsoft.AspNetCore.Authorization The following image shows the output after running the application.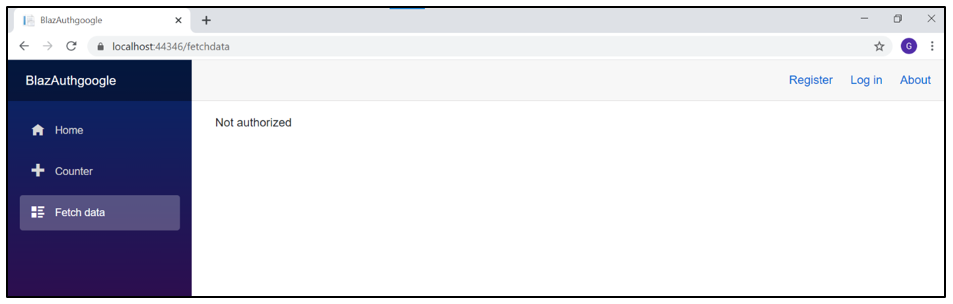
The following image shows the output after clicking Login to navigate to the authorization page.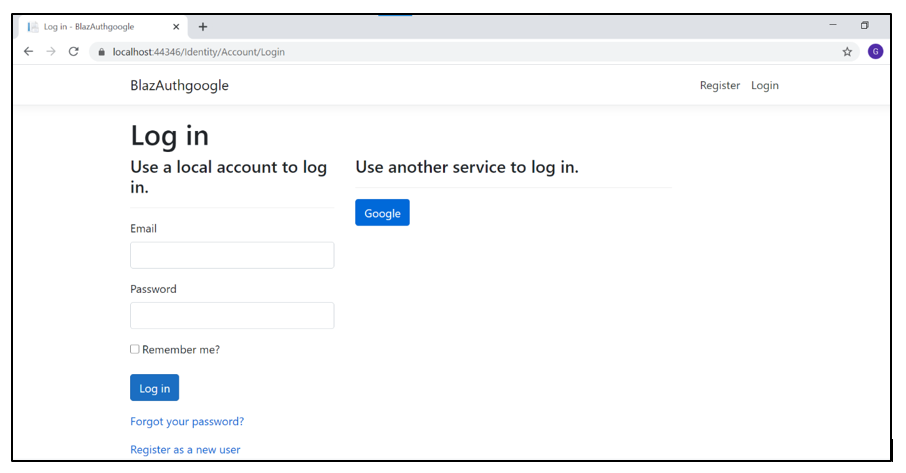
The following image shows the output after the user is authorized using their Google account.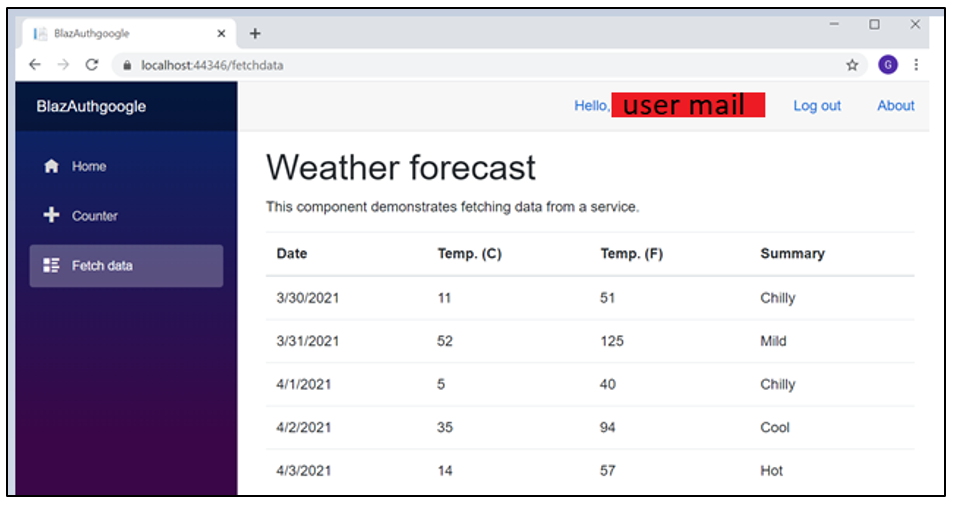
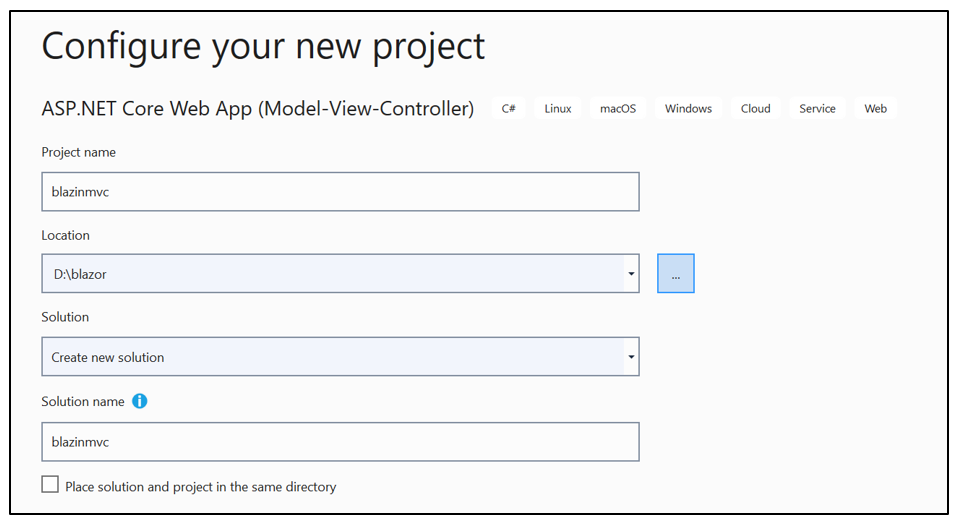
Blazor applications are component-based. Blazor components can be used in existing ASP.NET MVC applications. Follow these steps to learn how Blazor components are used in the view page of an MVC application.
- Prerequisites:
- Visual Studio 2019
- .NET Core 3.1
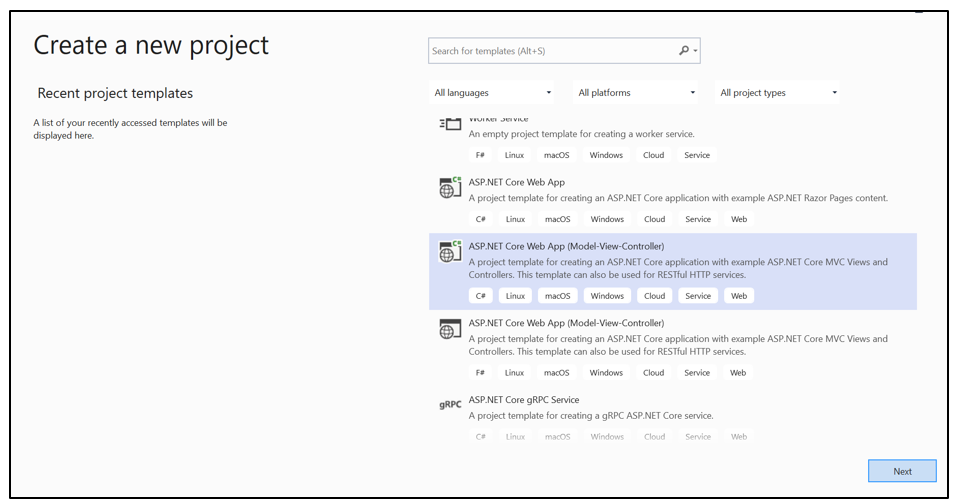
- Create a ASP.NET MVC application.
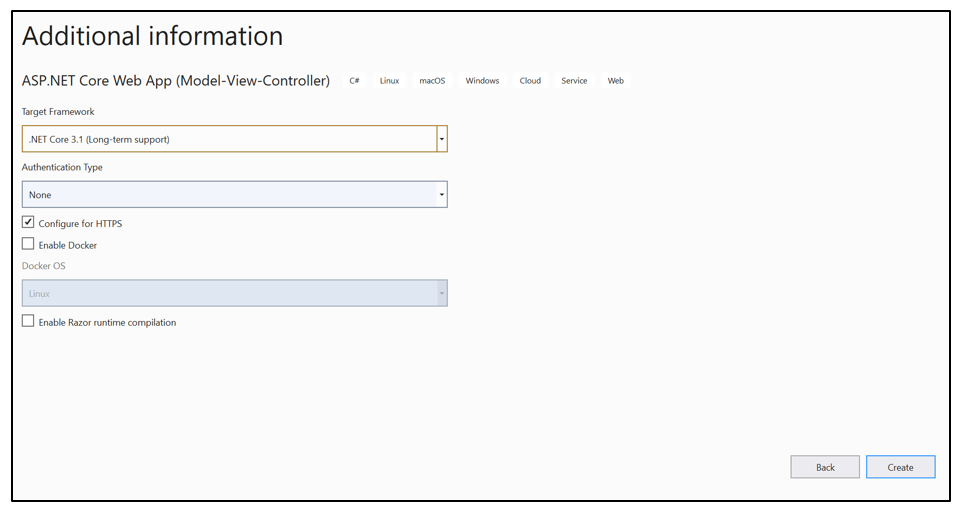
Open Visual Studio 2019 and select ASP.NET Core Web App (Model-View-Controller) in the Create a new project page and configure the project as shown.
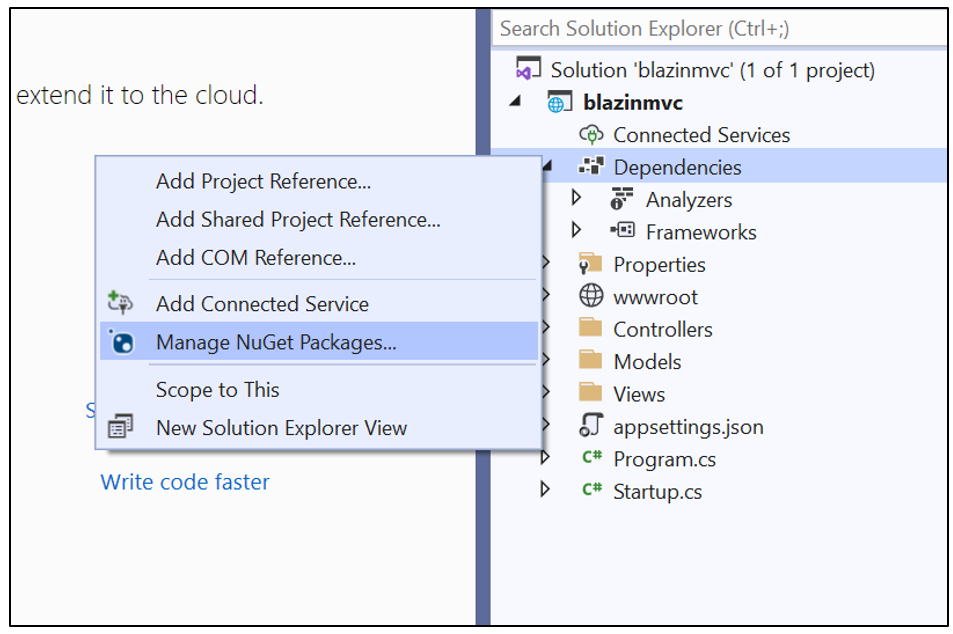
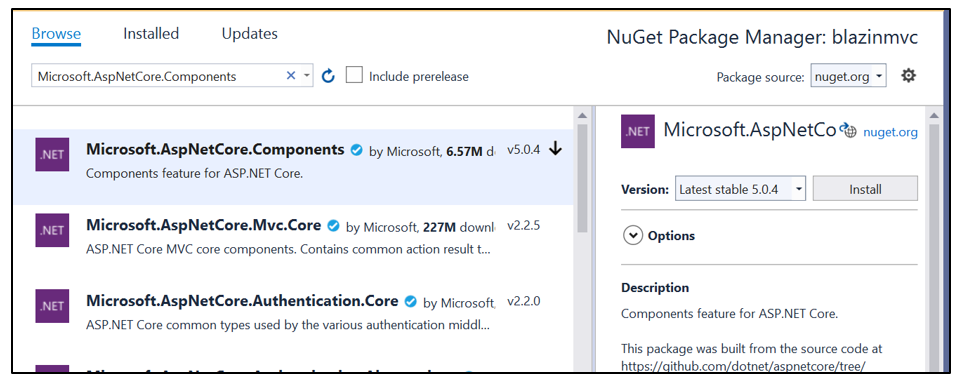
Add the reference Microsoft.AspNetCore.Components in your dependencies.
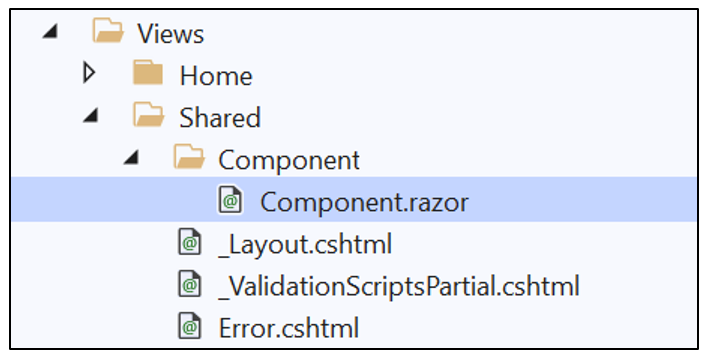
Add the Blazor component folder in the View/Shared folder.
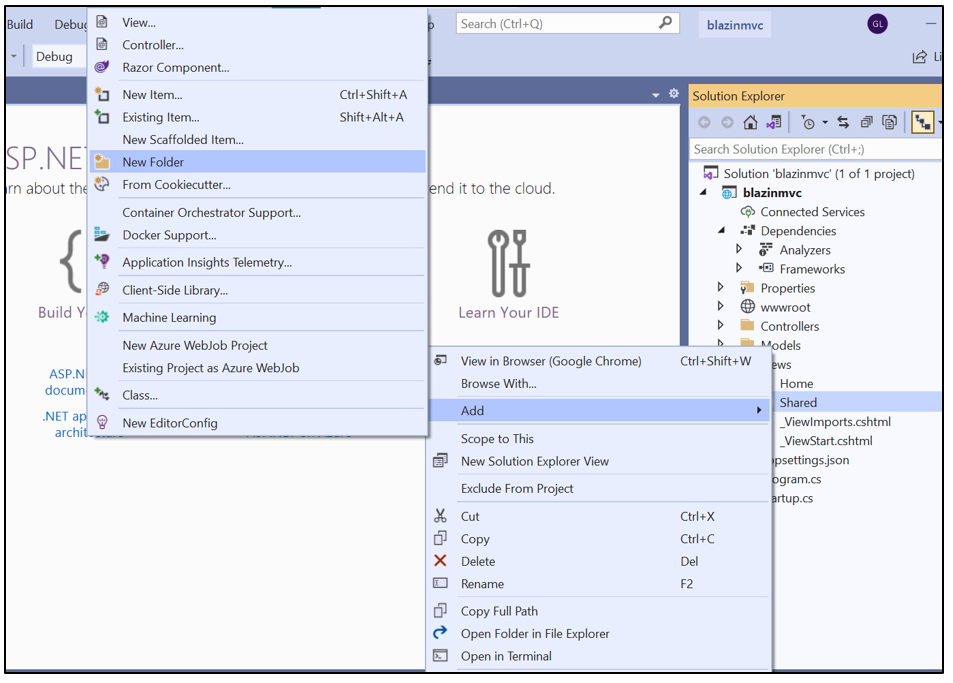
Then add a Razor component inside the Component folder.
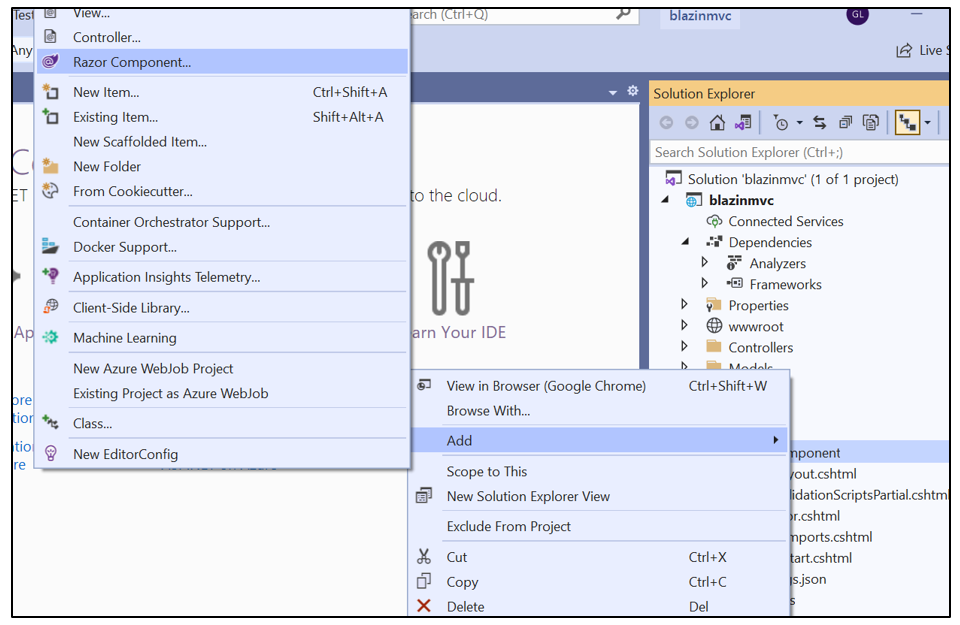
Add the following code to the created Component.razor file.
@using Microsoft.AspNetCore.Components
     <h3>Blazor Component in MVC</h3>
     <button @onclick="Test" class="btn btn-dark">Click to get answer</button>
     <br />
     <div >@Data </div>
 @code {
     [Parameter]
     public string Data { get; set; } = string.Empty;
        private void Test()
     {
         Data = "Button Clicked";
     }
 }
Add the script reference to the _Layout.cshtml file.
<base href="~/" />
<script src="_framework/blazor.server.js"></script>
Create an _Imports.razor file in the Component folder and add the following namespaces to the _Imports.razor file to access component features over your components in the application.
@using System.Net.Http
@using Microsoft.AspNetCore.Authorization
@using Microsoft.AspNetCore.Components.Authorization
@using Microsoft.AspNetCore.Components.Forms
@using Microsoft.AspNetCore.Components.Routing
@using Microsoft.AspNetCore.Components.Web
@using Microsoft.JSInterop
@using System.IO
Add services.AddServerSideBlazor() under the ConfigureServices method and add endpoints.MapBlazorHub(); under the Configure method in the Startup.cs file.
………………… . .
namespace blazinmvc
{
     public class Startup
     {
         ……………… . .

         public void ConfigureServices(IServiceCollection services)
         {
             services.AddServerSideBlazor();
             services.AddControllersWithViews();
         }
         public void Configure(IApplicationBuilder app, IWebHostEnvironment env)
         {            …………….. . .
             app.UseEndpoints(endpoints =>
             {
                 endpoints.MapControllerRoute(
                     name: "default",
                     pattern: "{controller=Home}/{action=Index}/{id?}");
                 endpoints.MapBlazorHub();
             });
         }
     }
 }
To render components on the View page, add the following code in the Index.cshtml page in the Views folder.
@{
     ViewData["Title"] = "Home Page";
 }
<div >
@(await Html.RenderComponentAsync<blazinmvc.Views.Shared.Component.Component>(RenderMode.ServerPrerendered,new {  Data= " Hello World " }))
 </div>
Run the application.

After button click

In the component page, we use the button to change the text defined in the Index.cshtml page inside the component rendering. Clicking the button will change the text shown on the Home page.
Since there is no built-in functionality for saving files in Blazor, it is necessary to write the function in JavaScript and then invoke the JavaScript function from C# code in Blazor. In this solution, we have used JavaScript interop for file saving and generation in client-side Blazor.
Create a new JavaScript file, saveFile.js, in the wwwroot folder and add the following code.
[saveFile.js]function saveFile(file, Content) {
var link = document.createElement('a');
link.download = name;
link.href = "data:text/plain;charset=utf-8," + encodeURIComponent(Content)
document.body.appendChild(link);
link.click();
document.body.removeChild(link);
}Reference the new script file in the index.html page as shown.
[index.html]<body>
………………………… . .
<script src="_framework/blazor.webassembly.js"></script>
<script src="saveFile.js"></script>
</body>Invoke the JavaScript function in a new Razor page.
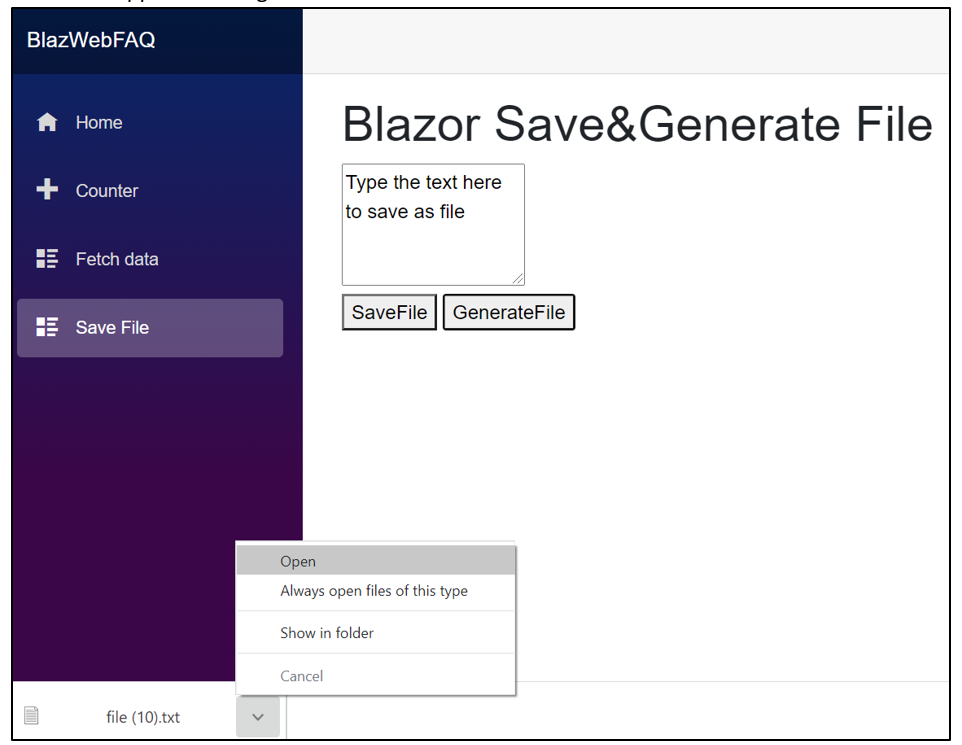
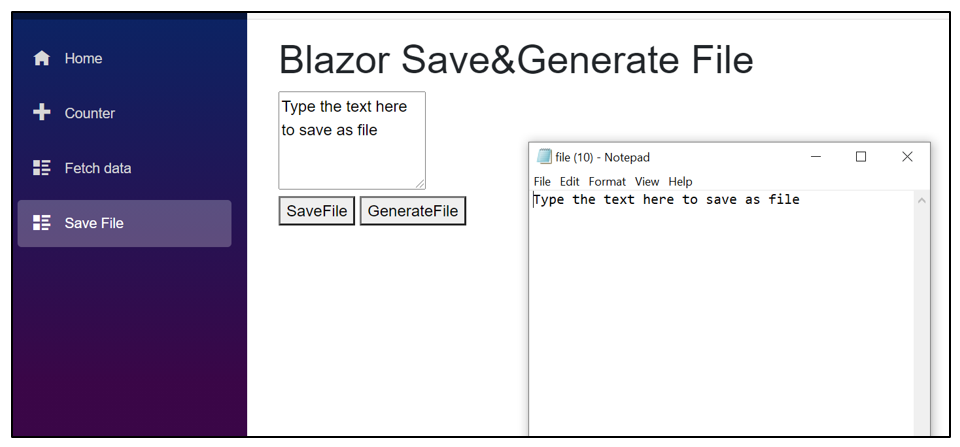
[Savefile.razor]page "/savefile"
@inject IJSRuntime JSRuntime
<h1>Blazor Save & Generate File</h1><textarea @bind="fileContent"
style="width:150px;height:100px" />
<button @onclick="SaveFile">SaveFile</button>
<button @onclick="DownloadFile">GenerateFile</button>
@code {
string Content;
string fileContent;
string fileName = "file.txt";
public void SaveFile()
{
Content = fileContent;
}
public async void DownloadFile()
{
await JSRuntime.InvokeAsync<object>("saveFile",fileName,Content);
}
}Run the app. Save and generate the file in text format.
 View Sample in GitHub
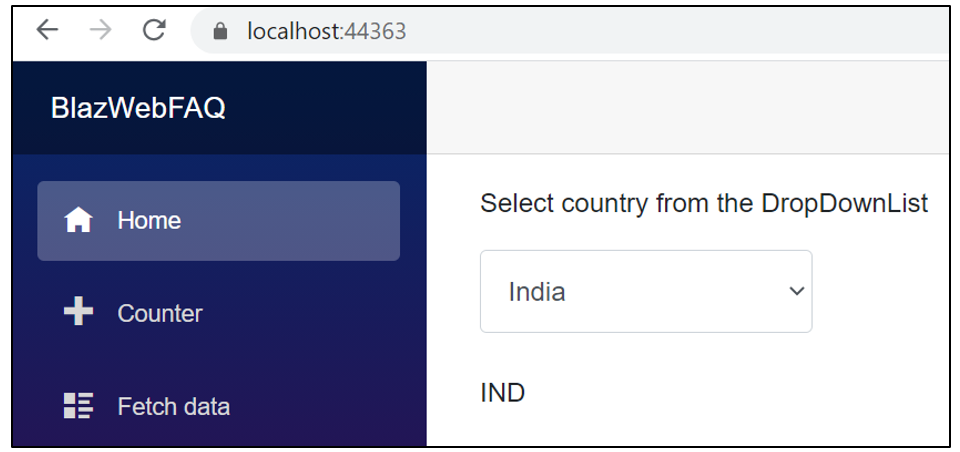
We can bind a drop-down list in Blazor WebAssembly using the <select> tag and bind the values to the drop-down list using the @bind attribute in the tag. In the following code example, we have bind a country list along with its country codes. On changing the dropdown list, the codes corresponding to the country will appear below.
[Index.razor]
@page "/"

<p>Select country from the DropDownList</p>

<select class="form-control" @bind="@SelectedCountryID">

        @foreach (var country in CountryList)
        {
            <option value="@country.Code"> @country.Name </option>
        }

</select>
<br/>
    <p>@SelectedCountryID</p>

    @code {

        string selectedCountryID;

        string SelectedCountryID
        {
            get => selectedCountryID;
            set {selectedCountryID = value;}
        }

        List<Country> CountryList = new List<Country>() { new Country ("IND", "India"),new Country ("USA", "United States"),new Country ("UK", "United Kingdom")};

        public class Country
        {

            public Country(string code, string name)
            {
                Code = code;
                Name = name;
            }
            public string Code { get; set; }
            public string Name { get; set; }

        }
    }
Note: We also have our Syncfusion Dropdown List component. Please refer to the demo link for more information about our product.
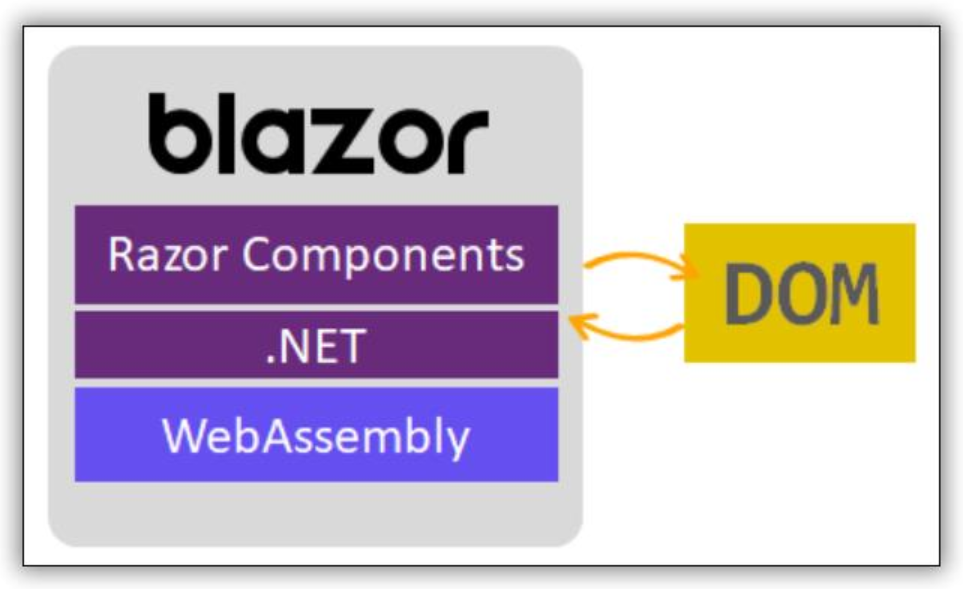
Permalink- Blazor WebAssembly can run client-side C# code directly in the browser.
- The Blazor application, as well as its dependencies and the .NET runtime, are all downloaded to the browser.
- The application runs on the browser’s UI thread directly. The same method handles both UI notifications and event management.
- We can re-use code and libraries from the server-side parts of the application while .NET runs on WebAssembly.
Unit testing is a level of software testing that is used by developers to ensure that the implemented logic meets the requirements and behaves as expected. The following example uses the bUnit testing library for Blazor components to write comprehensive and stable unit test cases. It allows you to write test cases in C# or Razor syntax to verify outcomes with semantic HTML diffing and comparison logic.
Create a simple Blazor Server/WebAssembly application.
In Visual Studio 2019, right-click on the project solution and select the Add > New Project option.
Select NUnit Test Project (.NET Core) and click Next button.
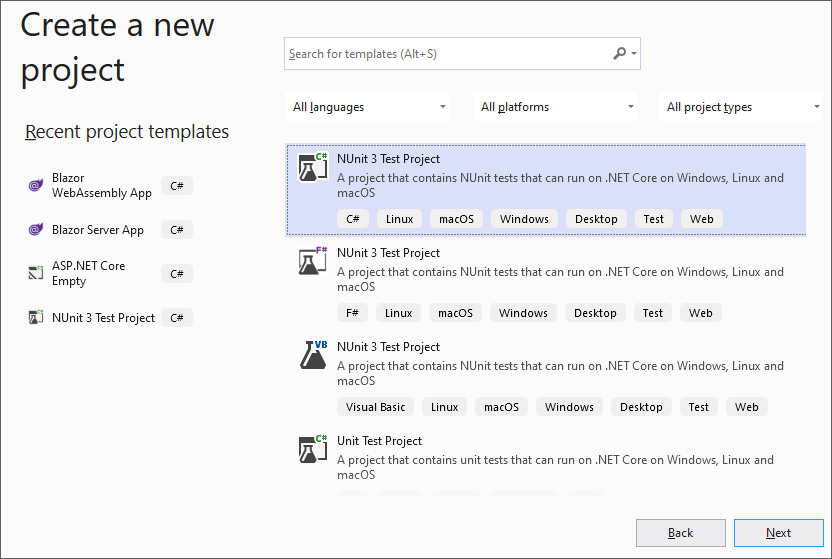
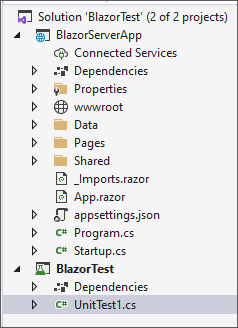
Enter the project name and then click Create button. The created project will be displayed like the following.
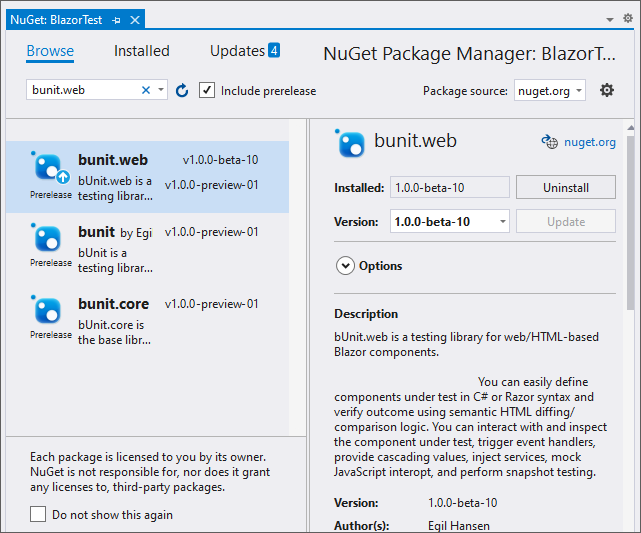
Open the NuGet manager for BlazorTest and search with the keyword bunit.web. The result will be displayed as seen in the following screenshot. Select bunit.web and install it.
Right-click on BlazorTest project dependencies and add the project reference BlazorServerApp.
Now, write a test case for a Razor component.
Add a Razor component to your Blazor project.
[Index.razor]
[Index.razor]
 @page "/"

 <h3>Hello World</h3>

 <button class="btn btn-primary" @onclick="OnButtonClick">Ping Me</button>

 @if (IsVisible)
 {
     <h5>Blazor component is clicked.</h5>
 }

 @code {

     public bool IsVisible { get; set; }
     protected void OnButtonClick()
     {
         IsVisible = true;
     }
 }
Add the following test cases in your created test project file [UnitTest1.cs] to test the Blazor components.
[UnitTest1.cs]
[UnitTest1.cs]
using NUnit.Framework;
using Bunit;
namespace TestProject1
{
public class Tests
{
[SetUp]
public void Setup()
{
}
[Test]
public void Test1()
{
// Arrange
using var context = new Bunit.TestContext();
// Act
var cut = context.RenderComponent<BlazorServerApp.Pages.Index>();
cut.Find("button").Click();
// Assert
cut.Find("h5").MarkupMatches("<h5>Blazor component is clicked.</h5>");
}
}
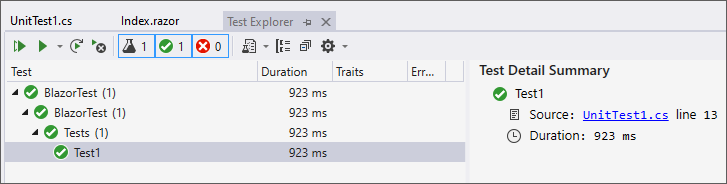
} Then select the View > Test Explorer options in Visual Studio 2019 and run the test.
Now you will see the list of test methods. The test run is successful, and the test case passes. You can also alter the test case if it fails.
Refer to “Unit test a Blazor component” for more details and download the sample here.
PermalinkIn the following example, the cookie consent banner temple will display to notify you to accept cookies. Follow the below steps to create a consent cookie in Blazor.
1. Configure the HttpContextAccessor and CookiePolicyOptions to the Program.cs file to create a consent cookie.
[Program.cs]
builder.Services.Configure<CookiePolicyOptions>(options =>
{
    options.CheckConsentNeeded = context => true;
    options.MinimumSameSitePolicy = SameSiteMode.None;
});
builder.Services.AddHttpContextAccessor();
var app = builder.Build();
app.UseCookiePolicy();
2. Now, add the Cookie consent banner template as a Razor component under the Shared folder.
[ConsentCookie.razor]
@using Microsoft.AspNetCore.Http.Features
@using Microsoft.AspNetCore.Http

@inject IHttpContextAccessor Http
@inject IJSRuntime JSRuntime


@if (showBanner)
{
    <div id="cookieConsent" class="alert alert-info alert-dismissible fade show" role="alert">
        Consent to set cookies.
        <button type="button" class="accept-policy close" data-dismiss="alert" aria-label="Close" data-cookie-string="@cookieString" @onclick="AcceptMessage">
            Accept Cookie
        </button>
    </div>
}
@code {
    ITrackingConsentFeature consentFeature;
    bool showBanner;
    string cookieString;

    protected override void OnInitialized()
    {
        consentFeature = Http.HttpContext.Features.Get<ITrackingConsentFeature>();
        showBanner = !consentFeature?.CanTrack ?? false;
        cookieString = consentFeature?.CreateConsentCookie();
    }

    private void AcceptMessage()
    {
        // JsInterop call to store the consent cookies.
        JSRuntime.InvokeVoidAsync("CookieFunction.acceptMessage", cookieString);
    }
}
3. Add the JavaScript function in the _Layout.cshtml/_Host.cshtml/index.cshtml file to store the cookie.
[_Layout.cshtml]/_Host.cshtml/index.cshtml
<body>
      . . .
      . . .

      <script>
        window.CookieFunction = {
            acceptMessage: function (cookieString) {
                document.cookie = cookieString;
            }
        };
   </script>
</body>
4. Refer to the cookie consent banner template Razor component in the MainLayout.razor file.
[MainLayout.razor]
<main>
	<div class="top-row px-4">
		<ConsentCookie />
    </div>
	<article class="content px-4">
		@Body
    </article>
</main>
5. Run the application, and you will find the consent cookie banner.
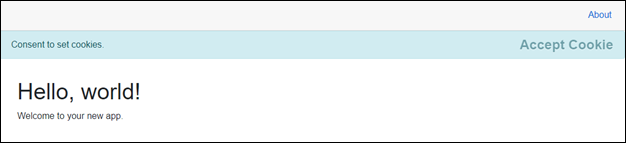
6. Now, click the Accept cookie button to store the cookie in the browser.

Follow these steps to create a Blazor WebAssembly (client-side) application using a command-line interface (CLI).
Create a Blazor WebAssembly App in CLI
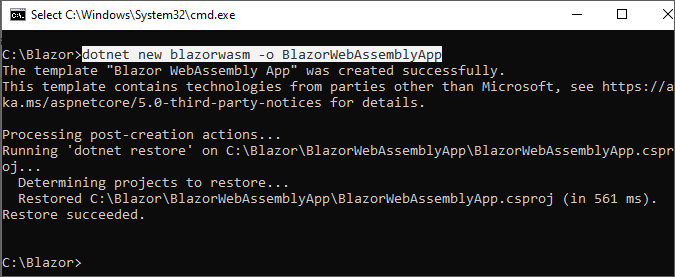
Open a command prompt where you want your project to be located and run the following command.
| dotnet new blazorwasm -o BlazorWebAssemblyApp |
Navigate to Blazor WebAssembly App
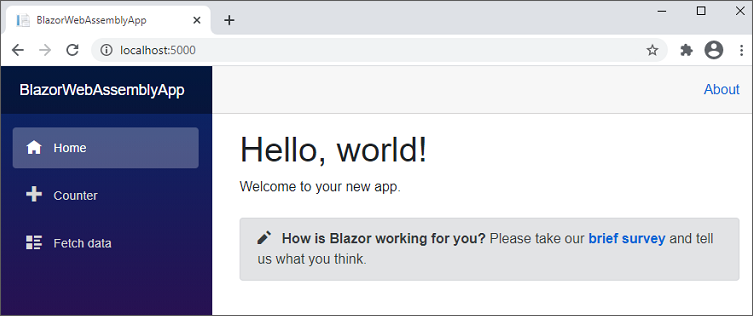
Run the cd BlazorWebAssemblyApp command to navigate to the BlazorWebAssemblyApp folder.
Run the application
The dotnet run command runs the application. See the following output in the default browser.
Note: If you have installed multiple SDK versions and need a specific framework version (e.g., net5.0, netcoreapp3.1) project, then add the -f flag to the dotnet new blazorwasm command. Refer here for the available flag options.
PermalinkFollow these steps to create a Blazor Server application using a command-line interface (CLI).
Create a Blazor Server App in CLI
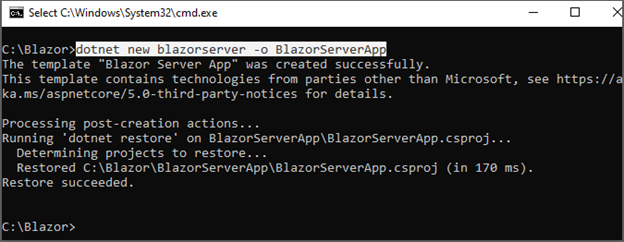
Open a command prompt where you want your project to be located and run the following command.
.NET CLI
| dotnet new blazorserver -o BlazorServerApp |
Navigate to Blazor Server App
Run the cd BlazorServerApp command to navigate to the BlazorServerApp folder.
Run the apllication.
The dotnet run command runs the application. See the following output in the default browser.

Note: If you have installed multiple SDK versions and need a specific framework version (e.g., .net7.0) project, then add the -f or –framework flag to the dotnet new blazorserver command.
.NET CLI
| dotnet new blazorserver -o BlazorServerApp –framework net6.0 |
Refer to this documentation for more details.
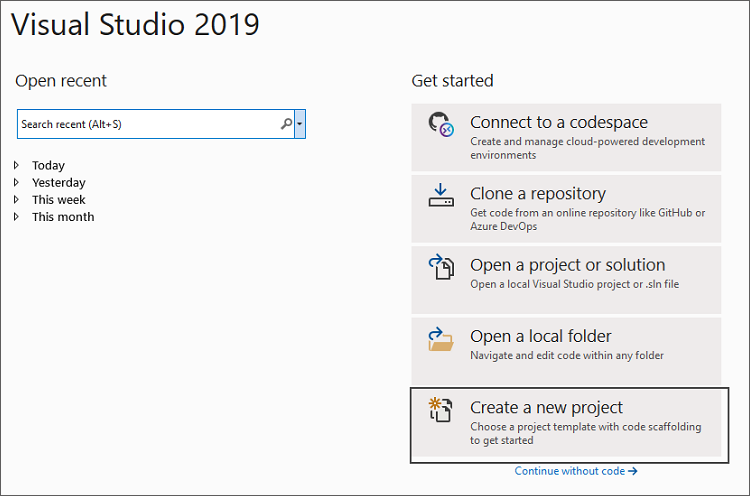
PermalinkFollow the step-by-step procedure below to create a Blazor Server Application in Visual Studio 2019.
Download and install Visual Studio 2019
Download and install the latest version of Visual Studio 2019 with the ASP.NET and web development workload.
Create a new project
Open Visual Studio 2019 and click Create a new project.
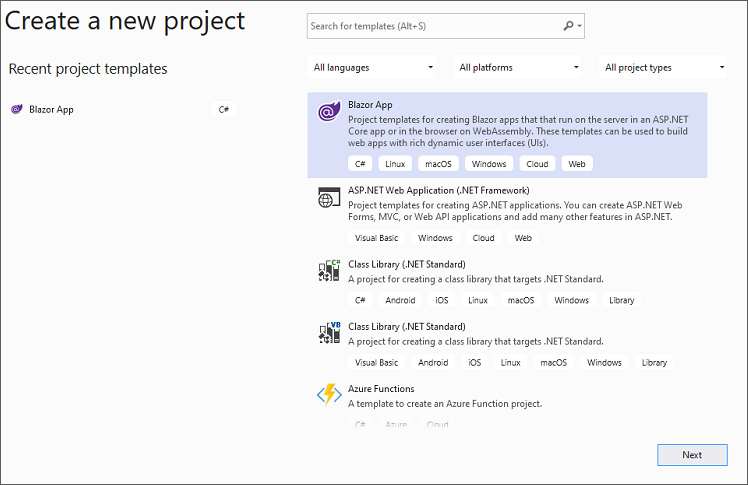
Select Blazor app from the template
Select Blazor App from the template list and click the Next button.
Configuring the project
The project configuration window will pop up. Click the Create button to create a new project with the default project configuration.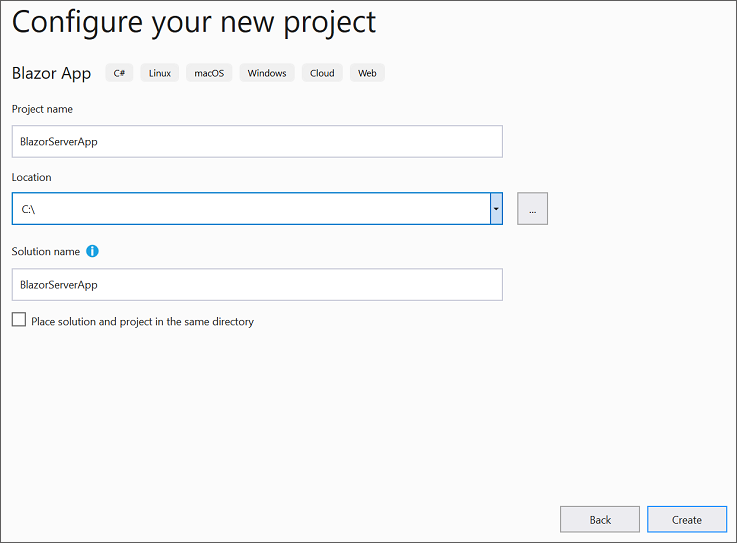
Choose Blazor Server App
Select a target framework based on your requirement, choose the Blazor Server App from the dashboard, and then click Create to create a new Blazor Server application.
Blazor Server App structure
Now the Blazor Server App is created, and the structure look like the following image.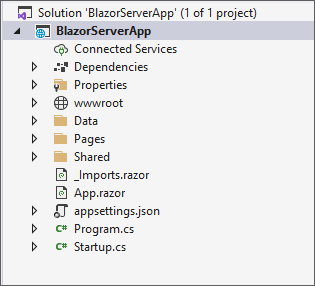
Run the application.
Press Ctrl + F5 to run the application and find the output in default browser.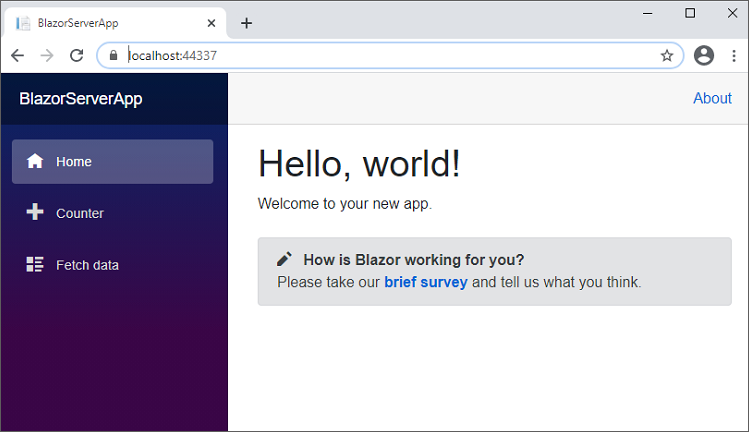
Refer to this link for more details.
PermalinkFollow the step-by-step procedure below to create a Blazor WebAssembly (client-side) application in Visual Studio 2019.
Download and install Visual Studio 2019
Download and install the latest version of Visual Studio 2019 with the ASP.NET and web development workload.
Create a new project
Open Visual Studio 2019 and select Create a new project.

Select Blazor app from the template
Select Blazor App from the template list and click the Next.

Choose Blazor WebAssembly App
Select a target framework based on your requirements, choose Blazor WebAssembly App from the dashboard, and then click Create to create a new Blazor WebAssembly application.
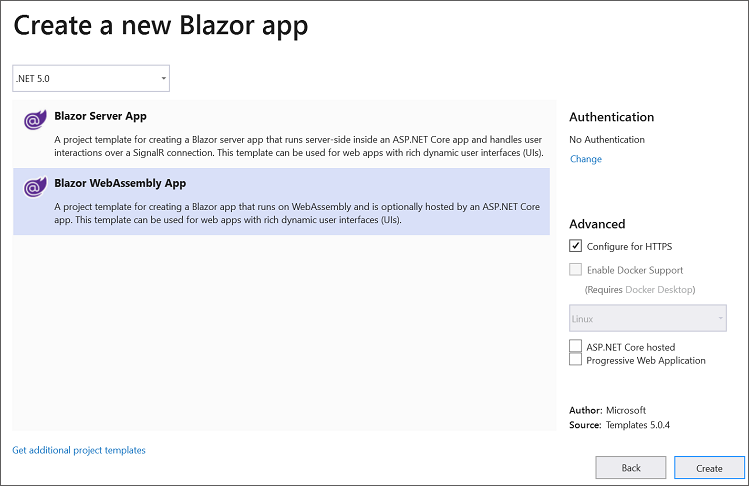
Blazor WebAssembly App structure
Now the Blazor WebAssemblyApp is created, and the structure look like in the below image.
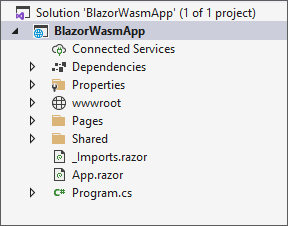
Run the application.
Press ctrl + F5 to run the application and see the below output in default browser.
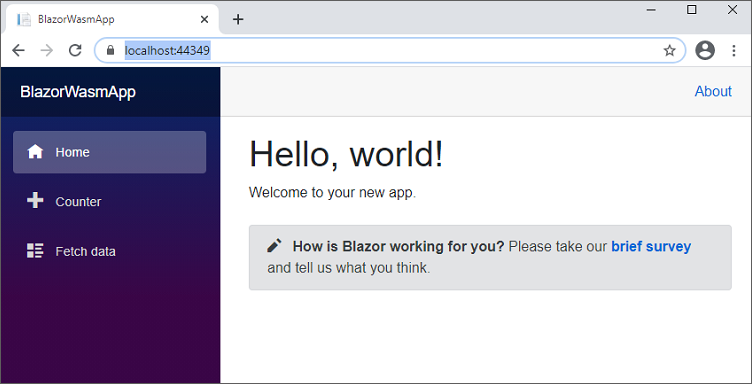
Refer to this link for more details.
PermalinkYes, you can host and deploy the blazor server-side application without using Azure but by using AWS or Firebase. Here you can find the steps for hosting the Blazor application using AWS.
- Create the Blazor application
- Publish the application using the context menu from the Solution in Solution Explorer in Visual Studio.

- Click Publish. If there is no error, your application will be published successfully.
For more details reference the links Host the application to AWS and Host the application to Firebase.
Permalink
