Maintaining more than one calendar is chaos if the appointments aren’t synchronized. With multiple calendars, the probability of scheduling different appointments in the same time solt is quite high. That’s why it’s always better synchronize appointments across calendars. In this blog, I will explain how to synchronize events in the Syncfusion WinUI Scheduler with Microsoft Outlook Calendar.
To do this, we will be using Microsoft Graph, which is the gateway to access the Microsoft APIs and allows developers to integrate their application with Microsoft products like Outlook Calendar.
Let’s get started!
Create a WinUI Scheduler application
- Create a WinUI 3 desktop application.
- Add a reference to the Syncfusion.Scheduler.WinUINuGet package.
- Import the control namespace Syncfusion.UI.Xaml.Scheduler in XAML.
- Finally, initialize the WinUI Scheduler control.
xmlns:scheduler="using:Syncfusion.UI.Xaml.Scheduler"
<scheduler:SfScheduler x:Name="Scheduler"/>
Create an event for the Scheduler
The WinUI Scheduler supports loading any data object to create appointments using the AppointmentMapping property.
Follow these steps to create custom appointments in the Scheduler.
- Create an event model with required fields such as event name, start and end time, etc.
public class Meeting { public string EventName { get; set; } public DateTime From { get; set; } public DateTime To { get; set; } public bool IsAllDay { get; set; } public Brush Background { get; set; } public Brush Foreground { get; set; } public string RRule { get; set; } } - Create events to schedule in the viewmodel class.
public class SchedulerViewModel { public ObservableCollection<Meeting> Meetings { get; set; } public SchedulerViewModel() { Meetings = new ObservableCollection<Meeting>(); this.AddSchedulerEvents(); } /// <summary> /// Method to add events to scheduler. /// </summary> private void AddSchedulerEvents() { var colors = new List<SolidColorBrush> { new SolidColorBrush(Color.FromArgb(255, 133, 81, 242)), new SolidColorBrush(Color.FromArgb(255, 140, 245, 219)), new SolidColorBrush(Color.FromArgb(255, 83, 99, 250)), new SolidColorBrush(Color.FromArgb(255, 255, 222, 133)), new SolidColorBrush(Color.FromArgb(255, 45, 153, 255)), new SolidColorBrush(Color.FromArgb(255, 253, 183, 165)), new SolidColorBrush(Color.FromArgb(255, 198, 237, 115)), new SolidColorBrush(Color.FromArgb(255, 253, 185, 222)), new SolidColorBrush(Color.FromArgb(255, 83, 99, 250)) }; var subjects = new List<string> { "Business Meeting", "Conference", "Medical check up", "Performance Check", "Consulting", "Project Status Discussion", "Client Meeting", "General Meeting", "Yoga Therapy", "GoToMeeting", "Plan Execution", "Project Plan" }; Random ran = new Random(); for (int startdate = -10; startdate < 10; startdate++) { var meeting = new Meeting(); meeting.EventName = subjects[ran.Next(0, subjects.Count)]; meeting.From = DateTime.Now.Date.AddDays(startdate).AddHours(9); meeting.To = meeting.From.AddHours(10); meeting.Background = colors[ran.Next(0, colors.Count)]; meeting.Foreground = GetAppointmentForeground(meeting.Background); this.Meetings.Add(meeting); } } private Brush GetAppointmentForeground(Brush backgroundColor) { var brush = backgroundColor as SolidColorBrush; if (brush.Color.ToString().Equals("#FF8551F2") || brush.Color.ToString().Equals("#FF5363FA") || brush.Color.ToString().Equals("#FF2D99FF")) return new SolidColorBrush(Microsoft.UI.Colors.White); else return new SolidColorBrush(Color.FromArgb(255, 51, 51, 51)); } } - Map the custom event data object properties to the Scheduler by configuring the AppointmentMapping property. Then assign the events from the viewmodel class to the ItemsSourceproperty.
<Grid>
  <Grid.DataContext>
     <local:SchedulerViewModel/>
  </Grid.DataContext>
  <scheduler:SfScheduler x:Name="Scheduler" ItemsSource="{Binding Meetings}">

    <scheduler:SfScheduler.AppointmentMapping>
      <scheduler:AppointmentMapping
            Subject="EventName"
            StartTime="From"
            EndTime="To"
            AppointmentBackground="Background"
            Foreground="Foreground"
            RecurrenceRule="RRule"
            IsAllDay="IsAllDay"/>
    </scheduler:SfScheduler.AppointmentMapping>
  </scheduler:SfScheduler>
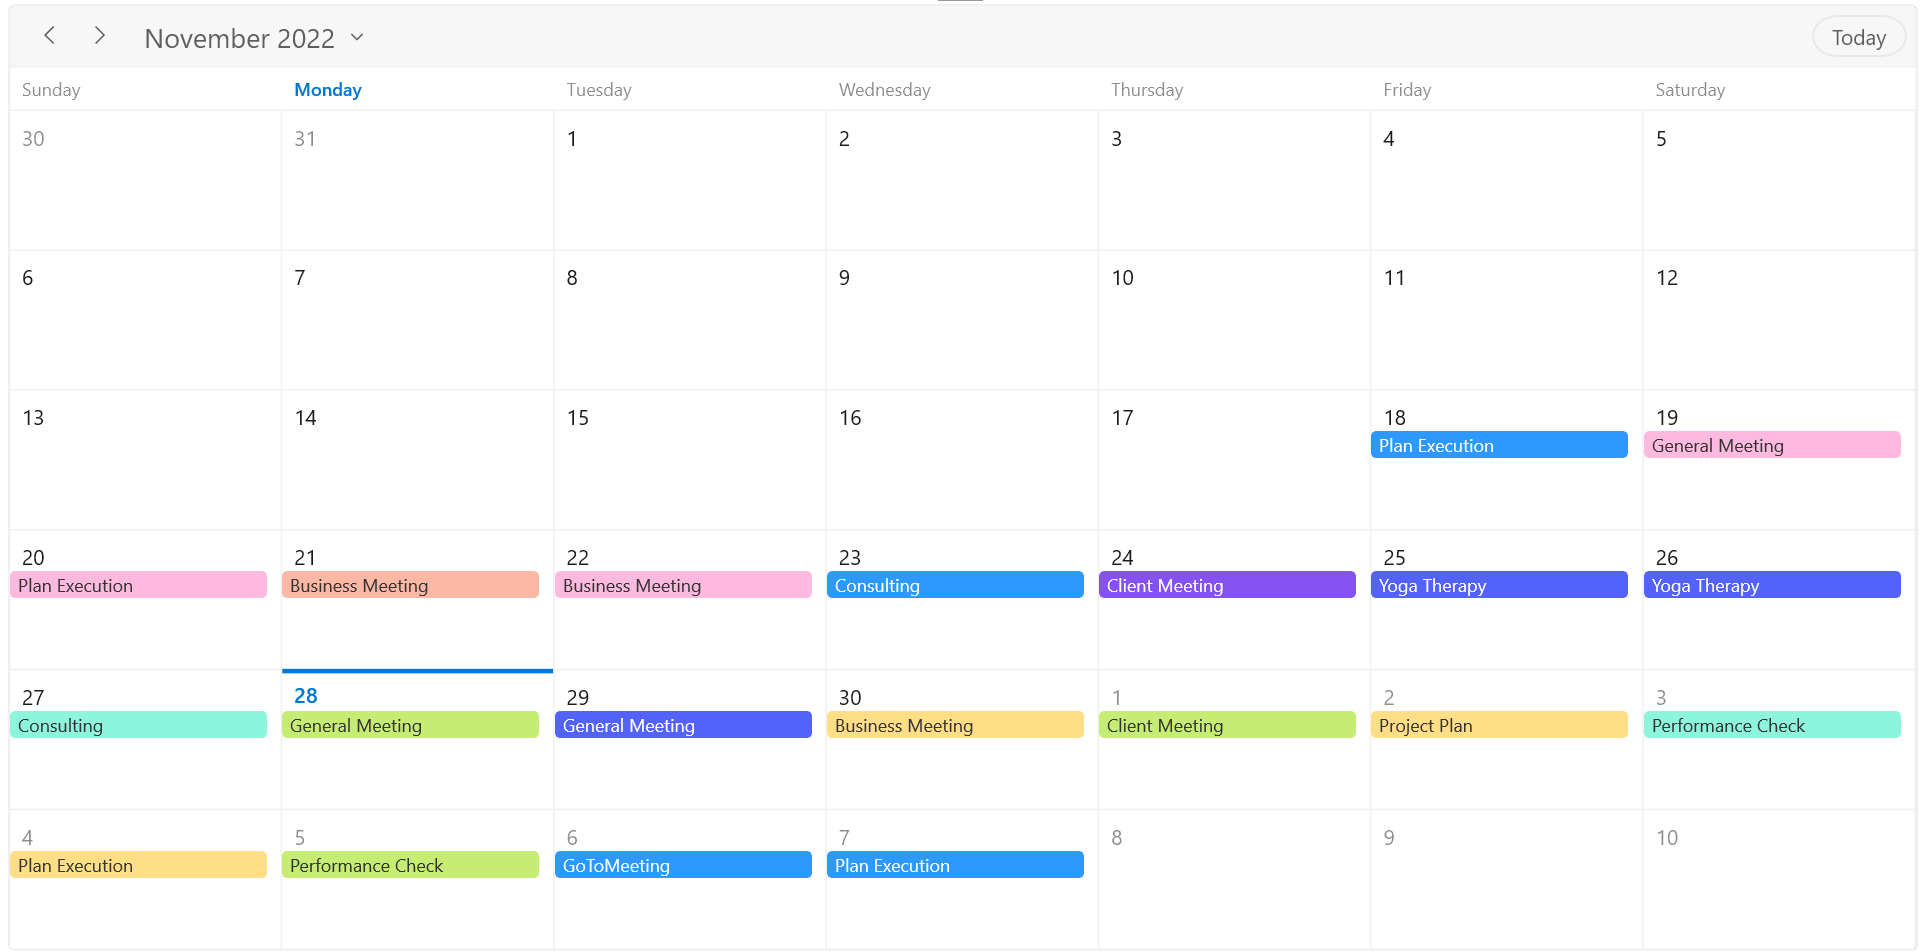
We are done creating a WinUI Scheduler application with custom appointments.
Configure Microsoft Azure AD service
Now let’s look at the steps to configure the settings to read and write calendar data from an Office 365 account. We will connect the WinUI Scheduler application with Microsoft Azure to import and export Syncfusion WinUI Scheduler and Microsoft Calendar events.
Follow these steps to configure the Microsoft Azure AD service.
- Log in to Microsoft Azure and select App registrations.
- In the App registration page, select the New registration option, fill in the Application Name (e.g., Outlook Calendar), and click Register.
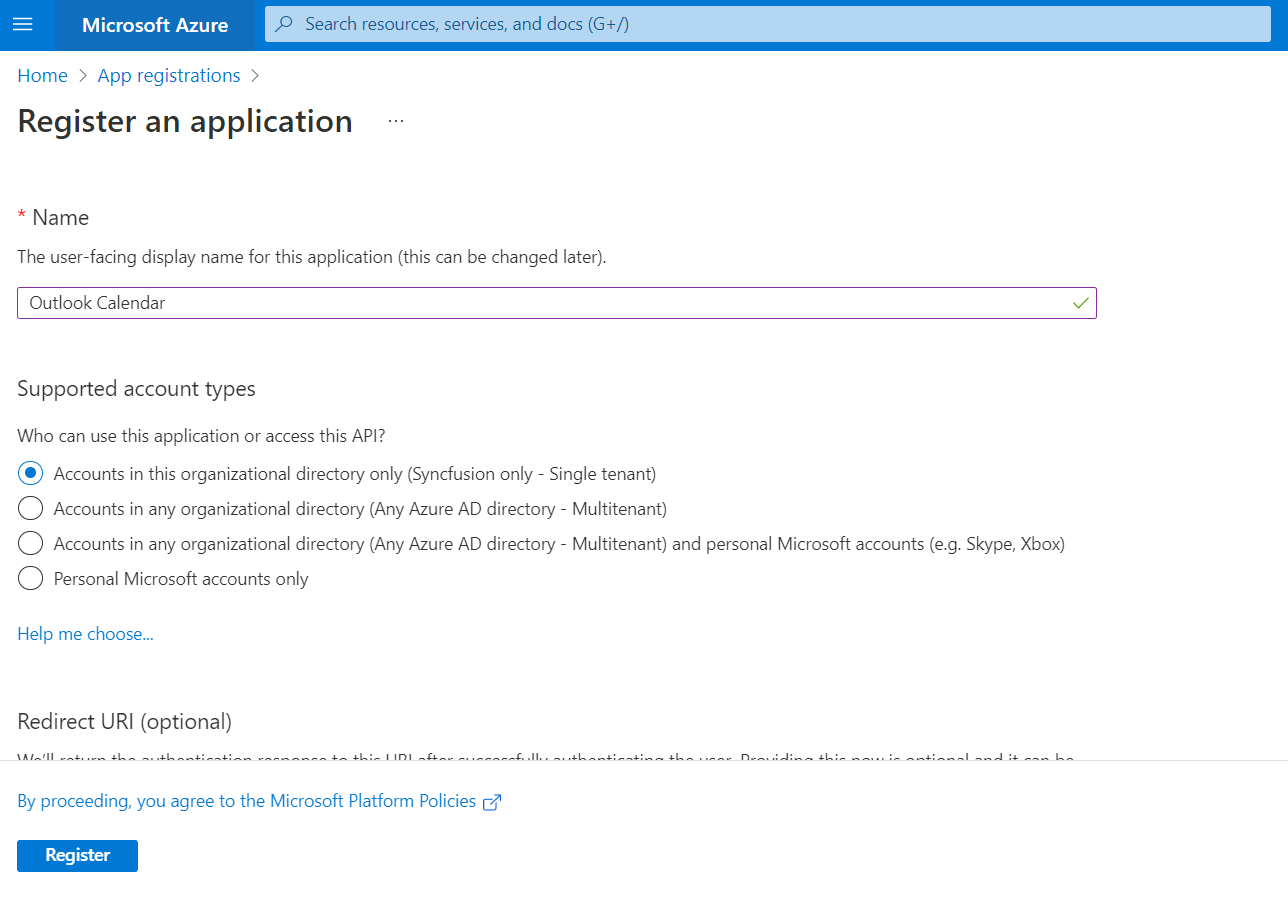
Register Application in Microsoft Azure - Once the application is registered, go to the registered Outlook Calendar Application page, select Authentication > Add Platform, and then select Mobile and desktop applications on the Configure platforms panel.
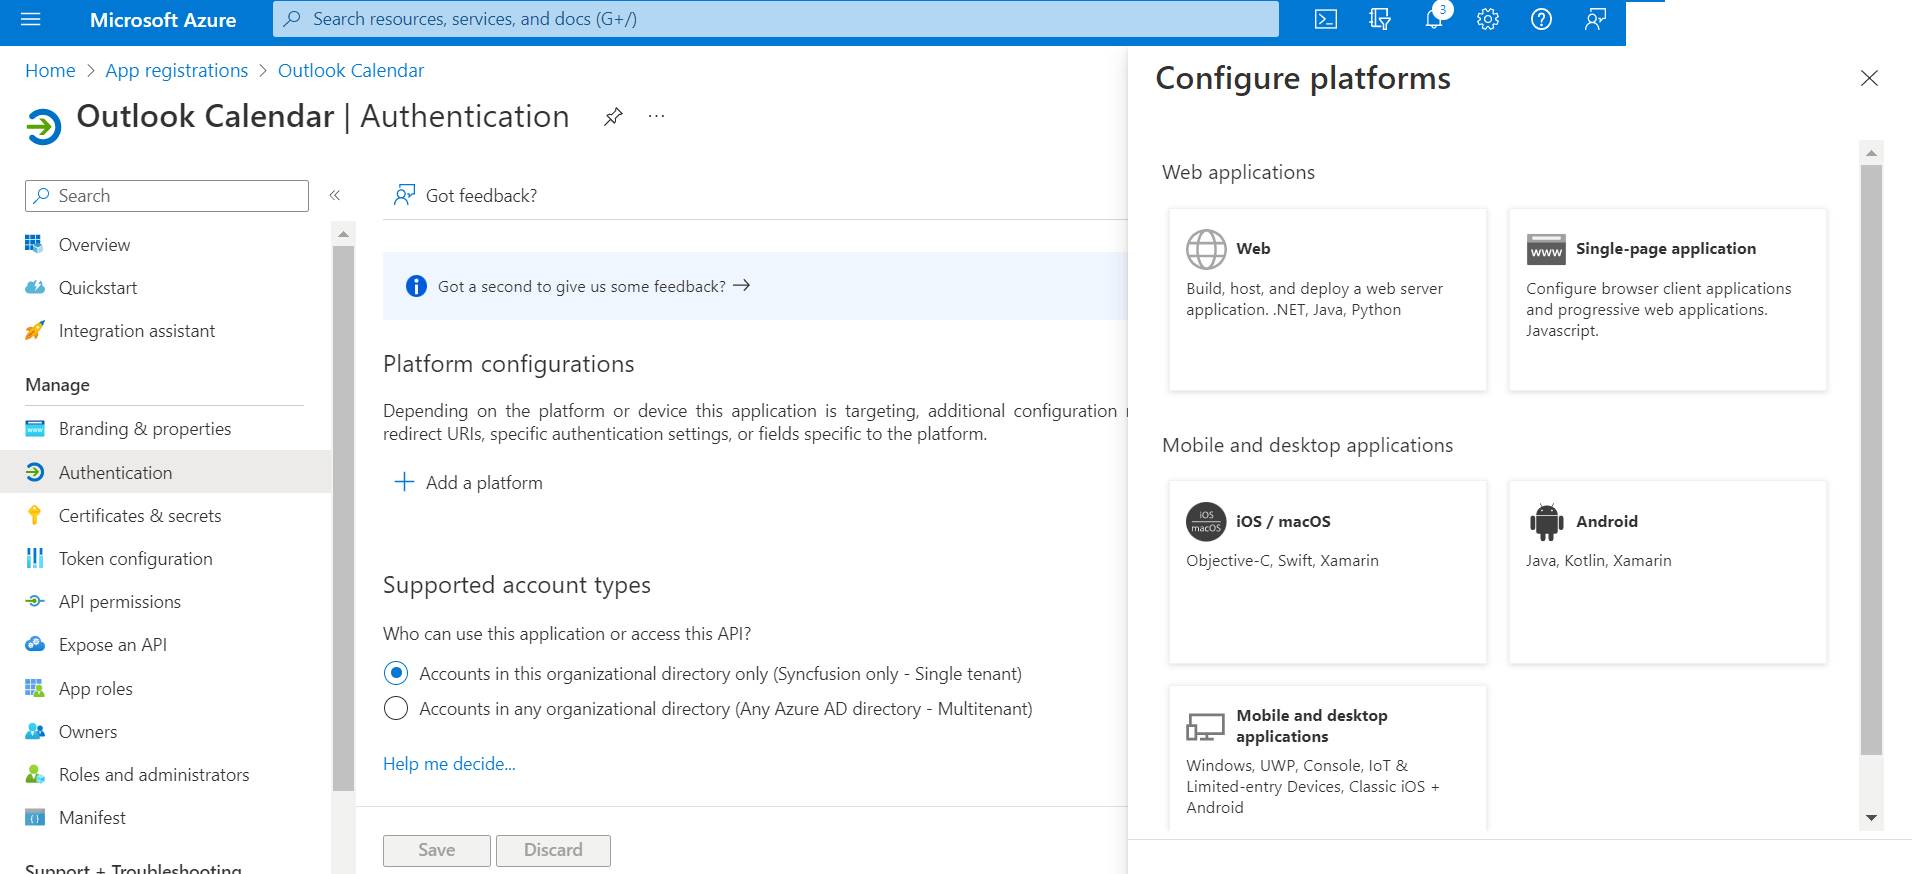
Add Platform for Application Registered - After clicking the platform configuration, select the Redirect URI option and then click Configure.
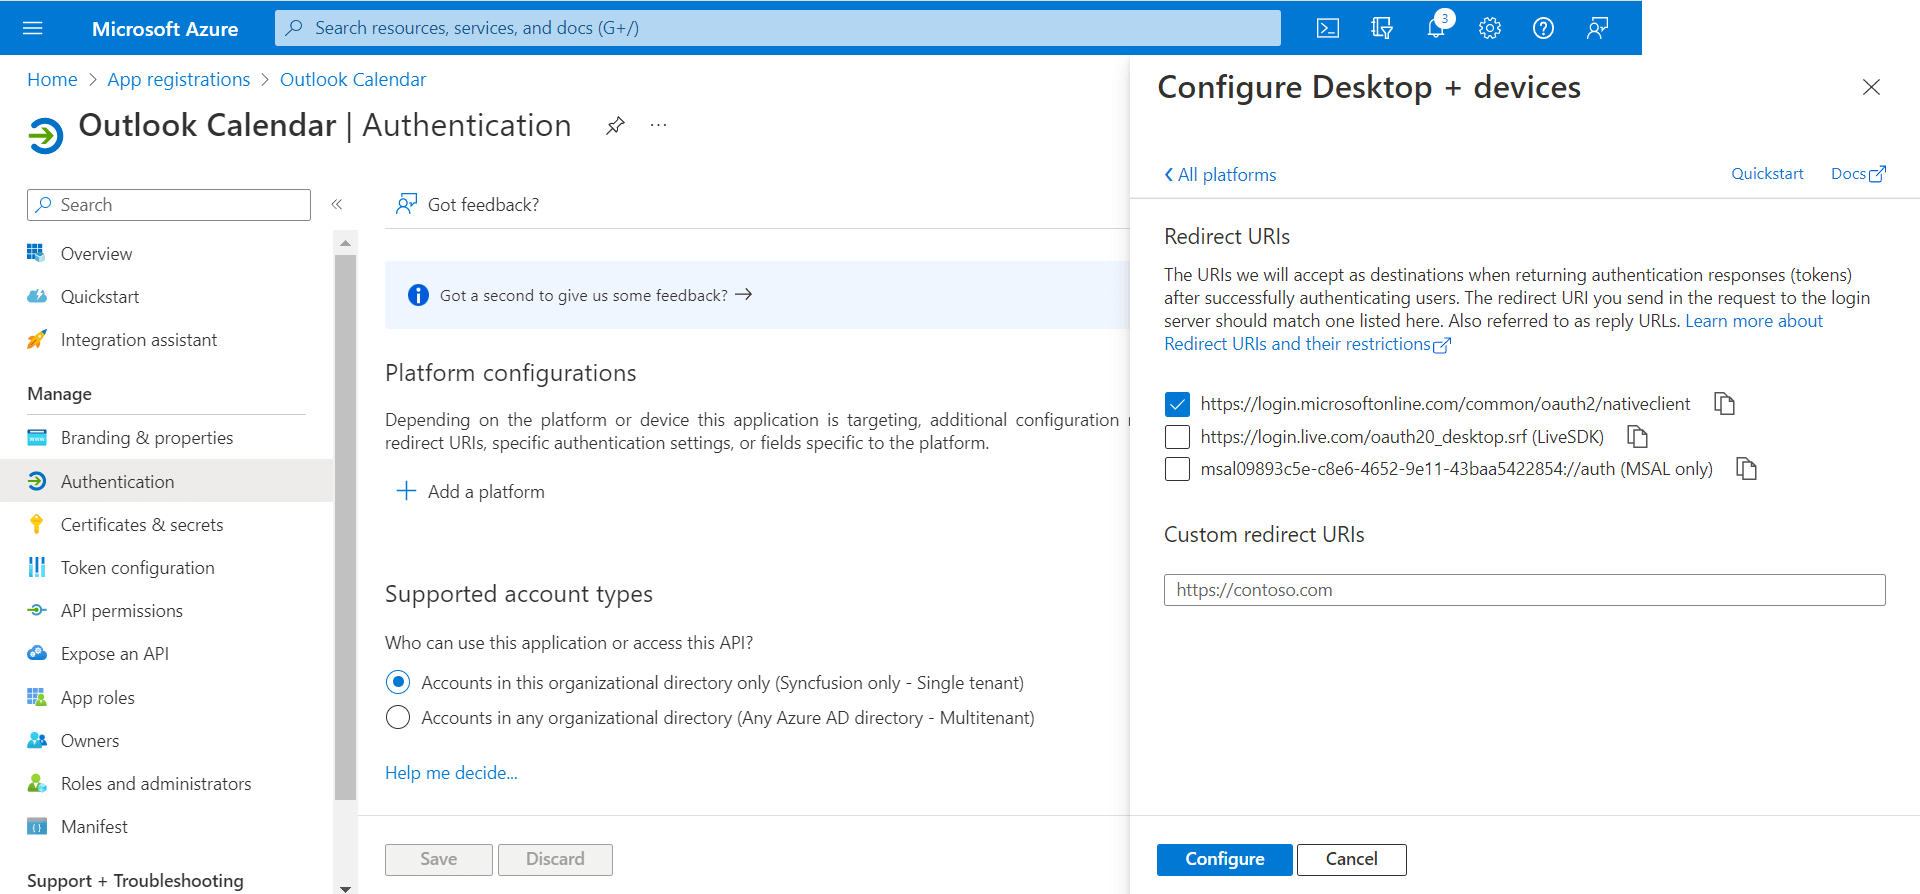
Configure Platform for Application Registered - Next, change the Outlook Calendar application and API permission to synchronize the Office 365 Calendar events in your application. To do that, go to API permissions, select Add a permission, then select Microsoft Graph.
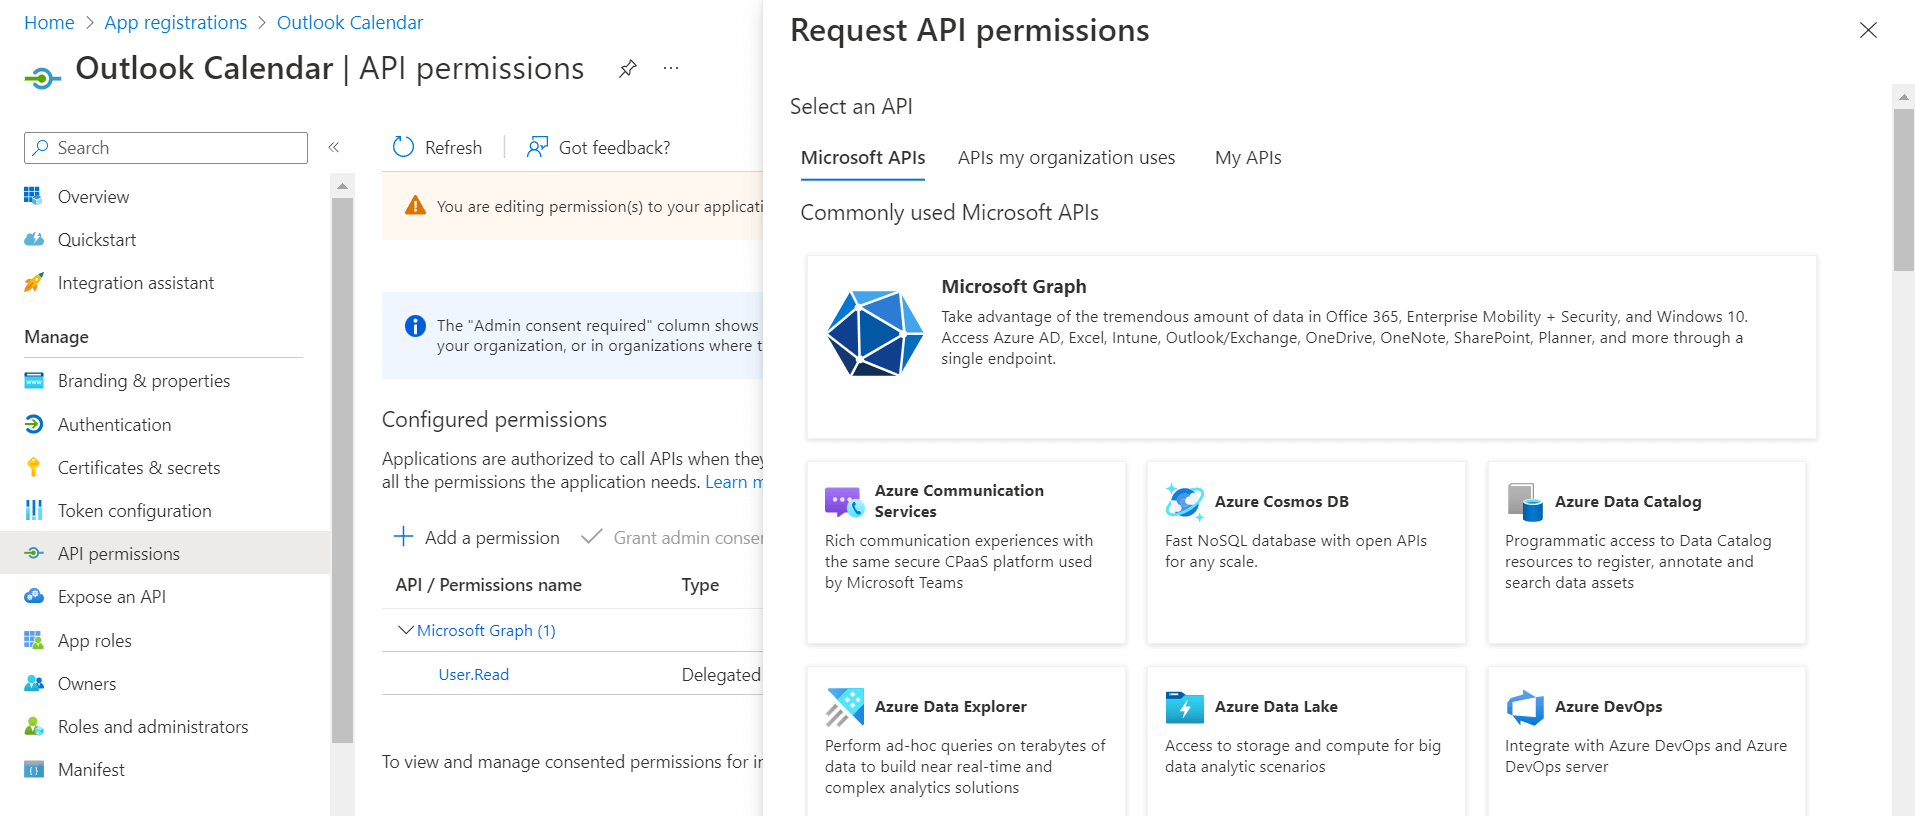
Request API Permission for Application Registered - Click Delegated permissions on the Microsoft Graph page.
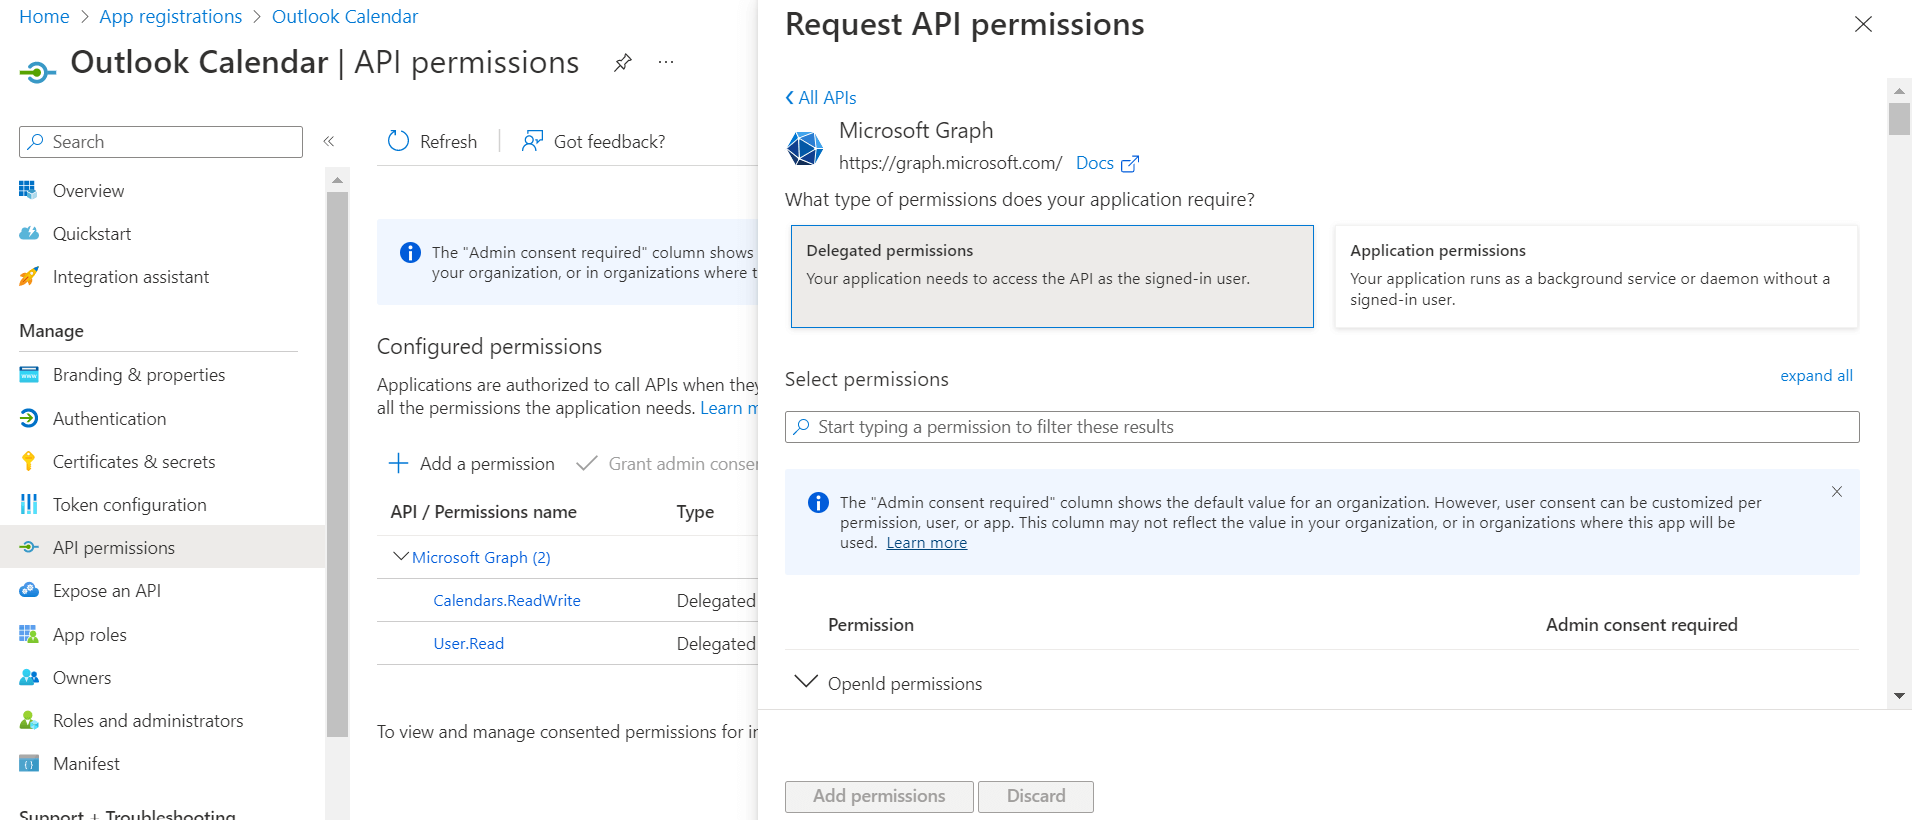
Delegated Permission for Application Registered - Search for Calendar and change the Calendar API permission to ReadWrite, and then click Add permissions.
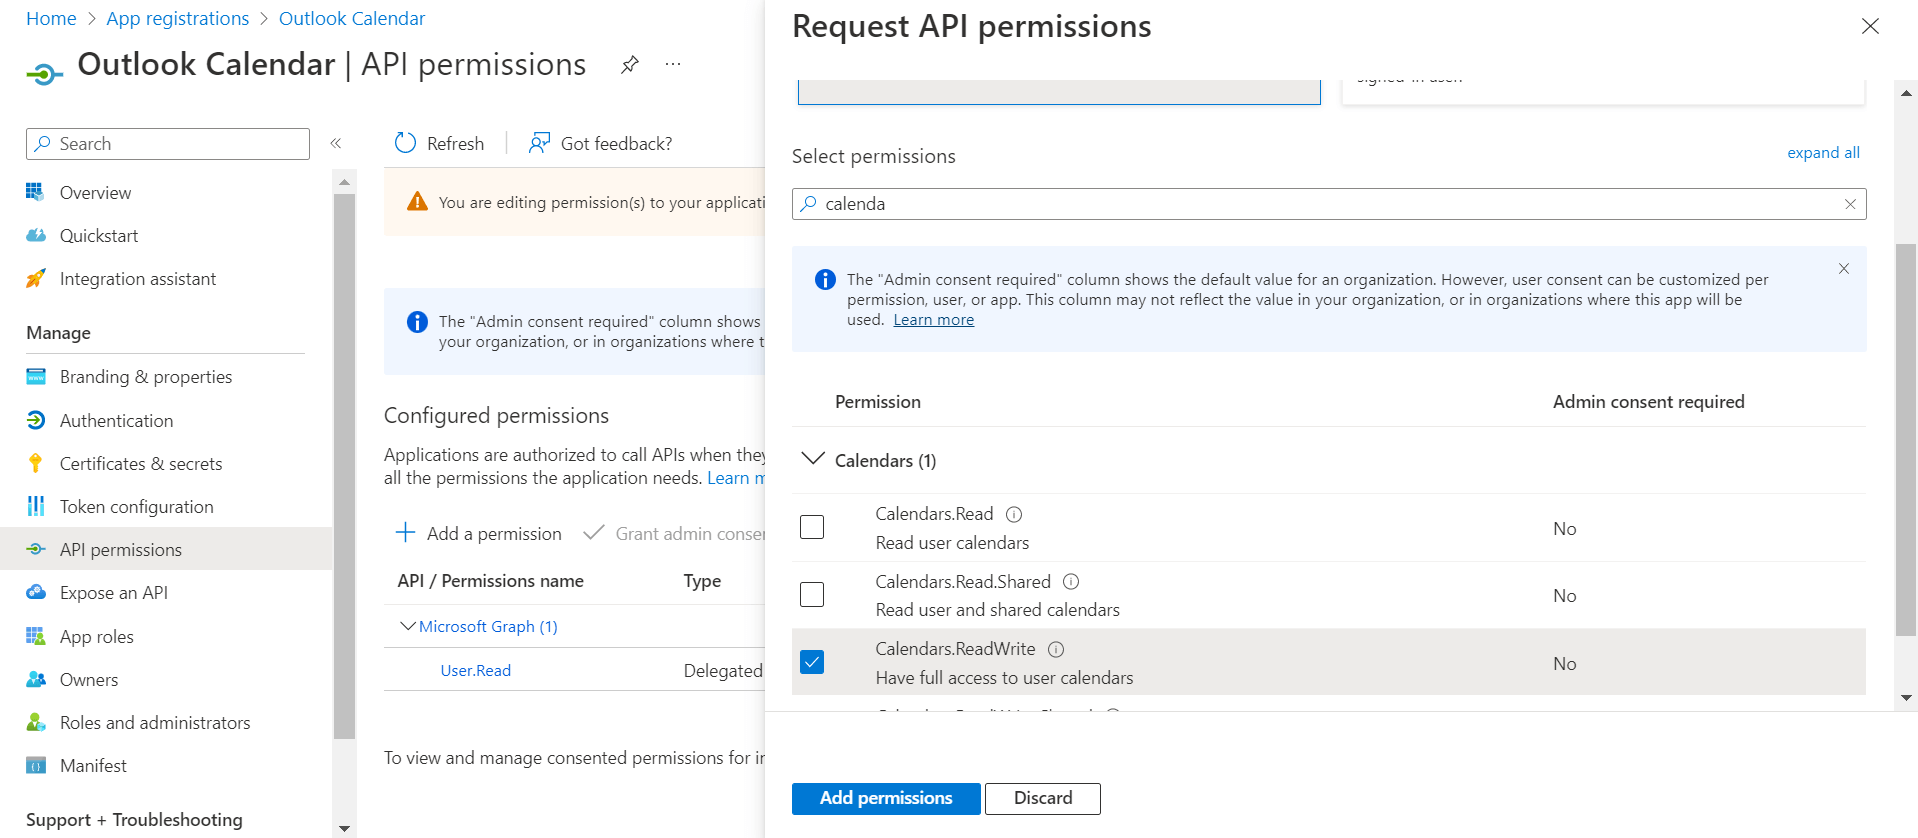
Request Outlook Calendar API Permission - Now we have configured the Microsoft Azure service to access the Calendar API. You can use the application ID and tenant ID of the registered Outlook Calendar application to connect Microsoft Azure with the application.
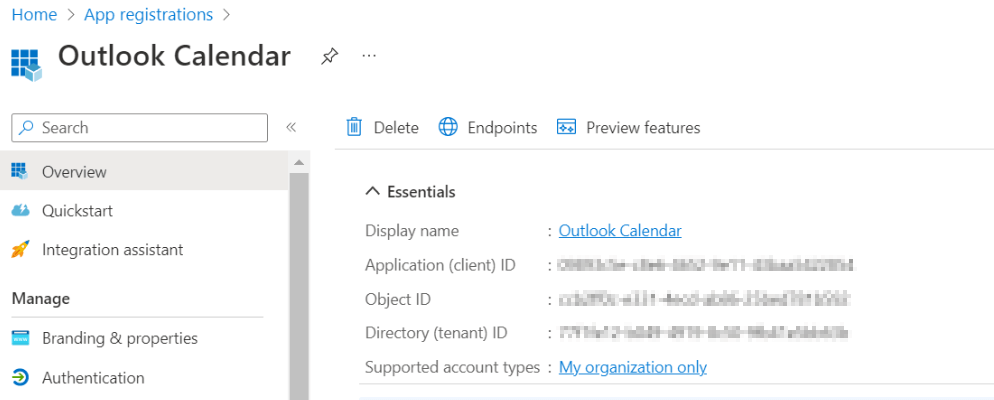
Registered Application Overview - Install the Microsoft Graph package in Visual Studio to connect the Syncfusion WinUI Scheduler application and Microsoft Azure. Install the NuGet package by selecting Manage NuGet packages for the solution, and then add the following references to access the Microsoft Calendar API:
using Microsoft.Graph; using Microsoft.Identity.Client; - Create the authority using the tenant ID and register the client ID, authority, and Redirecturi using the IPublicClientApplication. Refer to the following code to create a client application.
internal static IPublicClientApplication ClientApplication;
private string clientID, tenantID, authority;

public App()
{
   this.InitializeComponent();

   //// You need to replace this with your application or client ID.
   clientID = "--Client ID goes here--";

   //// You need to replace this with your tenant ID.
   tenantID = "--Tenant ID goes here--";

   authority = "https://login.microsoftonline.com/" + tenantID;

   ClientApplication = PublicClientApplicationBuilder.Create(clientID)
   .WithAuthority(authority)
   .WithRedirectUri("https://login.microsoftonline.com/common/oauth2/nativeclient")
   .Build();

}
Note: Use the Application (client) ID and tenant ID from the registered application overview in Microsoft Azure. Refer to the previous figure.
Connect the Microsoft Graph service client by using the GraphServiceClient
The user token information can be obtained using the AcquireTokenInteractive and AcquireTokenSilent methods of IPublicClientApplication. The GraphServiceClient is used to get user information from the endpoint by registering the user token information of the IPublicClientApplication.
Refer to the following code.
using Microsoft.Graph;
using Microsoft.Identity.Client;

private GraphServiceClient Client;

//// Scopes to access the Microsoft API permission.
private static string[] scopes = { "User.Read", "Calendars.Read", "Calendars.ReadWrite" };

private async void Authenticate()
{
    AuthenticationResult tokenRequest;

    //// Register the user token.
    var accounts = await App.ClientApplication.GetAccountsAsync();
    if (accounts.Count() > 0)
    {
        tokenRequest = await App.ClientApplication.AcquireTokenSilent(scopes, accounts.FirstOrDefault())
          .ExecuteAsync();
    }
    else
    {
        tokenRequest = await App.ClientApplication.AcquireTokenInteractive(scopes).ExecuteAsync();
    }
    //// Connect the client information.
    Client = new GraphServiceClient("https://graph.microsoft.com/v1.0/",
             new DelegateAuthenticationProvider(async (requestMessage) =>
             {
                 requestMessage.Headers.Authorization = new AuthenticationHeaderValue("bearer", tokenRequest.AccessToken);
             }));
}
We have finished the necessary code for connecting the WinUI application with Microsoft Azure. Once you run the application, you will see a login page like the one shown in the following image.
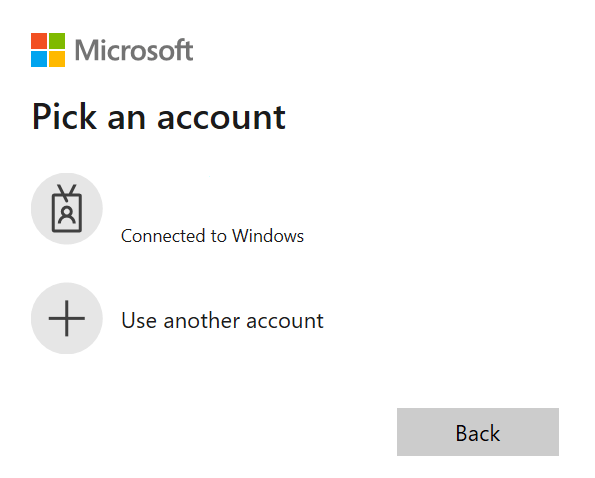
Once logged in, you will be prompted with a Permission requested dialog. Read the terms and click the Accept button.
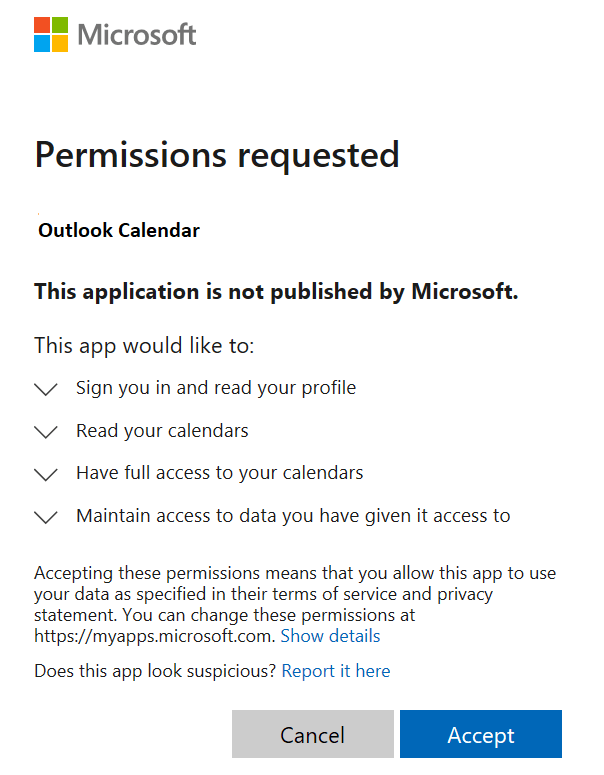
Note: If any details are mismatched, like application (client) ID, tenant ID, or redirect URI, then you will receive a connection error.
Export Syncfusion WinUI Scheduler events to Outlook Calendar
Once the Microsoft Azure client services are added to the application, you can add the Outlook Calendar events by requesting the event builder of the GraphServiceClient from the application.
Refer to the following code to convert the Syncfusion WinUI Scheduler appointments to Outlook Calendar events.
/// <summary>
/// Method to add event to Outlook Calendar.
/// </summary>
private void AddEventToOutlookCalendar()
{
    foreach (Meeting meeting in this.Meetings)
    {
       var calEvent = new Event
       {
           Subject = meeting.EventName,

           Start = new DateTimeTimeZone
           {
              DateTime = meeting.From.ToString(),
              TimeZone = "GMT Standard Time"
           },
           End = new DateTimeTimeZone()
           {
              DateTime = meeting.To.ToString(),
              TimeZone = "GMT Standard Time"
           },
       };
       //// Request to add Syncfusion WinUI Scheduler events to Outlook Calendar events.
       Client.Me.Events.Request().AddAsync(calEvent);
   }
}
Import Outlook Calendar events to Syncfusion WinUI Scheduler
Likewise, refer to the following code example to convert the Outlook Calendar events to Syncfusion WinUI Scheduler events.
private void GetOutlookCalendarEvents()
{
   //// Request to get the Outlook Calendar events.
   var events = Client.Me.Events.Request().GetAsync().Result.ToList();
   if (events != null && events.Count > 0)
   {
       foreach (Event appointment in events)
       {
          Meeting meeting = new Meeting()
          {
              EventName = appointment.Subject,
              From = Convert.ToDateTime(appointment.Start.DateTime),
              To = Convert.ToDateTime(appointment.End.DateTime),
              IsAllDay = (bool)appointment.IsAllDay,
           };

           if (appointment.Recurrence != null)
           {
               AddRecurrenceRule(appointment, meeting);
           }
           this.Meetings.Add(meeting);
       }
    }
}
Refer to the following code example to convert Microsoft Outlook recurring events to Syncfusion WinUI Scheduler recurring events.
Here, I added the code to create daily and weekly recurrence appointment types from Outlook Calendar.
private static void AddRecurrenceRule(Event appointment, Meeting meeting)
{
   // Creating recurrence rule.
   RecurrenceProperties recurrenceProperties = new RecurrenceProperties();
   if (appointment.Recurrence.Pattern.Type == RecurrencePatternType.Daily)
   {
      recurrenceProperties.RecurrenceType = SchedulerRecurrenceType.Daily;
   }
   else if (appointment.Recurrence.Pattern.Type == RecurrencePatternType.Weekly)
   {
      recurrenceProperties.RecurrenceType = SchedulerRecurrenceType.Weekly;
      foreach (var weekDay in appointment.Recurrence.Pattern.DaysOfWeek)
      {
         if (weekDay == MicrosoftDayOfWeek.Sunday)
         {
             recurrenceProperties.WeekDays = WeekDays.Sunday;
         }
         if (weekDay == MicrosoftDayOfWeek.Monday)
         {
             recurrenceProperties.WeekDays = recurrenceProperties.WeekDays | WeekDays.Monday;
         }
         if (weekDay == MicrosoftDayOfWeek.Tuesday)
         {
             recurrenceProperties.WeekDays = recurrenceProperties.WeekDays | WeekDays.Tuesday;
         }
         if (weekDay == MicrosoftDayOfWeek.Wednesday)
         {
             recurrenceProperties.WeekDays = recurrenceProperties.WeekDays | WeekDays.Wednesday;
         }
         if (weekDay == MicrosoftDayOfWeek.Thursday)
         {
             recurrenceProperties.WeekDays = recurrenceProperties.WeekDays | WeekDays.Thursday;
         }
         if (weekDay == MicrosoftDayOfWeek.Friday)
         {
             recurrenceProperties.WeekDays = recurrenceProperties.WeekDays | WeekDays.Friday;
         }
         if (weekDay == MicrosoftDayOfWeek.Saturday)
         {
              recurrenceProperties.WeekDays = recurrenceProperties.WeekDays | WeekDays.Saturday;
         }
      }
   }
   recurrenceProperties.Interval = (int)appointment.Recurrence.Pattern.Interval;
   recurrenceProperties.RecurrenceRange = SchedulerRecurrenceRange.Count;
   recurrenceProperties.RecurrenceCount = 10;
   meeting.RRule = RecurrenceHelper.CreateRRule(recurrenceProperties, meeting.From, meeting.To);
}
Synchronize Syncfusion WinUI Scheduler events with Outlook Calendar
In this application, I have added buttons to import and export Outlook Calendar events to and from Syncfusion WinUI Scheduler.
When the export button is clicked, Microsoft Azure connects and exports Syncfusion WinUI Scheduler events to Outlook Calendar.
public ICommand ImportButtonCommand { get; set; }

public void ExecuteImportCommand(object parameter)
{
   this.Authenticate(true);
}
When the import button is clicked, Microsoft Azure connects and imports Outlook Calendar events to the Syncfusion WinUI Scheduler.
public ICommand ExportButtonCommand { get; set; }

public void ExecuteExportCommand(object parameter)
{
    this.Authenticate(false);
}
Refer to the following code to add import and export buttons.
<Grid>
   <Grid.DataContext>
      <local:SchedulerViewModel/>
   </Grid.DataContext>

   <StackPanel Orientation="Horizontal" >
      <Button Content="Import Outlook Calendar Events to Syncfusion WinUI Scheduler" Background="#DEECF9" Command="{Binding ImportButtonCommand}" Margin="5"/>
      <Button Content="Export Syncfusion WinUI Scheduler Events to Outlook Calendar" Background="#DEECF9" Command="{Binding ExportButtonCommand}" Margin="5" />
   </StackPanel>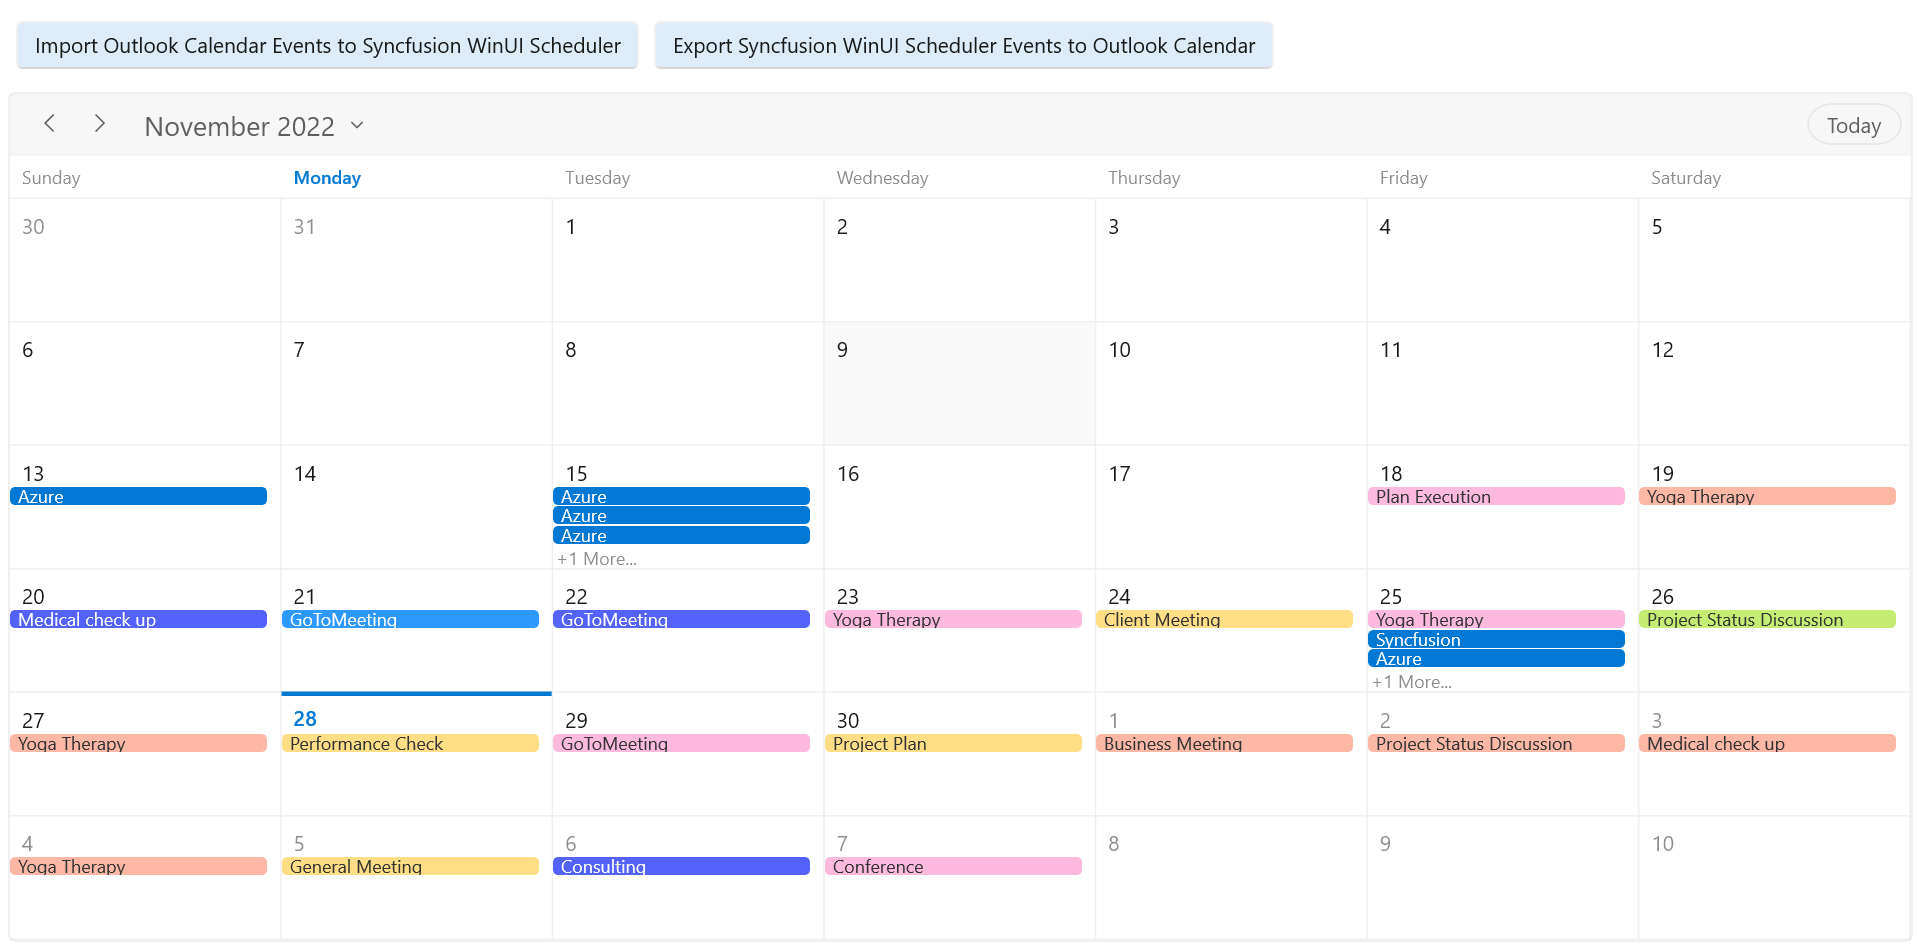
GitHub reference
Refer to the complete app code to Synchronize Outlook Calendar and WinUI Scheduler on GitHub.
Conclusion
Thanks for reading! In this blog, we saw a quick overview of how to synchronize WinUI Scheduler events with Outlook Calendar events.
For current customers, the newest version of our WinUI controls is available for download from the License and Downloads page. If you are not yet a Syncfusion customer, you can try our 30-day free trial to see how our components can enhance your projects.
You can also contact us through our support forum, support portal, or feedback portal. We are happy to assist you!
Related blogs
- Implement Fuzzy Search in Syncfusion WinUI AutoComplete
- Experience Seamless Excel-Like Filtering in WinUI DataGrid
- Design a Temperature Monitor Like a Pro Using WinUI Radial Gauge
- Achieve Google-Like Autosuggestions with the WinUI AutoComplete Control

