TL;DR: Let’s see how to implement AI-powered smart search using Syncfusion .NET MAUI Autocomplete control. We’ll cover custom filtering and integrate AI search with Azure OpenAI for seamless, relevant suggestions—even when exact matches aren’t found. The post explains how to create a business model, customize the filter behavior, and set up Azure OpenAI. Follow along to enhance user experience with intelligent suggestions!
Syncfusion .NET MAUI Autocomplete control is designed to efficiently load and display suggestions from large datasets based on user input. It enhances user experience by allowing selection from a suggested list of relevant items.
In this blog, we’ll explore how to implement the AI-powered smart searching feature in the .NET MAUI Autocomplete control, which delivers seamless results even when no exact matches are found.
Note: Before proceeding, refer to getting started with the .NET MAUI Autocomplete documentation.
Implementing smart AI searching in .NET MAUI Autocomplete
We’ll implement the AI-powered searching using the custom filtering feature of the .NET MAUI Autocomplete control. First, we’ll cover how to implement custom filtering, and then we’ll integrate AI search into this filtering process.
In this blog, I’ve used Azure OpenAI to provide the input prompts and retrieve the filtering results.
Implementing custom filtering in .NET MAUI Autocomplete
The .NET MAUI Autocomplete control allows you to apply custom filter logic to suggest items based on your specific filter criteria by utilizing the FilterBehavior property.
Step 1: Let’s create a new business model to search country names. Refer to the following code example.
//Model.cs
public class CountryModel
{
    public string? Name { get; set; }
}
//ViewModel.cs
public class CountryViewModel : INotifyPropertyChanged
{
private ObservableCollection<CountryModel> countries;
public ObservableCollection<CountryModel> Countries
{
get { return countries; }
set { countries = value; OnPropertyChanged(nameof(Countries)); }
}
public CountryViewModel()
{
countries = new ObservableCollection<CountryModel>
{
new CountryModel { Name = "Afghanistan" },
new CountryModel { Name = "Akrotiri" },
new CountryModel { Name = "Albania" },
new CountryModel { Name = "Algeria" },
…..
};
}
}Step 2: Now, create a new class that derives from the IAutocompleteFilterBehavior interface.
public class CountryFilterBehavior: IAutocompleteFilterBehavior
{

}
Step 3: Next, implement the GetMatchingItemsAsync method from the IAutocompleteFilterBehavior interface to generate a suggestion list. This list should include the filtered items based on your custom logic, which will be displayed in the Autocomplete control’s drop-down. The GetMatchingItemsAsync method includes the following arguments:
- source: Represents the owner of the filter behavior, providing access to properties such as ItemsSource and other related information.
- filterInfo: Contains details about the text entered in the Autocomplete control. You can use this text to prepare the suggestion list, which will be displayed in the drop-down list.
The following code demonstrates how to display a drop-down list of countries using the .NET MAUI Autocomplete control. The list is filtered based on the text entered, displaying only the countries that begin with the input.
public class CountryFilterBehavior : IAutocompleteFilterBehavior
{
    public async Task<object> GetMatchingItemsAsync(SfAutocomplete source, AutocompleteFilterInfo filterInfo)
    {
        IEnumerable itemssource = source.ItemsSource as IEnumerable;
        var filteredItems = (from CountryModel item in itemssource
                             where item.Name.StartsWith(filterInfo.Text, StringComparison.CurrentCultureIgnoreCase)
                             select item);

        return await Task.FromResult(filteredItems);
    }
}
Step 4: Finally, apply custom filtering to the .NET MAUI Autocomplete control using the FilterBehavior property.
<ContentPage.BindingContext>
    <local: CountryViewModel />
</ContentPage.BindingContext>

<VerticalStackLayout>
    <syncfusion:SfTextInputLayout Hint="Enter Country Name"
        ContainerType="Outlined"
        WidthRequest="248"
        ContainerBackground="Transparent">
        <editors:SfAutocomplete x:Name="autoComplete"
            DropDownPlacement="Bottom"
            MaxDropDownHeight="200"
            TextSearchMode="StartsWith"
            DisplayMemberPath="Name"
            ItemsSource="{Binding Countries}">
     	    <editors:SfAutocomplete.FilterBehavior>
         	<local: CountryFilterBehavior />
     	    </editors:SfAutocomplete.FilterBehavior>
 	</editors:SfAutocomplete>
    </syncfusion:SfTextInputLayout>
</VerticalStackLayout>
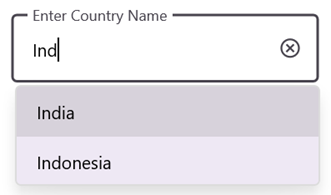
The following image demonstrates the output of the above custom filtering sample.
Integrating Azure OpenAI with your .NET MAUI App
First, ensure you have access to Azure OpenAI and have created a deployment in the Azure portal.
If you don’t have access, please refer to the create and deploy Azure OpenAI service guide to set up a new account.
In this blog, we’ll use the Azure.AI.OpenAI NuGet package from the NuGet Gallery. So, before getting started, install the Azure.AI.OpenAI NuGet package in your .NET MAUI app.
Setting up Azure OpenAI
Let’s begin creating the Azure OpenAI service.
Step 1: We’ll assume that the GPT-35 model, deployed under GPT35Turbo, is being used. Be sure to replace the endpoint, deployment name, and key with your specific details.
Step 2: Next, use the ChatCompletionsOptions to specify the prompt format for the system, user, and assistant messages in the Azure OpenAI. In our app, we’ve used the following messages as input.
- ChatRequestSystemMessage – You are a filtering assistant.
- ChatRequestUserMessage – Filter the list items based on the user input using characters Starting with and Phonetic algorithms like Soundex or Damerau-Levenshtein Distance. \” +\r$\”The filter should ignore spelling mistakes and be case insensitive.
- ChatRequestAssistantMessage – Afghanistan\nAkrotiri\nAlbania\nAlgeria\nAmerican Samoa \nAndorra\nAngola\nAnguilla
Step 3: Then, use the OpenAIClient to manage the ChatCompletionsOptions and obtain the completion results with the GetChatCompletionsAsync method. We’ve previously defined the ChatRequestAssistantMessage format for the AI response. This allows us to receive the proper format of the response message. The following is the code for the AzureOpenAIService class.
public class AzureOpenAIService
{
    const string endpoint = "https://{YOUR_END_POINT}.openai.azure.com";
    const string deploymentName = "GPT35Turbo";
    const string key = "";
    private OpenAIClient? client;
    private ChatCompletionsOptions? chatCompletions;
    public AzureOpenAIService()
    {
        InitializeClient();
    }

    public void InitializeClient()
    {
        client = new OpenAIClient(new Uri(endpoint), new AzureKeyCredential(key));
        chatCompletions = new ChatCompletionsOptions
        {
            DeploymentName = deploymentName,
            Temperature = (float)1.2f,
            MaxTokens = 120,
            NucleusSamplingFactor = (float)0.9,
            FrequencyPenalty = 0.8f,
            PresencePenalty = 0.8f
        };
        // Add the system message to the options.
        chatCompletions.Messages.Add(new ChatRequestSystemMessage("You are a filtering assistant."));
        chatCompletions.Messages.Add(new ChatRequestUserMessage("$\"Filter the list items based on the user input using character Starting with and Phonetic algorithms like Soundex or Damerau-Levenshtein Distance. \" +\r$\"The filter should ignore spelling mistakes and be case insensitive."));

         chatCompletions.Messages.Add(newChatRequestAssistantMessage(
           "\nAfghanistan\nAkrotiri\nAlbania\nAlgeria\nAmerican Samoa \nAndorra\nAngola\nAnguilla"));
    }

    public async Task<string> GetCompletion(string prompt, CancellationToken cancellationToken)
    {
     if (chatCompletions != null && client != null)
     {
         if (chatCompletions.Messages.Count > 5)
         {
             //Remove the message history to avoid exceeding the token limit.
             chatCompletions.Messages.RemoveAt(1);
             chatCompletions.Messages.RemoveAt(1);
         }
         // Add the user message to the options.
         chatCompletions.Messages.Add(new ChatRequestUserMessage(prompt));
         try
         {
            //Here, cancelling the previous request to continue our search.
             cancellationToken.ThrowIfCancellationRequested();
             var chatresponse = await client.GetChatCompletionsAsync(chatCompletions);
             cancellationToken.ThrowIfCancellationRequested();
             string chatcompletionText = chatresponse.Value.Choices[0].Message.Content.Trim();
             chatCompletions.Messages.Add(new ChatRequestAssistantMessage(chatcompletionText));
             return chatcompletionText;
         }
         catch (RequestFailedException ex)
         {
             // Log the error message and rethrow the exception or handle it appropriately.
             Debug.WriteLine($"Request failed: {ex.Message}");
             throw;
         }
         catch (Exception ex)
         {
             // Handle other potential exceptions.
             Debug.WriteLine($"An error occurred: {ex.Message}");
             throw;
         }
     }
     return "";
 }
}
Connecting to Azure OpenAI
In our .NET MAUI app, we can establish a connection to the Azure OpenAI service through a custom filtering class.
The custom filtering class uses the GetMatchingItemsAsync method, which is invoked each time when we provide input text into the Autocomplete control. By connecting to Azure OpenAI service, we create a prompt based on the entered text and retrieve the response message. And then, we convert the response message to an output collection.
So, modify the existing CountryFilterBehavior to connect to Azure OpenAI service. Refer to the following code example.
public class CountryFilterBehavior: IAutocompleteFilterBehavior
{
    private readonly AzureAIService _azureAIService;
    public ObservableCollection<CountryModel> Countries { get; set; }
    public ObservableCollection<CountryModel> FilteredCountries { get; set; } = new ObservableCollection<CountryModel>();
    private CancellationTokenSource? _cancellationTokenSource;

    public CountryFilterBehavior ()
    {
        _azureAIService = new AzureAIService();
        Countries = new ObservableCollection<CountryModel>();
        _cancellationTokenSource = new CancellationTokenSource();
    }
    public async Task<object?> GetMatchingItemsAsync(SfAutocomplete source, AutocompleteFilterInfo filterInfo)
    {
        if (string.IsNullOrEmpty(filterInfo.Text))
        {
           _cancellationTokenSource?.Cancel();
           FilteredCountries.Clear();
           return await Task.FromResult(FilteredCountries);
        }
        Countries = (ObservableCollection<CountryModel>)source.ItemsSource;
        string listItems = string.Join(", ", Countries!.Select(c => c.Name));
        // Join the first five items with newline characters for the demo output template for AI
        string outputTemplate = string.Join("\n", Countries.Take(5).Select(c => c.Name));
        //The cancellationToken was used for cancelling the API request if user types continuously
        _cancellationTokenSource?.Cancel();
        _cancellationTokenSource = new CancellationTokenSource();
        var cancellationToken = _cancellationTokenSource.Token;
        // Filter the country list using the Azure open AI
        var filterCountries = await FilterCountriesUsingAzureOpenAI(filterInfo.Text, listItems, outputTemplate, cancellationToken);
        return await Task.FromResult(filterCountries);
    }

    /// <summary>
    /// Filters country names based on user input using Azure AI.
    /// </summary>
    public async Task<ObservableCollection<CountryModel>> FilterCountriesUsingAzureOpenAI(string userInput, string itemsList, string outputTemplate, CancellationToken cancellationToken)
    {
        if (!string.IsNullOrEmpty(userInput))
        {
            //Add the prompt based on your filtering
            var prompt = $"Filter the list items based on the user input using character Starting with and Phonetic algorithms like Soundex or Damerau-Levenshtein Distance. " +
                         $"The filter should ignore spelling mistakes and be case insensitive. " +
                         $"Return only the filtered items with each item in new line without any additional content like explanations, Hyphen, Numberings and - Minus sign. Ignore the content 'Here are the filtered items or similar things' " +
                         $"Only return items that are present in the List Items. " +
                         $"Ensure that each filtered item is returned in its entirety without missing any part of its content. " +
                         $"Arrange the filtered items that starting with the user input's first letter are at the first index, followed by other matches. " +
                         $"Examples of filtering behavior: " +
                         $"The example data are for reference, dont provide these as output. Filter the item from list items properly" +
                         $"Here is the User input: {userInput}, " +
                         $"List of Items: {itemsList}" +
                         $"If no items found, return \"Empty\" " +
                         $"Dont use 'Here are the filtered items:' in the output. Check this demo output template, you should return output like this: {outputTemplate} ";

            var completion = await _azureAIService.GetCompletion(prompt, cancellationToken);
            var filteredCountryNames = completion.Split('\n').Select(x => x.Trim()).Where(x => !string.IsNullOrEmpty(x)).ToList();
            if (FilteredCountries.Count > 0)
                FilteredCountries.Clear();
            if (completion.ToLower().Trim() != "empty")
                        {
                foreach (var country in filteredCountryNames)
                {
                    FilteredCountries.Add(new CountryModel { Name = country });
            }
         }
     }
     return FilteredCountries;
 }
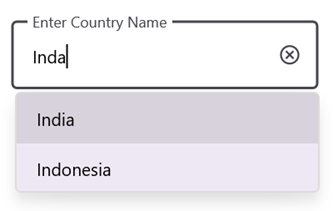
The following image demonstrates the output of the above AI-based search using a custom filtering sample.

Supercharge your cross-platform apps with Syncfusion's robust .NET MAUI controls.
GitHub reference
For more details, refer to the AI-powered smart searching in the .NET MAUI Autocomplete control GitHub demo.
Conclusion
Thanks for reading! In this blog, we explored how to implement AI-powered smart searching in the .NET MAUI Autocomplete control. This will deliver seamless results, even when no exact matches are found. This feature is available in the 2024 Volume 3 release. Try out the steps shared here, and leave your feedback in the comments section below!
The existing customers can download the latest version of Essential Studio® from the License and Downloads page. If you are new, try our 30-day free trial to explore our incredible features.
If you need assistance, please do not hesitate to contact us via our support forum, support portal, or feedback portal. We are always eager to help you!
Related blogs
- Sneak Peek 2024 Volume 3: AI-Powered Smart .NET MAUI controls
- Creating a Custom Chatbot with OpenAI APIs | Blazor and .NET MAUI Integration (Workshop Show Notes)
- Sneak Peek at 2024 Volume 3: .NET MAUI
- Chart of the Week: Forecast Stock Trends with AI-Powered Smart .NET MAUI Candle Chart








Comments (2)
chatCompletions = new ChatCompletionOptions();
chatCompletions.Messages -( doesnt’ exist ? )
// tried this approach got an 404 error
ChatClient cc = client.GetChatClient(deploymentName);
if (cc != null)
{
ChatCompletion completion = cc.CompleteChat(
new SystemChatMessage(“You are a helpful assistant that talks like a pirate.”),
new UserChatMessage(“Does Azure OpenAI support customer managed keys?”),
new AssistantChatMessage(“Yes, customer managed keys are supported by Azure OpenAI”),
new UserChatMessage(“Do other Azure AI services support this too?”)
);
msg = completion.Content[0].Text;
client = new OpenAIClient(new Uri(endpoint), new AzureKeyCredential(key)); // doesn’t work
// that works
OpenAIClientOptions option = new OpenAIClientOptions();
option.Endpoint = new Uri(endpoint);
var client = new OpenAIClient(new ApiKeyCredential(key),option);
Any Idea what is wrong? Thanks
In this blog post, I’m using Azure.AI.OpenAI version 1.0.0-beta.15. If you use the same version, everything should work as described.
For more details, please refer to the provided sample.