
TL;DR: CORS issues can significantly hinder development by blocking legitimate API requests. Angular Dev Proxy is a powerful tool for bypassing CORS during development. Learn the importance of addressing CORS and the step-by-step guide to setting up Angular Dev Proxy. This article includes creating a new Angular app, setting up a data service, and updating components for seamless data fetching.
Browsers use a Cross-origin resource sharing (CORS) mechanism to prevent harmful websites from making requests to other websites without permission. However, this can be an obstacle for developers, especially when they block legitimate API requests during development. I’m sure almost all developers have had a CORS issue at least once since StackOverflow has over 100K questions related to CORS.
This article will discuss the importance of handling CORS issues and how to set up and use Angular Dev Proxy to avoid them in five easy steps.

Understanding CORS
Cross-Origin Resource Sharing (CORS) is a set of web security tools devised for how a webpage demands resources from another domain. These are with additional HTTP headers such as:
- Origin
- Access-Control-Allow-Origin
- Access-Control-Allow-Methods
- Access-Control-Allow-Headers
- Access-Control-Allow-Credentials
When a web app tries to request a resource on a different origin, the browser and server communicate using these headers to determine if the request is allowed.
For example, consider the above CORS error message. In this case, the Angular app hosted at http://localhost:4200 attempts to access http://localhost:3000/api/data, of which status has been blocked by the browser because there was no Access-Control-Allow-Origin header in its response.
Why do we need to address CORS issues?
But why does it need addressing if it is a security measure that the browsers use?
While stopping malicious websites from sending unauthorized requests to other domains, CORS may also prevent legitimate requests necessary to properly operate web apps. Thus, it is essential to address CORS problems to allow safe and effective legitimate cross-origin requests.
Here are some of the common issues developers face due to CORS:
- Blocked requests: Certain parts of a web app may not work properly if there are CORS issues.
- Increased development time: Troubleshooting CORS can take longer, thus impacting development speed.
- Security risks: Incorrectly configured CORS headers could expose apps to risks such as CSRF (cross-site request forgery) attacks.
- Development environment discrepancies: Development environment discrepancies with respect to CORS might not be visible during development but emerge in production environments.
Using Angular Dev Proxy to avoid CORS issues
The Angular Dev Proxy allows developers to bypass CORS issues during development by configuring a proxy server that intercepts API requests and forwards them to the target server.
Here are the steps you need to follow to create an Angular Dev Proxy:
Step 1: Create a new Angular app
Note: You can skip this step if you already have an Angular app. However, I will be using standalone components of Angular 17 for this implementation.
To create a new Angular app, use the following command:
ng new angular-17-dev-proxy
cd angular-17-dev-proxy
Create a new service named data.service.ts and update it with the following code to fetch data from the server.
import { Injectable } from '@angular/core';
import { HttpClient } from '@angular/common/http';
import { Observable } from 'rxjs';
@Injectable({
  providedIn: 'root'
})
export class DataService {
  constructor(private http: HttpClient) {}
  getData(): Observable<any> {
    return this.http.get('/api/data'); // The proxy will forward this to http://localhost:4000/api/data
  }
}
Then, update app.component.ts and app.component.html files to display fetched data. Since we created a standalone app, there won’t be an app.module.ts file, and app.component.ts will have the standalone: true configuration.
app.component.ts
import { Component } from '@angular/core';
import { DataService } from './data.service';
import { CommonModule } from '@angular/common';
@Component({
  selector: 'app-root',
  standalone: true,
  templateUrl: './app.component.html',
  imports: [CommonModule],
  styleUrl: './app.component.scss'
})
export class AppComponent {
  title = 'angular-17-dev-proxy';
  data: any;
  constructor(private dataService: DataService) {}
  ngOnInit(): void {
    this.dataService.getData().subscribe(
      data => {
        console.log(data);
        this.data = data;
      },
      (error) => {
        console.error('Error fetching data:', error);
      }
    );
  }
}
app.component.html
<div *ngIf="data">
  <h2>Data from API</h2>
  <pre>{{ data | json }}</pre>
</div>
<div *ngIf="!data">
  <p>Loading data...</p>
</div>
You may get a run time error like this when you run the above code example. 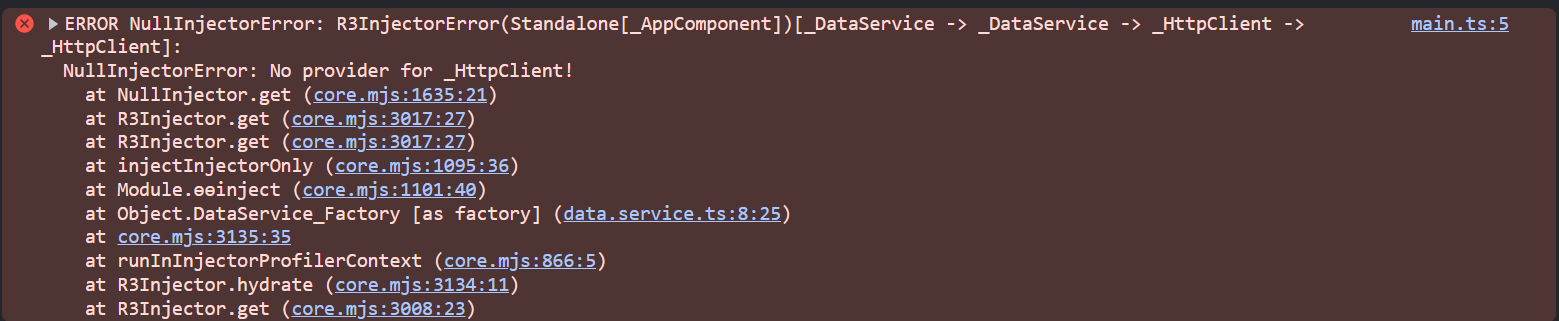 Please update your app.config.ts file with the following code.
import { ApplicationConfig, provideZoneChangeDetection } from '@angular/core';
import { provideRouter } from '@angular/router';
import { routes } from './app.routes';
import { provideHttpClient } from '@angular/common/http';
export const appConfig: ApplicationConfig = {
  providers: [
    provideZoneChangeDetection({ eventCoalescing: true }),
    provideRouter(routes),
    provideHttpClient()
  ]
};
Step 2: Create a proxy configuration file
Create a new file named proxy.conf.json in the root of your Angular project. This proxy configuration file allows you to define how specific requests should be proxied to a different server.
{
  "/api": {
    "target": "http://localhost:3000",
    "secure": false,
    "changeOrigin": true,
    "logLevel": "debug"
  }
}
- /api: The context path that will be proxied.
- target: The actual backend server URL where requests should be forwarded. In this case, it is http://localhost:3000/api/data.
- secure: Setting this to false allows self-signed certificates.
- changeOrigin: Makes sure that the request host header matches the target server.
- logLevel: Setting this to debug helps log proxy activities, making it easier to debug issues.
Step 3: Update package.json
After creating the proxy configuration file, you need to update the package.json file to use this proxy configuration.
"scripts": {
  "ng": "ng",
  "start": "ng serve --proxy-config proxy.conf.json",
  "build": "ng build",
  "watch": "ng build --watch --configuration development",
  "test": "ng test"
}
Step 4: Run the app
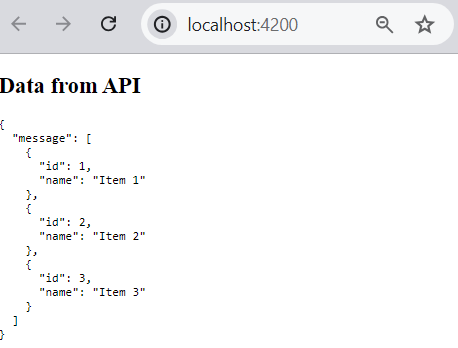
Use the npm start command to run the app. Since we addressed the CORS issue, you will see the data fetched from the server in the browser tab.
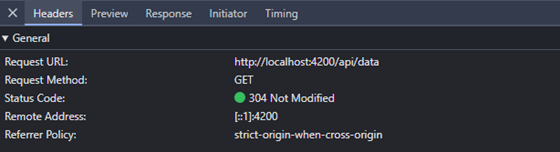
If you open the DevTool Network tab, you will see that the request was made to localhost:4200/api/data, and the proxy has routed it to the server at localhost:3000.
Node.js and Angular apps used in this example are available at these GitHub repos:
Advanced proxy configuration
Here are some advanced proxy configurations you can use to handle more complex development scenarios:
1. Configure multiple proxies for API endpoints
- /api: Routes API requests to http://localhost:3000.
- /auth: Routes authentication requests to http://localhost:4000.
{
  "/api": {
    "target": "http://localhost:3000",
    "secure": false,
    "changeOrigin": true,
    "logLevel": "debug",
    "pathRewrite": {
      "^/api": ""
    }
  },
  "/auth": {
    "target": "http://localhost:4000",
    "secure": false,
    "changeOrigin": true,
    "logLevel": "debug",
    "pathRewrite": {
      "^/auth": ""
    }
  }
}
2. Use advanced path rewriting to handle complex URL structures
- /api/v1/*: Proxies requests to https://api.example.com/v1 and removes the /api/v1 prefix.
{
  "/api/v1/*": {
    "target": "https://api.example.com/v1",
    "secure": false,
    "changeOrigin": true,
    "logLevel": "debug",
    "pathRewrite": {
      "^/api/v1": ""
    }
  }
}
3. Add custom headers to the proxied requests
- headers: Adds a custom header X-Custom-Header with the value value.
{
  "/api": {
    "target": "http://localhost:3000",
    "secure": false,
    "changeOrigin": true,
    "logLevel": "debug",
    "headers": {
      "X-Custom-Header": "value"
    }
  }
}
4. Distribute requests across multiple servers for load balancing
{
  "/api": {
    "target": "https://api1.example.com",
    "router": {
      "host2.example.com": "https://api2.example.com"
    },
    "secure": false,
    "changeOrigin": true,
    "logLevel": "debug"
  }
}
Handling common issues
Here are some common issues and solutions you might need when working with Angular Dev Proxies.
1. 500 Internal Server Error
Cause: This typically indicates an issue with the backend server or the proxy configuration.
Solution:
- Verify the API endpoint is accessible directly via a browser or a tool like curl or Postman.
curl -i http://localhost:3000/api/data
- Check if the target server is running and able to handle the request.
- Ensure the pathRewrite option in proxy.conf.json correctly maps the request path.
{
  "/api": {
    "target": "http://localhost:3000",
    "pathRewrite": {
      "^/api": ""
    }
  }
}
2. 404 Not Found
Cause: The proxy path or target URL may be incorrect.
Solution:
- Ensure the context path in proxy.conf.json matches the requested path.
- Verify that the target URL is correct and accessible via a browser or a tool.
3. No Response from Server
Cause: The request may not be reaching the server, or the server may not be responding.
Solution:
- Check the terminal logs for any proxy-related errors.
- Use the browser’s developer tools to inspect the network requests and responses.
Conclusion
In this article, we demonstrated how important it is to handle CORS issues and how easy Angular Dev Proxy makes it. With all its other capabilities, Angular Dev Proxy can act as a reverse proxy between your multiple backend services, rewrite complex URL paths, or add custom headers, ensuring robust and secure communication of Angular app frontend with backend APIs.
The Syncfusion Angular UI components library is the only suite that you will ever need to build an application since it contains over 85 high-performance, lightweight, modular, and responsive UI components in a single package.
For existing customers, the newest version of Essential Studio® is available for download from the License and Downloads page. If you are not a Syncfusion customer, try our 30-day free trial to check out its features.
If you have questions, you can contact us through our support forums, support portal, or feedback portal. We are always happy to assist you!


 No spam, just valuable updates.