TL;DR: Learn to build a movie ticket booking app using Syncfusion .NET MAUI Popup control. This guide covers creating popups for booking notifications, movie selection, showtimes, terms and conditions, seat selection, and booking confirmation. Customize each popup’s appearance and functionality to enhance user experience. For a complete demo, check out the GitHub repository linked in the blog.
In today’s digital world, convenience is crucial. Just as we use apps to pay bills, we also prefer to book movie tickets online. A thoughtfully designed movie ticket booking app can greatly improve the user experience by streamlining the process of selecting movies, choosing seats, and making payments. This eliminates the hassle of waiting in line at the ticket counter and makes movie-going effortless.
Syncfusion .NET MAUI Popup control is used to display alert messages with customized buttons or a desired view inside a pop-up. Users can completely customize the pop-up’s appearance and functionality, including its header, body, and footer.
In this blog, we’ll create a movie ticket booking app using the .NET MAUI Popup control.
Let’s get started!
Note: Before proceeding, create a .NET MAUI app and add the Popup control in it using the getting started documentation.
Step 1: Show a modal popup on the startup page
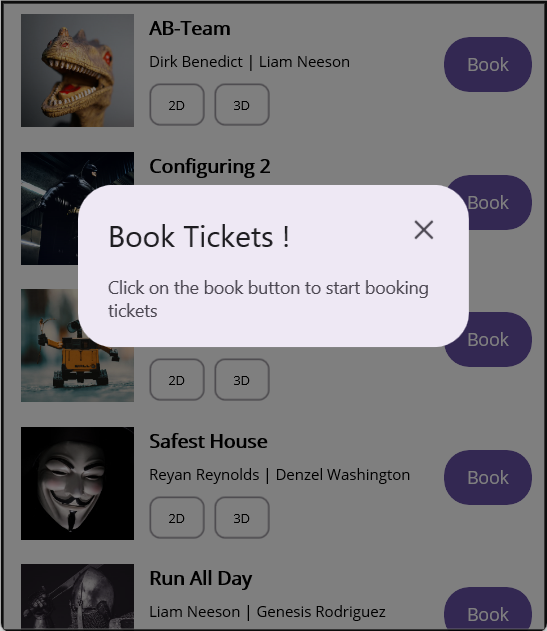
Let’s design a modal popup to display the message that you can book the tickets. A modal popup is a window that loads under the parent window surrounded by an overlay that prevents clicking anywhere else on the screen apart from the control of the modal. This can be achieved using the StaysOpen property. When you set this property, the popup will not close when you touch around it. It will be closed only when you tap the close icon on the popup.
Refer to the following code example.
<popup:SfPopup x:Key="BookingNotification"
               x:Name="bookingNotification"
               ShowFooter="False"
               HeaderTitle="Book Tickets !"
               ShowCloseButton="True"
               HeightRequest="130"
               Message="Click on the book button to start booking tickets">
</popup:SfPopup>
Refer to the following image.
Step 2: Selecting a movie to book a ticket
In the MoviePage.xaml file, we need to list the available movies screened in the theatres. To design this UI, use the Syncfusion .NET MAUI ListView control and customize the template to show the movie’s image and names with a Book button. This will enable users to easily select the movie of their choice.
Refer to the following code example.
<syncfusion:SfListView x:Name="listView" ItemsSource="{Binding TheaterInformation}" SelectionMode="None" ItemSize="110">
 <syncfusion:SfListView.ItemTemplate>
   <DataTemplate>
     .....
     .....
     <Button x:Name="bookbutton" Command="{Binding BookingCommand, Source={x:Reference viewModel}}" CommandParameter="{x:Reference listView}" Text="Book" Opacity="100" CornerRadius="20" VerticalOptions="CenterAndExpand" HorizontalOptions="EndAndExpand" HeightRequest="40" FontSize="14" WidthRequest="70" BackgroundColor="#6750A4" TextColor="White" Margin="10,0,12,10"/>
   </DataTemplate>
 </syncfusion:SfListView.ItemTemplate>
</syncfusion:SfListView>
Step 3: Choosing time for a movie
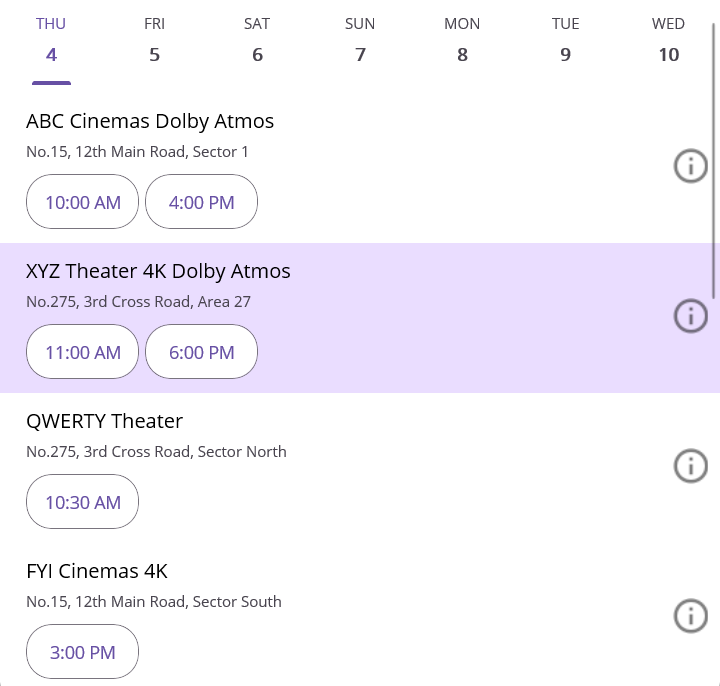
On clicking the Book button on a movie, you will be directed to the details page of the selected movie. It will display the showtimes, dates, and theater specifics details.
Refer to the following code example. Here, we’ll use the .NET MAUI ListView to display the movie details with a customized ItemTemplate.
<syncfusion:SfListView x:Name="secondlistView"
                       ItemsSource="{Binding TheaterInformation}"
                       BackgroundColor="White"
                       HeaderSize="72"
                       ItemSize="120">
 <syncfusion:SfListView.HeaderTemplate>
  <DataTemplate>
   <local:CustomHeaderTemplate></local:CustomHeaderTemplate>
  </DataTemplate>
 </syncfusion:SfListView.HeaderTemplate>
</syncfusion:SfListView>
Refer to the following image.
Step 4: Designing the terms and conditions popup
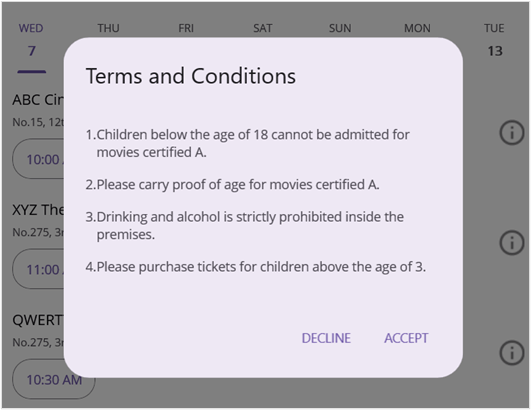
By selecting a time, you will be directed to a popup window displaying the terms and conditions for booking tickets.
Refer to the following code example. Here, the popup is defined as a modal popup. In this app, you have the option to either Accept or Decline the terms and conditions. It’s important to pay close attention to the information presented in the popup before making your choice.
The information you see within the content template is presented as text content, which you can tailor to fit your design needs. The option to close the popup window has been disabled by setting the ShowCloseButton property to false. However, you can close the popup easily using the built-in Decline button.
<popup:SfPopup x:Key="termsAndConditionsDialog"
               x:Name="termsAndConditionPopup"
               StaysOpen="True"
               ShowCloseButton="False"
               ShowFooter="True"
               HeaderTitle="Terms and Conditions"
               AppearanceMode="TwoButton"
               AcceptCommand="{Binding AcceptCommand}" >
 <popup:SfPopup.ContentTemplate>
  <DataTemplate>
   <Grid
    Padding="24">
    ……….
    <Label Grid.Column="0" Grid.Row="0" Text="1."/>
    <Label Grid.Column="0" Grid.Row="1" Text="2."/>
    <Label Grid.Column="0" Grid.Row="2" Text="3."/>
    <Label Grid.Column="0" Grid.Row="3" Text="4."/>
    <Label Grid.Column="1" Grid.Row="0" Text="Children below the age of 18 cannot be admitted for movies certified A."/>
    <Label Grid.Column="1" Grid.Row="1" Text="Please carry proof of age for movies certified A." />
    <Label Grid.Column="1" Grid.Row="2" Text="Drinking and alcohol is strictly prohibited inside the premises."/>
    <Label Grid.Column="1" LineBreakMode="WordWrap" Grid.Row="3" Text="Please purchase tickets for children above the age of 3."/>
   </Grid>
  </DataTemplate>
 </popup:SfPopup.ContentTemplate>
</popup:SfPopup>
You will get the following popup on selecting a time for a movie.
When you accept the terms and conditions, you will proceed through the seat selection process. When you decline, you will be navigated to the previous page containing the theatre list with time.
Step 5: Selecting seats for your comfort
Let’s implement the code to select the available seats in another popup window.
Refer to the following code example. Here, the popup contains seats and cost details updated in the ContentTemplate. We’ll also design the Proceed button in the FooterTemplate to process the booking commands.
<popup:SfPopup x:Key="BookingDialog"
               x:Name="ticketBookingPopup"
               ShowCloseButton="False"
               AnimationMode="None"
               HeaderTitle="Select your seats"
               AutoSizeMode="Height"
               ShowFooter="True">
 <popup:SfPopup.ContentTemplate>
  <DataTemplate>
   <StackLayout x:Name="seatSelectionPage" Orientation="Vertical">

    <StackLayout x:Name="numberOfSeatsLayout" Orientation="Horizontal">
     <Label x:Name="seat1" Text="1"></Label>
     <Label x:Name="seat2" Text="2"></Label>
     <Label x:Name="seat3" Text="3"></Label>
     <Label x:Name="seat4" Text="4"></Label>
     <Label x:Name="seat5" Text="5"></Label>
     <Label x:Name="seat6" Text="6"></Label>
    </StackLayout>

    <Label Text="Select your seat class"/>

    <StackLayout x:Name="seatClassLayout">
     <StackLayout Orientation="Horizontal" Margin="0,10,0,10">
      <Label Text="Silver"/>
      <Label Text="$19.69"/>
      <Label Text="Available"/>
     </StackLayout>

     <StackLayout Orientation="Horizontal" Margin="0,10,0,10">
      <Label Text="Premier"/>
      <Label Text="$23.65"/>
      <Label Text="Unavailable"/>
     </StackLayout>

    </StackLayout>
   </StackLayout>
  </DataTemplate>
 </popup:SfPopup.ContentTemplate>

<popup:SfPopup.FooterTemplate>
  <DataTemplate>
   <Button Text="Proceed" FontSize="14" Command="{Binding ProceedCommand, Source={x:Reference viewModel}}" CommandParameter="{StaticResource confirmationDialog}"/>
  </DataTemplate>
 </popup:SfPopup.FooterTemplate>
</popup:SfPopup>
Refer to the following image.
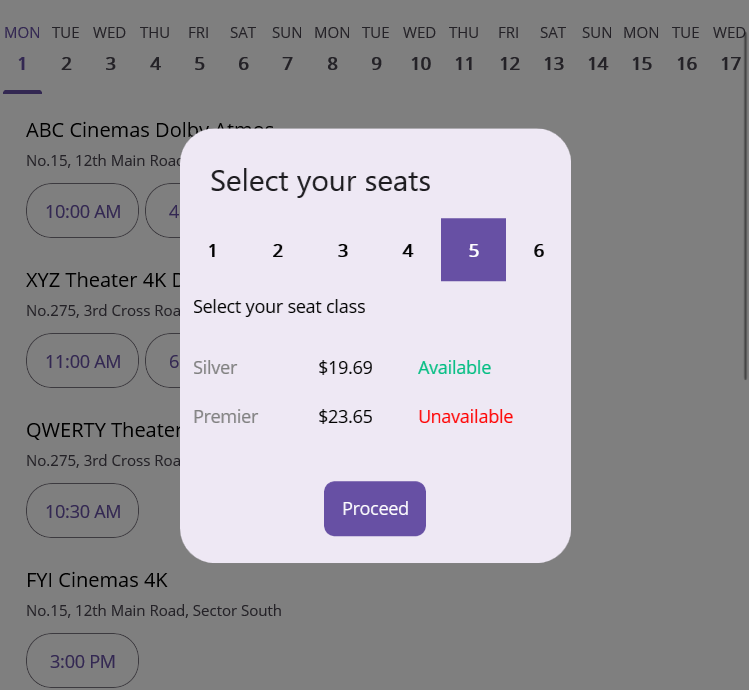
Upon choosing the seats, you can proceed to book the tickets.
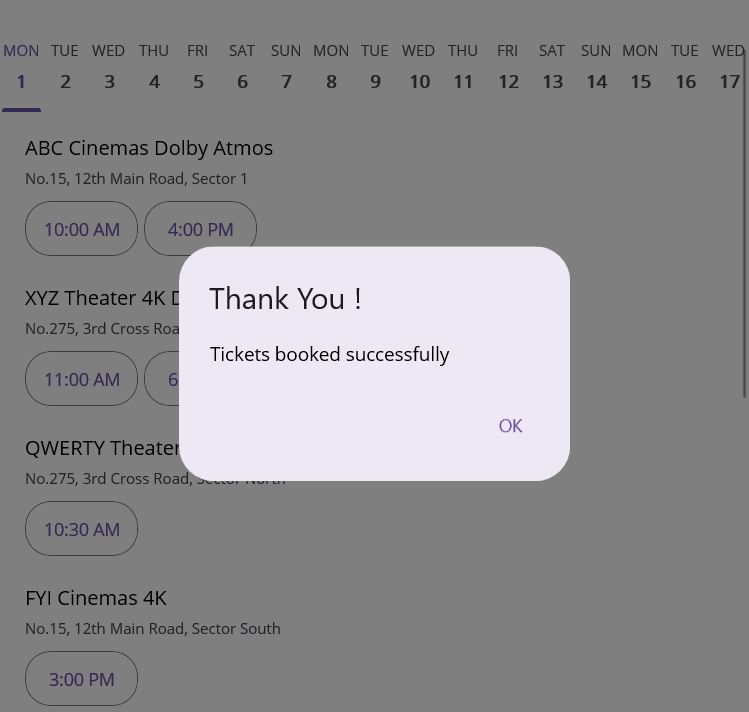
Step 6: Designing a popup for booking confirmation
Here, we’ll design a popup window to display the success message for the ticket booking confirmation. Refer to the following code example.
<popup:SfPopup x:Key="confirmationDialog"
               x:Name="confirmationDialog"
               AcceptButtonText="OK"
               HeaderTitle="Thank You !">
 <popup:SfPopup.ContentTemplate>
  <DataTemplate>
   <StackLayout Padding="25,5,0,5"
                BackgroundColor="Transparent">
    <Label Text="Tickets booked successfully"/>
   </StackLayout>
  </DataTemplate>
 </popup:SfPopup.ContentTemplate>
</popup:SfPopup>
Refer to the following image.
GitHub reference
For more details, refer to creating a movie ticket booking app using the .NET MAUI Popup control GitHub demo.

Conclusion
Thanks for reading! This blog shows creating a movie ticket booking app using Syncfusion .NET MAUI Popup control. Try out the steps in this blog and leave your feedback in the comments section below!
The existing customers can download the latest version of Essential Studio® from the License and Downloads page. If you are new, try our 30-day free trial to explore our incredible features.
You can also contact us through our support forums, support portal, or feedback portal. We are always happy to assist you!


 No spam, just valuable updates.