TLDR: Explore the new Syncfusion .NET MAUI Template Studio for Visual Studio Code, install the .NET MAUI extension, and streamline your .NET MAUI app creation by integrating Syncfusion .NET MAUI controls with ease.
We are thrilled to introduce the Syncfusion .NET MAUI Visual Studio Code Template Studio as part of our Essential Studio® 2024 Volume 1 release. This powerful tool is designed to simplify the creation of .NET MAUI apps featuring Syncfusion controls directly within Visual Studio Code. It enhances the utilization of Syncfusion .NET MAUI controls by automatically setting up the necessary Syncfusion .NET MAUI NuGet packages.
The Template Studio offers a user-friendly interface for configuring .NET MAUI apps. Users can easily select project names, locations, project types, Syncfusion .NET MAUI controls, and .NET Core versions, and themes within the UI, significantly improving their overall experience.
Let’s see how to install the Syncfusion .NET MAUI extension and create a .NET MAUI app using the Template Studio support for Visual Studio Code.
Prerequisites
To use the .NET MAUI Template Studio, you must install the Syncfusion .NET MAUI extensions. You can install them directly from Visual Studio Code or Visual Studio Marketplace.
Installing the Syncfusion .NET MAUI extensions from Visual Studio Code
Follow these steps to install the Syncfusion .NET MAUI extensions from Visual Studio Code:
- Open Visual Studio Code.
- Then, open the Command Palette by navigating to View- > Command Palette.
- Search for Install Extensions in the Command Palette and expand the Install Extensions option when it appears.
- Search for Syncfusion .NET MAUI in the search box to locate .NET MAUI VS Code Extensions – Syncfusion.
- Now, install the .NET MAUI VS Code Extensions – Syncfusion extension by clicking the Install button.
Installing the Syncfusion .NET MAUI extensions from Marketplace
Follow these steps to install the Syncfusion .NET MAUI extensions from Marketplace:
- Open the Syncfusion .NET MAUI Code Extensions in Visual Studio Code Marketplace and click Install.
- A pop-up will appear requesting to open Visual Studio Code. Click Open Visual Studio Code to launch the Syncfusion .NET MAUI Extension in Visual Studio Code.
- In the next pop-up, click the Install button to install the .NET MAUI VSCode Extensions—Syncfusion extension.
Creating a Syncfusion .NET MAUI app
Let’s see how to create a Syncfusion .NET MAUI app using the Template Studio for Visual Studio Code by following these steps:
- First, open Visual Studio Code.
- Then, open the Command Palette by pressing Ctrl+Shift+P. To access the Syncfusion templates, search for Syncfusion in the Visual Studio Code palette, select the Syncfusion .NET MAUI Template Studio: Launch option, and press the Enter key.

- Now, the Syncfusion .NET MAUI Template Studio wizard will be launched. We can configure the Syncfusion .NET MAUI app in this wizard by providing the Project Name and Location as required.
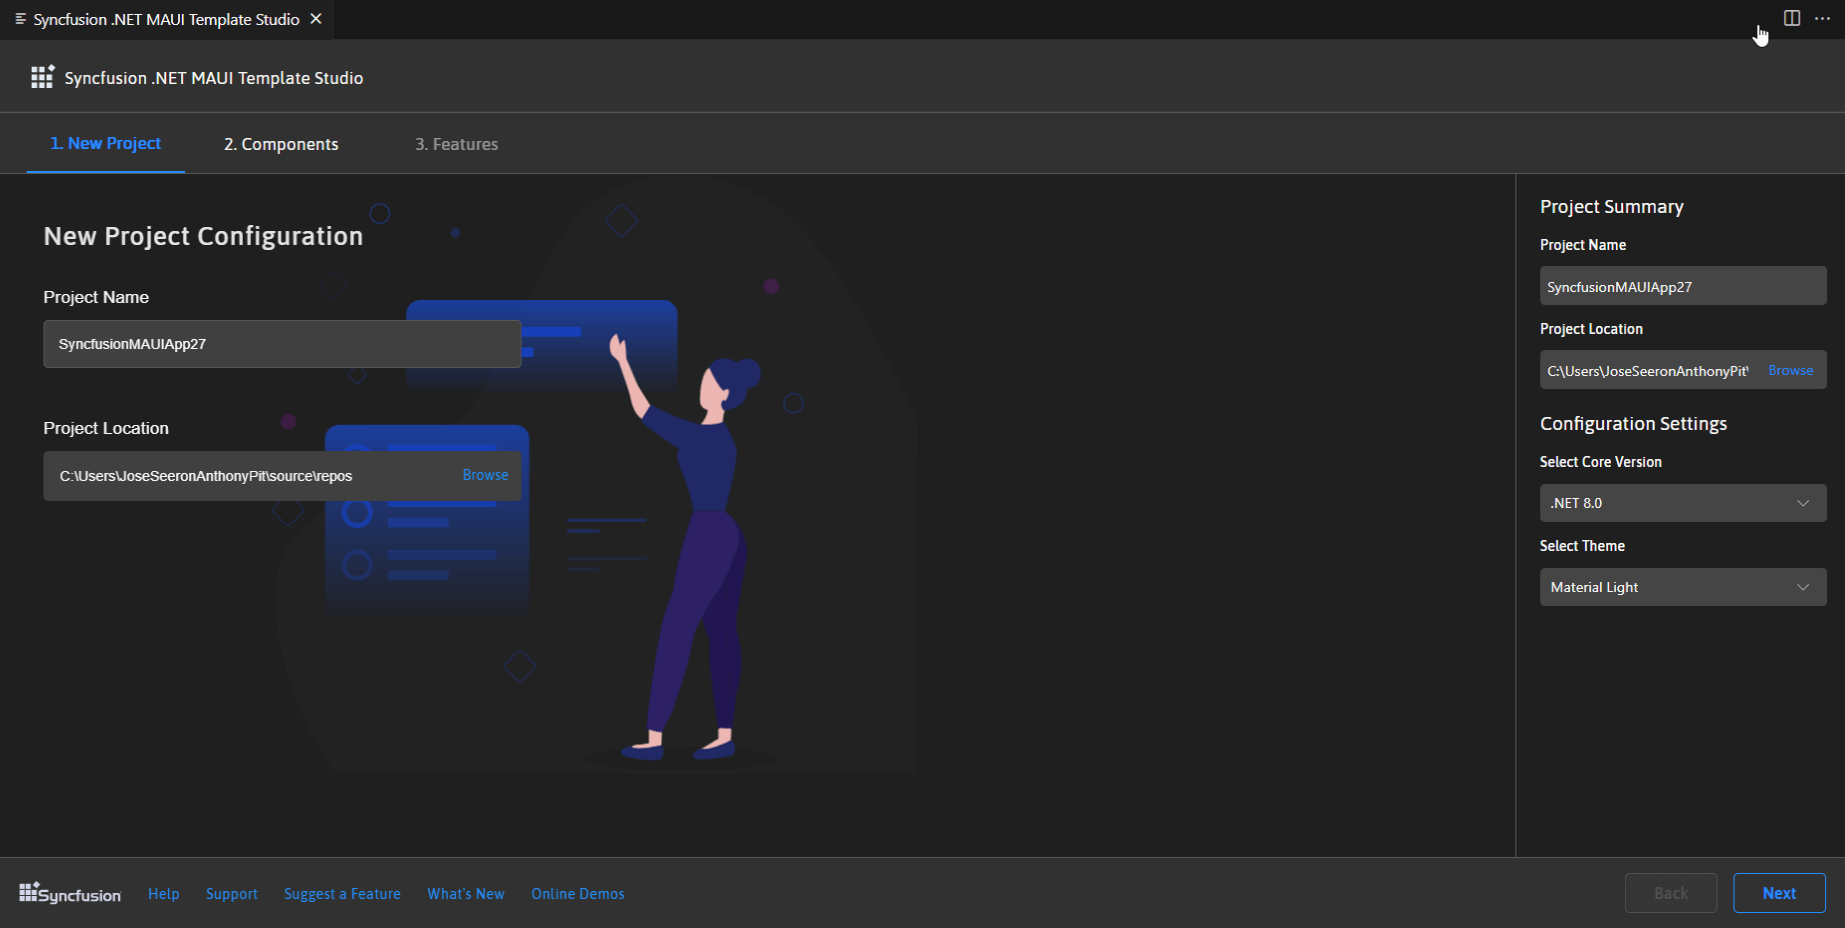
- Click on Next or navigate to the Components tab to select the Syncfusion .NET MAUI components you want to integrate into your .NET MAUI app.
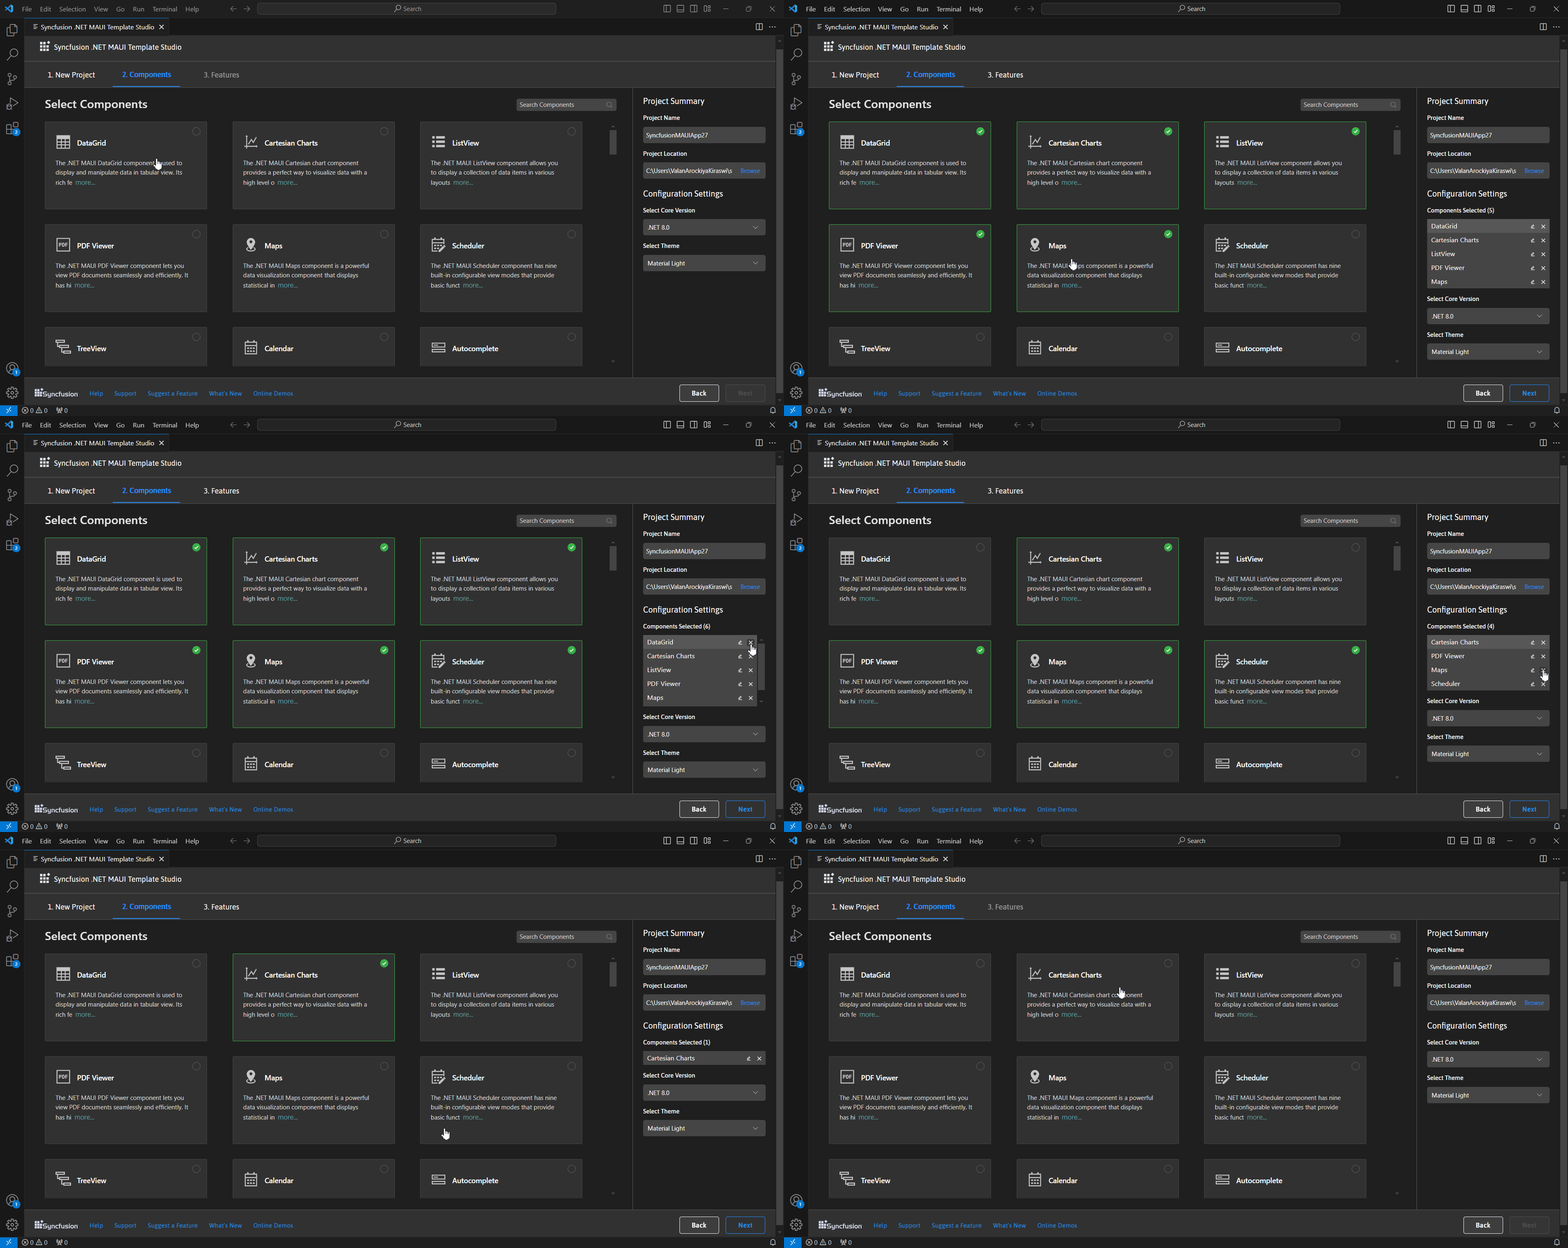
Select the required components by clicking the checkbox or the corresponding component box.
To remove the selected components, use one of the following options:
Option 1: Click on the selected component’s checkbox in the select components section.
Option 2: To remove the selected component, click the x button in the Components Selected list in the Project Summary section.
Note: We should select at least one component to enable the Features tab.
- Then, click Next or go to the Features tab to view and select the features of the chosen components.
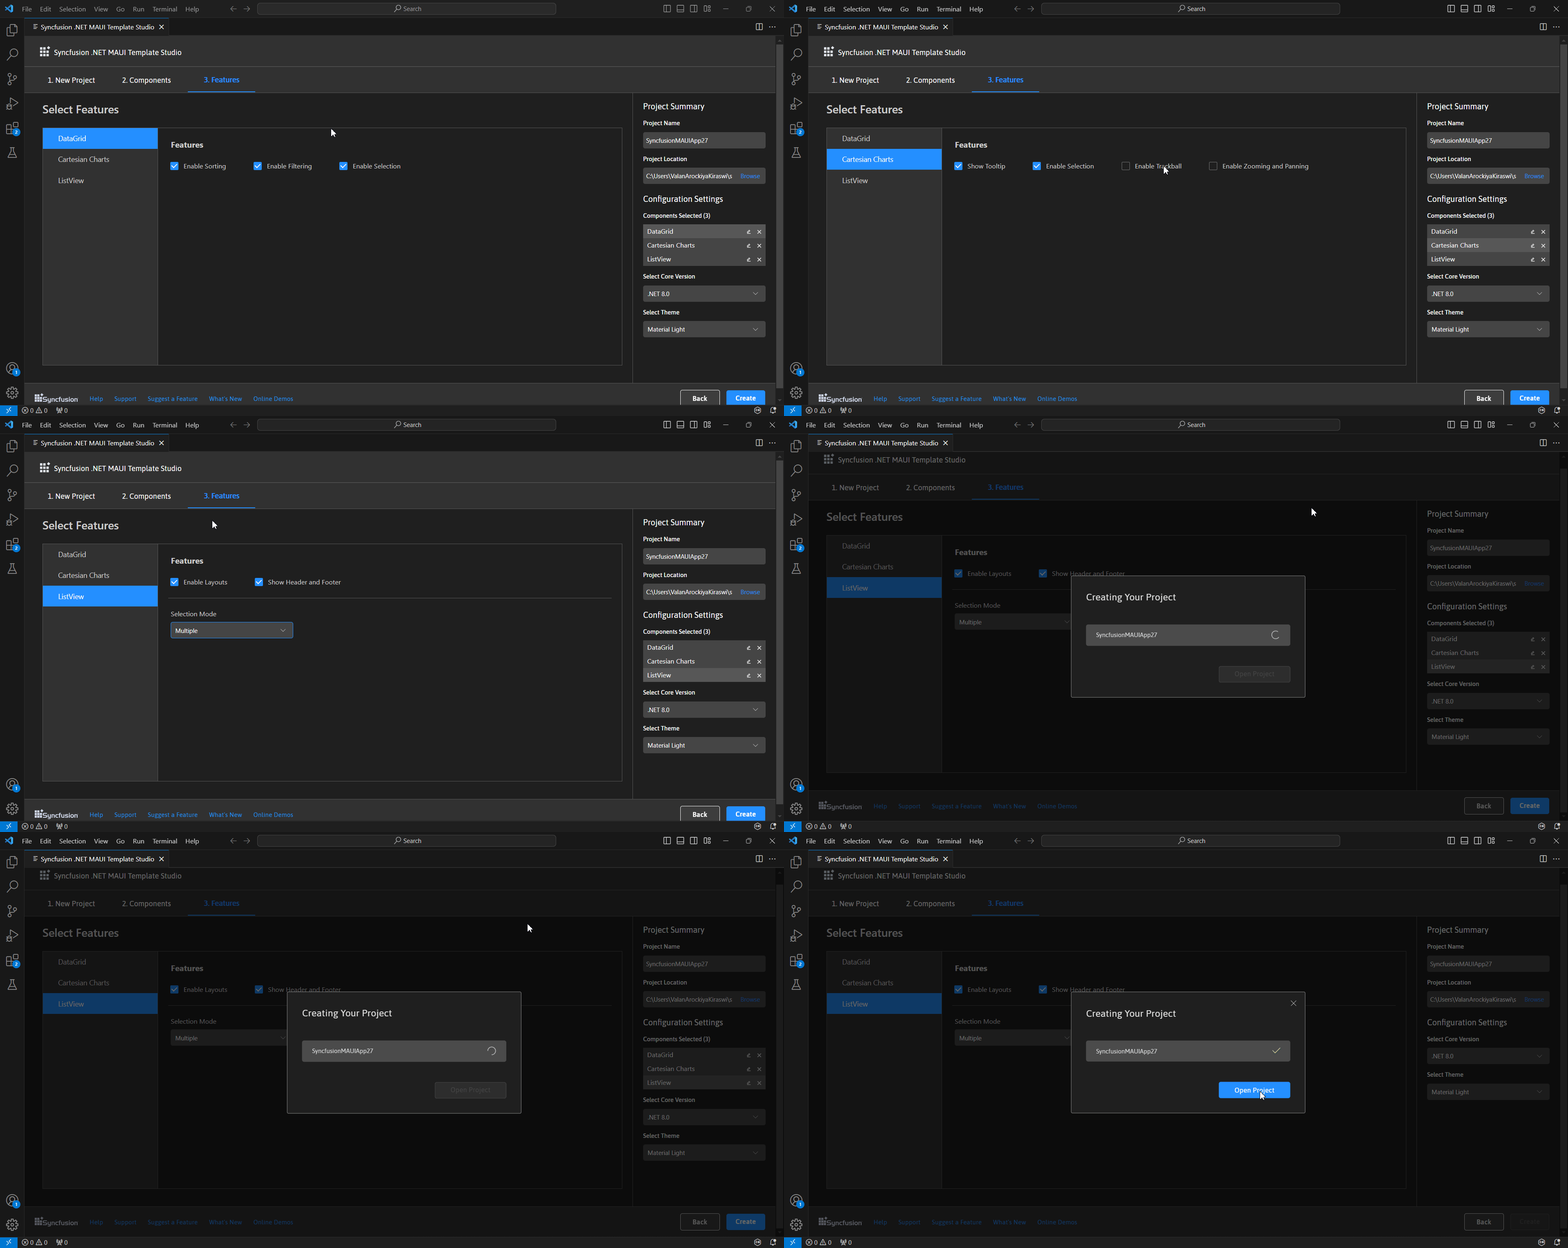
In the Project Details section of the Syncfusion .NET MAUI Template Studio wizard, you can change the project name, project location, core version, theme and remove selected components. Refer to the following image.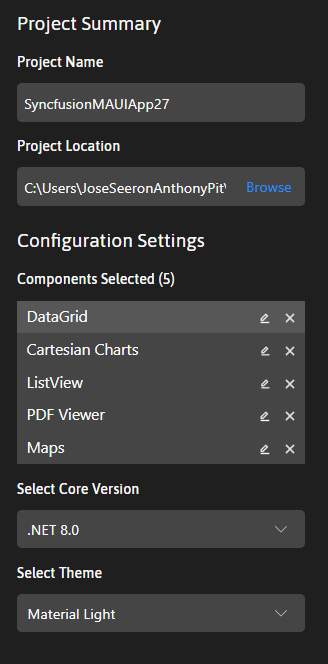
- Now, choose the Create button to generate the Syncfusion .NET MAUI app, including the necessary Syncfusion NuGet packages and rendering code for the selected Syncfusion controls.
- Press the F5 key or navigate to Run->Start Debugging. Then, search for .NET MAUI and select it to launch the created Syncfusion .NET MAUI app.
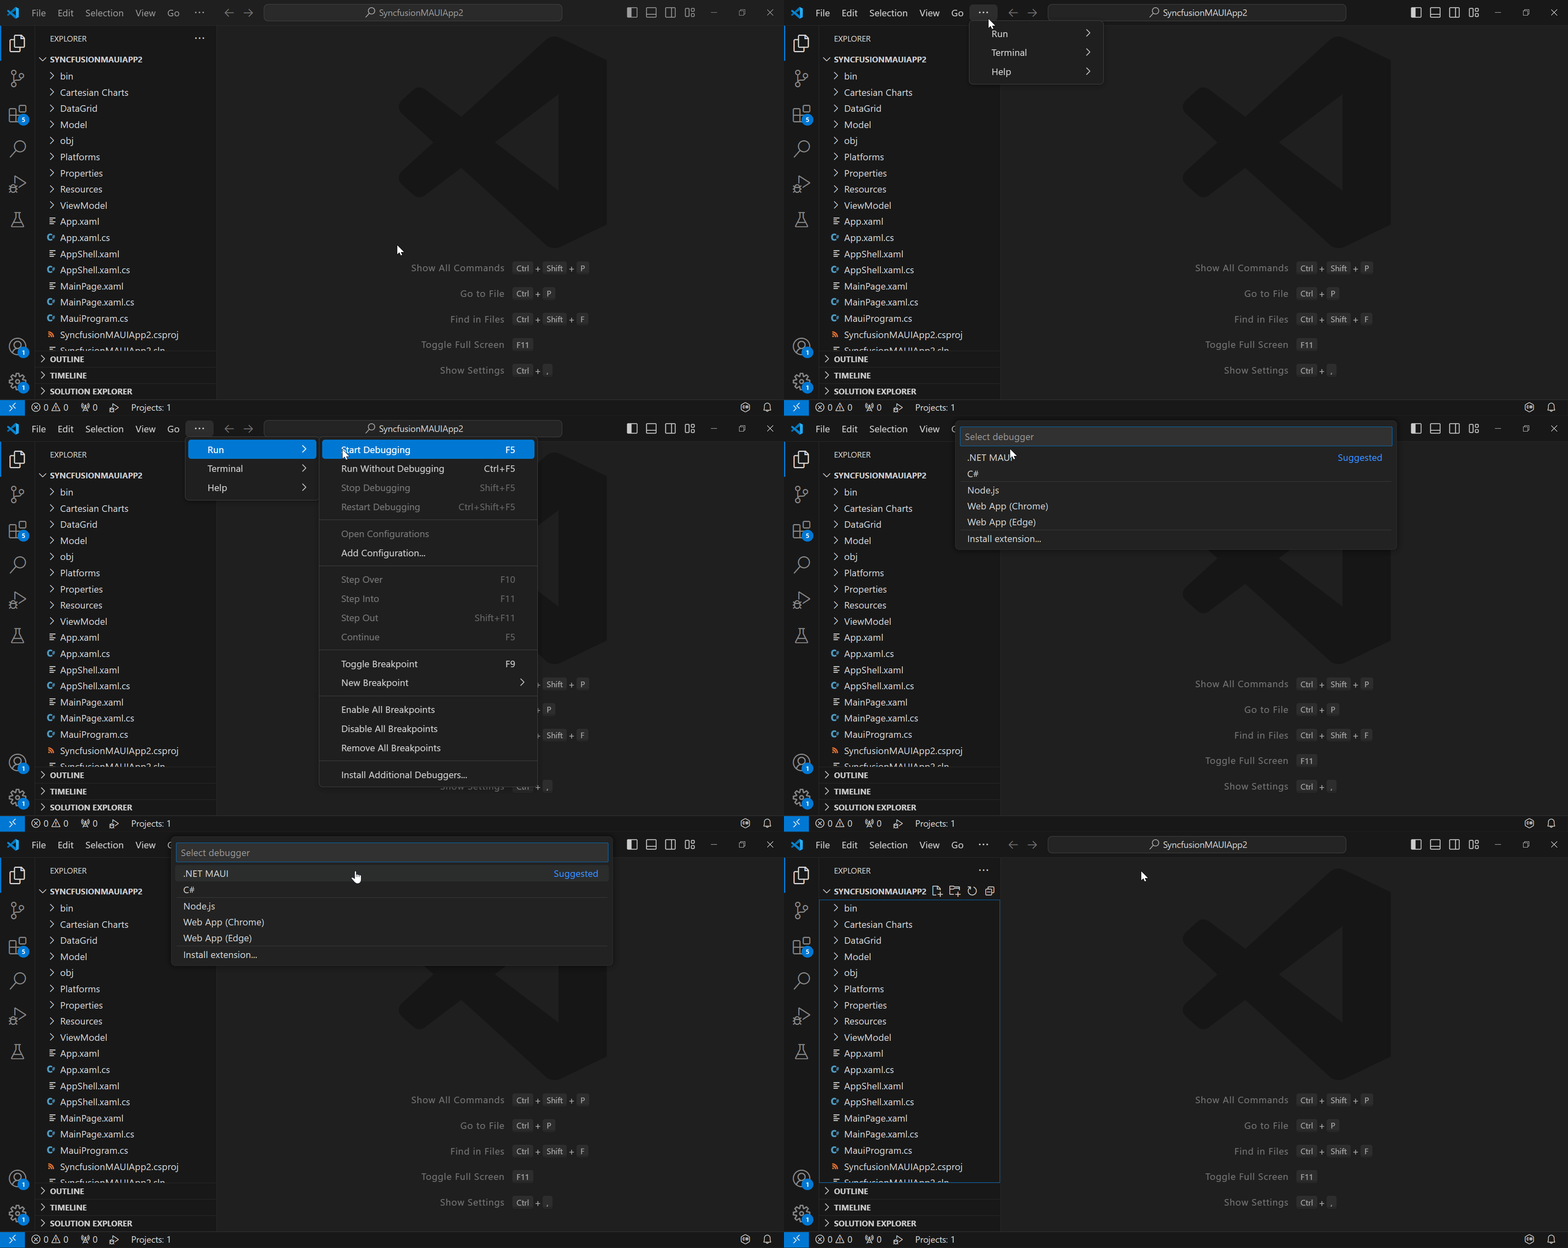
Note: If the .NET MAUI extension is a preview version, the debugger will be listed as .NET MAUI. If the extension is stable, the debugger configuration will be listed as C#.
- If we installed the trial setup or NuGet packages from nuget.org, we should register the Syncfusion license key for our app since Syncfusion introduced the licensing system in the Essential Studio® 2018 Volume 2 (v16.2.0.41) release. Navigate to the help topic to generate and register the Syncfusion license key for your app. Also, refer to this blog to understand the licensing changes introduced in Essential Studio®.
Special mention: Syncfusion® Document Viewer Extension
If you often find yourself switching between apps just to check a Word or Excel file, this handy tool is for you. The Syncfusion® Document Viewer Extension for Visual Studio Code lets you open and view documents like Word, Excel, and more; right inside your coding environment.
You can preview high-fidelity files and even make light edits such as text changes and formatting tweaks, all without leaving VS Code. It’s a simple way to stay focused and keep your project documentation within reach.
Available for free download on the Visual Studio Code Marketplace.
Conclusion
Thanks for reading! In this blog, we’ve explored the new Syncfusion .NET MAUI Template Studio for Visual Studio Code in the Essential Studio® 2024 Volume 1 release. This user-friendly project wizard is designed to streamline the integration of Syncfusion controls into your apps, automatically generating code and references. This eliminates the need to manually add Syncfusion .NET MAUI controls into your .NET MAUI apps, saving time and enhancing your app’s functionality.
To explore more updates from this release, please refer to our Release Notes and What’s New pages.
If you’re not a Syncfusion customer, we encourage you to try our 30-day free trial to experience these latest features firsthand.
We welcome your feedback and questions in the comments section below or through our support forums, support portal, or feedback portal. We’re here to help you every step of the way!
