Today I am going to show you how to perform mail merge in C# using the Syncfusion .NET Word Library (Essential DocIO) without Microsoft Word or Office interop dependencies.
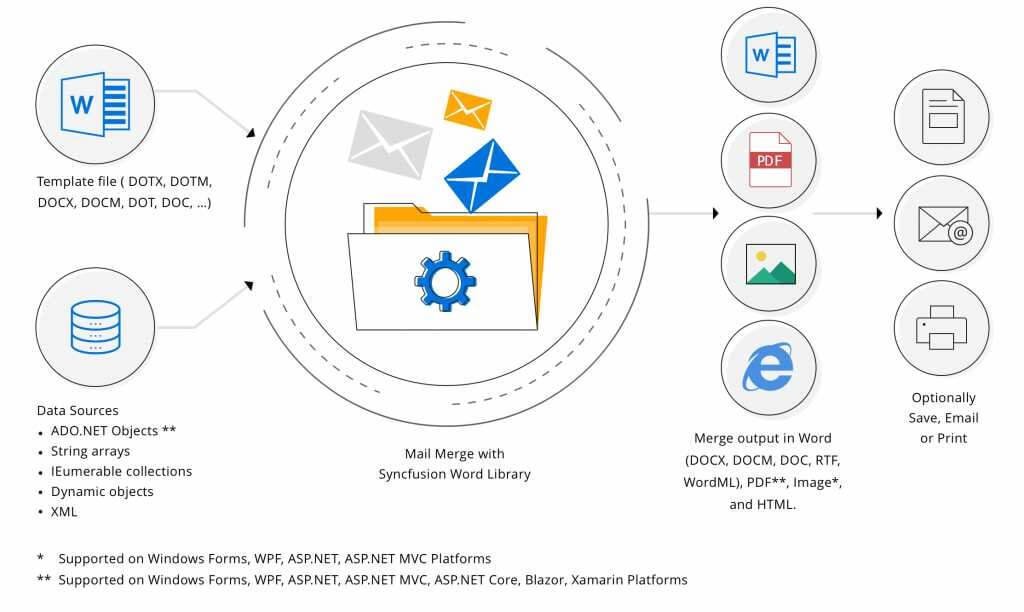
Syncfusion’s .NET Word Library has powerful mail merge APIs to generate personalized reports like letters, invoice, payroll, and email content. It saves you effort and time by helping you automate the generation of personalized documents programmatically in C# and VB.NET. The resultant documents can be saved as Word documents (DOC, DOCX), PDFs, images, HTML, and more.
In this blog, we are going to learn how to perform mail merge in C# and use other mail merge features.
- What is mail merge
- Mail merge in C# using Syncfusion mail merge API
- Types of data sources
- Different ways to mail merge
- Why Syncfusion mail merge APIs
- Conclusion

Mastering Word documents is a breeze with the Syncfusion Word Library, simplifying every aspect of document creation and management!
What is mail merge?
Mail merge is a process of creating multiple documents with similar text, graphics, layout, and formatting by replacing the placeholder (merge fields) with specific information such as name, address, etc., from a data source into each Word document to create personalized, individual documents such as letters, labels, envelopes, or email messages.
The mail merge process involves three documents:
- Template Word document: This document contains the static, template text and graphics along with merge fields (that are placeholders) for replacing dynamic data from a data source.
- Data source: This represents a file or database containing data to replace the merge fields in the template Word document.
- Final merged document: This resultant document is a combination of the template Word document and the data from the data source. The mail merge process pulls the information from the data source and replaces the merge fields (placeholders) in your template Word document.
Mail merge in C# using Syncfusion mail merge API
Let’s learn how to generate personalized letters step by step through the mail merge process on a Word document in C# using Syncfusion’s mail merge API.
Creating a template Word document
Create a template Word document with merge fields for generating a personalized letter using any Word editors, like Microsoft Word. By using a Word editor application, you can take advantage of the visual interface to design a unique layout, formatting, and more for your letter template interactively.
This mail merge example uses the following template Word document.
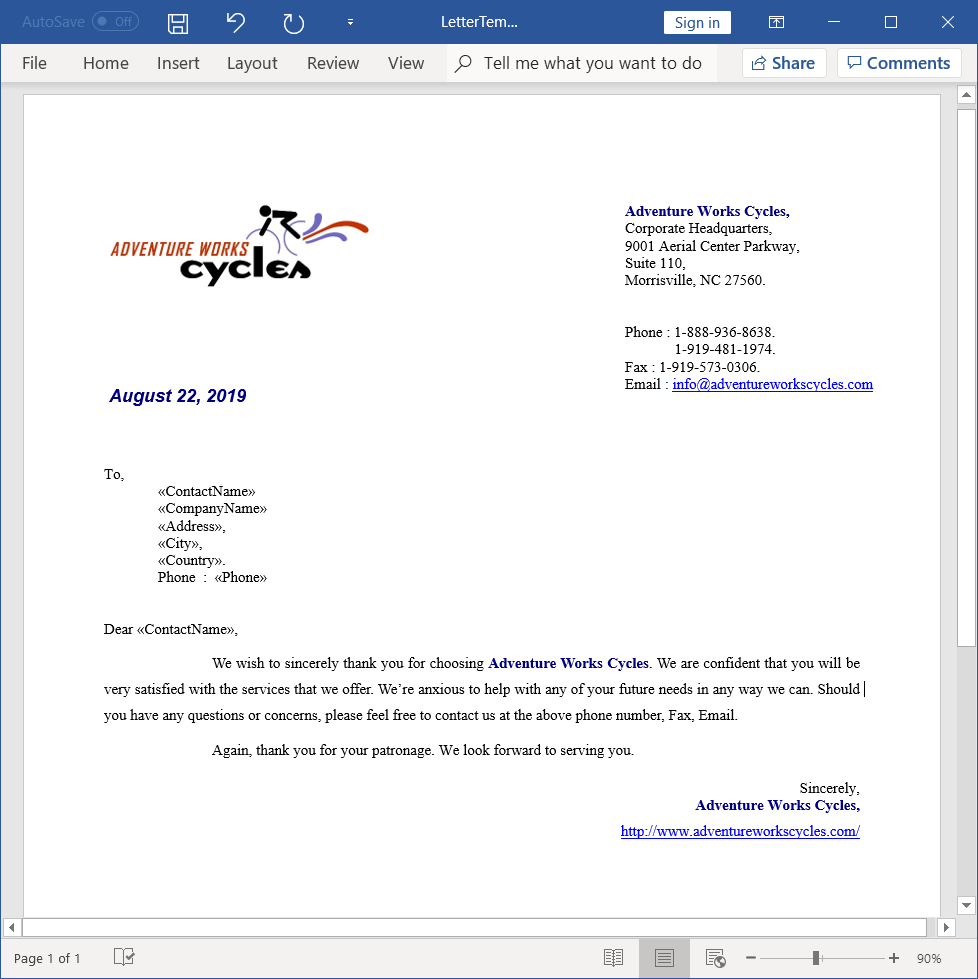
The template document can be downloaded from LetterTemplate.docx.
If you want to replace a merge field with an image, then define the merge field name with the prefix “Image:”.
For example, the merge field name should be like: “Image:Photo” («Image:MergeFieldName»)
You can define how the merge field result should be displayed in your final report by adding necessary format switches in the merge field.
There are three types of switches:
- Text format switch (\*)
- Numeric format switch (\#)
- Date-time format switch (\@)
For example:
The switch “\* Upper” in the merge field FirstName displays the result in upper case as “FIRSTNAME”.
{ MERGEFIELD FirstName \* Upper }
The switch “\# $#,##0.00” in the merge field TotalSales displays the result as “$4,455.70”.
{ MERGEFIELD TotalSales \# $#,##0.00 }
Executing mail merge in C#
Step 1: Create a new C# console application (.NET Core) project.
Step 2: Install the Syncfusion.DocIO.Net.Core NuGet package as a reference to your console application (.NET Core) from NuGet.org.
Step 3: Include the following namespace in the Program.cs file.
using Syncfusion.DocIO;
using Syncfusion.DocIO.DLS;
Add the following C# code in main method of the Program.cs file to generate personalized letters by performing mail merge in a Word document.
Step 4: Open the template Word document in C# using the Syncfusion Word Library.
//Opens the template Word document.
Stream docStream = File.OpenRead(Path.GetFullPath(@"../../../LetterTemplate.docx"));
WordDocument document = new WordDocument(docStream, FormatType.Docx);
docStream.Dispose();
Step 5: Prepare the data source to mail merge the Word template and generate the letter. Here, the string arrays load the data for mail merge.
//Loads the string arrays with field names and values for mail merge.
string[] fieldNames = { "ContactName", "CompanyName", "Address", "City", "Country", "Phone" };
string[] fieldValues = { "Nancy Davolio", "Syncfusion", "507 - 20th Ave. E.Apt. 2A", "Seattle, WA", "USA", "(206) 555-9857-x5467" };
Step 6: Execute mail merge on the Word template and generate the final letter as a Word document.
//Performs the mail merge.
document.MailMerge.Execute(fieldNames, fieldValues);
//Saves the Word document in DOCX format.
docStream = File.Create(Path.GetFullPath(@"Result.docx"));
document.Save(docStream, FormatType.Docx);
docStream.Dispose();
//Releases the resources occupied by WordDocument instance.
document.Dispose();
By executing the application, you will get the output Word document as follows.
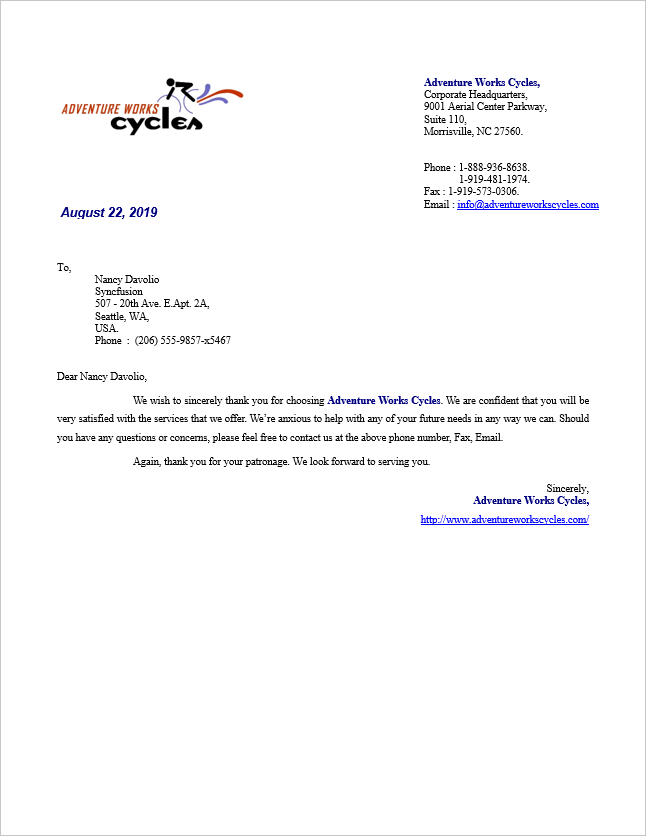
A complete, working example can be downloaded from GitHub.

Get insights into the Syncfusion’s Word Library and its stunning array of features with its extensive documentation.
Types of data sources
The Syncfusion mail merge API populates the template Word document with data from all the common data sources of .NET Framework:
- It allows data as two string arrays, the first array holding the field names and second array holding the field values.
- NET objects of type such as DataRow, DataSet, DataTable, DataView, DbConnection, IDataReader, and OleDbDataReader can be used to get data from several types of databases to be used for the mail merge process.
- An IEnumerable collection holding .NET objects or dynamic objects can be used.
- Easily load data from an XML or JSON file as ADO.NET objects or an IEnumerable collection of .NET objects and use it for the mail merge process.
- Syncfusion has its own wrapper class, MailMergeDataTable, which holds the data using an IEnumerable collection, like DataTable. And MailMergeDataSet holds multiple MailMergeDataTable objects for performing a nested mail merge, like DataSet.
Different ways to mail merge in C#
Let’s see how to generate personalized reports using the Syncfusion mail merge API several ways.
Simple mail merge
A simple mail merge replaces all the merge fields in the template document with data by repeating the whole document automatically for each record in the data source in a fraction of a second. It inserts the document contents at the end as a new section while repeating for next record in the data source. Executing mail merge for a whole document can be achieved by using the Execute method.
Create envelopes using mail merge in C#
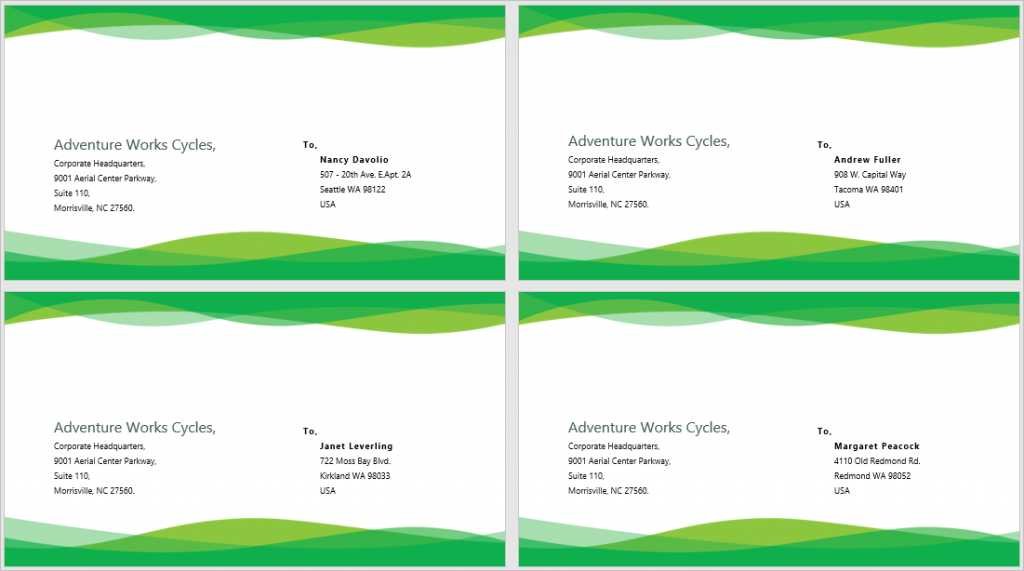
Let’s see how to create a batch of personalized envelopes for everyone in the mailing list.
Design your template Word document for an envelope with the required layout, formatting, graphics, and merge fields for personalized information using Microsoft Word. Prepare the mailing list as an IEnumerable collection and execute mail merge in C# using the Syncfusion mail merge API.
This mail merge example creates envelopes using the following template Word document.
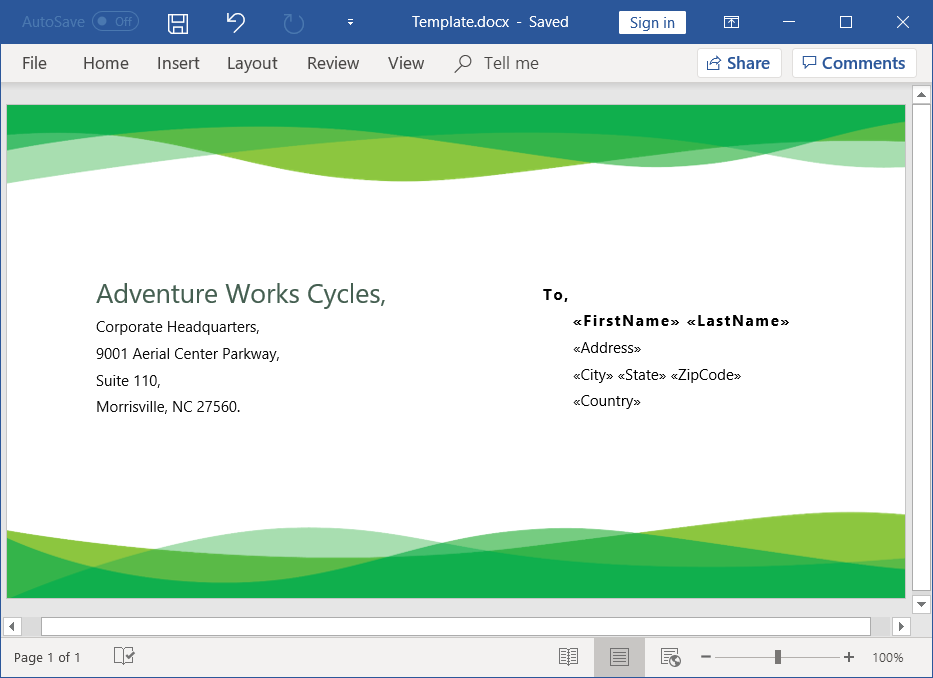
The template document can be downloaded from Template.docx.
The following C# code example illustrates how to create envelopes for mailing using mail merge.
static void Main(string[] args)
{
    //Creates new Word document instance for Word processing.
    using (WordDocument document = new WordDocument())
    {
        //Opens the template Word document.
        Stream docStream = File.OpenRead(Path.GetFullPath(@"../../../Template.docx"));
        document.Open(docStream, FormatType.Docx);
        docStream.Dispose();
        //Gets the recipient details as an "IEnumerable" collection of .NET objects.
        List<Recipient> recipients = GetRecipients();
        //Performs the mail merge.
        document.MailMerge.Execute(recipients);
        //Save the file in the given path.
        docStream = File.Create(Path.GetFullPath(@"Result.docx"));
        document.Save(docStream, FormatType.Docx);
        docStream.Dispose();
    }
}
Refer to the following C# code definition of the GetRecipients method, which provides data for mail merge.
private static List<Recipient> GetRecipients()
{
    List<Recipient>  recipients = new List<Recipient>();
    //Initializes the recipient details.
    recipients.Add(new Recipient("Nancy", "Davolio", "507 - 20th Ave. E.Apt. 2A", "Seattle", "WA", "98122", "USA"));
    recipients.Add(new Recipient("Andrew", "Fuller", "908 W. Capital Way", "Tacoma", "WA", "98401", "USA"));
    recipients.Add(new Recipient("Janet", "Leverling", "722 Moss Bay Blvd.", "Kirkland", "WA", "98033", "USA"));
    recipients.Add(new Recipient("Margaret", "Peacock", "4110 Old Redmond Rd.", "Redmond", "WA", "98052", "USA"));
    recipients.Add(new Recipient("Steven", "Buchanan", "14 Garrett Hil", "London", "", "SW1 8JR", "UK"));
    return recipients;
}
The following C# code shows the Recipient class.
class Recipient
{
    #region Properties
    public string FirstName { get; set; }
    public string LastName { get; set; }
    public string Address { get; set; }
    public string City { get; set; }
    public string State { get; set; }
    public string ZipCode { get; set; }
    public string Country { get; set; }
    #endregion

    #region Constructor
    public Recipient(string firstName, string lastName, string address, string city, string state, string zipCode, string country)
    {
        FirstName = firstName;
        LastName = lastName;
        Address = address;
        City = city;
        State = state;
        ZipCode = zipCode;
        Country = country;
    }
    #endregion
}
A complete, working example can be downloaded from GitHub.
Generate multiple Word documents using mail merge in C#
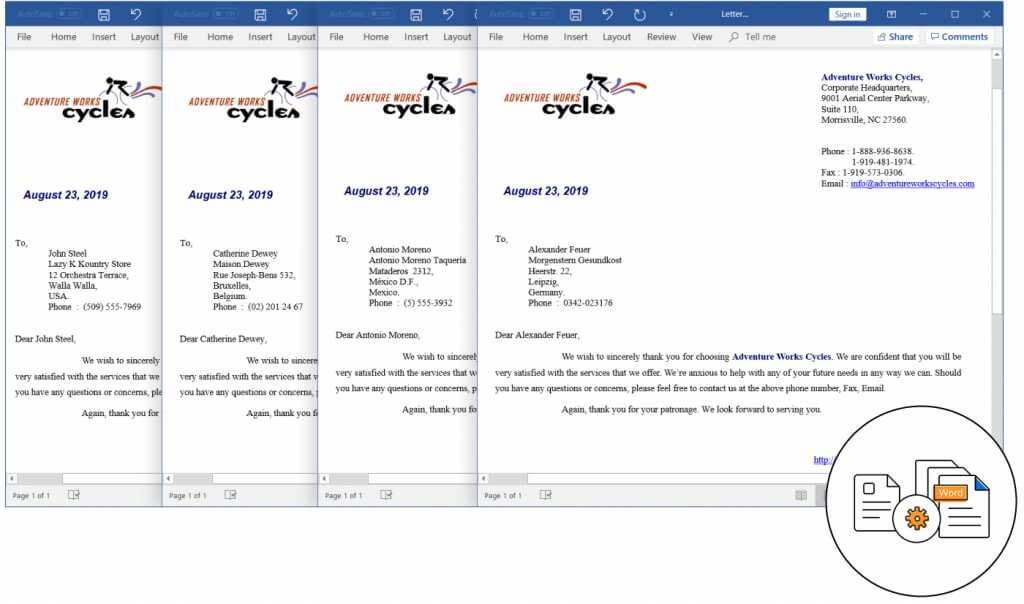
The Syncfusion Word Library can mail merge the template Word document with all the records in the data source and generate the report as just one consolidated document. To generate individual documents for each record in your data source, execute mail merge multiple times. This can be done like this:
- Loop through all records in the data source.
- Clone the template Word document.
- Mail merge the Word template for each record and save the document.
This mail merge example generates multiple Word documents using the following template Word document.

The template document can be downloaded from LetterTemplate.docx.
The following C# code example illustrates how to generate a personalized letter as an individual Word document for each record using mail merge.
static void Main(string[] args)
{
    //Creates new Word document instance for Word processing.
    using (WordDocument template = new WordDocument())
    {
        //Opens the template Word document.
        template.Open(Path.GetFullPath(@"../../LetterTemplate.docx"), FormatType.Docx);
        //Gets the recipient details as a DataTable.
        DataTable recipients = GetRecipients();
        //Creates folder for saving generated documents.
        if (!Directory.Exists(Path.GetFullPath(@"../../Result/")))
            Directory.CreateDirectory(Path.GetFullPath(@"../../Result/"));
        foreach (DataRow dataRow in recipients.Rows)
        {
            //Clones the template document for creating new document for each record in the data source.
            WordDocument document = template.Clone();
            //Performs the mail merge.
            document.MailMerge.Execute(dataRow);
            //Save the file in the given path.
            document.Save(Path.GetFullPath(@"../../Result/Letter_" + dataRow.ItemArray[2].ToString() + ".docx"), FormatType.Docx);
            //Releases the resources occupied by WordDocument instance.
            document.Dispose();
        }
    }
}
Refer to the following C# code definition of the GetRecipients method, which provides data for the mail merge. You can download the database from CustomerDetails.mdb.
private static DataTable GetRecipients()
{
    //Creates new DataTable instance.
    DataTable table = new DataTable();
    //Loads the database.
    OleDbConnection conn = new OleDbConnection("Provider=Microsoft.Jet.OLEDB.4.0;Data Source=" + @"../../CustomerDetails.mdb");
    //Opens the database connection.
    conn.Open();
    OleDbDataAdapter adapter = new OleDbDataAdapter("Select * from Customers", conn);
    //Gets the data from the database.
    adapter.Fill(table);
    //Releases the memory occupied by database connection.
    adapter.Dispose();
    conn.Close();
    return table;
}
A complete, working example can be downloaded from GitHub.

Unearth the endless potential firsthand through demos highlighting the features of the Syncfusion Word Library.
Create and send email messages using mail merge in C#
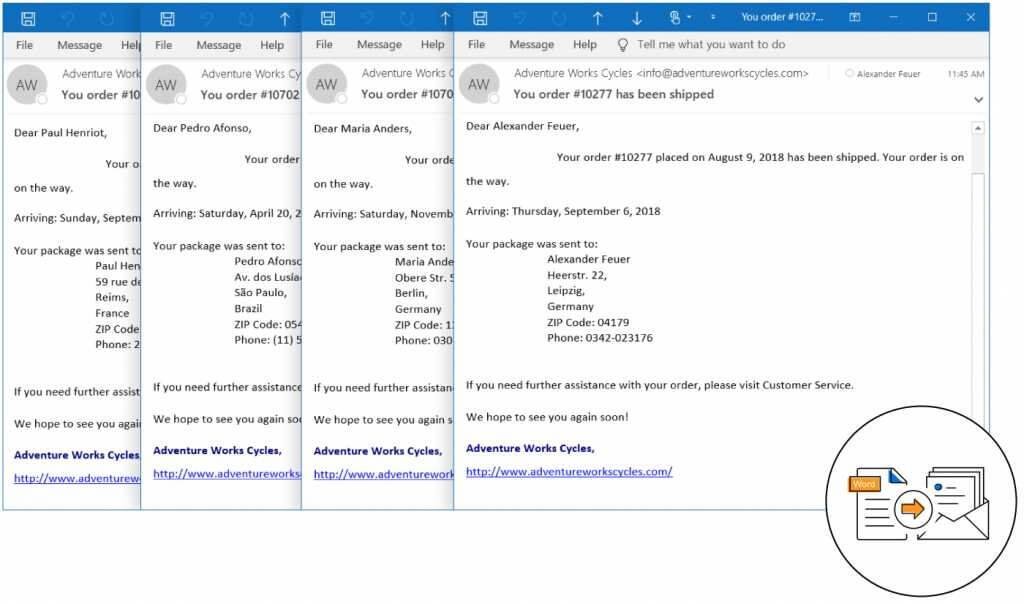
With Syncfusion Word Library, you can create email messages by converting the mail merged document to HTML. You can send the merged document as emails, either inline or as a file attachment.
This mail merge example of creating and sending email messages uses the following template Word document.
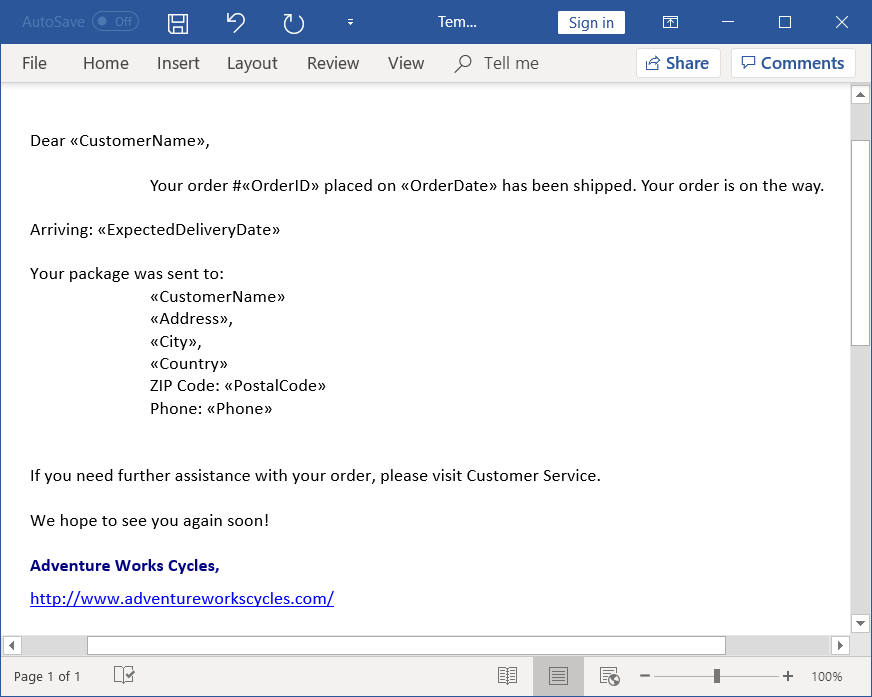
The template document can be downloaded from Template.docx.
The following C# code example illustrates how to create personalized letters and send bulk email messages using mail merge.
static void Main(string[] args)
{
    //Creates new Word document instance for word processing.
    using (WordDocument template = new WordDocument())
    {
        //Opens the template Word document.
        Stream docStream = File.OpenRead(Path.GetFullPath(@"../../../Template.docx"));
        template.Open(docStream, FormatType.Docx);
        docStream.Dispose();
        //Gets the recipient details as DataTable.
        List<object> recipients = GetRecipients();
        foreach (var dataRecord in recipients)
        {
            //Clones the template document for creating new document for each record in the data source.
            WordDocument document = template.Clone();
            //Performs the mail merge.
            document.MailMerge.Execute(new List<object>() { dataRecord as Dictionary<string, object> });
            //Save the HTML file as string.
            docStream = new MemoryStream();
            document.SaveOptions.HtmlExportOmitXmlDeclaration = true;
            document.Save(docStream, FormatType.Html);
            //Releases the resources occupied by WordDocument instance.
            document.Dispose();
            docStream.Position = 0;
            StreamReader reader = new StreamReader(docStream);
            string mailBody = reader.ReadToEnd();
            docStream.Dispose();
            if (mailBody.StartsWith("<!DOCTYPE"))
                mailBody = mailBody.Remove(0, 97);
            //Sends the email message.
            //Update the required email ID here.
            SendEMail("[email protected]", "[email protected]", "You order #" + (dataRecord as Dictionary<string, object>)["OrderID"].ToString() + " has been shipped", mailBody);
        }
    }
}
Refer to the following C# code definition of the GetRecipients method, which provides data for the mail merge. You can download the JSON file from CustomerDetails.json.
private static List<object> GetRecipients()
{
    //Reads the JSON object from JSON file.
    JObject jsonObject = JObject.Parse(File.ReadAllText(@"../../../CustomerDetails.json"));
    //Converts JSON object to Dictionary.
    IDictionary<string, object> data = GetData(jsonObject);
    return data["Customers"] as List<object>;
}
/// <summary>
/// Gets data from JSON object.
/// </summary>
/// <param name="jsonObject">JSON object.</param>
/// <returns>Dictionary of data.</returns>
private static IDictionary<string, object> GetData(JObject jsonObject)
{
    Dictionary<string, object> dictionary = new Dictionary<string, object>();
    foreach (var item in jsonObject)
    {
        object keyValue = null;
        if (item.Value is JArray)
            keyValue = GetData((JArray)item.Value);
        else if (item.Value is JToken)
            keyValue = ((JToken)item.Value).ToObject<string>();
        dictionary.Add(item.Key, keyValue);
    }
    return dictionary;
}
/// <summary>
/// Gets array of items from JSON array.
/// </summary>
/// <param name="jArray">JSON array.</param>
/// <returns>List of objects.</returns>
private static List<object> GetData(JArray jArray)
{
    List<object> jArrayItems = new List<object>();
    foreach (var item in jArray)
    {
        object keyValue = null;
        if (item is JObject)
            keyValue = GetData((JObject)item);
        jArrayItems.Add(keyValue);
    }
    return jArrayItems;
}
The following C# code example illustrates how to send an email message.
private static void SendEMail(string from, string recipients, string subject, string body)
{
    //Creates the email message.
    var emailMessage = new MailMessage(from, recipients);
    //Adds the subject for email.
    emailMessage.Subject = subject;
    //Sets the HTML string as email body.
    emailMessage.IsBodyHtml = true;
    emailMessage.Body = body;
    //Sends the email with prepared message.
    using (var client = new SmtpClient())
    {
        //Update your SMTP Server address here.
        client.Host = "smtp.live.com";
        client.UseDefaultCredentials = false;
        //Update your email credentials here.
        client.Credentials = new System.Net.NetworkCredential(from, "password");
        client.Port = 587;
        client.EnableSsl = true;
        client.Send(emailMessage);
    }
}
A complete, working example can be downloaded from GitHub.

Streamline your Word document workflow effortlessly with Syncfusion’s robust Word Library.
Generate barcode labels using mail merge in C#
Generate barcodes using the Syncfusion PDF Library and insert the generated barcode as an image into a Word document through a mail merge event. The MergeImageField event allows you to insert images from a file system, modify image data, and resize the merged images.
This mail merge example for generating barcode labels uses the following template Word document.
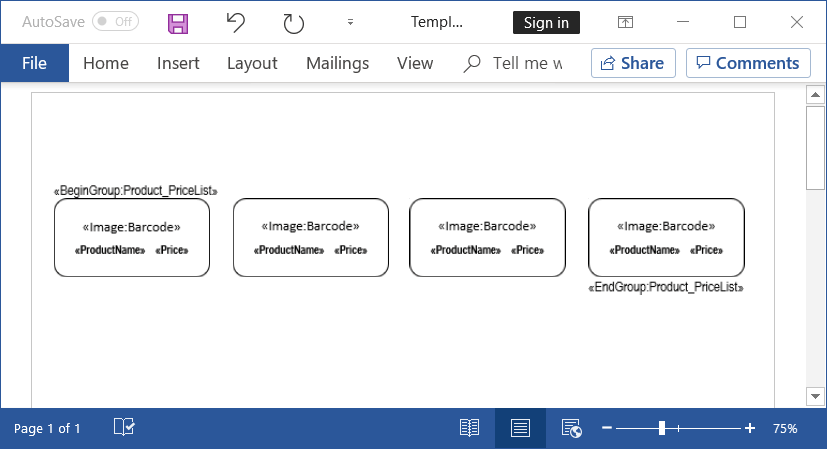
The template document can be downloaded from Template.docx.
In this template Word document, the NEXT field is inserted at the end of each cell. This field instructs Word library to merge the next record from the data source. You can view the NEXT field by opening this template document in the Microsoft Word application and pressing the Alt+F9 shortcut key to toggle field codes.
The following C# code example illustrates how to insert a barcode as an image through the MergeImageField event during mail merge.
static void Main(string[] args)
{
    //Opens the template document.
    WordDocument document = new WordDocument(Path.GetFullPath(@"../../Template.docx"));
    //Creates mail merge events handler for image fields.
    document.MailMerge.MergeImageField += new MergeImageFieldEventHandler(InsertBarcode);
    //Gets data to perform mail merge.
    DataTable table = GetDataTable();
    //Performs the mail merge.
    document.MailMerge.ExecuteGroup(table);
    //Saves and closes the Word document instance.
    document.Save(Path.GetFullPath(@"../../Sample.docx"));
    document.Close();
}
Please refer to the following C# code definition of the GetDataTable method, which provides data for mail merge.
private static DataTable GetDataTable()
{
    //List of product names.
    string[] products = { "Apple Juice", "Grape Juice", "Hot Soup", "Tender Coconut", "Vennila", "Strawberry", "Cherry", "Cone",
        "Butter", "Milk", "Cheese", "Salt", "Honey", "Soap", "Chocolate", "Edible Oil", "Spices", "Paneer", "Curd", "Bread", "Olive oil", "Vinegar", "Sports Drinks",
        "Vegetable Juice", "Sugar", "Flour", "Jam", "Cake", "Brownies", "Donuts", "Egg", "Tooth Brush", "Talcum powder", "Detergent Soap", "Room Spray", "Tooth paste"};
    DataTable table = new DataTable("Product_PriceList");
    //Adds fields to the product price list table.
    table.Columns.Add("ProductName");
    table.Columns.Add("Price");
    table.Columns.Add("Barcode");
    DataRow row;
    int Id =10001;
    //Insert values to the table.
    foreach (string product in products)
    {
        row = table.NewRow();
        row["ProductName"] = product;
        switch (product)
        {
            case "Apple Juice":
                row["Price"] = "$12.00";
                break;
            case "Grape Juice":
            case "Milk":
                row["Price"] = "$15.00";
                break;
            case "Hot Soup":
                row["Price"] = "$20.00";
                break;
            case "Tender coconut":
            case "Cheese":
                row["Price"] = "$10.00";
                break;
            case "Vennila Ice Cream":
                row["Price"] = "$15.00";
                break;
            case "Strawberry":
            case "Butter":
                row["Price"] = "$18.00";
                break;
            case "Cherry":
            case "Salt":
                row["Price"] = "$25.00";
                break;
            default:
                row["Price"] = "$20.00";
                break;
        }
        //Adds barcode text.
        row["Barcode"] = Id.ToString();
        table.Rows.Add(row);
        Id++;
    }
    return table;
}
Please refer to the following C# code definition of the InsertBarcode method, which is assigned to the merge image field event handler.
private static void InsertBarcode(object sender, MergeImageFieldEventArgs args)
{
    if (args.FieldName == "Barcode")
    {
        //Generates barcode image for field value.
        Image barcodeImage = GenerateBarcodeImage(args.FieldValue.ToString());
        //Sets barcode image for merge field.
        args.Image = barcodeImage;
    }
}
The following C# code example illustrates how to generate a barcode and convert it to an image using the Syncfusion PDF Library. You can get more information from the documentation.
Note: Install the Syncfusion.Pdf.WinForms NuGet package as a reference to your application from NuGet.org to use this barcode-related code.
private static Image GenerateBarcodeImage(string barcodeText)
{
    //Initialize a new PdfCode39Barcode instance.
    PdfCode39Barcode barcode = new PdfCode39Barcode();
    //Set the height and text for barcode.
    barcode.BarHeight = 45;
    barcode.Text = barcodeText;
    //Convert the barcode to image.
    Image barcodeImage = barcode.ToImage(new SizeF(145, 45));
    return barcodeImage;
}
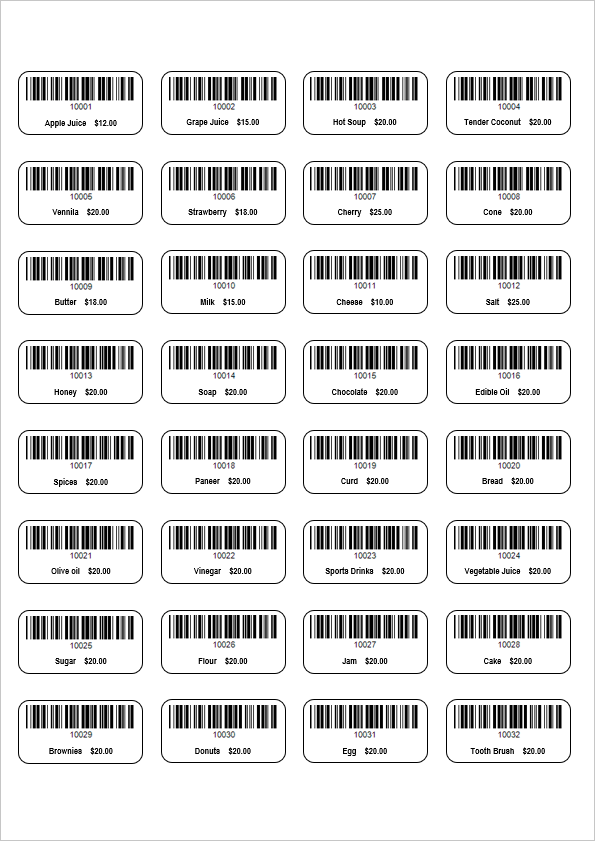
A complete, working example can be downloaded from GitHub.
Alternatively, you can insert a barcode as text by applying barcode font for the merge fields at the Word template level. It automatically displays the merged data as barcode in the generated document.

Witness the power of the Syncfusion Word Library in action with the examples featuring its dynamic functionalities.
Group mail merge using an Excel spreadsheet
Group mail merge replaces all the merge fields within a region in the template with data by repeating a region of the document automatically for each record in the data source. The merge fields with the following names represent the mail merge region or group:
- «TableStart:TableName» and «BeginGroup:GroupName»: Denotes the entry point of the region.
- «TableEnd:TableName» and «EndGroup:GroupName»: Denotes the end of the region.
Executing mail merge for a group or region in a Word document can be achieved by using the ExecuteGroup method.
Syncfusion Excel Library (Essential XlsIO) allows you to import data from an Excel spreadsheet and use it for a mail merge. See the documentation for more information.
This example for group mail merge uses the following template Word document.
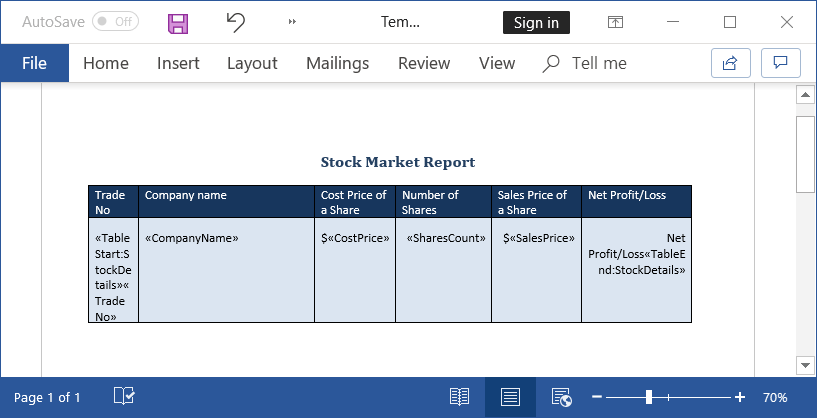
The template document for a stock market report example can be downloaded from Template.docx.
The following C# code example illustrates how to execute mail merge for a group in the Word document by importing data from an Excel spreadsheet.
static void Main(string[] args)
{
    //Creates new Word document instance for Word processing.
    using (WordDocument document = new WordDocument())
    {
        //Opens the template Word document.
        Stream docStream = File.OpenRead(Path.GetFullPath(@"../../../Template.docx"));
        document.Open(docStream, FormatType.Docx);
        docStream.Dispose();
        //Performs the mail merge for group.
        document.MailMerge.ExecuteGroup(GetData());
        //Updates fields in the document.
        document.UpdateDocumentFields();
        //Saves the file in the given path.
        docStream = File.Create(Path.GetFullPath(@"Result.docx"));
        document.Save(docStream, FormatType.Docx);
        docStream.Dispose();
    }
}
Import data from an Excel spreadsheet
Please refer to the following C# code definition of the GetData method, which provides data for mail merge. You can download the Excel spreadsheet from StockDetails.xlsx.
Note: Install the Syncfusion.XlsIO.Net.Core NuGet package as a reference to your application from NuGet.org to use this Excel-related code.
/// <summary>
/// Gets the data from Excel for mail merge.
/// </summary>
private static MailMergeDataTable GetData()
{
    //Creates new Excel engine.
    ExcelEngine excelEngine = new ExcelEngine();
    //Creates new Excel application.
    IApplication application = excelEngine.Excel;
    //Opens the Excel to extract data for mail merge.
    Stream excelStream = File.OpenRead(Path.GetFullPath(@"../../../StockDetails.xlsx"));
    IWorkbook workbook = application.Workbooks.Open(excelStream);
    excelStream.Dispose();
    //Exports data from worksheet to .NET objects.
    IWorksheet sheet = workbook.Worksheets[0];
    List<StockDetail> stockDetails = sheet.ExportData<StockDetail>(1, 1, 31, 5);
    workbook.Close();
    excelEngine.Dispose();
    return new MailMergeDataTable("StockDetails", stockDetails);
}
The following C# code shows the StockDetail class.
public class StockDetail
{
    public string TradeNo { get; set; }
    public string CompanyName { get; set; }
    public string CostPrice { get; set; }
    public string SharesCount { get; set; }
    public string SalesPrice { get; set; }

    public StockDetail()
    {
    }
}
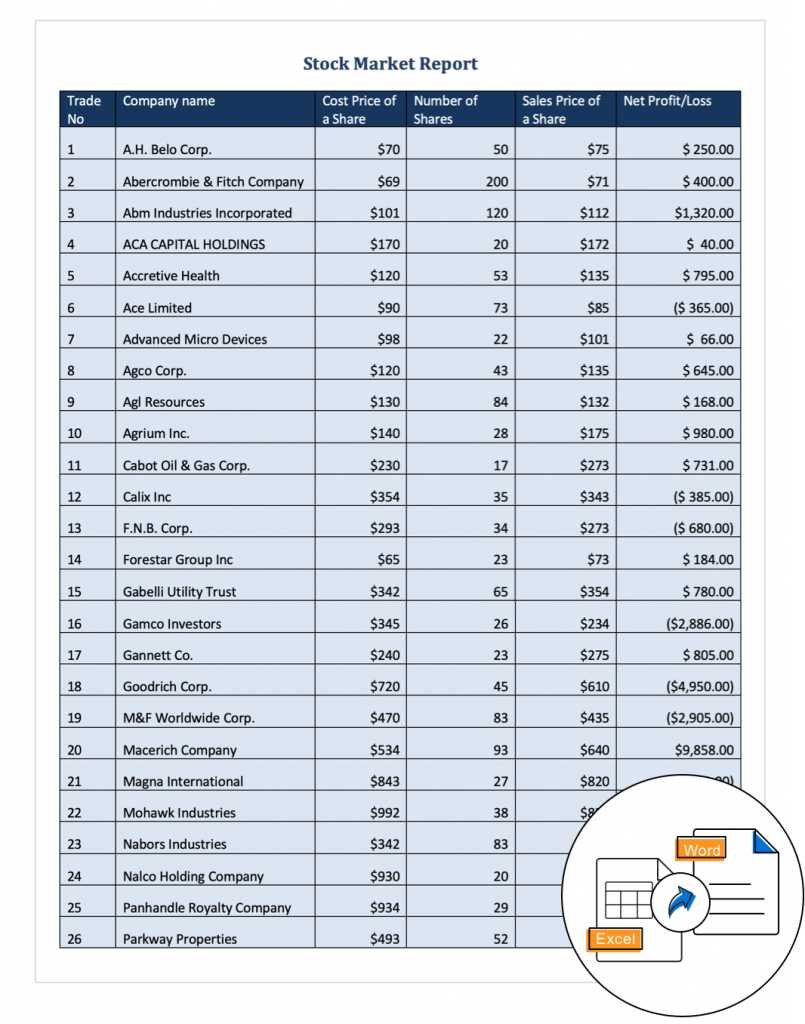
A complete, working example can be downloaded from GitHub.
Customize group mail merge
The Syncfusion mail merge API by default uses merge fields with the prefixes BeginGroup and EndGroup to execute mail merges inside the document body, to repeat a region for each record. It uses merge fields with the prefixes TableStart and TableEnd to execute mail merges inside tables, to repeat a row group inside the table for each record.
Let’s see a special requirement. Add each record as a new row inside the table when the row group contains only one cell, i.e. the merge fields denoting group start and end present inside the same cell.
A behavior conflict! Either the next record will be added as a new row or inside the same cell. Every requirement is unique, so some require adding a new row and some require adding the record inside the same cell.
No worries, Syncfusion’s intuitive mail merge API allows you to switch between these behaviors through the InsertAsNewRow property. It adds the next record as a new row if this property is true; otherwise it adds the next record inside the same cell.
Conditional fields during mail merge in C#
You can use conditional fields (IF, Formula) combined with merge fields when you require intelligent decisions in addition to a simple mail merge (replace merge fields with result text).
For example, you can use the conditional IF fields in the mail merge document for inserting gender-specific pronouns such as he or she and his or her.
The following field syntax illustrates the structure of the IF field to display “He” or “She”, depending on the result of the nested merge field “Gender”.
{ IF { MERGEFIELD Gender } = "Male" "He" "She" }
The above stock market report example uses a formula field with nested merge fields in the template Word document to display profit and loss. The mail merge process replaces those merge fields with numeric data. Later, the formula field with a numeric expression can be updated using the update fields functionality of Syncfusion Word Library.
The following field syntax illustrates the structure of the formula field defined in the template Word document.
| { = ({ MERGEFIELD SalesPrice } – { MERGEFIELD CostPrice }) * { MERGEFIELD SharesCount } \# “$#,##0.00;($#,##0.00)” } |

Mastering Word documents is a breeze with the Syncfusion Word Library, simplifying every aspect of document creation and management!
Mail merge for nested groups in C#
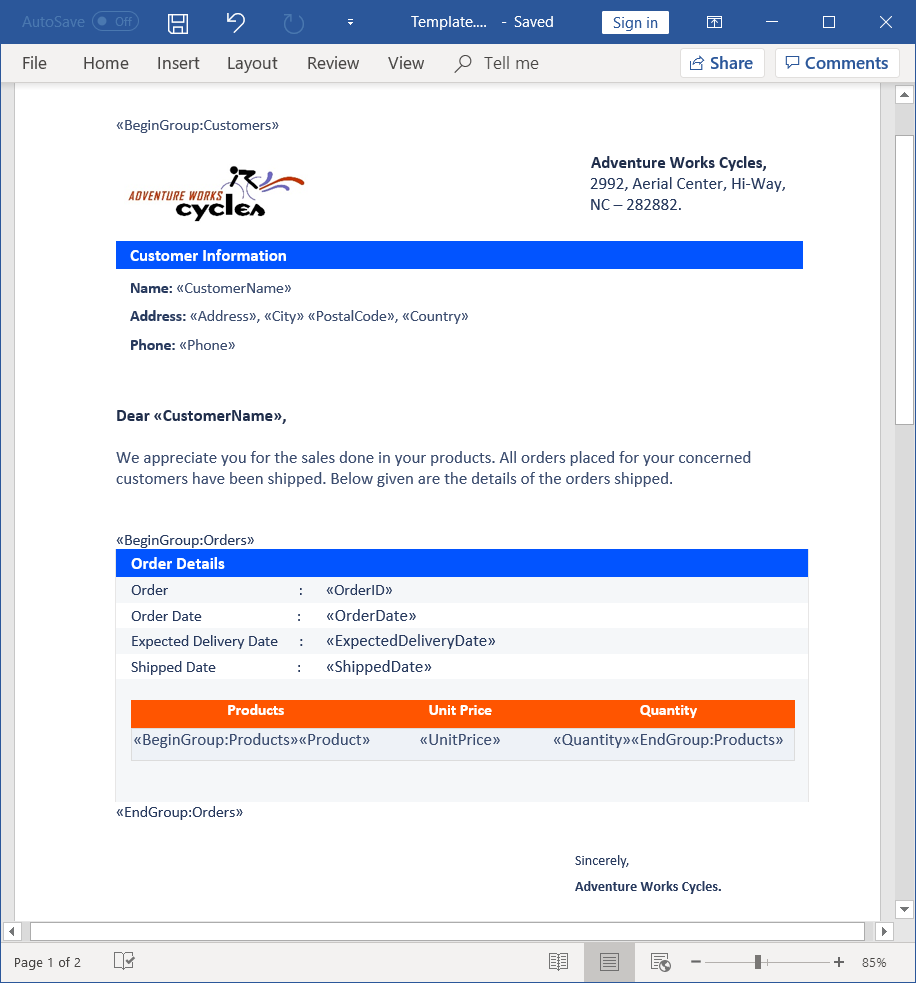
Mail merge for nested groups replaces all the merge fields within nested regions with relational (hierarchical) data by repeating nested regions of the document automatically for each record in the data source.
Executing mail merge for nested groups or regions in a Word document can be achieved by using the ExecuteNestedGroup method.
Syncfusion Word Library provides an API to execute nested mail merge with relational data in two ways:
- Using the internally nested structure of relational data (e.g., XML, JSON with nested elements).
- Using multiple tables and commands to link data (table name and expression).
This example illustrates nested mail merge with an internally nested structure of relational data from an XML file. Refer to the documentation for more information about linking data for nested mail merge through commands.
This mail merge example for a nested group uses the following template Word document.
The template document can be downloaded from Template.docx.
The following C# code example illustrates how to execute mail merge for nested groups or regions in the Word document.
static void Main(string[] args)
{
    //Creates new Word document instance for Word processing.
    using (WordDocument document = new WordDocument())
    {
        //Opens the template Word document.
        Stream docStream = File.OpenRead(Path.GetFullPath(@"../../../Template.docx"));
        document.Open(docStream, FormatType.Docx);
        docStream.Dispose();
        //Performs the mail merge for group.
        document.MailMerge.ExecuteNestedGroup(GetRelationalData());
        //Removes empty page at the end of Word document.
        RemoveEmptyPage(document);
        //Saves the file in the given path.
        docStream = File.Create(Path.GetFullPath(@"../../../Sample.docx"));
        document.Save(docStream, FormatType.Docx);
        docStream.Dispose();
    }
}
Please refer to the following C# code definition of the GetRelationalData method, which provides data for a mail merge. You can download the XML file from CustomerDetails.xml.
/// <summary>
/// Gets the relational data to perform mail merge.
/// </summary>
private static MailMergeDataTable GetRelationalData()
{
    List<ExpandoObject> customers = new List<ExpandoObject>();
    //Gets data from XML.
    Stream xmlStream = File.OpenRead(Path.GetFullPath(@"../../../CustomerDetails.xml"));
    XmlDocument xmlDocument = new XmlDocument();
    xmlDocument.Load(xmlStream);
    xmlStream.Dispose();
    ExpandoObject customer = new ExpandoObject();
    GetDataAsExpandoObject((xmlDocument as XmlNode).LastChild, ref customer);
    customers = (((customer as IDictionary<string, object>)["CustomerDetails"] as List<ExpandoObject>)[0] as IDictionary<string, object>)["Customers"] as List<ExpandoObject>;
    //Creates an instance of "MailMergeDataTable" by specifying mail merge group name and "IEnumerable" collection.
    MailMergeDataTable dataTable = new MailMergeDataTable("Customers", customers);
    return dataTable;
}
/// <summary>
/// Gets the data as ExpandoObject.
/// </summary>
/// <param name="reader">The reader.</param>
private static void GetDataAsExpandoObject(XmlNode node, ref ExpandoObject dynamicObject)
{
    if (node.InnerText == node.InnerXml)
        dynamicObject.TryAdd(node.LocalName, node.InnerText);
    else
    {
        List<ExpandoObject> childObjects;
        if ((dynamicObject as IDictionary<string, object>).ContainsKey(node.LocalName))
            childObjects = (dynamicObject as IDictionary<string, object>)[node.LocalName] as List<ExpandoObject>;
        else
        {
            childObjects = new List<ExpandoObject>();
            dynamicObject.TryAdd(node.LocalName, childObjects);
        }
        ExpandoObject childObject = new ExpandoObject();
        foreach (XmlNode childNode in (node as XmlNode).ChildNodes)
        {
            GetDataAsExpandoObject(childNode, ref childObject);
        }
        childObjects.Add(childObject);
    }
}
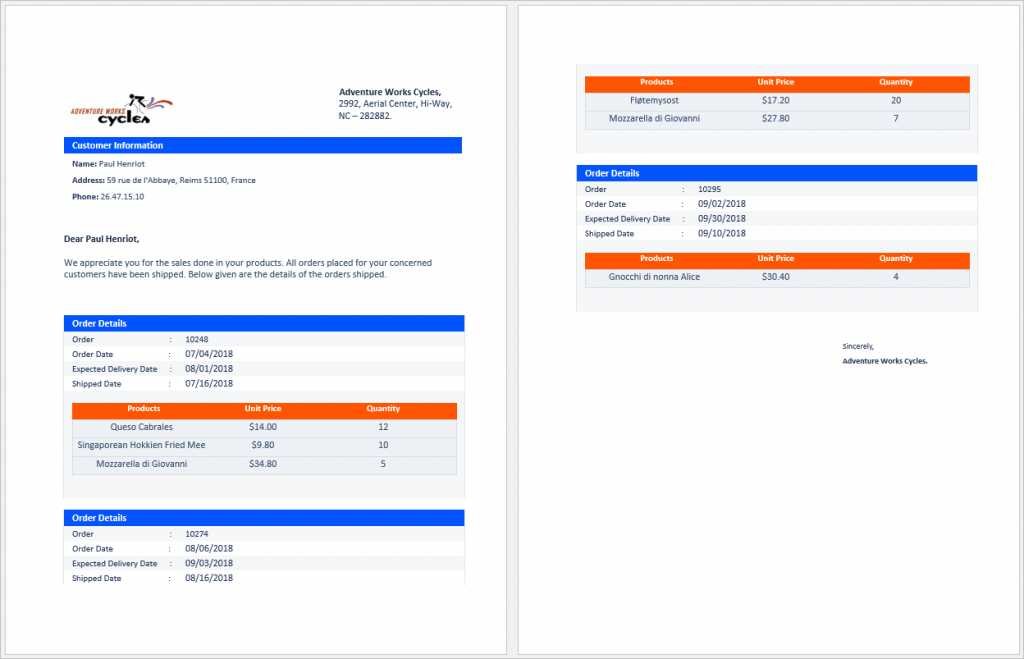
A complete, working example can be downloaded from GitHub.
Formatting through mail merge event
Using a mail merge event, you can format the merged text easily. Also, you can modify merged text, images, or other elements in the document through mail merge events.
Syncfusion Word Library provides four mail merge events that facilitate several customizations in the mail merge document during the mail merge process:
- MergeField: triggers before merging a text merge field.
- MergeImageField: triggers before merging an image merge field.
- BeforeClearField: triggers before removing an unmerged merge field.
- BeforeClearGroupField: triggers before removing an unmerged group of merge fields.
This example of mail merge events uses the following template Word document.
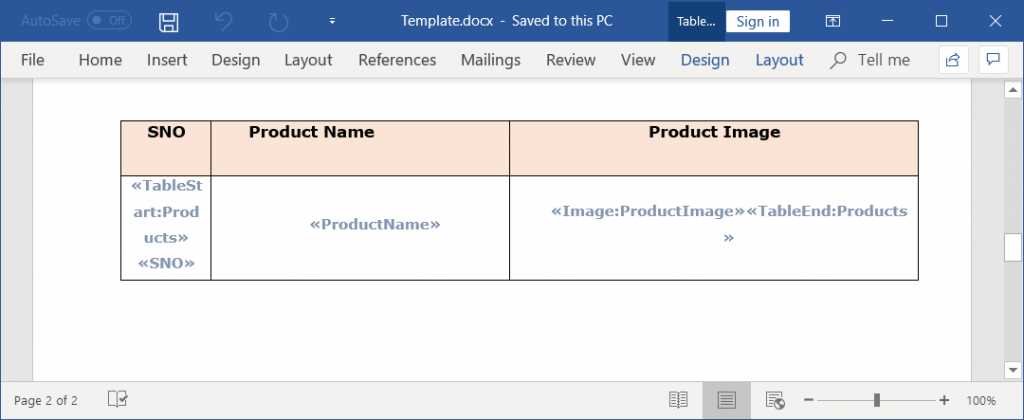
The template document can be downloaded from Template.docx.
The following C# code example illustrates how to format the merged text using the MergeField event during mail merge. Also, it updates the image using the MergeImageField event.
static void Main(string[] args)
{
    //Creates new Word document instance for Word processing.
    using (WordDocument document = new WordDocument())
    {
        //Opens the template Word document.
        Stream docStream = File.OpenRead(Path.GetFullPath(@"../../../Template.docx"));
        document.Open(docStream, FormatType.Docx);
        docStream.Dispose();
        //Get the data set.
        DataSet ds = GetData();
        //Using merge events to do conditional formatting during runtime.
        document.MailMerge.MergeField += new MergeFieldEventHandler(AlternateRows_MergeField);
        document.MailMerge.MergeImageField += new MergeImageFieldEventHandler(MergeField_ProductImage);
        //Execute mail merge with groups.
        document.MailMerge.ExecuteGroup(ds.Tables["Products"]);
        document.MailMerge.ExecuteGroup(ds.Tables["Product_PriceList"]);
        //Saves and closes the Word document.
        docStream = File.Create(Path.GetFullPath(@"../../../Sample.docx"));
        document.Save(docStream, FormatType.Docx);
        docStream.Dispose();
    }
}
Please refer to the following C# code definition of the GetData method, which provides data for the mail merge.
/// <summary>
/// Gets the data to perform mail merge.
/// </summary>
private static DataSet GetData()
{
    // Create a DataSet.
    DataSet ds = new DataSet();
    //List of product names.
    string[] products = { "Apple Juice", "Grape Juice", "Hot Soup", "Tender Coconut", "Vennila", "Strawberry", "Cherry", "Cone" };
    //Add new Tables to the data set.
    DataRow row;
    ds.Tables.Add();
    ds.Tables.Add();
    //Add fields to the Product_PriceList table.
    ds.Tables[0].TableName = "Product_PriceList";
    ds.Tables[0].Columns.Add("ProductName");
    ds.Tables[0].Columns.Add("Price");
    //Add fields to the Products table.
    ds.Tables[1].TableName = "Products";
    ds.Tables[1].Columns.Add("SNO");
    ds.Tables[1].Columns.Add("ProductName");
    ds.Tables[1].Columns.Add("ProductImage");
    int count = 0;
    //Insert values to the table row.
    foreach (string product in products)
    {
        row = ds.Tables["Product_PriceList"].NewRow();
        row["ProductName"] = product;
        switch (product)
        {
            case "Apple Juice":
                row["Price"] = "$12.00"; break;
            case "Grape Juice":
                row["Price"] = "$15.00"; break;
            case "Hot Soup":
                row["Price"] = "$20.00"; break;
            case "Tender coconut":
                row["Price"] = "$10.00"; break;
            case "Vennila Ice Cream":
                row["Price"] = "$15.00"; break;
            case "Strawberry":
                row["Price"] = "$18.00"; break;
            case "Cherry":
                row["Price"] = "$25.00"; break;
            default:
                row["Price"] = "$20.00"; break;
        }
        ds.Tables["Product_PriceList"].Rows.Add(row);
        count++;
        row = ds.Tables["Products"].NewRow();
        row["SNO"] = count.ToString();
        row["ProductName"] = product;
        row["ProductImage"] = string.Concat(product, ".png");
        ds.Tables["Products"].Rows.Add(row);
    }
    return ds;
}
The following C# code illustrates how to format the merged text of alternate rows with different text colors.
/// <summary>
/// Method to handle MergeField event.
/// </summary>
private static void AlternateRows_MergeField(object sender, MergeFieldEventArgs args)
{
    // Conditionally format data during merge.
    if (args.RowIndex % 2 != 0)
    {
        //Formats the merged text of alternate rows with different text color.
        args.CharacterFormat.TextColor = Color.FromArgb(196, 89, 17);
    }
}
The following C# code example shows how to update an image from the file system.
/// <summary>
/// Method to handle MergeImageField event.
/// </summary>
private static void MergeField_ProductImage(object sender, MergeImageFieldEventArgs args)
{
    // Gets the image from file system during mail merge.
    if (args.FieldName == "ProductImage")
    {
        //Gets the image file name
        string ProductFileName = args.FieldValue.ToString();
        //Gets image from file system.
        FileStream imageStream = new FileStream(@"../../../Data/" + ProductFileName, FileMode.Open, FileAccess.Read);
        //Sets the image for mail merge.
        args.ImageStream = imageStream;
    }
}
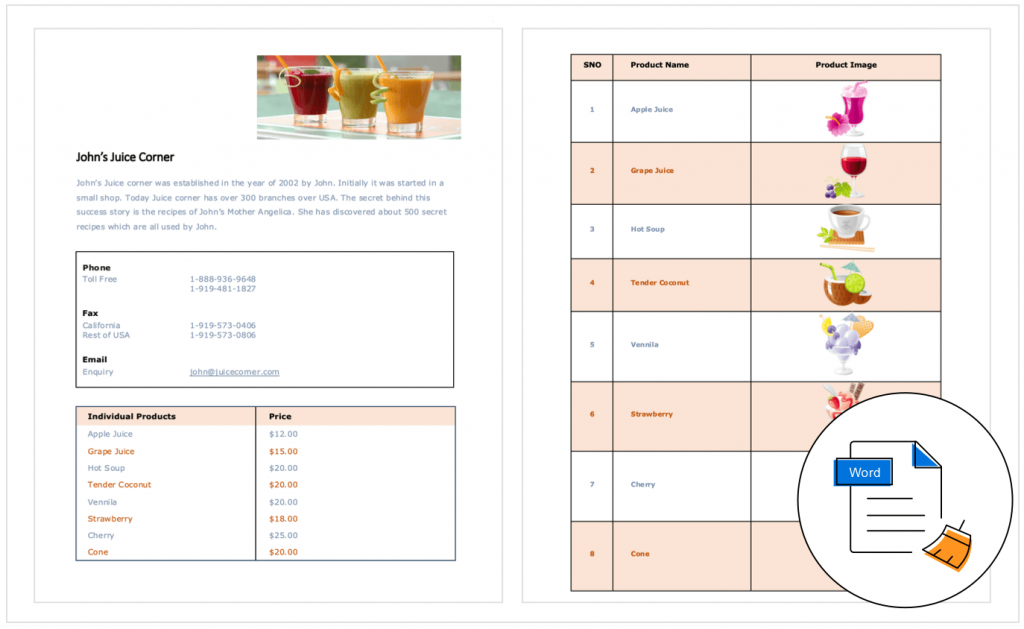
A complete, working example can be downloaded from GitHub.

Experience the interactive demos to see the vast functionality of Syncfusion’s Word Library for yourself.
Mail merge options
Start each record on a new page
If you are required to generate reports, letters, invoices, or payrolls for each record on a new page of a Word document, you can enable the StartAtNewPage property. This will save you from the headache of formatting each page in a Word document manually.
To achieve this, design the template document with the corresponding group start and end mail merge fields present in the text body.
For example, you can see the Invoice group present in the body of the following template Word document.
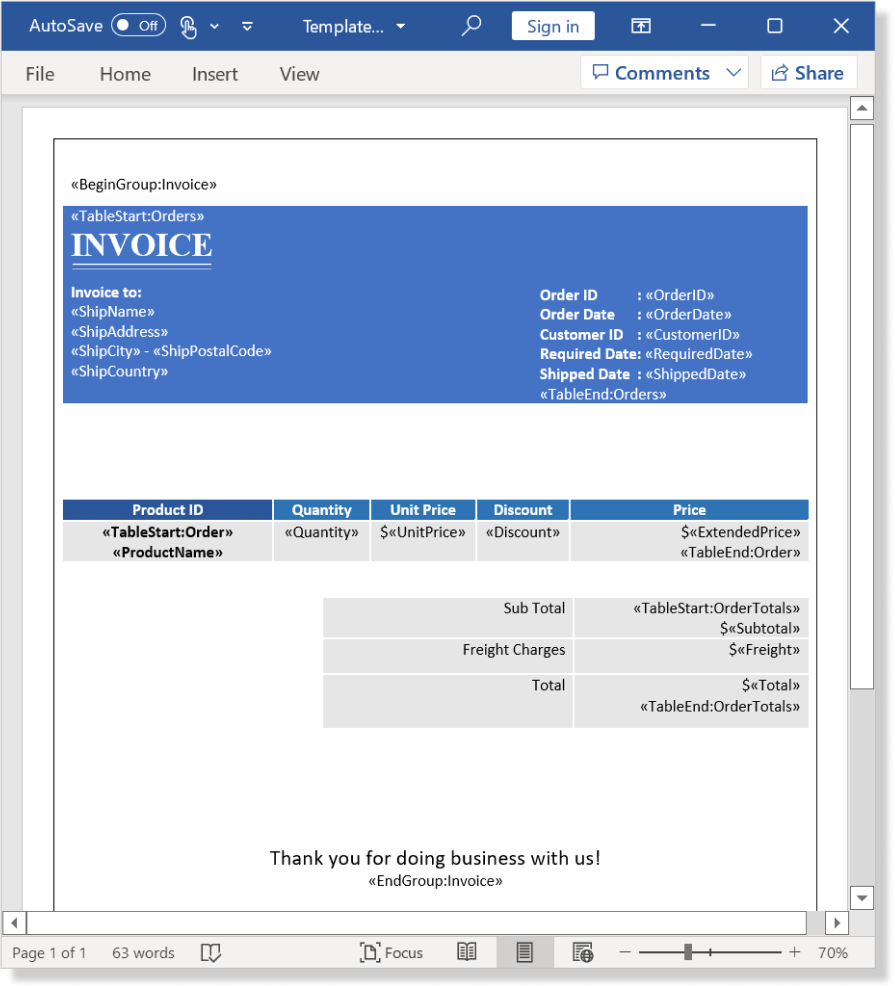 You can download the example template document from Template.docx.
The following C# code example illustrates how to generate an invoice for each record on a new page during a mail merge.
//Opens the template Word document.
using (WordDocument document = new WordDocument("Template.docx", FormatType.Docx))
{
    //Gets the invoice details as an “IEnumerable” collection.
    List<Invoice> invoice = GetInvoice();
    //Creates an instance of “MailMergeDataTable” by specifying mail merge group name and “IEnumerable” collection.
    MailMergeDataTable dataTable = new MailMergeDataTable("Invoice", invoice);
    //Enables the flag to start each record in a new page.
    document.MailMerge.StartAtNewPage = true;
    //Performs mail merge.
    document.MailMerge.ExecuteNestedGroup(dataTable);
    //Saves the WordDocument instance.
    document.Save("Sample.docx", FormatType.Docx);
}
By executing the previous code, we will get an output Word document like in the following screenshot.
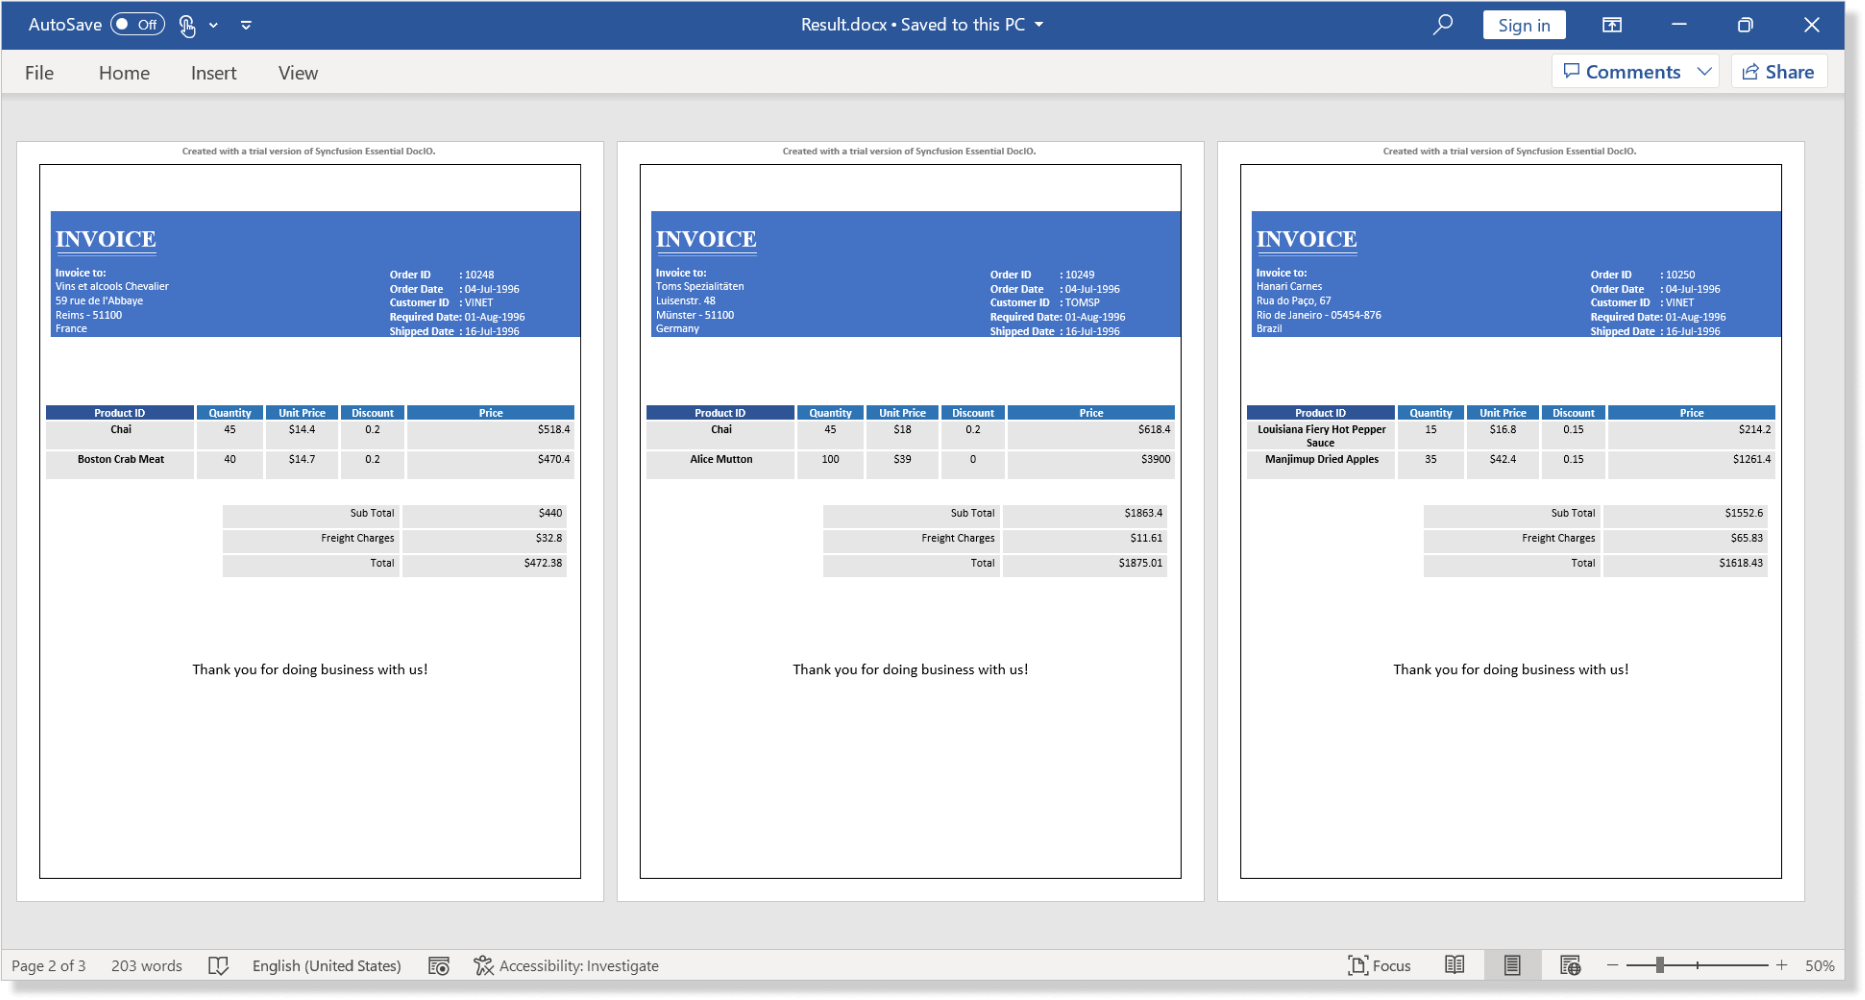 You can download the complete working example from GitHub.
Mapping fields
The Syncfusion mail merge API automatically maps the merge fields in the Word template with fields or columns in the data source by comparing their names (case-insensitive string comparison). In case there is a mismatch, you can add custom mapping through the MappedFields property. You can get details from the documentation.
Now you may ask: is it possible to identify the mismatch programmatically?
Yes, there are APIs to retrieve the merge field names from the template Word document.
Remove unmerged fields, paragraphs, and groups
What are unmerged merge fields?
- The merge field doesn’t have a mapping field or column in the data source.
- The merge field has a mapping field or column in the data source, but the data is null or DBNull.Value or string.Empty.
The mail merge process removes the unmerged merge fields from the Word template. You can keep the unmerged merge fields in the generated document by setting the ClearFields property to false before the mail merge execution statement. For more details, refer to the documentation.
A paragraph that contains only merge fields becomes empty when the mail merge process removes all its merge fields as unmerged. These empty paragraphs may add unwanted space and affect the look of the generated report. So these empty paragraphs can be removed along with their unmerged merge fields by setting the RemoveEmptyParagraphs property to true. Refer to the documentation for more information.
A mail merge group becomes empty when there is no data available to replace the merge fields. The static contents (other than merge fields) present within a mail merge group may add unwanted contents and affect the look of the generated report. So, these empty mail merge groups can be removed by setting the RemoveEmptyGroup property to true.
Why Syncfusion mail merge APIs?
- Work without Microsoft Office: Syncfusion Word Library was built in C# from scratch and does not require Microsoft Word or Office interop dependencies
- Create or design templates: You can easily create a template Word document with merge fields through the intuitive Document Object Model (API). Or design a template Word document with required layout, formatting, and graphics using Microsoft Word with placeholders, and replace the placeholders with merge fields using Syncfusion Word Library.
- Achieve more with conditional fields: You can update conditional fields such as if expressions and formulas. With an if expression, you can add a conditional option in your template to display either of two values in the final report based on the merged data.
- Use a complete mail merge solution: Syncfusion provides a complete solution for mail merge automation with an intuitive mail merge API; a high-performance Excel Library for importing data from an Excel spreadsheet; a Barcode control for creating barcodes from data, which you can then merge by converting them to images.
- Save in supported file formats: You can save the resultant merged document in multiple file formats, like Word documents (DOC, DOCX), HTML, PDF, image, RTF, TXT, and ODT. You can email the merged documents as an email message using HTML format or as an attachment by saving them as Word or PDF.
- Take advantage of platform independence: The same mail merge code works in any .NET Framework, .NET Core, Xamarin, or UWP application.
- Enjoy a cost-effective and hassle-free license model: There are no distribution fees, per-server licensing fees, or royalties, making the Syncfusion mail merge and other word processing solutions very cost-effective.
What if you aren’t a software developer, but need this mail merge solution for your organization? No worries! You can approach Syncfusion Solution Services to develop a solution for your requirements.

Discover the user-friendly features of the Syncfusion Word Library, reshaping your document creation process with ease.
Conclusion
As you can see, Syncfusion Word Library facilitates a complete solution for all your mail merge requirements. You can use it to effectively generate personalized reports with high performance and process large amounts of data. Take a moment to peruse the documentation, where you’ll find other options and features, all with accompanying code examples. Using the library, you can create, edit, and merge Word documents, as well as convert them to PDF, image, HTML, RTF and more.
If you are new to our Word Library (Essential DocIO), it is highly recommended to check out our Getting Started guide.
Are you already a Syncfusion user? You can download the product setup here. If you’re not yet a Syncfusion user, you can download a free, 30-day trial here.
If you have any questions or require clarification about these features, please let us know in the comments below. You can also contact us through our support forum, Direct-Trac, or Feedback Portal. We are happy to assist you!
Comments (3)
Great post! Just what I was looking for. Thanks!
Thank you, very well made for quick start working with DocIO and Mail Merge. Exactly what i need.
Thanks again
Best Regards
Andrew
You’re welcome Andrew. Please contact us if you need any further assistance. We would be happy to assist you.