TL;DR: Visual Studio 2019 enhances coding efficiency with Code Cleanup for formatting, faster project loading, improved debugging with Search in Watch, and easier navigation via Track Active File. It also includes Cycle Clipboard Ring for clipboard history, namespace management, customizable shortcuts, vertical selection, and automatic solution explorer sync. Running web apps in multiple browsers, auto-viewing outputs, and adding reusable code to the Toolbox are also streamlined for a more efficient coding experience.
Introduction
Visual Studio 2019 is packed with new features for smartly handling code for different projects. This blog compiles tips and tricks to make you more productive when using Visual Studio 2019. They are:
- Code Cleanup
- Improve performance
- Search in Watch window
- Track active file inside Solution Explorer
- Cycle Clipboard Ring
- Remove and sort namespaces
- Track miscellaneous files
- Run to Cursor
- Reusable code in Toolbox
- Show the Output window automatically
- Run web application in multiple browsers
- Quick launch
- Use keyboard shortcuts
- Vertical selection
- Collapse all
Code Cleanup
Visual Studio 2019 provides on-demand formatting for a code file, including code style preferences, through the Code Cleanup feature. To run Code Cleanup, click the broom icon at the bottom of the editor or press Ctrl+K and Ctrl+E.

Improve performance when loading a project
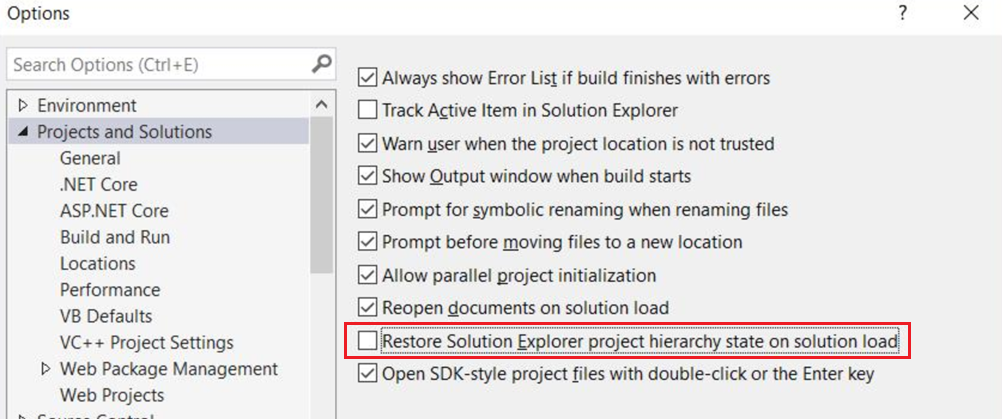
To improve the performance of a project or solution, navigate to Tools > Options > Project and Solutions, and then clear the Restore Solution Explorer project hierarchy state on solution load check box. Doing so will restore and resume the existing state of the solution when opening the VS 2019 IDE, improving the solution’s load performance.
Search in Watch window
The Watch window provides an advanced way to examine a variable. To watch a variable while debugging, add it to the Watch window by right-clicking the variable or the DataTip and selecting Add Watch. The variable appears in the Watch window.
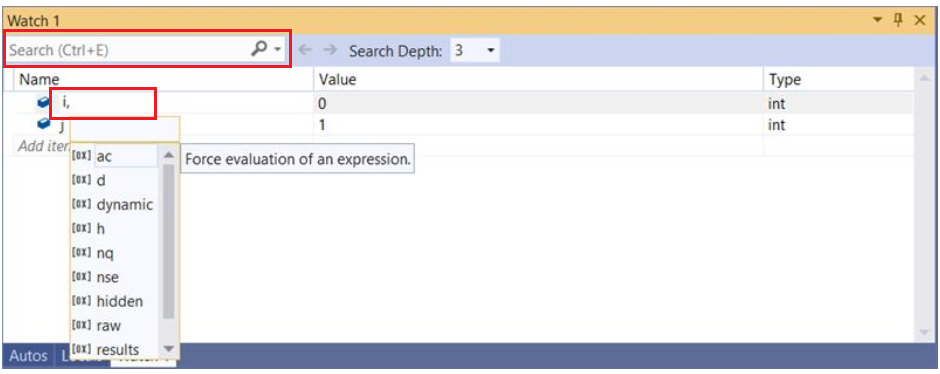
The search feature was added to the Watch window in Visual Studio 2019. This feature allows you to identify properties quickly.
Also, you can find all the possible format specifiers by double-clicking the property row and typing it after the property name. The following screenshot illustrates this.

Syncfusion’s Blazor components suite is the expert’s choice for building modern web apps.
Track active file inside Solution Explorer
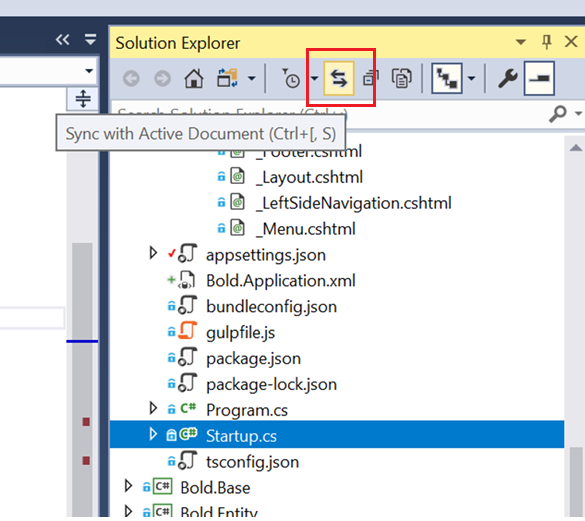
This option reduces your development time when working with large projects. When you work on a project with many files, it is not easy to see the current active file in the Solution Explorer—you have to scroll through the entire Solution Explorer to find the active file. To see the currently active file in the Solution Explorer’s editor, select the Sync with Active Document option.
How to track the active file automatically
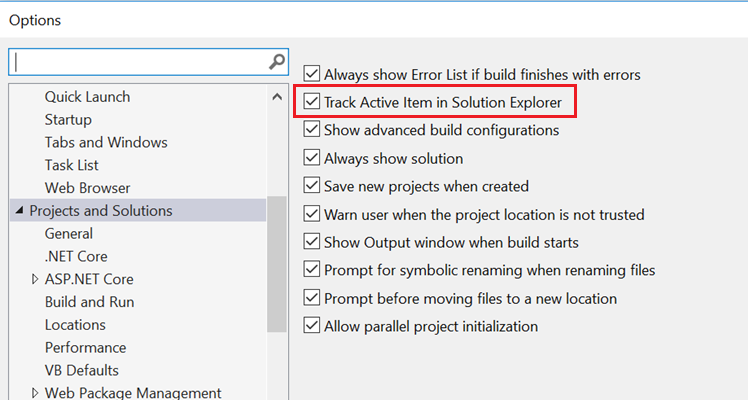
You can track the active file automatically by enabling the corresponding option.
Navigate to Tools > Options > Projects and Solutions > General, and then select the Track Active Item in Solution Explorer check box to turn on this feature.
Cycle Clipboard Ring
Navigate to Edit > Cycle Clipboard Ring or press Ctrl+Shift+V to perform the multiple-paste action.
When you press Ctrl+C (copy action) or Ctrl+X (cut action) in Visual Studio to copy or cut text content or a code block, Visual Studio keeps the last 15 copied or cut contents in its memory. Cycle Clipboard Ring allows you to cycle through your clipboard and paste the needed content.
You can copy or cut content ten times and then paste any of the copied or cut contents using Ctrl+Shift+V. Keep pressing this key combination to cycle through the paste content until you find what you want to paste.
Remove and sort namespaces
It is important to maintain coding standards during development. Often, we forget to maintain code standards. We may include unused namespaces, not arrange namespaces in the proper order, or not put system directives at the top. Visual Studio now has an option to correct these mistakes easily.
In the code editor, right-click to show the context menu, where you can find the Remove and Sort Usings option. Click this option to remove the unwanted namespaces and sort the namespaces in ascending order.

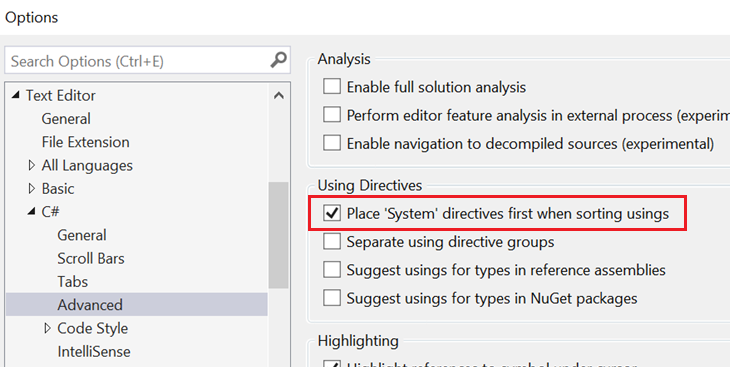
But you will face another coding standard issue even after using this option: system directives should be placed first. Keeping the System namespaces first in your code is a best practice. This issue can be overcome by setting an advanced option. Navigate to Tools > Options > Text Editor > C# > Advanced and select the Place ‘System’ directives first when sorting using the check box to turn it on.

Everything a developer needs to know to use Blazor components in the Blazor app is completely documented.
Track miscellaneous files
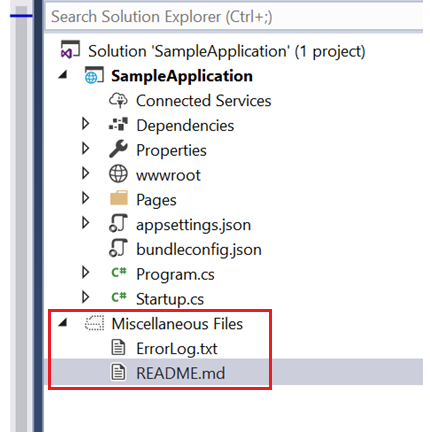
Sometimes, we need to group external files that are not inside the project folder or source or added to the solution file. These external files can be used as references in the development stage. So, Visual Studio can group these files under the Miscellaneous folder. With the option enabled, external files opened through the Visual Studio code editor are grouped under the Miscellaneous folder, which is available in the Solution Explorer.
By default, this option is disabled. To enable it, navigate to Tools > Options > Environment > Documents, and then select the Show Miscellaneous files in the Solution Explorer check box.
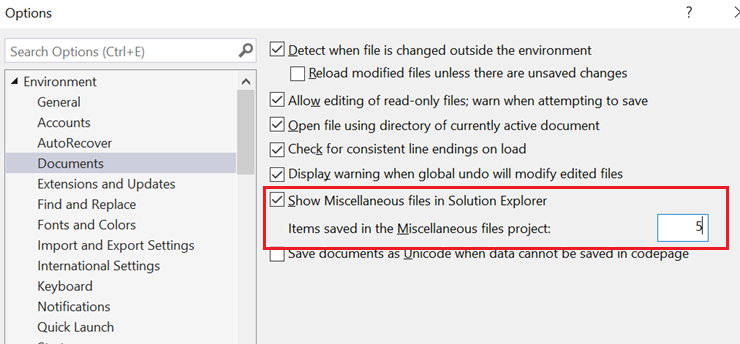
You can also restrict the number of files saved in the folder. In the previous screenshot, we set the count as 5, so only five external files will be listed under the Miscellaneous folder.
Run to Cursor
Run to Cursor can help you debug your code more efficiently by directly stopping the debugger where you point your cursor. Using this, you can avoid step-by-step debugging until you reach the point where you want to start the debugging. When you select the Run to Cursor option, Visual Studio starts the debugger automatically, and execution is stopped at the selected line.
In the code editor, right-click the line where you want to stop the debugger. Select the Run to Cursor option in the context menu.
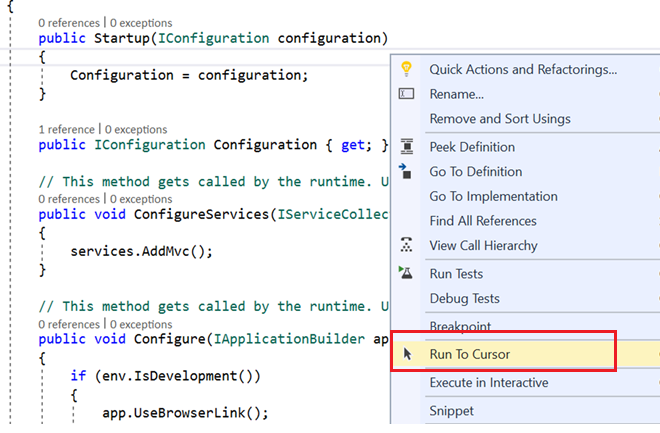
You can also use the shortcut key combination Ctrl+F10.
Reusable code in Toolbox
Visual Studio provides a great feature that lets you place code snippets inside the Toolbox. Select a code snippet and drag the selected snippet to the General tab.
This feature will be useful when you use a code snippet in multiple files or places. When working on a project, you often copy code from your current page and paste it into another page or location. You lose time scrolling and finding the files or places where you want to paste common code snippets.
Visual Studio provides space in the Toolbox where you can keep common code. You can drag a code snippet from the Toolbox and drop it wherever you want.
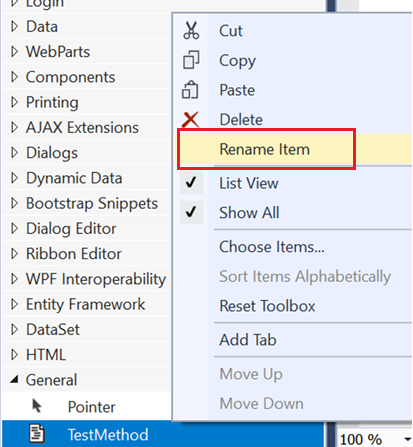
To keep your common code in the Toolbox, open the Toolbox and expand the General tab. You can drop your selected code blocks by dragging them from the code editor. In the following screenshot, we have chosen three lines of code and dragged them to the General tab.

You can also rename your code blocks for easy reference. In the following screenshot, I have renamed the code block as TestMethod. I can drag TestMethod from the Toolbox to any page or place to use it.

Explore the different application UIs developed using Syncfusion Blazor components.
Show the Output window automatically
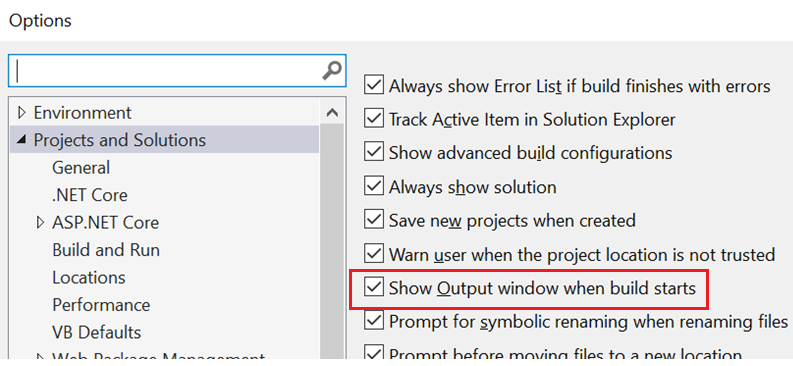
Visual Studio allows setting the Output window to be opened automatically each time you start a build.
Navigate to Tools > Options > Project and Solutions, and then select the Show Output window when the build starts check box.
Run web application in multiple browsers
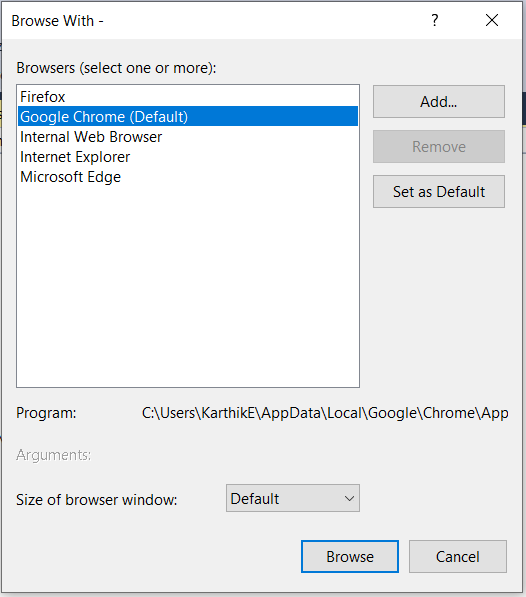
Usually, we run our application in any browser to ensure it functions correctly. But, as web developers, we need to ensure the application runs correctly in all major browsers. Visual Studio provides the option to run an application in multiple browsers simultaneously. Select the Browse With option in the browser list drop-down to do this. In the dialog that appears, you can see all the browsers plus the one set as your default. You can select all the browsers you want to run the application in and click Set as Default. If you click the Browse button at the bottom of the dialog, your web application will simultaneously start on all selected browsers.
Quick launch
You can quickly navigate to any file, class, type, member, or symbol declaration using the Go To option in Visual Studio. To open the Go To window, press Ctrl+T or Ctrl+Comma (,) or navigate to Edit > Go To. Go to All enables you to jump to any file, type, member, or symbol declaration quickly.

Search
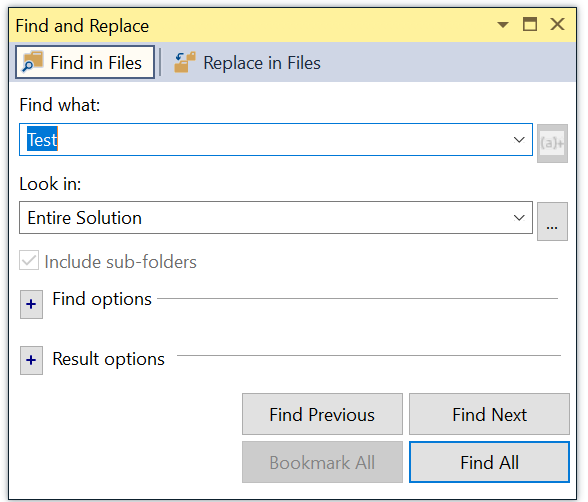
You can reduce development time by quickly finding the files you need. You can use the Visual Studio Search Files option to reduce the time spent on manual lookups.
To search inside the current file, press Ctrl+F.
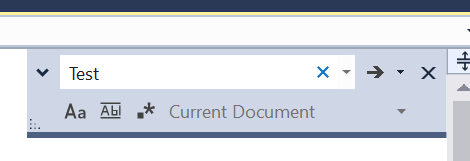
To search inside the current project, press Ctrl+Shift+F.

See how Syncfusion Blazor components can be transformed into beautiful and efficient applications.
Use keyboard shortcuts
Visual Studio keyboard shortcuts are the best way to work more efficiently and speed up your development. You can find more useful keyboard shortcuts listed on this website.
The following are some of the most commonly used shortcuts.
| Shortcut | Action |
| Ctrl+X | Cuts the selected item to the clipboard. |
| Ctrl+C | Copies the selected item to the clipboard. |
| Ctrl+V | Pastes the item from the clipboard |
| Ctrl+Z | Undo the previous action. |
| Ctrl+Y | Redo the previous undo action. |
| Ctrl+S | Saves the selected file. |
| Esc | Closes opened menu or dialog. |
Vertical selection
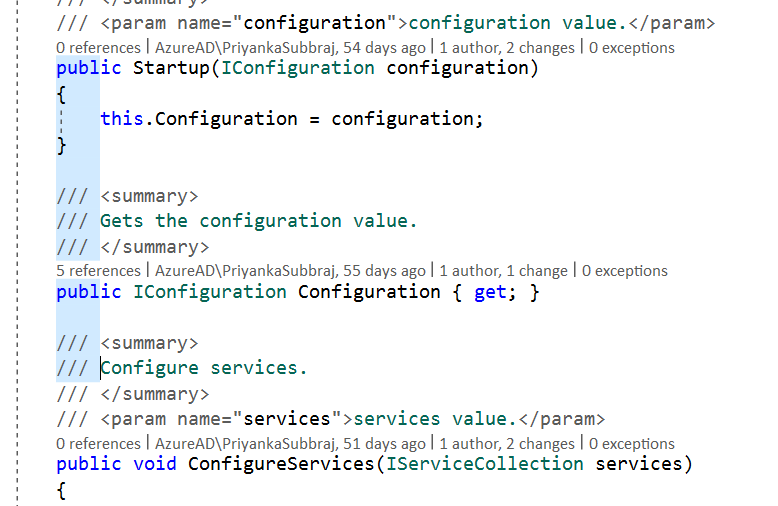
If you need to select multiple lines vertically, place the cursor at the beginning of the first line, press and hold Alt, and then select the lines downward.
Collapse all
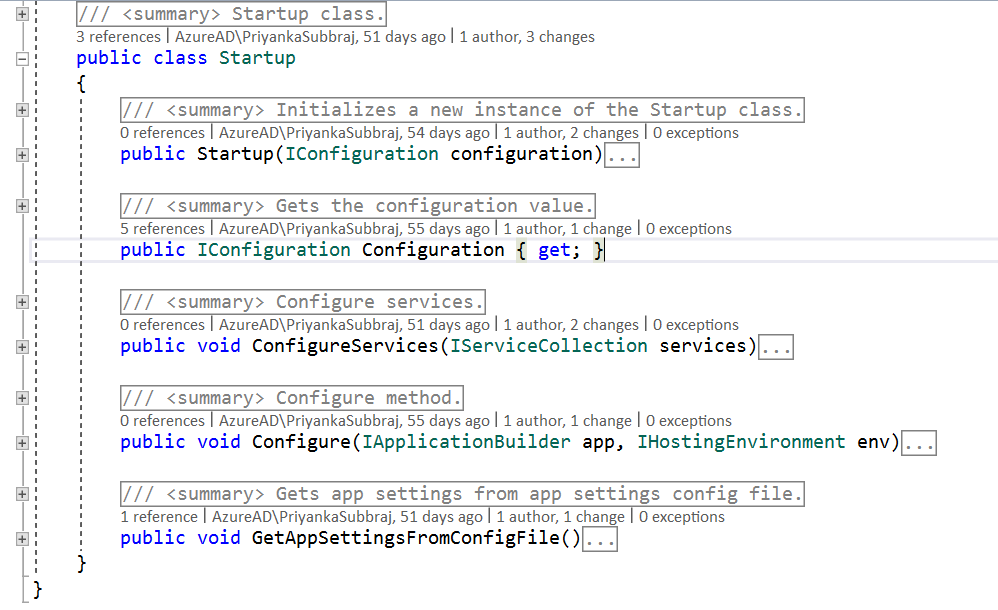
Press and hold Ctrl, and then press M and O continuously to collapse all your code.
Refer to this blog post for some tips for beginner-level developers using Visual Studio.
Conclusion
In this blog post, we’ve seen many ways to increase your productivity in Visual Studio 2019. We hope this blog helps you work better with Visual Studio 2019.
Syncfusion provides over 1,000 custom controls to ease the work of the developers on the following platforms:
Please let us know in the comments below if you have any questions or require clarifications about our components.
The newest version of Essential Studio® is available on the ® products” href=”https://www.syncfusion.com/downloads” target=”_blank” rel=”noopener”>free trial to test the latest features.
You can always contact us through our support forums, support portal, or feedback portal. We are always happy to assist you!


Comments (3)
For the Run To Cursor feature, when you don’t have yo right click, you can just click the green little icon that appears at the start of any line you’re hovering over.
Also, ctrl+q is a nice shortcut few people use. It allows you to search for any VS action so you don’t have to remember many shortcuts. For example, you can use ctrl+q and type ‘code for” and it will show ‘code format’ action in results.
Very nice shortcut, thanks <3
I found these shortcuts very useful! Thanks a lot!