TL;DR: Learn how to dynamically edit and update data in Syncfusion Flutter Charts, enabling real-time visualizations. This guide covers integrating Flutter Charts with the Flutter DataGrid for seamless data manipulation. Features include editing, sorting, and drag-and-drop data updates, all with interactive and fluid animations.
The Syncfusion Flutter Charts include functionality for plotting 30+ charts. This widget lets you display live data that changes in seconds or minutes. It updates itself when the data changes or is added at run time. The dynamically updated data point values are rendered with fluid easing animation.
In this blog, we’ll explore how to dynamically edit, sort, drag, and drop data in the Syncfusion Flutter Charts widget. Here, we will edit the data in the Flutter DataGrid widget and update the Flutter Charts accordingly. This feature lets users interactively edit or replace data points directly on the Charts, providing a more dynamic and intuitive data visualization experience.
Refer to the following image.
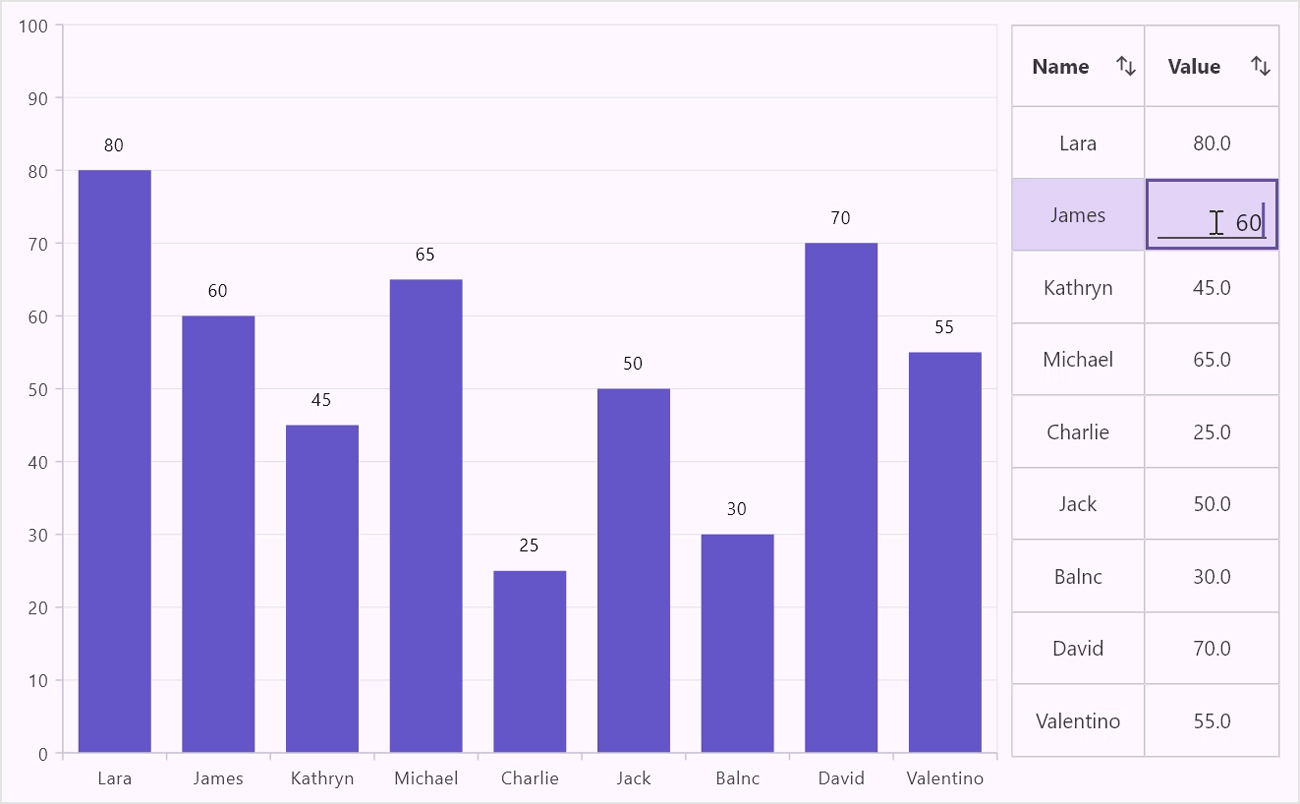
1. Dynamically editing Flutter Charts while editing the DataGrid
Here, when you edit the data within the data grid, the changes are immediately reflected in the corresponding chart. This ensures that your visualizations are always current and accurately represent the latest data. Let’s see the steps to implement this real-time update functionality, with necessary code examples and configurations.
Setting up the Flutter Charts
Let’s configure the Flutter Charts, primaryXAxis and primaryYAxis to represent your data’s categories and numeric values, respectively. Here, we’ll use the Flutter ColumnSeries to visualize employees’ data. This series fetches data from Employee data source, mapping each employee’s name to the x-axis and their value to the y-axis.
To further enhance the user experience, we’ll enable the series data labels using the dataLabelSettings. This will provide immediate visual feedback, making it easier to understand the data points briefly.
Moreover, the onRendererCreated callback provides access to the chart’s series controller. This controller is a powerful tool that allows you to programmatically update and customize the chart, making chart data editing a breeze.
Refer to the following code example.
SfCartesianChart _buildColumnChart() {
   return SfCartesianChart(
      primaryXAxis: const CategoryAxis(),
      primaryYAxis: const NumericAxis(),
      series: <ColumnSeries>[
        ColumnSeries<Employee, String>(
          dataSource: _source.employees,
          xValueMapper: (Employee employee, int index) => employee.name,
          yValueMapper: (Employee employee, int index) => employee.yValue,
          sortFieldValueMapper: (Employee employee, int index) =>
              _sortby == 'name' ? employee.name : employee.yValue,
          sortingOrder: _sortingOrder,
          dataLabelSettings: const DataLabelSettings(isVisible: true),
          onRendererCreated: (ChartSeriesController controller) {
            _controller = controller;
          },
        ),
      ],
   );
 }
Setting up the Flutter DataGrid
Next, we’ll use Syncfusion’s Flutter DataGrid to create a powerful data management tool that not only displays employee information but also allows for seamless data editing.
To achieve this, define the structure of the DataGrid, including column widths, data source, editing capabilities, navigation, and selection modes. Each column represents a different aspect of employee data, such as name and performance value, ensuring users can quickly identify and manage the necessary information.
With the source property, lay the foundation for your grid’s data by linking it to an instance of the EmployeeDataSource. We can use the gridLinesVisibility property to make the grid lines visible for both rows and columns. With the headerGridLinesVisibility property, we can ensure that header grid lines are visible, providing a clear delineation between headers and data.
By setting the allowEditing parameter to true, you empower users to modify employee data directly within the grid. Whether updating performance scores or correcting typos in employee names, users have complete control over the data editing process.
Refer to the following code example.
SfDataGrid _buildDataGrid() {
    const TextStyle textStyle = TextStyle(fontWeight: FontWeight.bold);
    return SfDataGrid(
      columnWidthMode: ColumnWidthMode.fill,
      source: _source,
      navigationMode: GridNavigationMode.cell,
      selectionMode: SelectionMode.single,
      gridLinesVisibility: GridLinesVisibility.both,
      headerGridLinesVisibility: GridLinesVisibility.both,
      allowEditing: true,
      columns: <GridColumn>[
        GridColumn(
          columnName: 'name',
          label: Container(
            padding: const EdgeInsets.all(8.0),
            alignment: Alignment.center,
            child: const Text('Name',
                style: textStyle, overflow: TextOverflow.ellipsis),
          ),
        ),
        GridColumn(
          columnName: 'yValue',
          label: Container(
            padding: const EdgeInsets.all(8.0),
            alignment: Alignment.center,
            child: const Text('Value',
                style: textStyle, overflow: TextOverflow.ellipsis),
          ),
        ),
      ],
    );
}
The buildEditWidget method serves as the gateway to data manipulation, providing a dynamic interface for entering and submitting changes.
At its core, the onCellSubmit method serves as the bridge between user edits and data persistence. When a user makes changes to a cell within the Flutter DataGrid, whether it’s updating an employee’s name or tweaking their performance score, the onCellSubmit method springs into action, ensuring that these changes are reflected in the underlying data model.
Refer to the following code example.
@override
Future<void> onCellSubmit(DataGridRow dataGridRow,
  RowColumnIndex rowColumnIndex, GridColumn column) async {
    final dynamic oldValue = dataGridRow
            .getCells()
            .firstWhereOrNull((DataGridCell dataGridCell) =>
                dataGridCell.columnName == column.columnName)
            ?.value ??
        '';

    final int dataRowIndex = _dataGridRows.indexOf(dataGridRow);

    if (newCellValue == null || oldValue == newCellValue) {
      return;
    }

    editedRowIndex = dataRowIndex;

    if (column.columnName == 'name') {
      _dataGridRows[dataRowIndex].getCells()[rowColumnIndex.columnIndex] =
          DataGridCell<String>(columnName: 'name', value: newCellValue);
      employees[dataRowIndex].name = newCellValue.toString();
    } else if (column.columnName == 'yValue') {
      num? yValue = newCellValue as num?;
      _dataGridRows[dataRowIndex].getCells()[rowColumnIndex.columnIndex] =
          DataGridCell<num?>(columnName: 'yValue', value: yValue);
      employees[dataRowIndex].yValue = yValue;
    }
  }

  @override
  Widget? buildEditWidget(DataGridRow dataGridRow,
   RowColumnIndex rowColumnIndex, GridColumn column, CellSubmit submitCell) {
    final String displayText = dataGridRow
            .getCells()
            .firstWhereOrNull((DataGridCell dataGridCell) =>
                dataGridCell.columnName == column.columnName)
            ?.value
            ?.toString() ??
        '';

    newCellValue = null;
    final bool isNumericType = column.columnName == 'yValue';
    final RegExp regExp = _regExp(isNumericType, column.columnName);

    return Container(
      ….
        keyboardType: isNumericType ? TextInputType.number : TextInputType.text,
        onChanged: (String value) {
          if (value.isNotEmpty) {
            if (isNumericType) {
              newCellValue = double.parse(value);
            } else {
              newCellValue = value;
            }
          } else {
            newCellValue = null;
          }
        },
        onSubmitted: (String value) {
          submitCell();
        },
      ),
    );
  }
Integrating Flutter DataGrid and Charts
With each edit made within the Flutter DataGrid, you trigger a cascade of updates within the Flutter Charts widget, ensuring that visualizations reflect the latest changes in real time.
When a user submits a cell edit within the DataGrid, the updateChart function is called. This function serves as the bridge between the DataGrid and the Charts widgets, ensuring that any changes made in the DataGrid are propagated to the Charts to perform the chart data editing in real time.
Refer to the following code example.
class EmployeeDataSource extends DataGridSource {
  EmployeeDataSource(this.employees, this._updateChartData) {
    ….
  }

  …..
  VoidCallback _updateChartData;


  @override
  Future<void> onCellSubmit(DataGridRow dataGridRow,
  RowColumnIndex rowColumnIndex, GridColumn column) async {

    …..

    _updateChartData.call();
  }
}
…

void _updateDataSource() {
    _controller?.updateDataSource(updatedDataIndex: _source.editedRowIndex);
}
Refer to the following image.
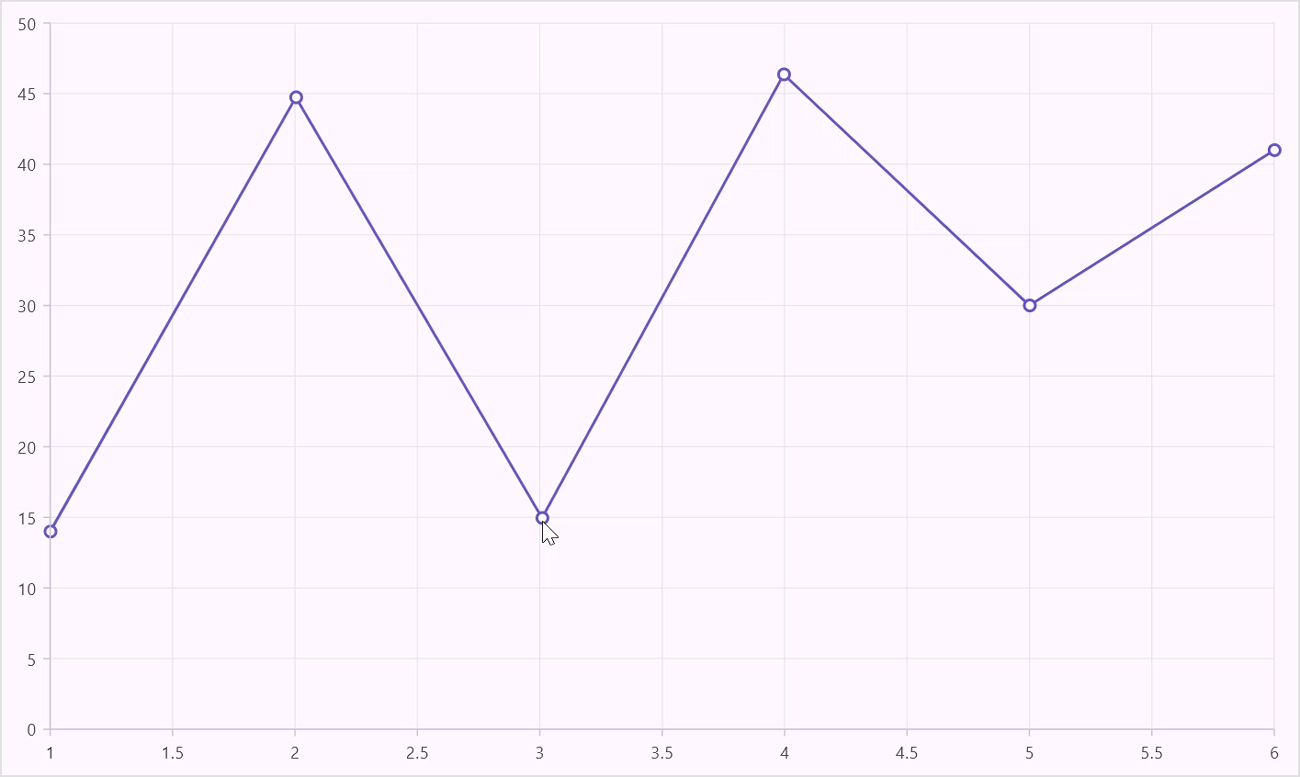
2. Dynamically sorting the Flutter Charts data while sorting the DataGrid
Sorting is a powerful tool for data analysis. Here, we are going to perform sorting on the Flutter DataGrid, which will automatically refresh and update the Charts data. This ensures that your chart reflects the most current data, significantly enhancing user experience.
With this, users can organize and view their data from different perspectives without any manual updates.
Let’s use the sortingOrder and sortFieldValueMapper properties to sort and update the chart data either by employee name or their performance value. When a column header is clicked, the sorting operation will be initiated. The performSorting method is called with the list of rows to be sorted and updates the chart data accordingly.
Refer to the following code example.
class EmployeeDataSource extends DataGridSource {
  EmployeeDataSource(this.employees, this.buildContext, this.updateChart,
  this.updateChartSorting) {
    ….
  }

  …..
  VoidCallback updateChartSorting;
  String? sortedColumnName;
  DataGridSortingOrder sortDirection = DataGridSortingOrder.none;
  DataGridSortingOrder _previousSortDirection = DataGridSortingOrder.none;

  ….

  @override
  Future<void> performSorting(List<DataGridRow> rows) {
    if (sortedColumns.isNotEmpty) {
      sortedColumnName = sortedColumns[0].name;
      sortDirection =
          sortedColumns[0].sortDirection == DataGridSortDirection.ascending
              ? DataGridSortingOrder.ascending
              : DataGridSortingOrder.descending;
    } else {
      sortedColumnName = null;
      sortDirection = DataGridSortingOrder.none;
    }

    if (_previousSortDirection != sortDirection) {
      updateChartSorting.call();
      _previousSortDirection = sortDirection;
    }
    return super.performSorting(rows);
  }
}

void _updateDataSorting() {
  setState(
      () {
        _sortingOrder =
            _employeeDataSource.sortDirection == DataGridSortingOrder.ascending
                ? SortingOrder.ascending
                : _employeeDataSource.sortDirection ==
                        DataGridSortingOrder.descending
                    ? SortingOrder.descending
                    : SortingOrder.none;
        _sortby = _employeeDataSource.sortedColumnName.toString();
      },
  );
}
Refer to the following image.

3. Dynamically editing/replacing Flutter Charts data while dragging the data using touch methods
Interactive data points allow users to manipulate the data displayed on the chart directly. By enabling touch methods, users can drag data points to new values and edit or replace chart data to reflect these changes. This interaction provides a hands-on approach to data analysis and makes the chart more engaging. We’ll demonstrate how to implement this feature, making your charts more responsive and user-friendly.
Declare the onChartTouchInteractionMove and onChartTouchInteractionUp callbacks within the SfCartesianChart widget. These callbacks become the cornerstone of user interaction, capturing touch events and laying the foundation for real-time chart updating. With touch events at your fingertips, you delve into the realm of interactivity. As users drag their fingers across the chart, harness the power of the ChartSeriesController and onRendererCreated callback to convert touch event positions into data points. This transformation becomes the bridge between user input and data manipulation.
With each touch event, users are granted the ability to drag and manipulate data points with ease. As they move their fingers across the chart, original data points are removed, and updated data points are inserted in their place. This seamless transition between old and new data points forms the backbone of real-time chart data editing and updating.
Refer to the following code example.
int? pointIndex;
ChartSeriesController? _controller;

@override
Widget build(BuildContext context) {
  return Scaffold(
      body: SfCartesianChart(
        onChartTouchInteractionMove: (ChartTouchInteractionArgs tapArgs) {
          _updateDataPoint(tapArgs);
        },
        onChartTouchInteractionUp: (ChartTouchInteractionArgs tapArgs) {
          _updateDataPoint(tapArgs);
          pointIndex = null;
        },
        series: <CartesianSeries<ChartData, num>>[
          LineSeries<ChartData, num>(
            dataSource: chartData,
            xValueMapper: (ChartData data, int index) => data.x,
            yValueMapper: (ChartData data, int index) => data.y,
            markerSettings: const MarkerSettings(isVisible: true),
            onPointLongPress: (ChartPointDetails pointInteractionDetails) {
              pointIndex = pointInteractionDetails.pointIndex;
            },
            onRendererCreated: (ChartSeriesController controller) {
              _controller = controller;
            },
          ),
        ],
      ),
   );
}

void _updateDataPoint(ChartTouchInteractionArgs tapArgs) {
    if (pointIndex != null) {
      CartesianChartPoint<dynamic> dragPoint =
          _controller!.pixelToPoint(tapArgs.position);
      chartData.removeAt(pointIndex!);

      chartData.insert(
          chartData.length - 1, ChartData(dragPoint.x, dragPoint.y as double?));

      _controller!.updateDataSource(updatedDataIndex: pointIndex!);
    }
}
Refer to the following image.
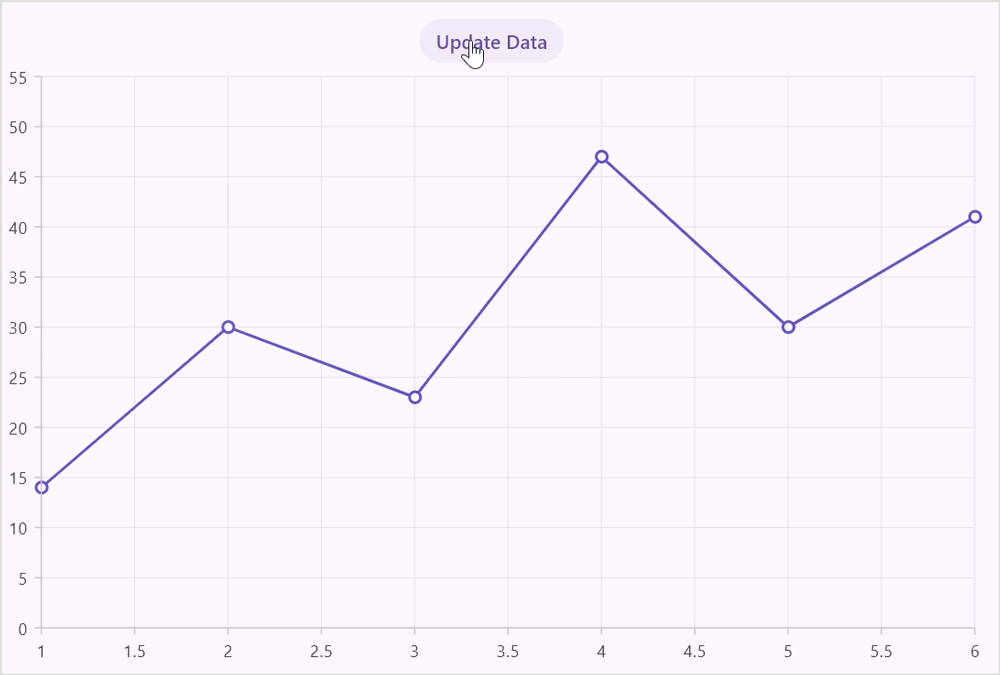
4. Dynamically editing or replacing Flutter Charts data using the updateDataSource method
Syncfusion’s tools make it easy to update the data source and have those changes reflected in the Flutter Charts. Whether you’re adding new data, deleting existing points, or modifying current values, the Charts widget will adjust accordingly. Here, we’ll guide you through the process of updating the data source, ensuring that your Charts remain accurate and up to date.
The updateDataSource method in the ChartSeriesController class efficiently updates the data source of a chart series without re-rendering the entire chart. This method is particularly useful when you need to modify, add, or remove data points dynamically in response to real-time chart or chart live updates or changes in data. The updateDataSource method significantly improves performance by processing only the modified data points.
Certainly! The updateDataSource method provides flexibility in updating data points in bulk or individually, depending on the scenario. When you need to update a huge volume of data points at once, using the properties ending with Indexes (addedDataIndexes, removedDataIndexes, and updatedDataIndexes) is more efficient. When you’re modifying only one or a few data points, it’s more convenient to use the properties ending with Index (addedDataIndex, removedDataIndex, and updatedDataIndex).
Refer to the following code example.
ChartSeriesController? _controller;

@override
Widget build(BuildContext context) {
   return Scaffold(
      body: Column(
        children: <Widget>[
          Expanded(
            child: SfCartesianChart(
              series: <CartesianSeries<ChartData, num>>[
                LineSeries<ChartData, num>(
                 ….
                  onRendererCreated: (ChartSeriesController controller) {
                    _chartSeriesController = controller;
                  },
                ),
              ],
            ),
          ),
          TextButton(
            onPressed: () {
              // Update data
              chartData[1] = ChartData(2, 50);
              _controller!.updateDataSource(updatedDataIndex: 1);


              // Update datas
              chartData[1] = ChartData(2, 70);
              chartData[2] = ChartData(3, 80);
              chartData[3] = ChartData(4, 90);

              _chartSeriesController!
                  .updateDataSource(updatedDataIndexes: [1, 2, 3]);
            },
            child: const Text('Update Data'),
          ),
        ],
      ),
   );
}
Refer to the following image.
GitHub reference
For more details, refer to dynamic editing in the Flutter Charts GitHub demo.
Conclusion
Thanks for reading! In this blog, we have seen how to dynamically edit data in the Syncfusion Flutter Charts widget with the help of DataGrid. Integrating these widgets allows you to create powerful real-time live update and chart sorting visualizations that update automatically based on user input. Also, we demonstrated how to enable efficient data updates and interactive data dragging in the Charts. By leveraging the updateDataSource method, you can interactively modify, add, or remove data points without re-rendering the entire chart, thus enhancing the performance of your Flutter apps.
Try the methods discussed in this blog, and leave your feedback in the comments below!
For our customers, the latest version of Essential Studio® is available from the License and Downloads page. If you’re not a Syncfusion customer, try our 30-day free trial to evaluate our components.
If you have any questions, contact us through our support forum, support portal, or feedback portal. As always, we are here to assist you!
 No spam, just valuable updates.