Welcome to the Chart of the Week blog series.
Thermal expansion is a fundamental property of materials that describes their tendency to change shape or size due to temperature changes. Error bar charts are excellent tools to visualize and analyze thermal expansion data.
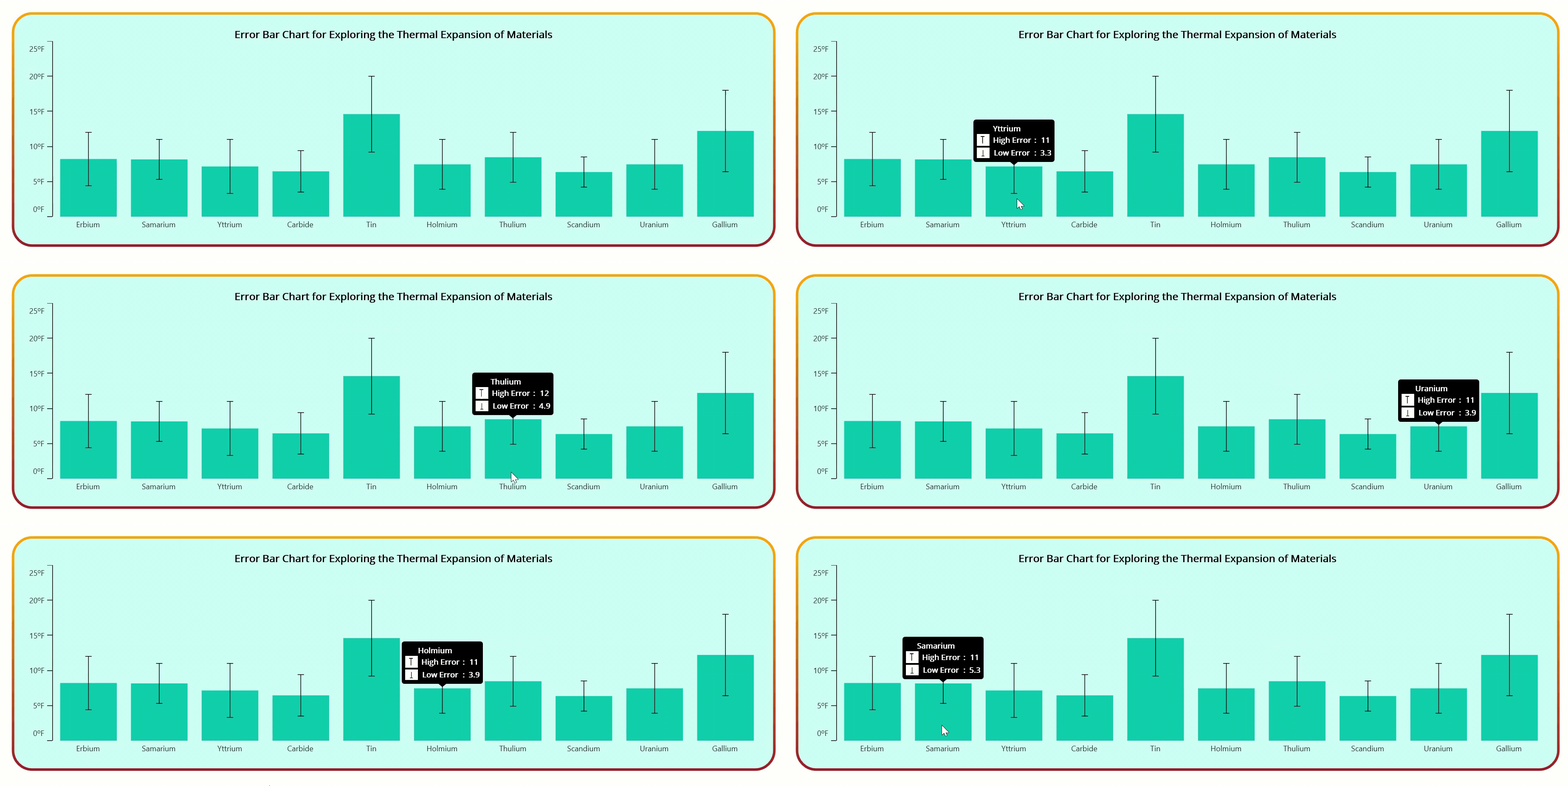
In this blog, we’ll create an error bar chart with column series representation to visualize the thermal expansion of materials using the Syncfusion .NET MAUI error bar chart. This control is supported on both desktop (Windows and Mac) and mobile platforms (Android and iOS).

Let’s see the steps to replicate the previous graph with the Syncfusion .NET MAUI error bar chart!
Step 1: Gathering thermal coefficient data
Before creating the chart, let’s gather the data on the thermal coefficient of materials from this document. Table 2.1, titled Summary of Thermal Expansion, provides the thermal expansion coefficient of various materials.
Step 2: Preparing the data for the chart
Define the ThermalExpansionModel class with MaterialName, Coefficient, ErrorValue, HighErrorValue, and LowErrorValue properties to store the materials’ thermal expansion coefficient and error values accurately.
public class ThermalExpansionModel
{
    public string MaterialName { get; set; }
    public double Coefficient { get; set; }
    public double ErrorValue { get; set; }
    public double HighErrorValue { get; set; }
    public double LowErrorValue { get; set; }
    public ThermalExpansionModel(string materialName, double lowError, double highError)
    {
        MaterialName = materialName;
        LowErrorValue = lowError;
        HighErrorValue = highError;
        Coefficient = (highError + lowError) / 2;
        ErrorValue = (highError - lowError) / 2;
    }
}
Then, generate the data collection for the thermal expansion coefficient of materials using the ThemalExpansionViewModel class.
public class ThermalExpansionViewModel
{
    public ObservableCollection<ThermalExpansionModel> ThermalExpansion { get; set; }
    public ThermalExpansionViewModel()
    {
       ThermalExpansion = new ObservableCollection<ThermalExpansionModel>()
       {
           new ThermalExpansionModel("Erbium", 4.4, 12),
           new ThermalExpansionModel("Samarium", 5.3, 11),
           new ThermalExpansionModel("Yttrium", 3.3, 11),
           new ThermalExpansionModel("Carbide", 3.5, 9.4),
           new ThermalExpansionModel("Tin", 9.2, 20),
           new ThermalExpansionModel("Holmium", 3.9, 11),
           new ThermalExpansionModel("Thulium", 4.9, 12),
           new ThermalExpansionModel("Scandium", 4.2, 8.5),
           new ThermalExpansionModel("Uranium", 3.9, 11),
           new ThermalExpansionModel("Gallium", 6.4, 18)
       };
   }
}
Step 3: Configuring Syncfusion .NET MAUI Cartesian Charts
Then, refer to the user guide documentation to configure the Syncfusion .NET MAUI Cartesian Charts control. This document provides detailed instructions on setting it up in your .NET MAUI application.
Refer to the following code example.
<chart:SfCartesianChart>
 <chart:SfCartesianChart.XAxes>
  <chart:CategoryAxis>
  </chart:CategoryAxis>
 </chart:SfCartesianChart.XAxes>
 <chart:SfCartesianChart.YAxes>
  <chart:NumericalAxis>
  </chart:NumericalAxis>
 </chart:SfCartesianChart.YAxes>
</chart:SfCartesianChart>
Step 4: Binding data to the chart
To visualize the thermal expansion of materials, we’ll use the Syncfusion ColumnSeries and ErrorBarSeries instances.
In the ColumnSeries, bind the collection of ThermalExpansion data to the ItemsSource property. The XBindingPath and YBindingPath are bound with the MaterialName and Coefficient properties, which indicate the data points that need to be used for the x-axis and y-axis values, respectively.
<chart:ColumnSeries ItemsSource="{Binding ThermalExpansion}"
                    XBindingPath="MaterialName"
                    YBindingPath="Coefficient"
</chart:ColumnSeries>
In the ErrorBarSeries, set Vertical as the value to the Mode property to draw the error bars in vertical orientation. Set Custom as the value to the Type property, and bind the error values to the VerticalErrorPath property.
<chart:ErrorBarSeries ItemsSource="{Binding ThermalExpansion}"
                      XBindingPath="MaterialName"
                      YBindingPath="Coefficient"
                      Mode="Vertical"
                      Type="Custom"
                      VerticalErrorPath="ErrorValue">
</chart:ErrorBarSeries>
Step 5: Adding an interactive tooltip
The TooltipTemplate element with the key tooltipTemplate1 represents the structure and content of the tooltip.
<chart:ColumnSeries TooltipTemplate="{StaticResource tooltipTemplate1}" />
By defining this tooltip template, we can customize the appearance and content of the tooltip displayed when hovering over the column series in the chart. This allows us to provide detailed information about the materials and enhance the readability of the thermal expansion data.
Refer to the following code example.
<chart:SfCartesianChart.Resources>
    <DataTemplate x:Key="tooltipTemplate1">
        <Grid ColumnDefinitions="Auto,Auto,Auto,Auto" RowDefinitions="Auto,Auto,Auto,Auto" ColumnSpacing="5">
            <Label Grid.ColumnSpan="3"
                   Text="{Binding Item.MaterialName}"
                   TextColor="White"
                   FontAttributes="Bold"
                   FontSize="12"
                   HorizontalOptions="Center"
                   VerticalOptions="Center"/>
            <Image Grid.Row="1" Grid.Column="0" HeightRequest="20" WidthRequest="20" Source="high.png" />
            <Label Grid.Row="1" Grid.Column="1"
                   Text="High Error"
                   TextColor="White"
                   FontAttributes="Bold"
                   FontSize="12"
                   HorizontalOptions="Center"
                   VerticalOptions="Center"/>
            <Label Grid.Row="1" Grid.Column="2" Text=":"
                   TextColor="White"
                   FontAttributes="Bold"
                   FontSize="12"
                   HorizontalOptions="Center"
                   VerticalOptions="Center"/>
            <Label Grid.Row="1" Grid.Column="3"
                   Text="{Binding Item.HighErrorValue,StringFormat='{0:0.#}'}"
                   TextColor="White"
                   FontAttributes="Bold"
                   FontSize="12"
                   HorizontalOptions="Center"
                   VerticalOptions="Center"/>
            <Image Grid.Row="2" Grid.Column="0" HeightRequest="20" WidthRequest="20"
                   Source="low.png" />
            <Label Grid.Row="2" Grid.Column="1" Text="Low Error"
                   TextColor="White"
                   FontAttributes="Bold"
                   FontSize="12"
                   HorizontalOptions="Center"
                   VerticalOptions="Center"/>
            <Label Grid.Row="2" Grid.Column="2" Text=":"
                   TextColor="White"
                   FontAttributes="Bold"
                   FontSize="12"
                   HorizontalOptions="Center"
                   VerticalOptions="Center"/>
            <Label Grid.Row="2" Grid.Column="3"
                   Text="{Binding Item.LowErrorValue,StringFormat='{0:0.#}'}"
                   TextColor="White"
                   FontAttributes="Bold"
                   FontSize="12"
                   HorizontalOptions="Center"
                   VerticalOptions="Center"/>
        </Grid>
    </DataTemplate>
</chart:SfCartesianChart.Resources>
Step 6: Customizing the chart appearance
Let’s customize the appearance of the error bar chart.
Combining the following elements, the next code example creates a styled layout with a bordered container and a Cartesian chart with a customized title, x-axis, and y-axis, with their respective styles. This layout helps us display thermal expansion data and visualize the material behavior.
<StackLayout Padding="{OnPlatform WinUI='40',MacCatalyst='40'}">
 <Border StrokeThickness="4"
         StrokeShape="RoundRectangle 30,30,30,30"
         Background="#ccfff5"
         HorizontalOptions="Center">
  <Border.Stroke>
   <LinearGradientBrush EndPoint="0,1">
    <GradientStop Color="Orange" Offset="0.1" />
    <GradientStop Color="Brown"  Offset="1.0" />
   </LinearGradientBrush>
  </Border.Stroke>
  <chart:SfCartesianChart>
   <chart:SfCartesianChart.Title>
    <Label
          Text="Error Bar Chart for Exploring the Thermal Expansion of Materials"
          HorizontalOptions="CenterAndExpand"
          VerticalOptions="CenterAndExpand"
          FontAttributes="Bold"
          TextColor="Black"
          FontSize="16"
          LineBreakMode="WordWrap"
          Padding="0,0,0,0"/>
   </chart:SfCartesianChart.Title>
   …
</ StackLayout>
Finally, customize the axis and its elements, as shown in the following code example.
<chart:SfCartesianChart.XAxes> <chart:CategoryAxis ZoomPosition="0.8" ShowMajorGridLines="False" LabelPlacement="BetweenTicks"> <chart:CategoryAxis.MajorTickStyle> <chart:ChartAxisTickStyle TickSize="0"/> </chart:CategoryAxis.MajorTickStyle> <chart:CategoryAxis.AxisLineStyle> <chart:ChartLineStyle StrokeWidth="0"/> </chart:CategoryAxis.AxisLineStyle> </chart:CategoryAxis> </chart:SfCartesianChart.XAxes> <chart:SfCartesianChart.YAxes> <chart:NumericalAxis Maximum="25" ShowMajorGridLines="False" IsVisible="True" > <chart:NumericalAxis.LabelStyle> <chart:ChartAxisLabelStyle LabelFormat="0.#ºF"/> </chart:NumericalAxis.LabelStyle> <chart:NumericalAxis.AxisLineStyle> <chart:ChartLineStyle StrokeWidth ="1" Stroke="Black"/> </chart:NumericalAxis.AxisLineStyle> <chart:NumericalAxis.MajorTickStyle> <chart:ChartAxisTickStyle Stroke="Black" /> </chart:NumericalAxis.MajorTickStyle> </chart:NumericalAxis> </chart:SfCartesianChart.YAxes>
After executing these code examples, we’ll get output like the following screenshot.

GitHub reference
For more details, refer to the project on GitHub.
Conclusion
Thanks for reading! In this blog, we’ve seen how to chart the thermal expansion of materials using Syncfusion’s .NET MAUI error bar chart. We encourage you to follow the steps discussed and share your thoughts in the comments below.
You can also contact us via our support forum, support portal, or feedback portal. We are always happy to assist you!


