TL;DR: Let’s see how to integrate Supabase with Syncfusion Flutter Calendar to manage appointments. This guide covers setting up dependencies, initializing Supabase, fetching data, and performing CRUD operations. Using these tools, you’ll also learn how to handle real-time updates and load appointments on demand.
Syncfusion Flutter Calendar has rich features for scheduling, managing, and efficiently representing appointments. This widget exposes a clean and convenient user interface for custom working days and hours and basic calendar operations such as date navigation and selection.
Let’s see how to integrate the Supabase database with the Flutter Calendar, fetch appointments, and display them in it. We’ll also see how to perform CRUD actions (Add, update, and delete) on the appointments.
Note: Before proceeding, refer to the getting started with the Flutter Calendar documentation.
Adding dependencies
Add the Supabase_flutter and Syncfusion_flutter_calendar dependencies in your pubspec.yaml file with the latest version.
dependencies:
  syncfusion_flutter_calendar: *.*.*
  supabase_flutter: *.*.*
Initializing the Supabase in a Flutter app
Initialize the Supabase database in your Flutter app using the initialize function, and provide the URL and anonKey to access the database.
Future<<void>> main() async {
  WidgetsFlutterBinding.ensureInitialized();
  await Supabase.initialize(
    url: 'YOUR_SUPABASE_URL',
    anonKey: 'YOUR_SUPABASE_ANON_KEY',
  );
  runApp(MyApp());
}
Replace YOUR_SUPABASE_URL and YOUR_SUPABASE_ANON_KEY values with your Supabase URL and anonymous key, respectively.
Retrieve data from Supabase and bind it in the Flutter Calendar
Create a Supabase client instance and access its data by providing the respective table name and the primaryKey. Then, store the data in a future variable.
Next, create the SfCalendar widget and wrap it with a StreamBuilder. Assign the future variable to the stream property of the StreamBuilder.
Finally, create a Meeting class to define meeting details and a factory constructor to convert JSON data into real values. This will update the calendar to display real-time data.
final Stream<<List<<Map<<String, dynamic>>>>>> _future =
supabase.from('table_name').stream(primaryKey: ['primary_Key']);
@override
Widget build(BuildContext context) {
return Scaffold(
body: StreamBuilder<<List<<Map<<String, dynamic>>>>>>(
stream: _future,
builder: (context, snapshot) {
if (!snapshot.hasData) {
return const Center(child: CircularProgressIndicator());
}
final countries = snapshot.data!;
_events = DataSource(
countries.map((e) =>> Meeting.fromSnapShot(e, Colors.blue)).toList(),
);
return SfCalendar(
view: CalendarView.month,
controller: _controller,
dataSource: DataSource(
countries
.map((e) =>> Meeting.fromSnapShot(e, Colors.blue))
.toList(),
),
onTap: onCalendarTapped,
monthViewSettings: const MonthViewSettings(
appointmentDisplayMode: MonthAppointmentDisplayMode.appointment,
),
);
},
),
);
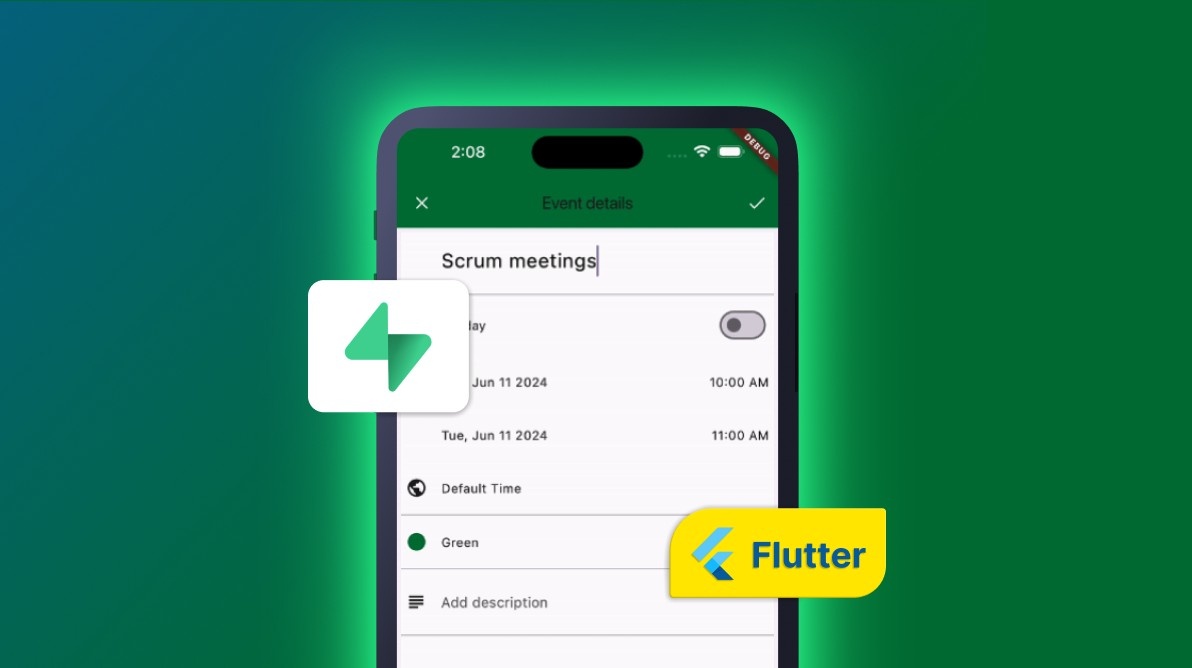
}Add an appointment using the appointment editor
To add an appointment to the Flutter Calendar, use the onTap event to open an appointment editor and enter the required information. Then, access the Supabase instance and use the insert function to add the data to the table.
await _client.from(table_name').insert(
  [
    {
      'startTime': appointment.from.toIso8601String(),
      'endTime': appointment.to.toIso8601String(),
      'color': appointment.background.toString(),
      'eventName': appointment.eventName,
    }
  ],
);
Update an existing appointment
To update an appointment in the Flutter Calendar, get the tapped appointment information from the calendar’s onTap event. Then, compare its fields (e.g., id) using the eq() function and update the specific fields with the update() function.
await _client.from(table_name').update(
    {
      'startTime': appointment.from.toIso8601String(),
      'endTime': appointment.to.toIso8601String(),
      'color': appointment.background.toString(),
      'eventName': appointment.eventName,
    }
).eq('id’: appointment.id);
Delete an appointment
To delete an appointment in the Flutter Calendar, retrieve the appointment information from the onTap event. Then, check whether the ID field matches and then call the delete() function in the Supabase instance. This action will remove the data from the Supabase database and update the SfCalendar through the StreamBuilder.
await _client
    .from('appointment_editor')
    .delete()
    .eq('number', appointment.id);
Load appointments on-demand
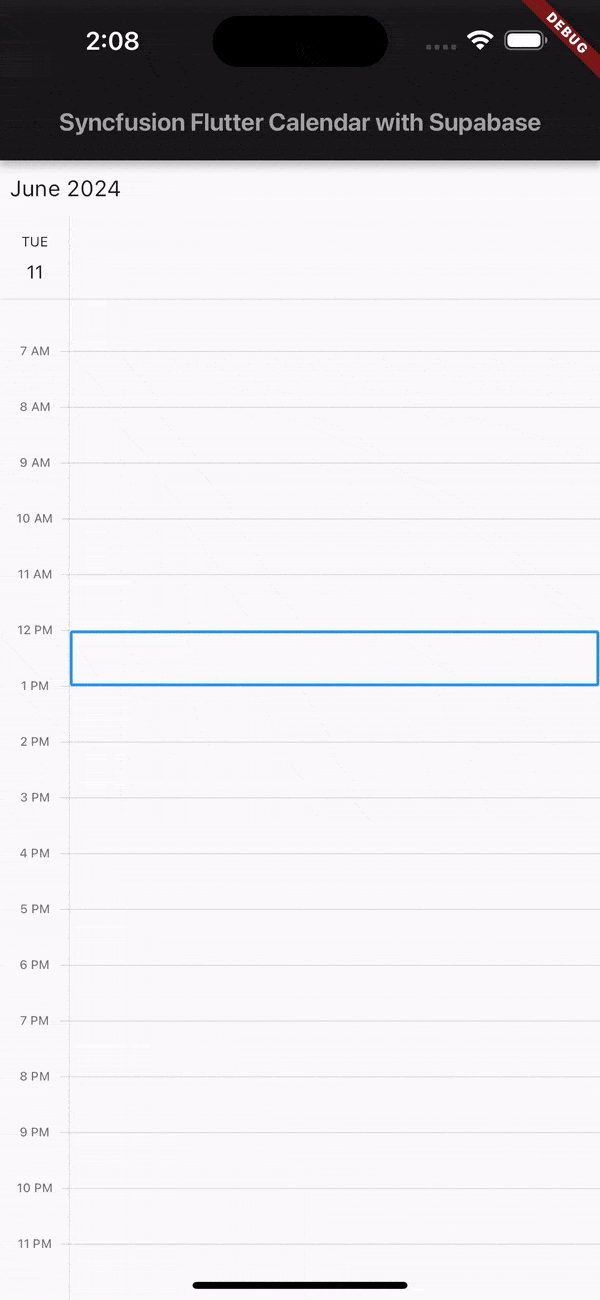
In the SfCalendar, we have a load more feature that helps us load appointments on-demand. This feature allows us to retrieve appointments from the Supabase database and load them into SfCalendar when the view changes, such as when swiping or tapping the navigation arrow button.
Refer to the following code example to load appointments on demand from the Supabase database to the Flutter Calendar.
@override
Future<<void>> handleLoadMore(DateTime startDate, DateTime endDate) async {
  List<<_Meeting>> meetings = <<_Meeting>>[];
  DateTime date = DateTime(startDate.year, startDate.month, startDate.day);
  DateTime appEndDate =
      DateTime(endDate.year, endDate.month, endDate.day, 23, 59, 59);
      await Future<<void>>.delayed(const Duration(seconds: 1));
      while (date.isBefore(appEndDate)) {
        final List<<_Meeting>>? data =
            responseData.map((e) =>> Meeting.fromSnapShot(e, Colors.blue)).toList();
        if (data == null) {
          date = date.add(const Duration(days: 1));
          continue;
        }
        for (final _Meeting meeting in data) {
          if (appointments.contains(meeting)) {
             continue;
          }
          meetings.add(meeting);
        }
        date = date.add(const Duration(days: 1));
      }
    appointments.addAll(meetings);
    notifyListeners(CalendarDataSourceAction.add, appointments);
}
Refer to the following output image.
GitHub reference
For more details, refer to the Binding Flutter Calendar with Supabase and performing CRUD actions GitHub demo.

Conclusion
Thanks for reading! In this blog, we’ve seen how to integrate the Supabase database with the Syncfusion Flutter Calendar widget and perform CRUD actions to manage appointments efficiently. Try out the steps in this blog and leave your feedback in the comments section below!
For our customers, the latest version of Essential Studio® is available from the License and Downloads page. If you’re not a Syncfusion customer, try our 30-day free trial to evaluate our components.
If you have any questions, contact us through our support forum, support portal, or feedback portal. As always, we are here to assist you!