
TL;DR: The Blazor Data Form simplifies form creation by auto-generating fields based on your data model, saving you time and effort. This blog explores how to use it for dynamic forms with features like validation, customizable layouts, and data management using data annotations with minimal code.
Creating forms for data entry is a common task in web development, but manually defining each field can be time-consuming.
Syncfusion Blazor Data Form component simplifies form creation by automatically generating form fields based on your data model. It supports various field types, data annotations, validation, and customizable form layouts, making it an efficient tool for building data-driven forms in Blazor apps.
In this blog, we’ll explore how to effortlessly create forms with auto-generated fields using the Blazor Data Form component with code examples.
Note: For more details, refer to the getting started with Blazor Data Form documentation.
Step 1: Install the required NuGet packages
To begin using the Blazor DataForm, install the Syncfusion Blazor DataForm and Themes packages. You can add the package to your project using NuGet:
Install-Package Syncfusion.Blazor.DataForm --Version <latest-version>
Install-Package Syncfusion.Blazor.Themes --Version <latest-version>
Step 2: Define a data model
Then, create a data model that represents the form data. The properties in this model will automatically generate corresponding fields in the form.
public class Employee
{
   public string EmployeeID { get; set; }
   public string FirstName { get; set; }
   public string LastName { get; set; }
   public string Email { get; set; }
   public DateOnly DateOfBirth { get; set; }
   public DateOnly DateOfJoining { get; set; }
}
Step 3: Add the Blazor Data Form component
Now, add the Data Form component to your Blazor page (.razor file) and bind it to the Employee model. The DataForm will automatically generate fields based on the properties defined in the model.
@using System.ComponentModel.DataAnnotations

<SfDataForm ID="EmployeeForm"
            Model="@EmployeeDetail">
    <FormItems>
        <FormAutoGenerateItems></FormAutoGenerateItems>
    </FormItems>
</SfDataForm>


@code {

   private Employee EmployeeDetail = new Employee()
   {
       FirstName = "Anne",
       LastName = "Lawsen"
   };
}
Step 4: Configuring auto-generated fields in Blazor Data Form
The Blazor Data Form allows you to customize the auto-generated fields using data annotations or by setting field-specific options. For example, you can set display names, validation rules, and formats for the form fields.
Adding auto-generate components in Blazor Data Form
The Blazor Data Form component automatically generates editors based on primitive property types when we use the FormAutoGenerateItems within it.
Refer to the following code example.
<SfDataForm ID="MyForm" Model="@EmployeeDetail">
  <FormItems>
    <FormAutoGenerateItems></FormAutoGenerateItems>
  </FormItems>
</SfDataForm>
The types and their corresponding default editor components are listed in the following table for reference.
|
Data type |
Component |
|
Int, float, decimal, double, long |
|
|
string |
|
|
DateTime |
|
|
DateOnly |
|
|
TimeOnly |
|
|
bool |
|
|
enum |
Note: For more details, refer to the auto-generated fields in the Blazor Data Form documentation.
Using data annotations for customization
As I said earlier, the Blazor Data Form component allows us to customize the auto-generated fields using data annotations or by setting field-specific options. For example, you can set display names, validation rules, and ranges for the form fields.
Refer to the following code example.
public class Employee
 {
     [Editable(false)]
     [Display(Name = "Employee ID")]
     public string EmployeeID { get; set; }

     [Required(ErrorMessage = "Please enter your first name.")]
     [Display(Name = "First Name", Prompt = "Enter first name")]
     public string FirstName { get; set; }

     [Required(ErrorMessage = "Please enter your last name.")]
     [Display(Name = "Last Name", Prompt = "Enter last name")]
     public string LastName { get; set; }

     [Required(ErrorMessage = "Please enter email address.")]
     [EmailAddress(ErrorMessage = "Please enter a valid email address.")]
     [Display(Name = "Email ID", Prompt = "Enter email address")]
     public string EmailID { get; set; }

     [Required(ErrorMessage = "Please enter date of birth.")]
     [Display(Name = "Date of Birth", Prompt = "Enter date of birth")]
     public DateOnly? DOB { get; set; }

     [Required(ErrorMessage = "Please enter date of joining.")]
     [Display(Name = "Date of Joining", Prompt = "Enter date of joining")]
     public DateOnly? DateOfJoining { get; set; }
 }
Using display options to customize column-spanning
The custom DataFormDisplayOptions attribute is used to specify the column span for a property in the Blazor Data Form component in the data model annotations attribute. The DataForm component uses this attribute to determine the ColumnSpan for the property.
public class Employee
{
     [Editable(false)]
     [Display(Name = "Employee ID:")]
     [DataFormDisplayOptions(ColumnSpan = 2)]
     public string EmployeeID { get; set;

    ............
    ............

     [Required(ErrorMessage = "Please enter your email address.")]
     [EmailAddress(ErrorMessage = "Please enter a valid email address.")]
     [Display(Name = "Email ID")]
     [DataFormDisplayOptions(ColumnSpan = 2)]
     public string EmailID { get; set; }

    ............
    ............

}
Using date options to customize date-related fields
The custom DataFormDateOptions attribute is used to specify the MinimumDate, MaximumDate, and its Format for a Date type property within the DataForm component in the data model annotations. This attribute simplifies the management of date-related inputs in data models. When applied to a date property, the DataFormDateOptions attribute automatically configures the associated date field components, ensuring user input adheres to the defined constraints and format.
@using System.ComponentModel.DataAnnotations
<SfDataForm ID="MyForm"
Model="@EmployeeDetail" ColumnCount=2
ColumnSpacing="10px" Width="400px">
<FormValidator>
<DataAnnotationsValidator></DataAnnotationsValidator>
</FormValidator>
<FormItems>
<FormAutoGenerateItems></FormAutoGenerateItems>
</FormItems>
</SfDataForm>
@code {
public class Employee
{
[Editable(false)]
[Display(Name = "Employee ID")]
[DataFormDisplayOptions(ColumnSpan = 2)]
public string EmployeeID { get; set; }
[Required(ErrorMessage = "Please enter your first name.")]
[Display(Name = "First Name", Prompt = "Enter first name")]
public string FirstName { get; set; }
[Required(ErrorMessage = "Please enter your last name.")]
[Display(Name = "Last Name", Prompt = "Enter last name")]
public string LastName { get; set; }
[Required(ErrorMessage = "Please enter email address.")]
[EmailAddress(ErrorMessage = "Please enter a valid email address.")]
[Display(Name = "Email ID", Prompt = "Enter email address")]
[DataFormDisplayOptions(ColumnSpan = 2)]
public string EmailID { get; set; }
[Required(ErrorMessage = "Please enter date of birth.")]
[Display(Name = "Date of Birth", Prompt = "Enter date of birth")]
[DataFormDateOptions(MaximumDate ="17/10/2024" , MinimumDate = "01/01/1970", Format = "dd/MM/yyyy")]
public DateOnly? DOB { get; set; }
[Required(ErrorMessage = "Please enter date of joining.")]
[Display(Name = "Date of Joining", Prompt = "Enter date of joining")]
public DateOnly? DateOfJoining { get; set; }
}
private Employee EmployeeDetail = new Employee()
{
EmployeeID = "AZ-1489",
FirstName = "Anne",
LastName = "Lawsen"
};
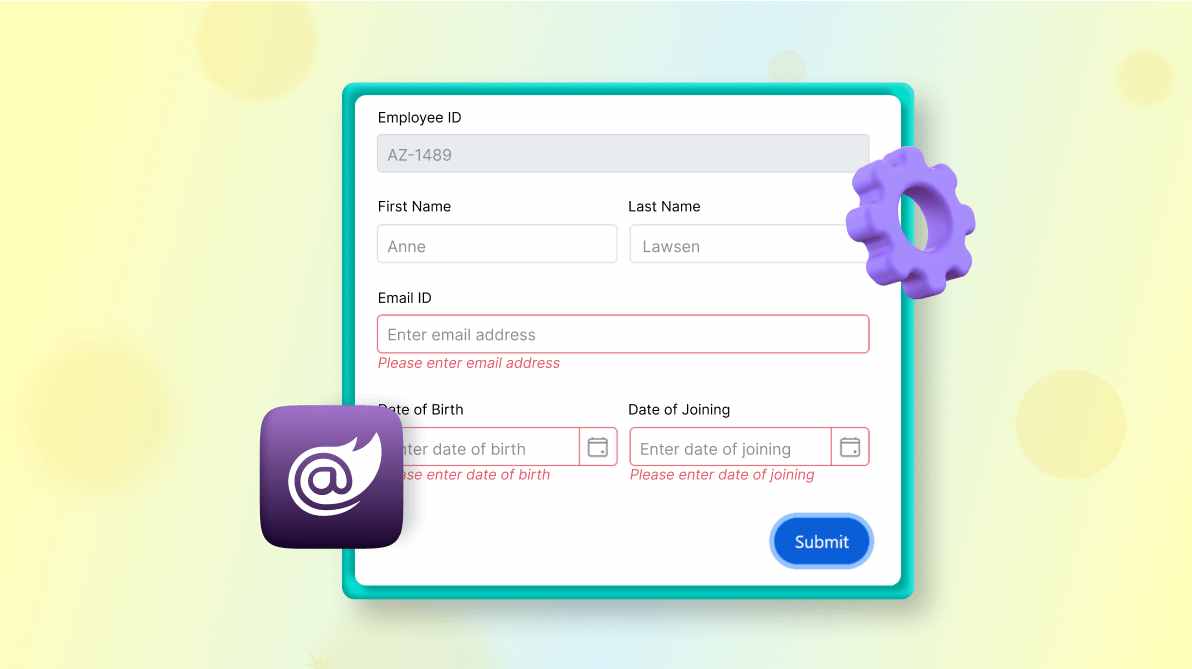
}Now, run the app, and you can obtain an auto-generated data form based on your model. Refer to the following image.

References
Also, refer to the auto-generating form fields using the Blazor Data Form component GitHub demo.

Conclusion
Thanks for reading! In this blog, we’ve seen how to auto-generate form fields using the Syncfusion Blazor Data Form component. It allows you to create forms quickly with minimal code. The component also supports data annotations for validation, customizable layouts, and event handling for form submissions, making it a versatile choice for data-driven form development.
Try our Blazor component by downloading a free 30-day trial or from our NuGet package. Feel free to look at our online examples and documentation to explore other available features. If you have any questions, please let us know in the comments section below.
You can also contact us through our support forum, support portal, and feedback portal. We are always happy to assist you!


 No spam, just valuable updates.