TL;DR: Let’s see how to integrate AI-powered smart paste in a customer feedback form using Syncfusion’s .NET MAUI Data Form control. This feature automates data entry, minimizing errors and boosting efficiency by pasting and organizing data into relevant fields. We’ll cover setting up Semantic Kernel with Azure OpenAI, implementing the smart paste function, and creating a feedback form with data validation and AI integration. Ready to speed up data entry with AI? Let’s begin!
The AI-powered Smart Paste feature automates data entry by intelligently pasting and formatting data into the appropriate fields on various forms. This improves efficiency, minimizes manual errors, and ensures consistency in forms across different apps, such as customer information forms, surveys, orders, registrations, financial records, healthcare documents, legal contracts, and HR apps.
In this blog, we’ll see how to implement the AI-powered Smart Paste feature in a customer feedback form using the Syncfusion .NET MAUI Data Form control.
Let’s get started!
Why use AI-powered smart paste?
Retail companies frequently gather feedback via emails, surveys, and social media, which then need to be manually entered into a central system.
Smart Paste allows customer service representatives to quickly paste this feedback into a data form, where AI automatically sorts text, ratings, and other details into the appropriate fields. This enhances data collection speed and consistency, allowing for faster insights and responses based on customer feedback.
Step 1: Integrating Semantic Kernel with the .NET MAUI app
- First, open Visual Studio and create a new .NET MAUI app.
- Ensure you have access to Azure OpenAI service and have set up a deployment in the Azure portal.
- Next, install the Microsoft.SemanticKernel NuGet package from the NuGet Gallery.
Step 2: Set up Semantic Kernel
To configure Semantic Kernel, we’ll use the GPT-35 model deployed under the name GPT35Turbo. Start by creating the SemanticKernelService class, as shown in the following code example.
internal class SemanticKernelService
{
    const string endpoint = "https://{YOUR_END_POINT}.openai.azure.com";
    const string deploymentName = "GPT35Turbo";
    string key = "API key";
    IChatCompletionService chatCompletionService;
    Kernel kernel;

    internal SemanticKernelService()
    {

    }
}
Step 3: Connect to the Semantic Kernel
In the .NET MAUI app, set up a connection to the AzureAI chat completion service, as shown in the following code example.
// At the time of required.
var builder = Kernel.CreateBuilder().AddAzureOpenAIChatCompletion(deploymentName, endpoint, key);
this.kernel = builder.Build();
this.chatCompletionService = this.kernel.GetRequiredService();
This connection allows you to send prompts to the model and receive responses, which you can use for smart paste functionality.
Step 4: Implement the GetResponseFromGPT method
Now, implement the GetResponseFromGPT method to send a prompt to the Semantic Kernel and retrieve the completion result.
internal class SemanticKernelService
{
    const string endpoint = "https://{YOUR_END_POINT}.openai.azure.com";
    const string deploymentName = "GPT35Turbo";
    string key = "API key";

    IChatCompletionService chatCompletionService;
    Kernel kernel;

    internal SemanticKernelService()
    {

    }
   internal async Task GetResponseFromGPT (string userPrompt)
   {
      var builder = Kernel.CreateBuilder().AddAzureOpenAIChatCompletion(deploymentName, endpoint, key);
            this.kernel = builder.Build();
            if (this.kernel != null)
            {
                var chatHistory = new ChatHistory();
                chatHistory.Clear();
                // Add the user's prompt as a user message to the conversation.
                chatHistory.AddSystemMessage("You are a predictive analytics assistant.");
                // Add the user's prompt as a user message to the conversation.
                chatHistory.AddUserMessage(userPrompt);
                // Get the chat completions from kernal.
                chatCompletionService = kernel.GetRequiredService();
                OpenAIPromptExecutionSettings openAIPromptExecutionSettings = new OpenAIPromptExecutionSettings();
                openAIPromptExecutionSettings.ToolCallBehavior = ToolCallBehavior.AutoInvokeKernelFunctions;
                try
                {
                    var response = await chatCompletionService.GetChatMessageContentAsync(chatHistory, executionSettings: openAIPromptExecutionSettings, kernel: kernel);
                    return response.ToString();
                }
                catch
                {
                    return "";
                }
            }

            return "";
   }
}
That’s it! The SemanticKernelService class will now provide a convenient way to interact with the OpenAI API and retrieve completion results based on the given prompt.
Design a feedback form using .NET MAUI DataForm
Let’s create a product feedback form using the Syncfusion .NET MAUI DataForm control. For initial setup instructions, follow the getting started with the .NET MAUI DataForm documentation.
Step 1: Create the FeedbackForm model
Define a FeedbackForm model with the necessary fields: Name, Email, Product Name, Product Version, Rating, and Comments.
public class FeedBackForm
{
       public FeedBackForm()
        {
            this.Name = string.Empty;
            this.Email = string.Empty;
            this.ProductName = string.Empty;
            this.ProductVersion = string.Empty;
            this.Rating = 0;
            this.Comments = string.Empty;
        }
        [Display(Name = "Name", Prompt = "Enter your name")]
        public string Name { get; set; }

        [Display(Name = "Email", Prompt = "Enter your email")]
        public string Email { get; set; }

        [Display(Name = "Product Name", Prompt = "Example: Scheduler")]
        public string ProductName { get; set; }

        [Display(Name = "Product Version", Prompt = "Example: 26.2.8")]
        public string ProductVersion { get; set; }

        [Display(Name = "Rating", Prompt = "Rating between 1-5")]
        public int Rating { get; set; }

        [DataType(DataType.MultilineText)]
        public string Comments { get; set; }
}
Step 2: Create the editors for the feedback form
The .NET MAUI DataForm control automatically generates the data editors based on primitive data types such as string, enumeration, DateTime, and TimeSpan in the DataObject property.
Let’s set the feedback form model (FeedbackForm) to the DataObject property from the view model class, enabling the creation of data editors for the feedback form.
Refer to the following code example to bind the FeedbackForm property from the FeedbackViewModel class.
FeedbackViewModel.cs
C#
public class FeedbackViewModel
{
    /// <summary>
    /// Initializes a new instance of the <see cref="FeedbackViewModel " /> class.
    /// </summary>
    public FeedbackViewModel()
    {
        this.ViewModel = new FeedBackForm();
    }
    /// <summary>
    /// Gets or sets the feedback form model.
    /// </summary>
    public FeedBackForm ViewModel { get; set; }
}
XAML
<Grid>
  <Grid.BindingContext>
     <local:FeedbackViewModel/>
  </Grid.BindingContext>

  <dataForm:SfDataForm x:Name="feedbackForm" DataObject="{Binding ViewModel}"/>
</Grid>
Step 3: Design the feedback form page
Design the feedback form page by adding an image, label, and a Smart Paste button to enhance the user experience.
Refer to the following code that outlines the layout and structure for adding the feedback form.
<Grid>
    <Image Source="feedbackform.png" Aspect="Fill" />
    <Grid HorizontalOptions="Center" VerticalOptions="Center" ColumnSpacing="20">

        <Frame HasShadow="False"
                       BackgroundColor="{DynamicResource SfDataFormNormalBackground}"
                       CornerRadius="10"
                       MaximumHeightRequest="550"
                       VerticalOptions="Start"
                       HorizontalOptions="Center"
                       WidthRequest="550"
                       Padding="10">
            <Grid BackgroundColor="{DynamicResource SfDataFormNormalBackground}">
                <Grid.RowDefinitions>
                      <RowDefinition Height="40"/>
                      <RowDefinition Height="0.8*"/>
                      <RowDefinition Height="1"/>
                      <RowDefinition Height="75"/>
                </Grid.RowDefinitions>

                <Grid.BindingContext>
                   <local:FeedbackViewModel/>
                </Grid.BindingContext>

                <Label Text="Product Feedback"
                             TextColor="Black"
                             FontSize="Subtitle"
                             FontAttributes="Bold"
                             VerticalTextAlignment="Center"
                             HorizontalTextAlignment="Center"/>

                <dataForm:SfDataForm x:Name="feedbackForm"
                                         Grid.RowSpan="1"
                                         Grid.Row="1"
                                         DataObject="{Binding ViewModel}"
                                                          ValidationMode="PropertyChanged"
                                                           LayoutType="TextInputLayout"
                                                           HorizontalOptions="Center">
                    <dataForm:SfDataForm.TextInputLayoutSettings>
                        <dataForm:TextInputLayoutSettings ShowHelperText="True"
                                                                                         FocusedStroke="{DynamicResource SfDataFormFocusedEditorStroke}"/>
                    </dataForm:SfDataForm.TextInputLayoutSettings>
                </dataForm:SfDataForm>

                <Line Grid.Row="2" Background="#F5F5F5" />

                <HorizontalStackLayout Grid.Row="3" HorizontalOptions="End">

                    <Button x:Name="onlineSmartPaste"
                                    Text="Smart Paste"
                                    CornerRadius="20"
                                    FontSize="16"
                                    Margin="20,0,20,0"
                                    Clicked="OnSmartPasteButtonClicked"
                                    HeightRequest="40"/>

                    <Button x:Name="submitButton"
                                   Text="Submit"
                                   CornerRadius="20"
                                   FontSize="16"
                                   Margin="20,0,20,0"
                                   Clicked="OnSubmitButtonClicked"
                                   HeightRequest="40"/>
                </HorizontalStackLayout>
            </Grid>
        </Frame>
    </Grid>
</Grid>
Step 4: Enabling smart paste functionality
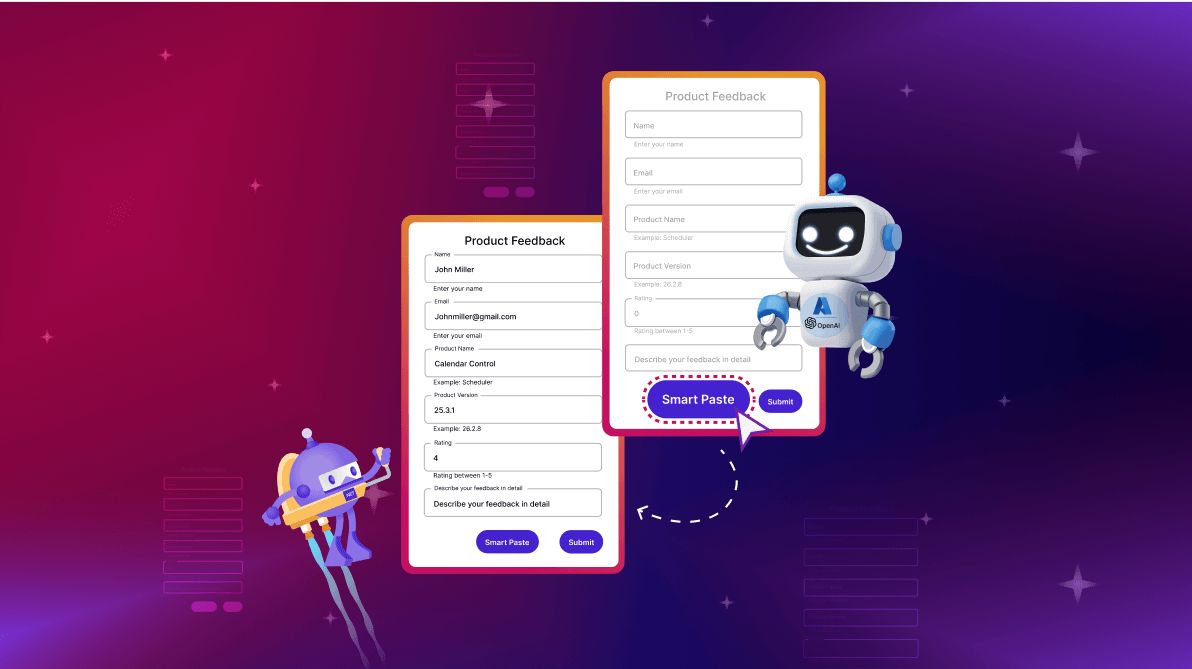
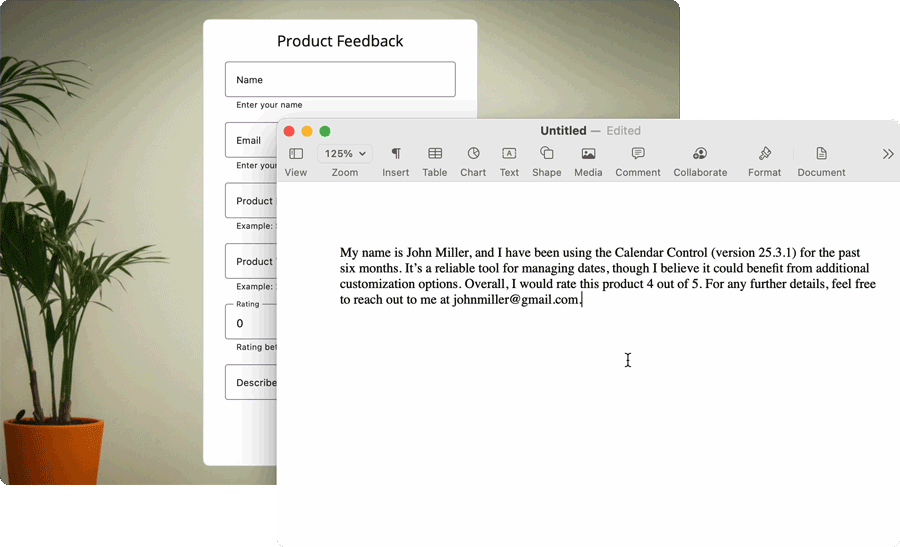
Smart Paste fills out forms automatically using data from the user’s clipboard on clicking the Smart Paste button and improves data management by accurately organizing and populating information in the correct fields.
Here, we’ll add prompts, an AI service to intelligently merge clipboard data into a form’s JSON fields. It checks whether the clipboard text matches the form’s DataObject object field names. The AI returns the merged JSON, which is then processed and incorporated into the DataForm.
string clipboardText;
SemanticKernelService semanticKernelService = new SemanticKernelService();
private async void OnSmartPasteButtonClicked(object sender, EventArgs e)
{
    if (Clipboard.Default.HasText)
    {
        this.clipboardText = await Clipboard.Default.GetTextAsync();
    }

    if (string.IsNullOrEmpty(this.clipboardText))
    {
        await App.Current.MainPage.DisplayAlert("", "No text copied to clipboard. Please copy the text and try again", "OK");
        return;
    }
    string dataFormJsonData = JsonConvert.SerializeObject(this.feedbackForm!.DataObject);
    string prompt = $"Merge the copied data into the DataForm field content, ensuring that the copied text matches suitable field names. Here are the details:" +
    $"\n\nCopied data: {this.clipboardText}," +
    $"\nDataForm Field Name: {dataFormJsonData}," +
    $"\nProvide the resultant DataForm directly." +
    $"\n\nConditions to follow:" +
    $"\n1. Do not use the copied text directly as the field name; merge appropriately." +
    $"\n2. Ignore case sensitivity when comparing copied text and field names." +
    $"\n3. Final output must be Json format" +
    $"\n4. No need any explanation or comments in the output" +
    $"\n Please provide the valid JSON object without any additional formatting characters like backticks or newlines";
    string finalResponse = await this.azureAIService.GetResponseFromGPT(prompt);
    this. ProcessSmartPasteData(finalResponse);
}
Step 5: Update the feedback form with smart paste data
After receiving the merged JSON response from the AI model, the feedback form fields will be updated with the extracted values. The response is deserialized into a dictionary, which is then used to populate the corresponding fields in the DataObject property in the DataForm.
private void ProcessSmartPasteData(string response)
{
    //// Deserialize the JSON string to a Dictionary.
    var openAIJsonData = JsonConvert.DeserializeObject<Dictionary<string, object>>(response);

    //// Create lists to hold field names and values
    var filedNames = new List<string>();
    var fieldValues = new List<string>();

    foreach (var data in openAIJsonData!)
    {
        filedNames.Add(data.Key);
        fieldValues.Add(data.Value?.ToString() ?? string.Empty);
    }

    if (this.feedbackForm.DataObject is FeedBackForm feedbackForm)
    {
        feedbackForm.Name = fieldValues[0];
        feedbackForm.Email = fieldValues[1];
        feedbackForm.ProductName = fieldValues[2];
        feedbackForm.ProductVersion = fieldValues[3];
        feedbackForm.Rating = (int)Math.Round(double.Parse(fieldValues[4]));
        feedbackForm.Comments = fieldValues[5];
    };

    for (int i = 0; i < filedNames.Count; i++)
    {
        this.feedbackForm!.UpdateEditor(filedNames[i]);
    }
}
Step 6: Validate the feedback form data
We’ve created the feedback form; the next step is to implement validation to ensure that the input data meets specific criteria.
Refer to the following code example to validate the fields in the FeedbackForm class.
public class FeedBackForm
{
       public FeedBackForm()
        {
            this.Name = string.Empty;
            this.Email = string.Empty;
            this.ProductName = string.Empty;
            this.ProductVersion = string.Empty;
            this.Rating = 0;
            this.Comments = string.Empty;
        }

        [Display(Name = "Name", Prompt = "Enter your name")]
        [Required(ErrorMessage = "Please enter your name")]
        public string Name { get; set; }

        [Display(Name = "Email", Prompt = "Enter your email")]
        [EmailAddress(ErrorMessage = "Invalid email address")]
        public string Email { get; set; }

        [Display(Name = "Product Name", Prompt = "Example: Scheduler")]
        public string ProductName { get; set; }

        [Display(Name = "Product Version", Prompt = "Example: 26.2.8")]
        public string ProductVersion { get; set; }

        [Display(Name = "Rating", Prompt = "Rating between 1-5")]
        [Range(1, 5, ErrorMessage = "Rating should be between 1 and 5")]
        public int Rating { get; set; }

        [DataType(DataType.MultilineText)]
        [Display(ShortName = "Describe your feedback in detail", Name = "Comments")]
        public string Comments { get; set; }
}
Explanation of validation attributes:
- Required: Ensures that the user provides a name. If left empty, an error message prompts the user to fill it in.
- EmailAddress: Validates that the email format is correct. An error message is displayed if the input is not a valid email address.
- Range: Specifies that the rating must be between 1 and 5. An error message informs the user of the valid rating limits if the input is outside this range.
- Display: Customizes the label and prompt displayed for each field to enhance user guidance and experience.
Step 7: Show the validation message on the Submit button click
To ensure that all required fields are filled out correctly before submission, we’ll validate the feedback form when the Submit button is clicked using the Validate method. This will help provide immediate feedback to the user regarding the form’s completeness.
Refer to the following code example.
private async void OnSubmitButtonClicked(object sender, EventArgs e)
{
    if (this.feedbackForm != null && App.Current?.MainPage != null)
    {
        if (this.feedbackForm.Validate())
        {
            await App.Current.MainPage.DisplayAlert("", "Feedback form submitted successfully", "OK");
        }
        else
        {
            await App.Current.MainPage.DisplayAlert("", "Please enter the required details", "OK");
        }
    }
}
After executing all the above code examples, we’ll get the output that resembles the following image.

GitHub reference
For more details, refer to the Integrating AI-powered smart paste feature in the .NET MAUI DataForm GitHub demo.
Conclusion
Thanks for reading! In this blog, we’ve seen how to create and validate a feedback form by integrating the AI-powered smart paste functionality in the Syncfusion .NET MAUI DataForm control. This feature is supported in our 2024 Volume 3 release. Try out this smart feature and share your feedback in the comments section below.
If you are not a customer, try our 30-day free trial to check out these new features.
If you have questions, you can contact us through our support forum, feedback portal, or support portal. We are always happy to assist you!
 No spam, just valuable updates.