This blog post will guide you in using GraphQL to bind data to the Syncfusion Angular Data Grid component and perform sorting, filtering, and CRUD actions.
GraphQL
According to the GraphQL website, “GraphQL is a query language for your API and a server-side runtime for executing queries using a type system you define for your data. GraphQL isn’t tied to any specific database or storage engine and is instead backed by your existing code and data.”
GraphQL vs. REST API
GraphQL has only one endpoint. So, it is a more efficient client API than REST API.
| Comparison of REST API and GraphQL | |
| REST API | GraphQL API |
| Multiple endpoints (GET/POST/PUT). | Single endpoint. |
| Supports JSON data exchange. | Supports JSON data exchange. |
| Can work with all types of databases. | Can work with all types of databases. |
REST API
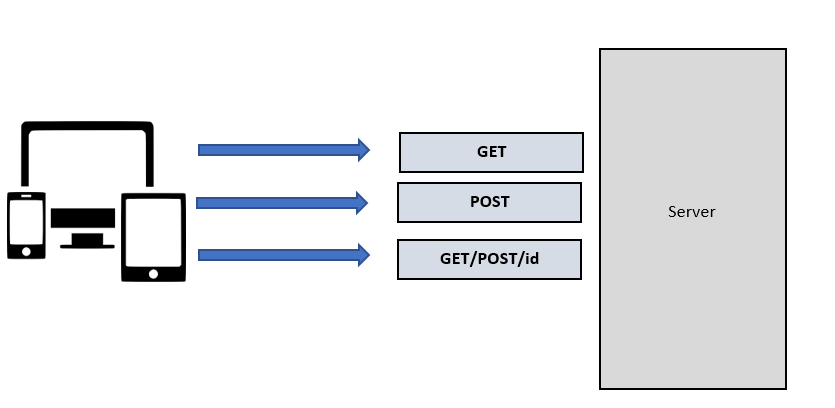
As I said before, the REST API has multiple endpoints. So, it will send a separate request to the server for each data operation.
Refer to the following image.
Example:
Consider a social media application using REST API. In it, we have to send individual HTTP API requests to fetch details such as user ID, posts, like count, and follower count.
Refer to the following image.
 GraphQL
GraphQL has only one endpoint. It will send multiple queries in a single request. So, its performance is much better than the REST API.
Refer to the following image. 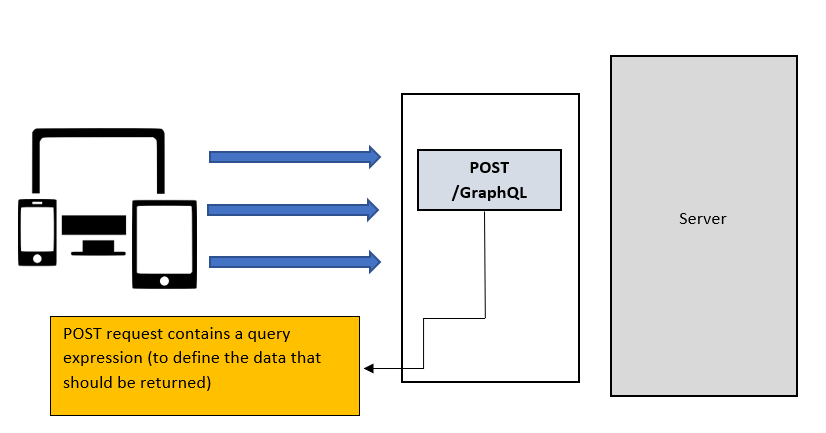
Example:
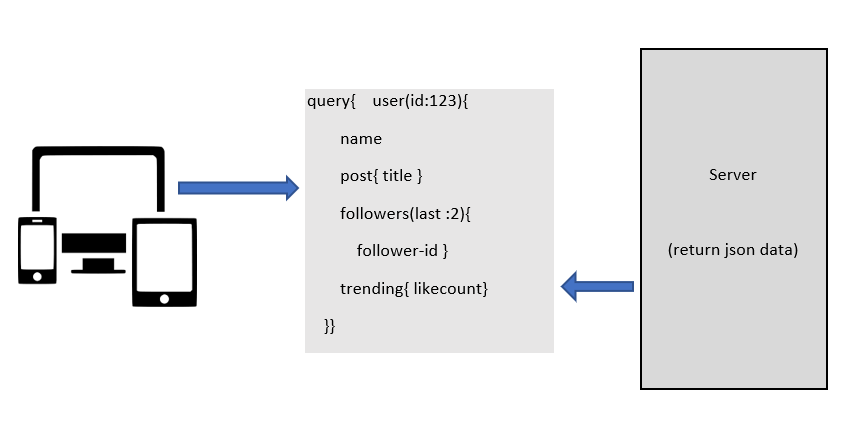
You can easily fetch the user ID, posts, like count, and follower count in a social media application by sending a single HTTP request using GraphQL.
Refer to the following image.
Fundamentals of GraphQL
To get started with GraphQL you should know:
- Schema and types
- Query
- Mutation
- Resolver
Schema and types
Since GraphQL APIs are organized based on types, we have to define the exact type of the field name based on our data. The schema is a fundamental concept in GraphQL implementation. The following is an example of a basic schema declaration in GraphQL.
type Order {
  OrderID: Int!
  CustomerID: String!
  Employees: [Employee]
}

type Employee {
  EmployeeID: Int!
  FirstName: String!
  LastName: String     // it accept null value.
}
Query
The GraphQL query is used to read or fetch data from the GraphQL server. The following is an example of a basic query declaration in GraphQL.
{
  Employee{
   EmployeeID
   FirstName
  }
}
Mutation
The GraphQL mutation is used to perform CRUD actions in the GraphQL server. The following is an example of a basic mutation declaration in GraphQL.
Mutation: { // Perform Insert
 createOrder: (parent, { value }, context, info) => {
 return value;
 }}
Resolver
The GraphQL resolver helps us handle the GraphQL query. The following is an example of a basic resolver declaration in GraphQL.
const resolvers = {
 Query: {
  getOrders: (parent, { datamanager }, context, info) => {
   if (datamanager.search) {
     // Perform searching
   }
 }
}
Syncfusion DataManager with GraphQLAdaptor
The GraphQLAdaptor in our Syncfusion DataManager component retrieves data from the GraphQL server. It performs CRUD and data operations such as paging, sorting, and filtering by sending the required arguments to the server.
This GraphQLAdaptor enables us to manage data in Syncfusion components.
Syncfusion Angular Data Grid
Our Syncfusion Angular Data Grid is a feature-rich control for displaying data in a tabular format. Its functionalities include data binding, editing, Excel-like filtering, and selection. It also supports exporting data to Excel, CSV, and PDF formats.
Let’s see how to bind data in our Syncfusion Angular Data Grid through the GraphQL server and perform sorting, filtering, and other CRUD operations.
Required software
Configure GraphQL server
First, install the GraphQL server using the Graphpack npm package.
Then, include the following code in the package.json file to configure the GraphQL server.
package.json
{
 "name": "graphql-server",
 "version": "1.0.0",
 "description": "",
 "main": "index.js",
 "scripts": {
 "dev": "graphpack --port 4200",
 "build": "graphpack build"
 },
 "author": "",
 "license": "ISC",
 "devDependencies": {
  "graphpack": "^1.0.9"
 },
 "dependencies": {
  "@syncfusion/ej2-data": "^19.2.55"
 }
}
Create a database file
Next, we create the database file using JSON data in the GraphQL server. I am naming this database file db.js.
Refer to the following code example.
export let filterData = [
 {
   OrderID: 10248, CustomerID: 'VINET', EmployeeID: 5, OrderDate: new Date("07 12 1996 02:00:23"),
   ShipName: 'Vins et alcools Chevalier', ShipCity: 'Reims', ShipAddress: '59 rue de l Abbaye',
   ShipRegion: 'CJ', ShipPostalCode: '51100', ShipCountry: 'France', Freight: 32.38, Verified: !0
 },
 {
   OrderID: 10249, CustomerID: 'TOMSP', EmployeeID: 6, OrderDate: new Date("07 12 1996 00:03:23"),
   ShipName: 'Toms Spezialitäten', ShipCity: 'Münster', ShipAddress: 'Luisenstr. 48',
   ShipRegion: 'CJ', ShipPostalCode: '44087', ShipCountry: 'Germany', Freight: 11.61, Verified: !1
 },
 {
   OrderID: 10250, CustomerID: 'HANAR', EmployeeID: 4, OrderDate: new Date("07 12 1996 00:00:23"),
   ShipName: 'Hanari Carnes', ShipCity: 'Rio de Janeiro', ShipAddress: 'Rua do Paço, 67',
   ShipRegion: 'RJ', ShipPostalCode: '05454-876', ShipCountry: 'Brazil', Freight: 65.83, Verified: !0
 },
 {
   OrderID: 10251, CustomerID: 'VICTE', EmployeeID: 3, OrderDate: new Date(8367642e5),
   ShipName: 'Victuailles en stock', ShipCity: 'Lyon', ShipAddress: '2, rue du Commerce',
   ShipRegion: 'CJ', ShipPostalCode: '69004', ShipCountry: 'France', Freight: 41.34, Verified: !0
 }
]
Create schema definition for GraphQL
Then, create the schema for the GraphQL server with the following code. I am going to name this schema.graphql.
#Grid sort direction

input Sort {
  name: String!
  direction: String!
}

#Grid aggregates type

input Aggregate {
  field: String!
  type: String!
}

#Syncfusion DataManager query params

input DataManager {
  skip: Int
  take: Int
  sorted: [Sort]
  group: [String]
  table: String
  select: [String]
  where: String
  search: String
  requiresCounts: Boolean,
  aggregates: [Aggregate],
  params: String
}

# Grid field names
input OrderInput {
  OrderID: Int!
  CustomerID: String
  EmployeeID: Int
  ShipCity: String
  ShipCountry: String
}

type Order {
  OrderID: Int!
  CustomerID: String
  EmployeeID: Int
  ShipCity: String
  ShipCountry: String
}

# need to return type as 'result (i.e. current pager data)' and count (i.e., the total number of records in your database)
type ReturnType {
  result: [Order]
  count: Int
  aggregates: String
}

type Query {
  getOrders(datamanager: DataManager): ReturnType
}

type Mutation {

  createOrder(value: OrderInput): Order!
  updateOrder(key: Int!, keyColumn: String, value: OrderInput): Order
  deleteOrder(key: Int!, keyColumn: String, value: OrderInput): Order!
}
Create resolver and mutation for GraphQL server
Then, create the resolvers and mutation for the GraphQL server. I’m going to name this resolver.js.
Refer to the following code example.
const resolvers = {
 Query: {
  getOrders: (parent, { datamanager }, context, info) => {
   var ret = DataUtil.processData(datamanager, filterData);
   return ret;
  }
 },

 Mutation: {

  createOrder: (parent, { value }, context, info) => {
   const newOrder = value;
   filterData.push(newOrder);
   return newOrder;

  },
  updateOrder: (parent, { key, keyColumn, value }, context, info) => {
   let newOrder = filterData.find(order => order.OrderID === parseInt(key));
   newOrder.CustomerID = value.CustomerID;
   newOrder.EmployeeID = value.EmployeeID;
   newOrder.ShipCity = value.ShipCity;
   newOrder.ShipCountry = value.ShipCountry;
   return newOrder;
  },
  deleteOrder: (parent, { key, keyColumn, value }, context, info) => {
   const orderIndex = filterData.findIndex(order => order.OrderID === parseInt(key));
   if (orderIndex === -1) throw new Error("Order not found." + value);

   const deletedOrders = filterData.splice(orderIndex, 1);

   return deletedOrders[0];
  }
 }
};

export default resolvers;
Run the GraphQL server
Finally, run the GraphQL server using the following command.
npm run dev |
Thus, we have configured the GraphQL server.
Add Syncfusion Angular Data Grid component
Follow these steps to add the Syncfusion Angular Data Grid component to your app:
- Refer to the Getting started with Angular Data Grid documentation. Then, set up the Angular environment and add the Syncfusion Angular Data Grid component to your app.
- Now, add the following code in the src/app.component.html, src/app.component.ts files to perform sorting, filtering, paging, and other CRUD operations.
[app.component.html]<ejs-grid [dataSource]='data' [allowPaging]="true" [allowSorting]="true" [allowFiltering]="true" [editSettings]="editSettings" [toolbar]="toolbar"> <e-columns> <e-column field='OrderID' headerText='Order ID' isPrimaryKey="true" textAlign='Right' width=90></e-column> <e-column field='CustomerID' headerText='Customer ID' width=120></e-column> <e-column field='EmployeeID' headerText='Freight' textAlign='Right' width=90></e-column> <e-column field='ShipCity' headerText='Ship City' width=120></e-column> <e-column field='ShipCountry' headerText='Ship Country' width=120></e-column> </e-columns> </ejs-grid>[app.component.ts]
export class AppComponent {
 public data!: DataManager;
 public pageSettings!: PageSettingsModel;
 public editSettings!: Object;
 public toolbar!: string[];
 ngOnInit(): void {
  // Add the Syncfusion DataManager GrpahQLAdaptor for fetching data from GraphQL server
  this.data = new DataManager({
   url: "http://localhost:4200/", adaptor: new GraphQLAdaptor({
    response: {
     result: 'getOrders.result',
     count: 'getOrders.count'
    },
    query: `query getOrders($datamanager: DataManager) {
     getOrders(datamanager: $datamanager) {
      count,
      result{
       OrderID, CustomerID, EmployeeID, ShipCity, ShipCountry}
      }
     }`,
     // mutation for performing CRUD
     getMutation: function (action: any): string {
      if (action === 'insert') {
       return `mutation CreateOrderMutation($value: OrderInput!){
        createOrder(value: $value){
         OrderID, CustomerID, EmployeeID, ShipCity, ShipCountry
        }}`;
      }
      if (action === 'update') {
       return `mutation Update($key: Int!, $keyColumn: String,$value: OrderInput){
        updateOrder(key: $key, keyColumn: $keyColumn, value: $value) {
         OrderID, CustomerID, EmployeeID, ShipCity, ShipCountry
        }
      }`;
     } else {
       return `mutation Remove($key: Int!, $keyColumn: String, $value: OrderInput){
        deleteOrder(key: $key, keyColumn: $keyColumn, value: $value) {
         OrderID, CustomerID, EmployeeID, ShipCity, ShipCountry
        }
       }`;
      }
     }
   })
 });
 this.editSettings = { allowEditing: true, allowAdding: true, allowDeleting: true } // enable editing
 this.toolbar = ["Add", "Edit", "Delete", "Update", "Cancel"]; // enable toolbar option
 }
}
Note: For more details, refer to the Editing in Angular Data Grid documentation.
Run the application
Finally, run the application using the following command.
npm start |
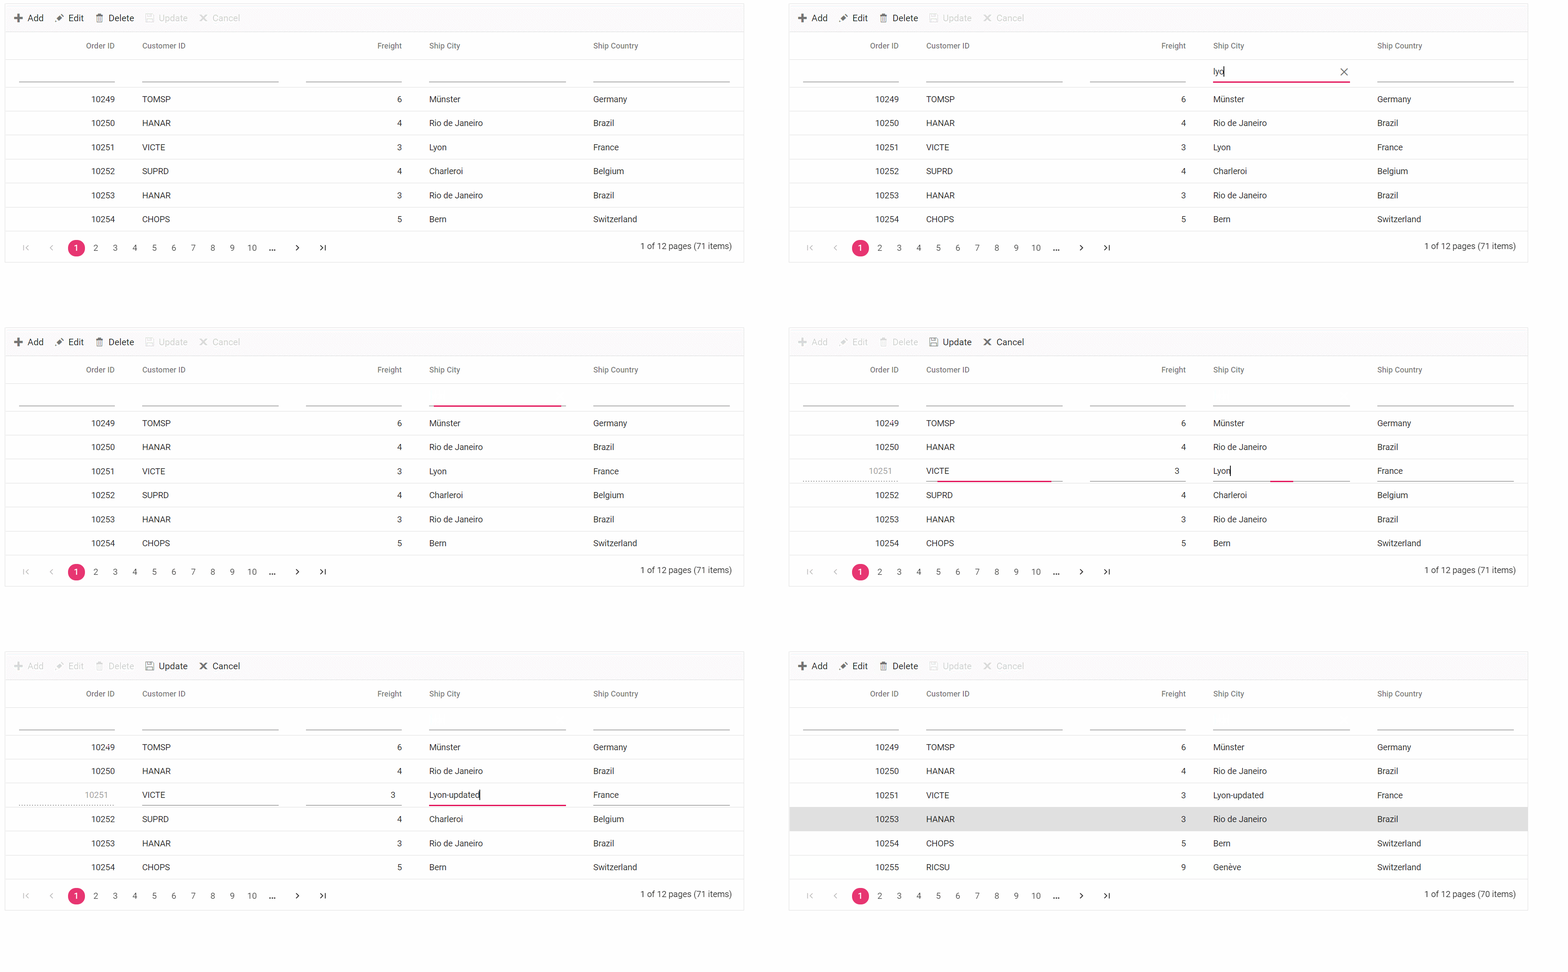
Now, you can easily perform sorting, paging, filtering, and CRUD operations in the Angular Data Grid component.
Refer to the following GIF image.
GitHub reference
For more details, refer to the Binding Data to Angular Data Grid using GraphQL demo on GitHub.
Conclusion
Thanks for reading! I hope you now have a clear idea of how to use the GraphQL server in our Syncfusion Angular Data Grid component to bind data and perform CRUD operations in it. As GraphQL has a single endpoint, it will save you time and considerably enhance your productivity while fetching data. Try out the steps in this blog post and leave your feedback in the comments section below!
The Syncfusion DataGrid component is also available in the Blazor, ASP.NET (Core, MVC, WebForms), JavaScript, Angular, React, Vue, Xamarin, Flutter, UWP, WinForms, WPF, and WinUI platforms. Use it to build great applications!
For existing customers, the new version of Essential Studio® is available for download from the License and Downloads page. If you are not yet a Syncfusion customer, you can try our 30-day free trial to check out our available features.
You can contact us through our support forum, support portal, or feedback portal. We are here to help you succeed!

 GraphQL
