Blazor is a next-generation platform for developing single-page applications (SPA) by building client-side web apps using .NET. It supports writing C# code instead of using JavaScript for client-side web applications. Syncfusion has already provided the Blazor extension in Visual Studio for:
- Creating Syncfusion Blazor applications.
- Converting Blazor applications to Syncfusion Blazor applications.
- Migrating Syncfusion Blazor applications from one version to another.
Now, Syncfusion provides the Blazor extension for Visual Studio Code.
The various features of this extension, such as installing NuGet packages, applying themes as CDN, and applying built-in templates, make it a useful tool for developers. The basic structure of the Blazor project templates with Syncfusion components is useful for developers interested in building an application.
In this blog, I am going to explain how to create a Syncfusion Blazor application and how to convert and migrate Blazor applications configured with Syncfusion components in Visual Studio Code.
Prerequisites
The prerequisites for creating a Blazor application are:
- Visual Studio Code
- .NET Core 3.0 SDK or Later (Download Link)
- C# Extension for Visual Studio Code
Installing the Syncfusion Blazor extension
The Syncfusion Blazor extension for Visual Studio Code is available from the Syncfusion Blazor setup in the Syncfusion Essential Studio® 2019 Volume 4 release. The extension is also available in the Visual Studio Marketplace.
Installing from Visual Studio Marketplace
To install the Syncfusion Blazor extension from the Visual Studio Marketplace, follow these steps:
- Open Visual Studio Code.
- Open the Command Palette by navigating to View > Command Palette.
- Search for Install Extensions in the Command Palette and expand Install Extensions when it appears.
- Search for Syncfusion Blazor in the search box to locate the Syncfusion Blazor extension package.
- Install the Syncfusion Blazor extension by clicking Install.
Installing from a VSIX package
To install the Syncfusion Blazor extension from a VSIX package, follow these steps:
- Open Visual Studio Code.
- Open the Command Palette by navigating to View > Command Palette.
- Search for Install, and then click Install from VSIX in the Command Palette.
- Select Syncfusion Blazor Extension from the Browse The extension will be installed.
Creating a Syncfusion Blazor application
The Syncfusion Blazor extension helps developers create Blazor applications with Syncfusion components, saving them significant time. The following steps create a Syncfusion Blazor application:
- Open Visual Studio Code.
- Open the Command Palette by navigating to View > Command Palette.
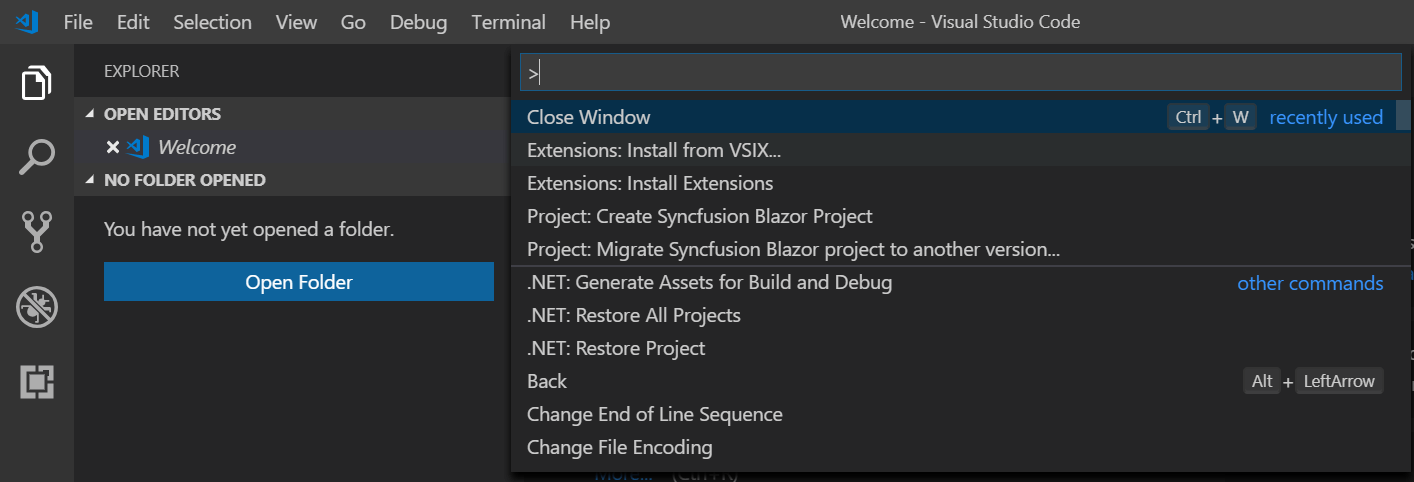
- Select the Create Syncfusion Blazor Project option by searching for Syncfusion Blazor.
- Provide the project location to store the application.

- Name the application.

- Select the Blazor application type.

- Choose a theme.

And that’s it. The Blazor application has been created with the required NuGet package and CDN links of the Syncfusion components for the project.
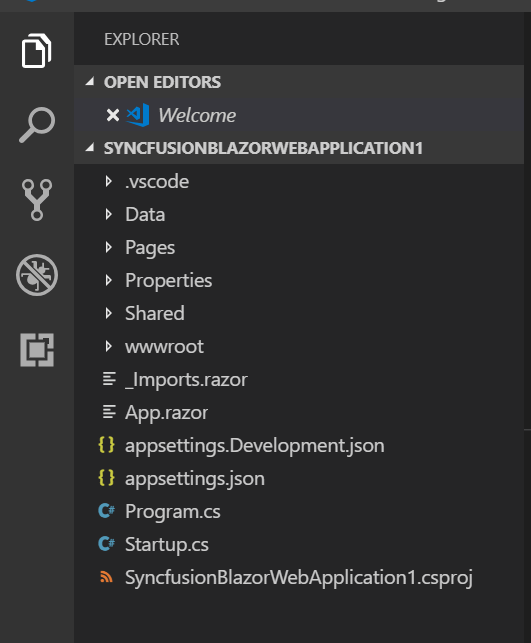
Now, you can develop your application with Syncfusion components. When creating a Syncfusion Blazor application, snippets for the Calendar, Grid, and Button components are added. You can run these Syncfusion Blazor components without any changes in the source.
Refer to this documentation to render the code and run the application.
Debugging the application
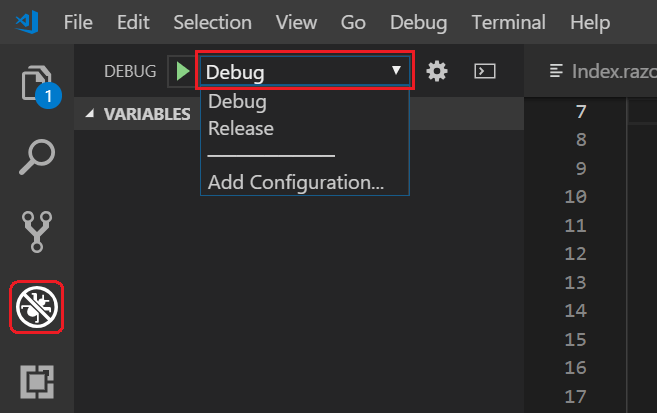
The Debug and Release modes are configured while the project is created. So, you do not need to configure them manually. When debugging the Syncfusion Blazor application, it will restore the NuGet packages, compile the application, and run the application in the default browser.
By default, the Blazor application runs in Debug mode. It can be changed to Release mode in the Debug tab (Ctrl+Shift+D).
Convert Blazor application to use Syncfusion components
A Blazor application can be converted to use Syncfusion Blazor components in Visual Studio Code by using the Convert to Syncfusion Blazor Application add-in. This add-in configures the required Syncfusion NuGet packages and CDN links in an application.
To convert an existing Blazor app to a Syncfusion Blazor application:
- Open the Blazor web application, and then right-click the project file (.csproj) in the workspace. The Convert to Syncfusion Blazor application option will appear in the context menu.
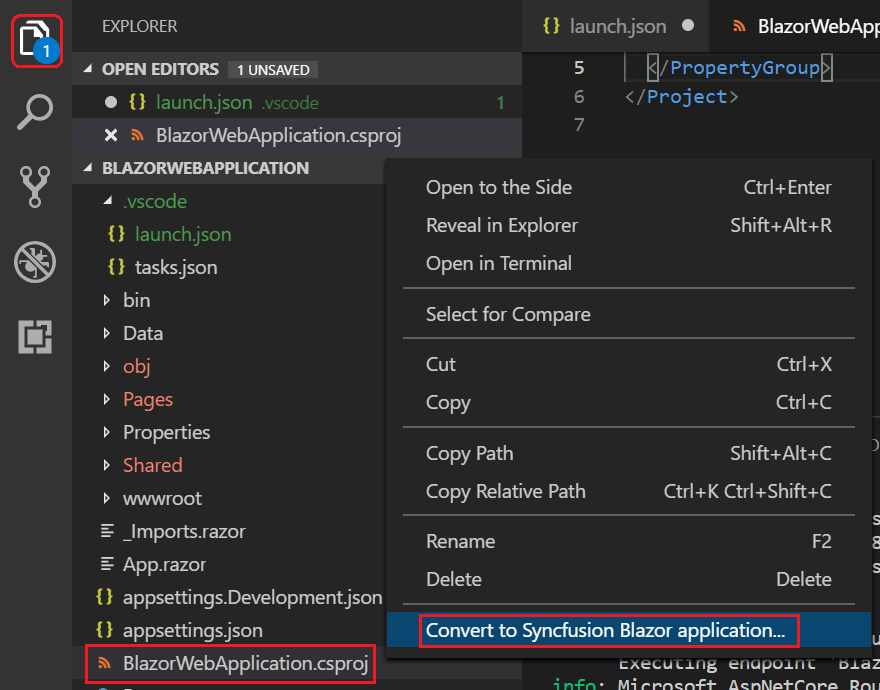
Conversion option - Choose the required Syncfusion Blazor version and theme. The application will be converted to include Syncfusion NuGet packages and CDN links. Now, you can develop the application with Syncfusion components.
Migrate the Syncfusion Blazor version
The Syncfusion Blazor application can be migrated to another Syncfusion version by using the Migrate Syncfusion Blazor Application to Another Version add-in. The add-in updates the Syncfusion Blazor NuGet packages and CDN version.
To migrate a Syncfusion Blazor application:
- Open the Blazor web application with Syncfusion components configured, and then right-click the project file (.csproj) in the workspace. The Migrate Syncfusion Blazor application to another version option will be listed in the context menu.
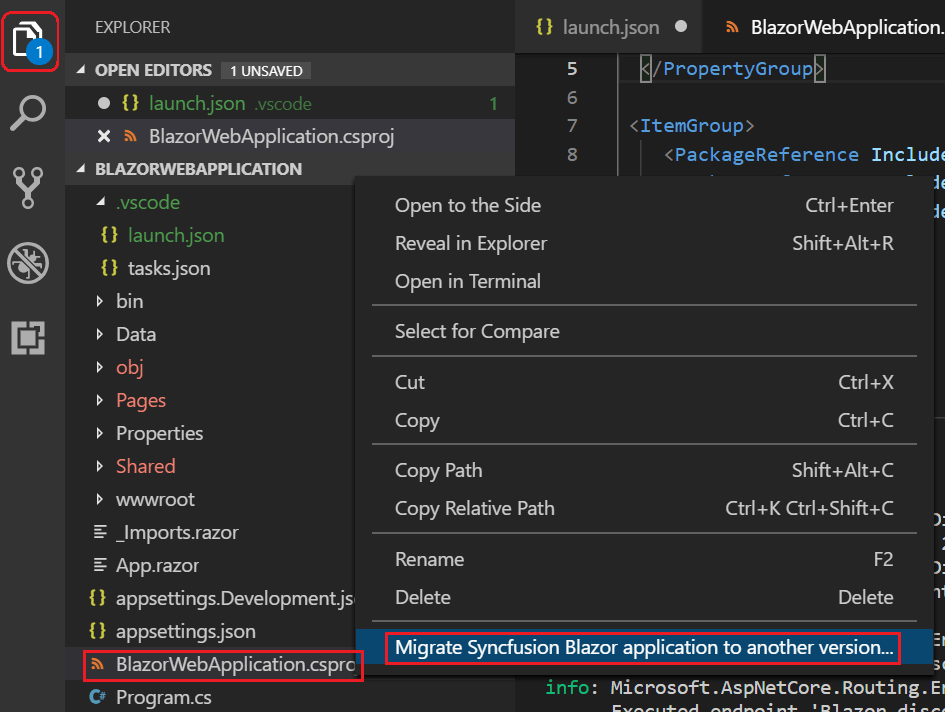
Migration option - Choose the required Syncfusion Blazor version. The application will be migrated to use the desired Syncfusion NuGet package and CDN link versions.
Conclusion
I hope this blog helps you understand and use the Syncfusion Blazor extension in Visual Code to its full potential. Easily create Syncfusion Blazor applications, convert existing Blazor applications to Syncfusion Blazor applications, and migrate Syncfusion Blazor apps to different versions.
Syncfusion provides more than 65 high-performance, lightweight, modular, and responsive Blazor UI controls such as Data Grid, Charts, and Scheduler to ease the work of developers.
If you have any questions, please let us know in the comments section below. You can also contact us through our support forum, Direct-Trac, or feedback portal. We are always happy to assist you!


