
TL;DR: .NET 9 brings new features for .NET MAUI, including improved controls, HybridWebView integration, and better performance. This blog covers key updates and provides a step-by-step guide to implementing the Syncfusion React Data Grid with HybridWebView in your app.
Introduction
The .NET Multi-Platform App UI (.NET MAUI) continues to evolve, gaining new features and improvements with each release. In .NET 9, developers can expect enhanced controls, better performance, and more robust testing capabilities. This blog explores the new features for .NET MAUI in .NET 9 and provides a step-by-step guide on integrating the Syncfusion React Data Grid component into the HybridWebView control.
HybridWebView: Bridging Web and Native Worlds
The HybridWebView control in .NET MAUI allows developers to host HTML, JavaScript, and CSS content directly within their applications. This control is handy for seamlessly integrating web-based functionality into your app’s native experience.
Step-by-Step Guide: Building with HybridWebView
Step 1: Set Up Your Development Environment
To get started, make sure you have the following setup:
- Visual Studio 2022: Install version 17.3 or later with the .NET MAUI development workload.
- .NET 9 SDK: Ensure the latest SDK is installed.
Step 2: Create a New .NET MAUI Project
Open Visual Studio and create a new .NET MAUI App project.
Step 3: Add Web Content to Your Project
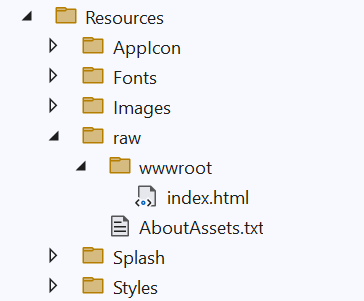
Create a folder named wwwroot under your project’s Resources/Raw directory. This folder will contain your HTML, JavaScript, and CSS files. You can start with a basic index.html file.
Here’s an example of what your index.html might look like:
<!doctype html>
<html lang="en">
  <head>
    <meta charset="UTF-8" />
    <meta name="viewport" content="width=device-width, initial-scale=1.0" />
    <title>Vite + React + TS</title>
    <script type="module" crossorigin src="/assets/index-CtlmMUak.js"></script>
    <link rel="stylesheet" crossorigin href="/assets/index-cmgkem7l.css">
  </head>
  <body>
    <div id="root"></div>
  </body>
</html>
Step 4: Integrate the Syncfusion React Data Grid
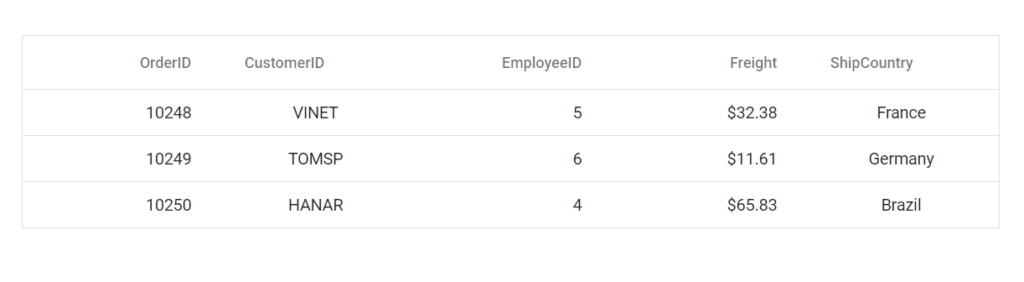
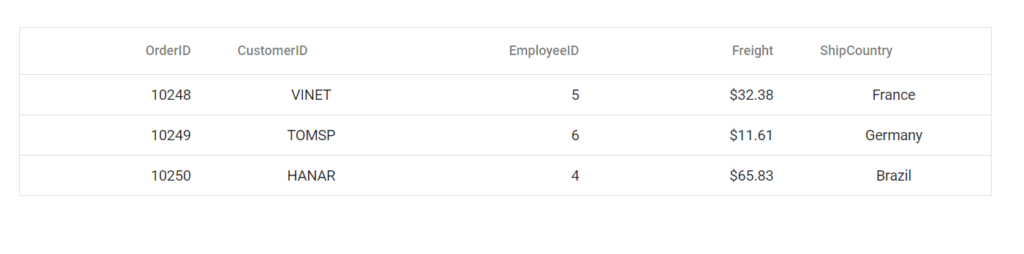
In this guide, I’ll demonstrate how to integrate the Syncfusion React Data Grid component as web content within the HybridWebView.
To start with React, a recommended approach is to scaffold a project using Vite. Follow the steps in the Syncfusion documentation Getting Started with React UI Components with Vite to create a React project with the Data Grid component.
After setting up the React project, build it using the following command.
npm run build
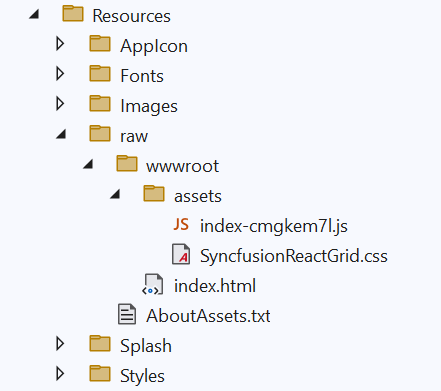
The output will be placed in the /dist folder, containing all the necessary HTML, JavaScript, and CSS files. Copy these files into the MAUI project’s Resources/Raw/wwwroot folder.
Step 5: Bundle the Project into a Single File (Optional)
For simplicity, you can bundle the entire project into a single file.
- First, install the Vite single file plugin using the next command.
npm install vite-plugin-singlefile –save-dev
- Modify the
vite.config.jsfile to include this plugin.
import { defineConfig } from 'vite'
import react from '@vitejs/plugin-react'
import { viteSingleFile } from 'vite-plugin-singlefile'

// https://vitejs.dev/config/
export default defineConfig({
  plugins: [react(), viteSingleFile()],
})
- Run the following command to build the project.
npm run build
- Then, the project is bundled inside the /dist folder. Copy and paste all the files inside the /dist folder into the MAUI project’s Resources\Raw\wwwroot folder.
Step 6: Update XAML to Include HybridWebView
Now, integrate the HybridWebView control in your XAML.
<ContentPage xmlns="http://schemas.microsoft.com/dotnet/2021/maui"
             xmlns:x="http://schemas.microsoft.com/winfx/2009/xaml"
             x:Class="MauiApp3.MainPage">
    <HybridWebView />
</ContentPage>
Key Considerations:
- DefaultFile: Specifies the file within the HybridRoot that will be served as the default. The default value is index.html.
- HybridRoot: The path within the app’s raw asset resources containing the web content. The default value is wwwroot, which is mapping to Resources/Raw/wwwroot.
The HybridWebView will look for the index.html file in the Resources/Raw/wwwroot directory in this setup.
Step 7: Run Your Application
Finally, build and run your application to see the HybridWebView in action.
GitHub Reference
You can check out the complete working example of this in GitHub.
TitleBar for Windows: Customizing Your App’s Appearance
The TitleBar control in .NET MAUI allows you to customize the title bar of your Windows application. This can help you create a more integrated and polished user experience. Here’s a simple example to get you started:
Window window = new Window();
window.TitleBar = new TitleBar
{
    Title = "MAUI App",
    Background = Colors.Blue,
    HeightRequest = 60,
    Content = new Entry()
    {
        Margin = 5,
        Placeholder = "Search",
        WidthRequest = 300,
        HeightRequest = 30
    }
};
Refer to the output of the above code example.

Control Enhancements
.NET 9 brings several control enhancements that improve the development experience and performance of applications:
- BackButtonBehavior: The IsVisible and IsEnabled properties in BackButtonBehavior in Shell apps are now using BindingMode.OneWay. This change ensures the back button’s visibility and enabled state dynamically respond to changes in the underlying data, providing a more responsive user interface.
- BlazorWebView: In iOS and Mac Catalyst, the default behavior for hosting content in a BlazorWebView has been updated to use localhost. This update enhances the security and performance of web content hosted within a .NET MAUI application, making it more robust and efficient.
- CollectionView and CarouselView: The CollectionView and CarouselView controls have received performance improvements and additional features. These enhancements make it easier to handle large data sets and provide a smoother user experience, especially when displaying collections of items in a swipeable format.
Conclusion
Thank you for reading! .NET 9 for .NET MAUI introduces new features and improvements that make building cross-platform applications more efficient and enjoyable. Start exploring these features today to take your .NET MAUI applications to the next level.
Follow the steps in this blog and share your feedback in the comments section below. You can also contact us through our support forums, support portal, or feedback portal. We are always happy to assist you!