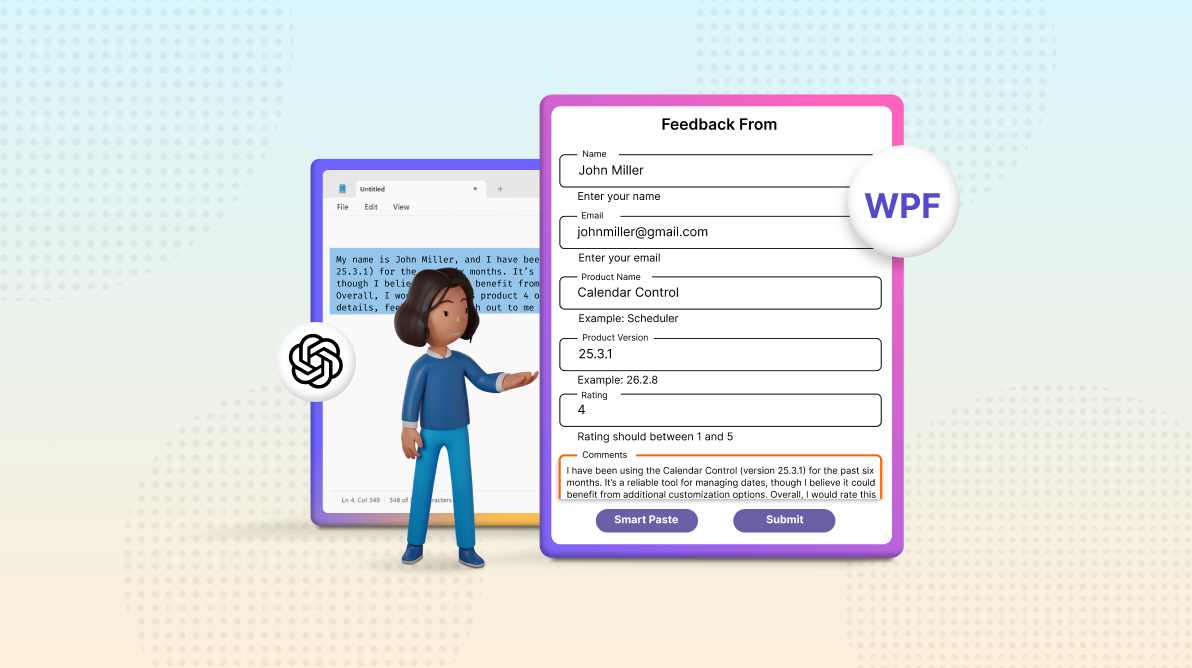
TL;DR: Transform Your WPF Apps with AI-Powered Smart Paste! This blog guides you through integrating the smart paste feature into the Syncfusion WPF Text Input Layout control for customer feedback forms. By harnessing AI, you can streamline data entry processes and automatically organize pasted information into the correct fields, greatly enhancing accuracy and efficiency.
Say goodbye to manual data entry in your forms! This blog demonstrates implementing the Smart Paste feature in customer feedback forms using the Syncfusion WPF Text Input Layout control. Learn how to effortlessly paste feedback information directly into the appropriate fields, saving time and reducing errors.
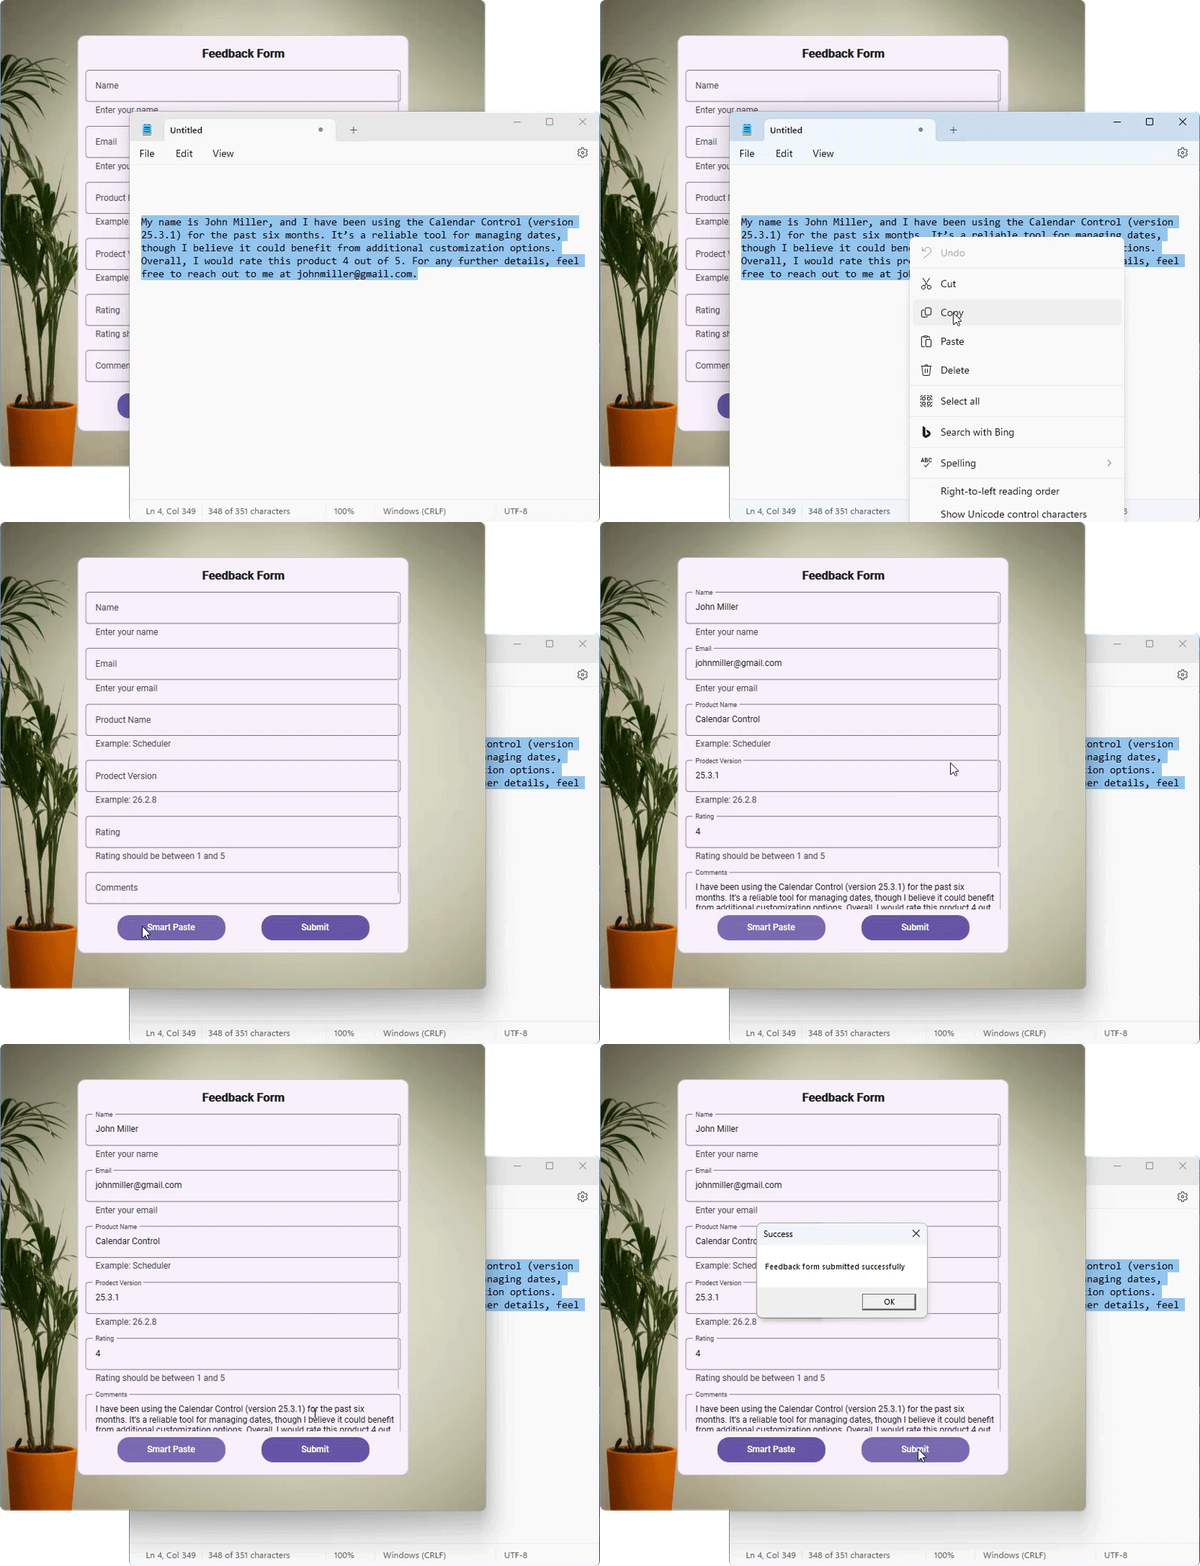
Smart Paste allows customer service representatives to easily paste data into a feedback form, where AI sorts text, ratings, and other details into the appropriate fields. This improves data collection speed and consistency, allowing for faster insights and responses based on customer feedback.
Let’s get started!
Integrating Semantic Kernel with the WPF app
First, open Visual Studio and create a new WPF app.
Before using the AI-powered Smart Paste feature, ensure you have access to Azure OpenAI and set up a deployment in the Azure portal. You can find the Microsoft.SemanticKernel NuGet package in the NuGet Gallery and install it in your project.
Once you get your key and endpoint, follow these steps:
Step 1: Set up Semantic Kernel
To configure Semantic Kernel, we will assume using the GPT-35 model deployed under the name GPT35Turbo. Let’s start by creating the SemanticKernelService, as shown in the following code example.
internal class SemanticKernelService
{
    const string endpoint = "https://{YOUR_END_POINT}.openai.azure.com";
    const string deploymentName = "GPT35Turbo";
    string key = "API key";

    IChatCompletionService chatCompletionService;
    Kernel kernel;

    internal SemanticKernelService()
    {
    }
}
Step 2: Connect to the Semantic Kernel
Let’s set up the connection to Azure OpenAI chat completion service. Refer to the following code.
// At the time of required.
var builder = Kernel.CreateBuilder().AddAzureOpenAIChatCompletion(deploymentName, endpoint, key);
this.kernel = builder.Build();
this.chatCompletionService = this.kernel.GetRequiredService<IChatCompletionService>();
This connection allows you to send prompts to the model and receive responses, which can be used for smart paste functionality.
Create product feedback data form model
Now, create a product feedback form using the Syncfusion WPF Text Input Layout. Before proceeding, please refer to the getting started with the WPF Text Input Layout documentation.
Create a feedback form and define a model with the following fields: Name, Email, Product Name, Product Version, Rating, and Comments.
Refer to the following code example, where we’ve implemented the FeedbackForm class, which also supports property change notifications through the INotifyPropertyChanged interface. This will allow the UI to update when any property values change automatically.
public class FeedbackForm : INotifyPropertyChanged
{
    private string name = string.Empty;
    private string email = string.Empty;
    private string productName = string.Empty;
    private string productVersion = string.Empty;
    private string rating = string.Empty;
    private string comments = string.Empty;

    ///<summary>
    /// Occurs when a property value changes.
    ///</summary>
    public event PropertyChangedEventHandler? PropertyChanged;

    ///<summary>
    /// Invokes the property changed event.
    ///</summary>
    ///<param name="propertyName">The property name.</param>
    protected void OnPropertyChanged(string propertyName)
    {
        this.PropertyChanged?.Invoke(this, new PropertyChangedEventArgs(propertyName));
    }

    public string Name
    {
        get => this.name;
        set
        {
            if (this.name != value)
            {
                this.name = value;
                this.OnPropertyChanged("Name");
            }
        }
    }

    public string Email
    {
        get => this.email;
        set
        {
            if (this.email != value)
            {
                this.email = value;
                this.OnPropertyChanged("Email");
            }
        }
    }

    public string ProductName
    {
        get => this.productName;
        set
        {
            if (this.productName != value)
            {
                this.productName = value;
                this.OnPropertyChanged("ProductName");
            }
        }
    }

    public string ProductVersion
    {
        get => this.productVersion;
        set
        {
            if (this.productVersion != value)
            {
                this.productVersion = value;
                this.OnPropertyChanged("ProductVersion");
            }
        }
    }

    public string Rating
    {
        get => this.rating;
        set
        {
            if (this.rating != value)
            {
                this.rating = value;
                this.OnPropertyChanged("Rating");
            }
        }
    }

    public string Comments
    {
        get => this.comments;
        set
        {
            if (this.comments != value)
            {
                this.comments = value;
                this.OnPropertyChanged("Comments");
            }
        }
    }
}
Create editors for the product feedback form
Then, define the required fields for the feedback form, such as name, email, product name, product version, rating, and comments using TextInputLayout controls for each input field. The TextBox elements within the layout will bind to the FeedbackForm properties in the ViewModel to handle data input.
Refer to the following code example for defining the input fields.
FeedbackFormViewModel.cs
public class FeedbackFormViewModel
{
    /// <summary>
    /// Gets or sets the feedback form model.
    /// </summary>
    public FeedbackForm FeedbackForm { get; set; }

    /// <summary>
    /// Initializes a new instance of the  class.
    /// </summary>
    public FeedbackFormViewModel()
    {
        this.FeedbackForm = new FeedbackForm();
    }
}
Design the interactive product feedback form page
In this step, the feedback form page will be designed to include images, buttons, and labels for an engaging user experience. The form will collect feedback information such as Name, Email, Product Name, Product Version, Rating, and Comments using TextInputLayout controls for each input field. Refer to the following code example that outlines the layout and structure for adding the feedback form.
<Grid>
  <!-- Set the DataContext to the FeedbackFormViewModel -->
  <Grid.DataContext>
    <local:FeedbackFormViewModel x:Name="feedbackFormViewModel" />
  </Grid.DataContext>

  <!-- Feedback Form Background Image -->
  <Image Stretch="Fill"
         Source="/AISmartPasteDemo;component/Assets/feedbackform.png" />

  <!-- Feedback Form Container -->
  <Border MaxHeight="550"
          Width="460"
          Background="{DynamicResource ContentBackgroundAlt1}"
          BorderBrush="{DynamicResource BorderAlt}"
          BorderThickness="1"
          CornerRadius="10"
          VerticalAlignment="Center"
          HorizontalAlignment="Center">
    <Grid Margin="10">
      <!-- Define the rows for the form layout -->
      <Grid.RowDefinitions>
        <RowDefinition Height="30" />
        <RowDefinition Height="*" />
        <RowDefinition Height="50" />
      </Grid.RowDefinitions>

      <!-- Title Label for the Form -->
      <Label Grid.ColumnSpan="4"
             Grid.Row="0"
             FontSize="16"
             FontWeight="Bold"
             Content="Feedback Form"
             HorizontalContentAlignment="Center" />

      <!-- Scrollable section for input fields -->
      <ScrollViewer Grid.Row="1"
                    VerticalScrollBarVisibility="Auto">
        <Grid>
          <Grid.RowDefinitions>
            <RowDefinition Height="Auto" />
            <RowDefinition Height="Auto" />
            <RowDefinition Height="Auto" />
            <RowDefinition Height="Auto" />
            <RowDefinition Height="Auto" />
            <RowDefinition Height="Auto" />
            <RowDefinition Height="Auto" />
          </Grid.RowDefinitions>

          <inputLayout:SfTextInputLayout x:Name="nameTextInputLayout"
                                         Grid.Row="0"
                                         Hint="Name"
                                         Width="auto"
                                         HelperText="Enter your name"
                                         HintFloatMode="Float"
                                         ContainerType="Outlined">
            <TextBox Text="{Binding FeedbackForm.Name}" />
          </inputLayout:SfTextInputLayout>

          <inputLayout:SfTextInputLayout x:Name="emailTextInputLayout"
                                         Grid.Row="1"
                                         Hint="Email"
                                         HelperText="Enter your email"
                                         Margin="0,8,0,0"
                                         Width="auto"
                                         ContainerType="Outlined">
            <TextBox Text="{Binding FeedbackForm.Email}" />
          </inputLayout:SfTextInputLayout>

          <inputLayout:SfTextInputLayout x:Name="productNameTextInputLayout"
                                         Grid.Row="2"
                                         Margin="0,8,0,0"
                                         Hint="Product Name"
                                         Width="auto"
                                         HelperText="Example: Scheduler"
                                         ContainerType="Outlined">
            <TextBox Text="{Binding FeedbackForm.ProductName}" />
          </inputLayout:SfTextInputLayout>

          <inputLayout:SfTextInputLayout x:Name="prodectVersionTextInputLayout"
                                         Grid.Row="3"
                                         Width="auto"
                                         Margin="0,8,0,0"
                                         HelperText="Example: 26.2.8"
                                         Hint="Product Version"
                                         ContainerType="Outlined">
            <TextBox Text="{Binding FeedbackForm.ProductVersion}" />
          </inputLayout:SfTextInputLayout>

          <inputLayout:SfTextInputLayout x:Name="ratingTextInputLayout"
                                         Grid.Row="4"
                                         Hint="Rating"
                                         Margin="0,8,0,0"
                                         HelperText="Rating should be between 1 and 5"
                                         Width="auto"
                                         ContainerType="Outlined">
            <TextBox Text="{Binding FeedbackForm.Rating}" />
          </inputLayout:SfTextInputLayout>

          <inputLayout:SfTextInputLayout x:Name="commentsTextInputLayout"
                                         Grid.Row="5"
                                         Margin="0,8,0,0"
                                         Hint="Comments"
                                         Width="auto"
                                         ContainerType="Outlined">
            <TextBox Text="{Binding FeedbackForm.Comments}"
                     TextWrapping="Wrap"
                     AcceptsReturn="True" />
          </inputLayout:SfTextInputLayout>
        </Grid>
      </ScrollViewer>

      <!-- Buttons for Smart Paste and Submit -->
      <StackPanel Grid.Row="2"
                  HorizontalAlignment="Center"
                  Orientation="Horizontal">
        <Button x:Name="smartPasteButton"
                Width="150"
                Height="35"
                HorizontalAlignment="Center"
                Click="OnSmartPasteButtonClicked"
                Content="Smart Paste"
                Style="{DynamicResource WPFPrimaryButtonStyle}" />
        <Button x:Name="submitButton"
                Width="150"
                Height="35"
                Click="OnSubmitButtonClicked"
                Margin="50,0,0,0"
                HorizontalAlignment="Right"
                Content="Submit"
                Style="{DynamicResource WPFPrimaryButtonStyle}" />
      </StackPanel>
    </Grid>
  </Border>
</Grid>
Configure AI service to process smart paste
Now, implement the GetResponseFromGPT method to send a prompt to the OpenAI API and retrieve the completion result.
Refer to the following code example.
internal class SemanticKernelService
{
    const string endpoint = "https://{YOUR_END_POINT}.openai.azure.com";
    const string deploymentName = "GPT35Turbo";
    string key = "API key";

    IChatCompletionService chatCompletionService;
    Kernel kernel;

    internal SemanticKernelService()
    {
    }

    internal async Task<string> GetResponseFromGPT(string userPrompt)
    {
        var builder = Kernel.CreateBuilder().AddAzureOpenAIChatCompletion(deploymentName, endpoint, key);
        this.kernel = builder.Build();
        if (this.kernel != null)
        {
            var chatHistory = new ChatHistory();
            chatHistory.Clear();

            // Add the user's prompt as a user message to the conversation.
            chatHistory.AddSystemMessage("You are a predictive analytics assistant.");

            // Add the user's prompt as a user message to the conversation.
            chatHistory.AddUserMessage(userPrompt);

            // Get the chat completions from kernel.
            chatCompletionService = kernel.GetRequiredService<IChatCompletionService>();
            OpenAIPromptExecutionSettings openAIPromptExecutionSettings = new OpenAIPromptExecutionSettings();
            openAIPromptExecutionSettings.ToolCallBehavior = ToolCallBehavior.AutoInvokeKernelFunctions;
            try
            {
                var response = await chatCompletionService.GetChatMessageContentAsync(chatHistory, executionSettings: openAIPromptExecutionSettings, kernel: kernel);
                return response.ToString();
            }
            catch
            {
                // If an exception occurs (e.g., network issues, API errors), return an empty string.
                return "";
            }
        }

        return "";
    }
}
Enabling smart paste functionality for easy data entry
The Smart Paste fills out forms automatically using data from the user’s clipboard when clicking the Smart Paste button. This improves data management by accurately organizing and populating information in the correct fields.
Here, we’ll add the prompts, an AI service that intelligently merges clipboard data into a form’s JSON fields. It checks that the clipboard text matches the form’s object field names. The AI returns the merged JSON, which is then processed and incorporated into the form.
string clipboardText;
SemanticKernelService semanticKernelService = new SemanticKernelService();

private async void OnSmartPasteButtonClicked(object sender, RoutedEventArgs e)
{
    if (Clipboard.ContainsText())
    {
        this.clipboardText = Clipboard.GetText();
    }

    if (string.IsNullOrEmpty(this.clipboardText))
    {
        MessageBox.Show("No text copied to clipboard. Please copy the text and try again", "Information", MessageBoxButton.OK);
        return;
    }

    string dataFormJsonData = JsonConvert.SerializeObject(this.feedbackFormViewModel.FeedbackForm);
    string prompt = $"Merge the copied data into the DataForm field content, ensuring that the copied text matches suitable field names. Here are the details:" +
    $"\n\nCopied data: {this.clipboardText}," +
    $"\nDataForm Field Name: {dataFormJsonData}," +
    $"\nProvide the resultant DataForm directly." +
    $"\n\nConditions to follow:" +
    $"\n1. Do not use the copied text directly as the field name; merge appropriately." +
    $"\n2. Ignore case sensitivity when comparing copied text and field names." +
    $"\n3. Final output must be Json format" +
    $"\n4. No need any explanation or comments in the output" +
    $"\n Please provide the valid JSON object without any additional formatting characters like backticks or newlines";
    string finalResponse = await this.semanticKernelService.GetResponseFromGPT(prompt);
    this.ProcessSmartPasteData(finalResponse);
}
Updating the product feedback form with smart paste data
After receiving the merged JSON response from the AI model, this step updates the feedback form fields with extracted values. The response is deserialized into a dictionary, which is then used to populate the corresponding fields in the feedback form.
private void ProcessSmartPasteData(string response)
{
    // Deserialize the JSON string to a Dictionary
    var openAIJsonData = JsonConvert.DeserializeObject<dictionary<string, object>>(response);

    // Create lists to hold field names and values
    var fieldNames = new List<string>();
    var fieldValues = new List<string>();

    foreach (var data in openAIJsonData)
    {
        fieldNames.Add(data.Key);
        fieldValues.Add(data.Value?.ToString() ?? string.Empty);
    }

    this.feedbackFormViewModel.FeedbackForm.Name = fieldValues[0];
    this.feedbackFormViewModel.FeedbackForm.Email = fieldValues[1];
    this.feedbackFormViewModel.FeedbackForm.ProductName = fieldValues[2];
    this.feedbackFormViewModel.FeedbackForm.ProductVersion = fieldValues[3];
    this.feedbackFormViewModel.FeedbackForm.Rating = fieldValues[4];
    this.feedbackFormViewModel.FeedbackForm.Comments = fieldValues[5];
}
Validating the feedback form data using the WPF Text Input Layout control
We’ve created the feedback form; the next step involves implementing validation to ensure that the input data meets specific criteria. Refer to the following code example to validate the fields in the feedback form.
readonly string mailPattern = @"^(([\w-]+\.)+[\w-]+|([a-zA-Z]{1}|[\w-]{2,}))@" +
    @"((([0-1]?[0-9]{1,2}|25[0-5]|2[0-4][0-9])\.([0-1]?[0-9]{1,2}|25[0-5]|2[0-4][0-9])\." +
    @"([0-1]?[0-9]{1,2}|25[0-5]|2[0-4][0-9])\.([0-1]?[0-9]{1,2}|25[0-5]|2[0-4][0-9])){1}|" +
    @"([a-zA-Z]+[\w-]+\.)+[a-zA-Z]{2,4})$";

private bool ValidateAllFields()
{
    bool isValidForm = true;
    FeedbackForm feedbackForm = this.feedbackFormViewModel.FeedbackForm;

    this.nameTextInputLayout.HasError = false;
    this.emailTextInputLayout.HasError = false;
    this.productNameTextInputLayout.HasError = false;
    this.prodectVersionTextInputLayout.HasError = false;
    this.ratingTextInputLayout.HasError = false;
    this.commentsTextInputLayout.HasError = false;

    //// Name Validation.
    if (string.IsNullOrEmpty(feedbackForm.Name))
    {
        isValidForm = false;
        this.nameTextInputLayout.HasError = true;
        this.nameTextInputLayout.ErrorText = "Enter your name";
    }
    else if (feedbackForm.Name.Length > 20)
    {
        isValidForm = false;
        this.nameTextInputLayout.HasError = true;
        this.nameTextInputLayout.ErrorText = "Name cannot exceed 20 characters";
    }

    //// Email Validation.
    if (string.IsNullOrEmpty(feedbackForm.Email))
    {
        isValidForm = false;
        this.emailTextInputLayout.HasError = true;
        this.emailTextInputLayout.ErrorText = "Enter your email";
    }
    else if (!Regex.IsMatch(this.feedbackFormViewModel.FeedbackForm.Email, this.mailPattern))
    {
        isValidForm = false;
        this.emailTextInputLayout.HasError = true;
        this.emailTextInputLayout.ErrorText = "Please enter a valid email address.";
    }

    //// Product Name Validation.
    if (string.IsNullOrEmpty(feedbackForm.ProductName))
    {
        isValidForm = false;
        this.productNameTextInputLayout.HasError = true;
        this.productNameTextInputLayout.ErrorText = "Enter product name";
    }
    else if (feedbackForm.Name.Length > 20)
    {
        isValidForm = false;
        this.productNameTextInputLayout.HasError = true;
        this.productNameTextInputLayout.ErrorText = "Product name cannot exceed 20 characters";
    }

    //// Product Version Validation.
    if (string.IsNullOrEmpty(feedbackForm.ProductVersion))
    {
        isValidForm = false;
        this.prodectVersionTextInputLayout.HasError = true;
        this.prodectVersionTextInputLayout.ErrorText = "Enter product version";
    }

    //// Rating Validation.
    if (string.IsNullOrEmpty(feedbackForm.Rating))
    {
        isValidForm = false;
        this.ratingTextInputLayout.HasError = true;
        this.ratingTextInputLayout.ErrorText = "Enter rating";
    }
    else if (!double.TryParse(feedbackForm.Rating, out double rating))
    {
        isValidForm = false;
        this.ratingTextInputLayout.HasError = true;
        this.ratingTextInputLayout.ErrorText = "Please enter a valid rating";
    }
    else if (rating < 1 || rating > 5)
    {
        isValidForm = false;
        this.ratingTextInputLayout.HasError = true;
        this.ratingTextInputLayout.ErrorText = "Rating should be between 1 and 5";
    }

    //// Comments Validation.
    if (string.IsNullOrEmpty(feedbackForm.Comments))
    {
        isValidForm = false;
        this.commentsTextInputLayout.HasError = true;
        this.commentsTextInputLayout.ErrorText = "Enter your comments";
    }

    return isValidForm;
}
Show the validation message on the submit button click
To ensure that all required fields are filled out correctly before submission, we’ll validate the feedback form when the submit button is clicked using the ValidateAllFields method. This will help provide immediate feedback to the user regarding the form’s completeness.
Refer to the following code example.
private void OnSubmitButtonClicked(object sender, RoutedEventArgs e)
{
    if (this.ValidateAllFields())
    {
        MessageBox.Show("Feedback form submitted successfully", "Success", MessageBoxButton.OK);
    }
    else
    {
        MessageBox.Show("Please enter the required details", "Error", MessageBoxButton.OK);
    }
}
After executing the previous code example, we will get the output as shown in the following image.

GitHub reference
For more details, refer to the AI-powered smart paste feature in the WPF Text Input Layout GitHub demo.
Conclusion
Thanks for reading! In this blog, we’ve seen how to create and validate a feedback form by implementing AI-powered smart paste functionality in the Syncfusion WPF Text Input Layout control. Try out this user-friendly control and share your feedback in the comments section below.
Existing customers can download the latest version of Essential Studio from the License and Downloads page. If you are not yet a customer, you can try our 30-day free trial to check out these new features.
If you have questions, you can contact us through our support forum, feedback portal, or support portal. We are always happy to assist you!


