TLDR: Unleash the power of CRUD in Blazor Pivot Tables! Explore step-by-step instructions for setting up the database, configuring Entity Framework, creating a data access layer, and binding data to the Pivot Table.
Syncfusion Blazor Pivot Table is a powerful control used to organize and summarize business data and display the result in a cross-table format. Its rich feature set includes data binding, drilling up and down, Excel-like filtering and sorting, editing, and more. A high volume of pivot data can be loaded without any performance degradation using row and column virtualization.
SQL Server is a relational database management system. It can be used to store and manage a huge volume of data.
In this blog post, we will explore integrating Syncfusion Blazor Pivot Table with a SQL database via Entity Framework for CRUD operations.
What is Entity Framework?
Entity Framework is a Microsoft framework for .NET applications and serves as an Object-Relational Mapping (ORM) tool. It simplifies database interaction by enabling developers to utilize .NET objects, abstracting complexities, and providing a higher-level interface to manipulate data. In conjunction with SQL databases, Entity Framework involves defining database schemas through Entity Classes or Entity Models. These classes directly correspond to database tables, mapping class properties to table columns and facilitating seamless data management.
Setting up a CRUD service using Entity Framework
To begin, create a simple Blazor Server App project with Syncfusion Blazor Pivot Table in Visual Studio.
Next, to connect a SQL Server database using Entity Framework in your project, you’ll need to install the following NuGet packages:
To do this, open the project solution’s NuGet package manager and search for the packages Microsoft.EntityFrameworkCore and Microsoft.EntityFrameworkCore.SqlServer, and install them.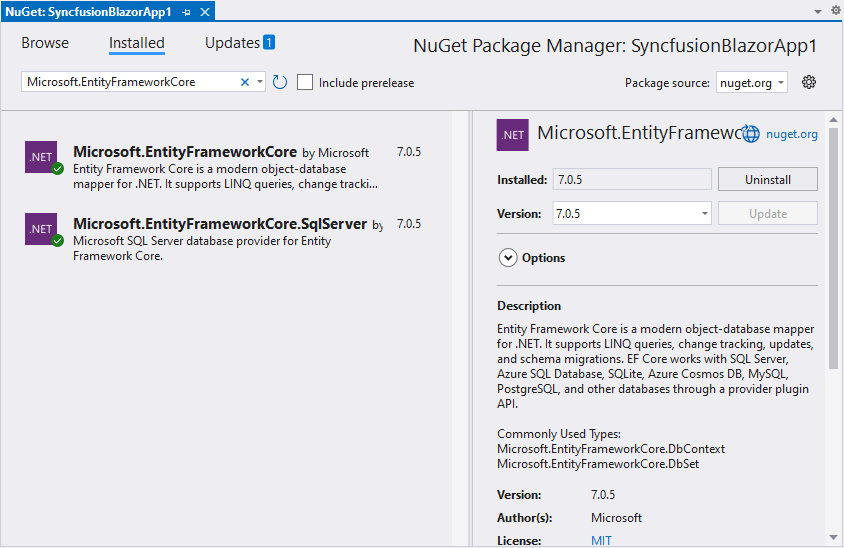
Step 1: Setting up the database
First, we must set up a SQL Server database to store our data. Open SQL Server Management Studio (SSMS) and create a new database. We used Microsoft’s Northwind database to establish the SQL connection using Entity Framework.
Step 2: Creating the data model
Next, define the data model obtained from the connected SQL Server database using Entity Framework. In the project’s root folder, add a new class file named Orders.cs within the Data folder.
Refer to the following code example.
using System.ComponentModel.DataAnnotations;
namespace SyncfusionBlazorApp1.Data
{
    public class Order
    {
        [Key]
        public int? OrderID { get; set; }
        [Required]
        public string CustomerID { get; set; }
        [Required]
        public int EmployeeID { get; set; }
        [Required]
        public decimal Freight { get; set; }
        public DateTime? OrderDate { get; set; }
        public string? ShipCountry { get; set; }
        public string? ShipCity { get; set; }
        public string? ShipName { get; set; }
    }
}
This class represents the sales order transaction data model, with properties corresponding to the columns in the database table.
Step 3: Configure the Entity Framework
To work with the database using Entity Framework, we need to configure a DbContext. Add a new class file called OrderContext.cs in the Data folder.
Refer to the following code example.
using Microsoft.EntityFrameworkCore;
namespace SyncfusionBlazorApp1.Data
{
    public class OrderContext : DbContext
    {
        public virtual DbSet<Order> Orders { get; set; }
        protected override void OnConfiguring(DbContextOptionsBuilder optionsBuilder)
        {
            if (!optionsBuilder.IsConfigured)
            {
                optionsBuilder.UseSqlServer(@"<Enter your valid connection string here");
            }
        }
    }
}
This class inherits from DbContext and provides a DbSet for our Order model, specifying the SQL Server provider and the connection string.
Step 4: Create a data access layer to perform data operations
Then, add a new class OrderDataAccessLayer.cs to the project. This class will handle the CRUD operations for the Order entity. Implement the necessary methods to perform Add, Update, and Delete operations on the Order table using the OrderContext class.
using Microsoft.EntityFrameworkCore;
namespace MyBlazorApp.Data
{
    public class OrderDataAccessLayer
    {
        OrderContext db = new OrderContext ();
        //To get all orders details.
        public DbSet<Order> GetAllOrders()
        {
            try
            {
                return db.Orders;
            }
            catch
            {
                throw;
            }
        }
       // To add a new order record.
        public void AddOrder(Order Order)
        {
            try
            {
                db.Orders.Add(Order);
                db.SaveChanges();
            }
            catch
            {
                throw;
            }
        }
        //To update the records of an order.
        public void UpdateOrder(Order Order)
        {
            try
            {
                var local = db.Set<Order>().Local.FirstOrDefault(entry => entry.OrderID.Equals(Order.OrderID));
                // check if local is not null.
                if (local != null)
                {
                    // detach
                    db.Entry(local).State = EntityState.Detached;
                }
                db.Entry(Order).State = EntityState.Modified;
                db.SaveChanges();
            }
            catch
            {
                throw;
            }
        }
        //Get the details of a particular order.
        public Order GetOrderData(int? id)
        {
            try
            {
                Order Order = db.Orders.Find(id);
                return Order;
            }
            catch
            {
                throw;
            }
        }
        //To delete the record of a particular order.
        public void DeleteOrder(int? id)
        {
            try
            {
                Order Order = GetOrderData(id);
                if (Order != null)
                {
                    db.Orders.Remove(Order);
                    db.SaveChanges();
                }
            }
            catch
            {
                throw;
            }
        }
    }
}
Step 5: Create a web API controller
A Web API controller named PivotController.cs should be created to allow the pivot table to collect data directly from the Entity Framework. Add the necessary methods to perform CRUD operations, such as Add, Update, and Delete.
Refer to the following code example.
using MyBlazorApp.Data;
using Microsoft.AspNetCore.Mvc;
using Syncfusion.Blazor.Data;
using System.Linq.Dynamic.Core;
namespace MyBlazorApp.Controller
{
    [Route("api/[controller]")]
    [ApiController]
    public class PivotController : ControllerBase
    {
        public OrderDataAccessLayer OrderService = new OrderDataAccessLayer();
        // GET: api/Default
        [HttpGet]
        public object Get()
        {
            IQueryable<Order> data = OrderService.GetAllOrders().AsQueryable();
            return new { Items = data, Count = data.Count() };
        }
        // The modified orders can be obtained from the EditCompleted event via HttpClient and used to update specified records in the SQL database.
        [HttpPost]
        [Route("Update")]
        public void Update([FromBody] Dictionary<int, Order> modifiedData)
        {
            if (modifiedData != null)
            {
                foreach (int index in modifiedData.Keys)
                {
                    OrderService.UpdateOrder(modifiedData[index]);
                }
            }
        }
        // The newly added orders can be obtained from the EditCompleted event via HttpClient and used to add specified records to the SQL database.
        [HttpPost]
        [Route("Add")]
        public void Add([FromBody] Dictionary<int, Order> addedData)
        {
            if (addedData != null)
            {
                foreach (int index in addedData.Keys)
                {
                    OrderService.AddOrder(addedData[index]);
                }
            }
        }
        // The newly added orders can be obtained from the EditCompleted event via HttpClient and used to delete specified records in the SQL database.
        [HttpPost]
        [Route("Delete")]
        public void Delete([FromBody] Dictionary<int, Order> removedData)
        {
            if (removedData != null)
            {
                foreach (int index in removedData.Keys)
                {
                    OrderService.DeleteOrder(index);
                }
            }
        }
    }
}
Step 6: Configure dependency injection
Now, open the Program.cs file and add services and endpoints required for the Web API controller.
Note: For the .NET 6 and .NET 7 apps, open the ~/Program.cs file and register the required services and endpoints.
For the .NET 5 and .NET 3 app, open the ~/Startup.cs file and register the required services and endpoints.
Refer to the following code example.
using Syncfusion.Blazor;
using SyncfusionBlazorApp1.Data;
var builder = WebApplication.CreateBuilder(args);
// Add services to the container.
builder.Services.AddSingleton<WeatherForecastService>();
builder.Services.AddSingleton<OrderDataAccessLayer>();
var app = builder.Build();
app.UseRouting();
// Add endpoints for controller actions to the Microsoft IEndpointRouteBuilder
app.MapDefaultControllerRoute();
app.MapBlazorHub();
app.MapFallbackToPage("/_Host");
app.Run();
Step 7: Binding data to the Blazor Pivot Table
After configuring the required services and endpoints, bind data from the data access layer class OrderDataAccessLayer directly to the pivot table by assigning the DataSource property from the OrderData.GetAllOrders() method under PivotViewDataSourceSettings in the Index.razor file.
Then, inject the OrderDataAccessLayer into the component, which will fetch the data from the database. Finally, add the report based on the data model.
Refer to the following code example.
@page "/"
@using SyncfusionBlazorApp1.Data
@using Syncfusion.Blazor.PivotView
@using Syncfusion.Blazor.Data
@inject OrderDataAccessLayer Orders;
<SfPivotView TValue="Order" Width="800" Height="340" EnableVirtualization="true" ShowFieldList="false" ShowTooltip=false>
    <PivotViewDataSourceSettings TValue="Order" DataSource="@Orders.GetAllOrders()">
        <PivotViewColumns>
            <PivotViewColumn Name="ShipName"></PivotViewColumn>
        </PivotViewColumns>
        <PivotViewRows>
            <PivotViewRow Name="CustomerID" ExpandAll=true></PivotViewRow>
            <PivotViewRow Name="OrderDate"></PivotViewRow>
        </PivotViewRows>
        <PivotViewValues>
            <PivotViewValue Name="Freight"></PivotViewValue>
        </PivotViewValues>
        <PivotViewFormatSettings>
            <PivotViewFormatSetting Name="Freight" Type="FormatType.Number" Format="N2"></PivotViewFormatSetting>
            <PivotViewFormatSetting Name="OrderDate" Type="FormatType.DateTime" Format="dd/MM/yyyy"></PivotViewFormatSetting>
        </PivotViewFormatSettings>
    </PivotViewDataSourceSettings>
    <PivotViewCellEditSettings AllowEditing=true AllowAdding=true AllowDeleting=true></PivotViewCellEditSettings>
</SfPivotView>
To bind data to the pivot table via the Web API Controller, provide the appropriate endpoint Url in the SfDataManager and the Adaptor type in the PivotViewDataSourceSettings class. In this case, WebApiAdaptor must interact with the Web API to appropriately consume data from the Entity Framework.
@page "/httpClient"
@using MyBlazorApp.Data
@using Syncfusion.Blazor.PivotView
@using Syncfusion.Blazor.Data

<SfPivotView TValue="Order" Width="650" Height="340" EnableVirtualization="true" ShowFieldList="false" ShowTooltip=false>
    <PivotViewDataSourceSettings TValue="Order">
        <SfDataManager Url="api/Pivot" Adaptor="Adaptors.WebApiAdaptor"></SfDataManager>
        <PivotViewColumns>
            <PivotViewColumn Name="ShipName"></PivotViewColumn>
        </PivotViewColumns>
        <PivotViewRows>
            <PivotViewRow Name="CustomerID" ExpandAll=true></PivotViewRow>
            <PivotViewRow Name="OrderDate"></PivotViewRow>
        </PivotViewRows>
        <PivotViewValues>
            <PivotViewValue Name="Freight"></PivotViewValue>
        </PivotViewValues>
        <PivotViewFormatSettings>
            <PivotViewFormatSetting Name="Freight" Type="FormatType.Number" Format="N2"></PivotViewFormatSetting>
            <PivotViewFormatSetting Name="OrderDate" Type="FormatType.DateTime" Format="dd/MM/yyyy"></PivotViewFormatSetting>
        </PivotViewFormatSettings>
    </PivotViewDataSourceSettings>
    <PivotViewCellEditSettings AllowEditing=true AllowAdding=true AllowDeleting=true></PivotViewCellEditSettings>
</SfPivotView>
Note: In this blog, we have created the Web API controller and Pivot Table component in the same Blazor application project. So, we map the Url as illustrated above. If you want to map the Web API controller from an external hosted service, please provide the controller path along with the hosted IP (example: “https://localhost:7146/api/Pivot”)
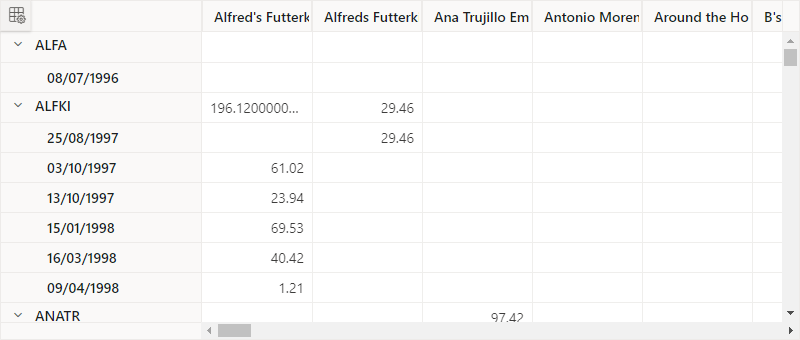
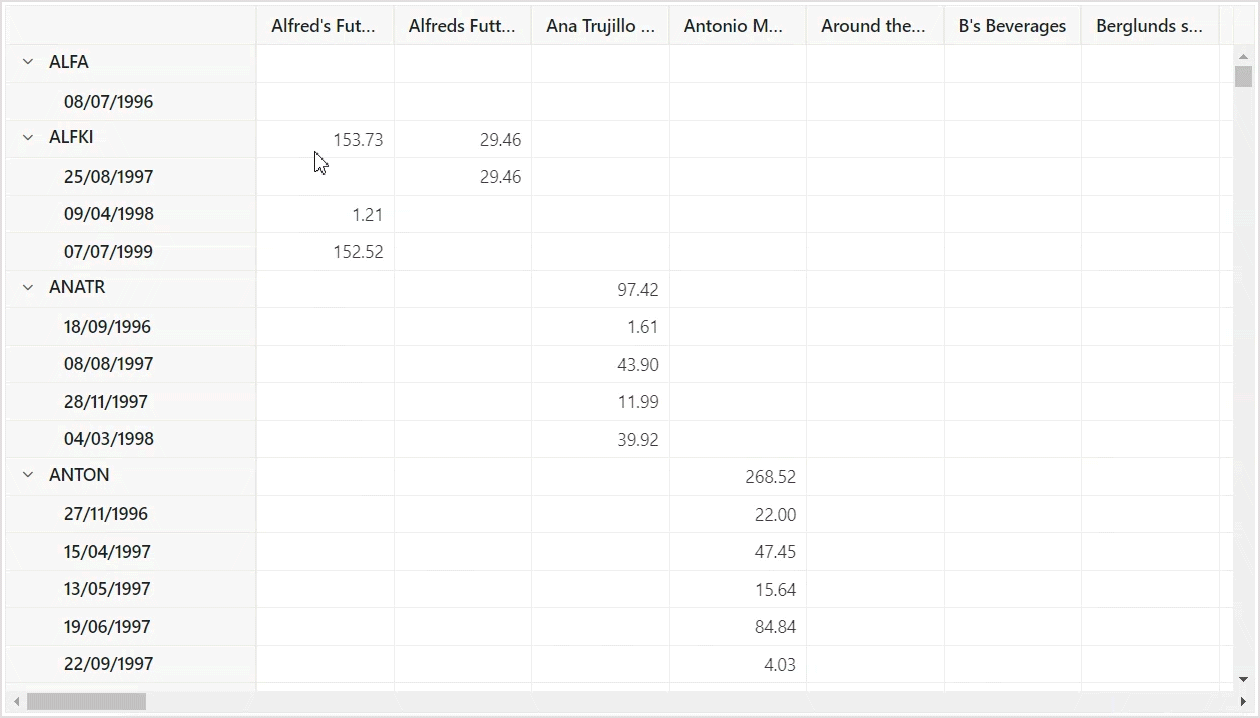
After executing the complete code examples, the output will look like the following image.
Performing CRUD operations
With the Syncfusion Blazor Pivot Table and SQL database integration in place, let’s explore leveraging the built-in Editing Feature to perform CRUD operations on the SQL database, such as adding, updating, and removing data.
Selecting values in the Pivot Table
When you double-click a value in the pivot table, a dialog appears listing the underlying raw data of the clicked cell, as shown in the following image.
In the opened dialog, various toolbar options, including Add, Edit, and Delete, allow CRUD operations.
Refer to the gif image.
Adding a new record to the table
To add a new record, click the Add button in the toolbar. Input fields will appear where new order details can be inserted into the table.
After adding a new order, click on the Update button. The dialog closes, triggering the EditCompleted event. This event passes a collection of newly added records to the SQL Server database via the OrderDataAccessLayer instance, which can be used to add them to the Order table in the SQL Server database.
Refer to the following code example for adding a new record to the table.
@page "/"
@using MyBlazorApp.Data
@using Syncfusion.Blazor.PivotView
@using Syncfusion.Blazor.Data
@inject OrderDataAccessLayer Orders;
<SfPivotView TValue="Order" Width="650" Height="340" EnableVirtualization="true" ShowFieldList="false" ShowTooltip=false>
    <PivotViewDataSourceSettings TValue="Order" DataSource="@Orders.GetAllOrders()">
        <PivotViewColumns>
            <PivotViewColumn Name="ShipName"></PivotViewColumn>
        </PivotViewColumns>
        <PivotViewRows>
            <PivotViewRow Name="CustomerID" ExpandAll=true></PivotViewRow>
            <PivotViewRow Name="OrderDate"></PivotViewRow>
        </PivotViewRows>
        <PivotViewValues>
            <PivotViewValue Name="Freight"></PivotViewValue>
        </PivotViewValues>
        <PivotViewFormatSettings>
            <PivotViewFormatSetting Name="Freight" Type="FormatType.Number" Format="N2"></PivotViewFormatSetting>
            <PivotViewFormatSetting Name="OrderDate" Type="FormatType.DateTime" Format="dd/MM/yyyy"></PivotViewFormatSetting>
        </PivotViewFormatSettings>
    </PivotViewDataSourceSettings>
    <PivotViewCellEditSettings AllowEditing=true AllowAdding=true AllowDeleting=true></PivotViewCellEditSettings>
    <PivotViewEvents TValue="Order" EditCompleted="EditCompleted"></PivotViewEvents>
</SfPivotView>
@code{
    private void EditCompleted(EditCompletedEventArgs<Order> args)
    {
        // The newly added orders can be obtained from "args.AddedaData" and used to add specified records to the SQL database.
        if (args.AddedData?.Count > 0)
        {
            foreach (Order order in args.AddedData)
            {
                Orders.AddOrder(order);
            }
        }
    }
}
Refer to the gif image.
Modifying an existing record
To edit/modify existing records, select one with the mouse and click the Edit option in the toolbar. While doing so, the selected order will become editable.
For example, we will change the Freight value from 200 to 250 in the dialog-contained table. When you click the Update button after editing a record, the dialog closes, triggering the EditCompleted event. This event sends a collection of edited records via the OrderDataAccessLayer instance, which can search for and identify the records using the OrderID and update them in the SQL Server database.
Refer to the following code example for modifying an existing record to the table.
@page "/"
@using MyBlazorApp.Data
@using Syncfusion.Blazor.PivotView
@using Syncfusion.Blazor.Data

@inject OrderDataAccessLayer Orders;

<SfPivotView TValue="Order" Width="650" Height="340" EnableVirtualization="true" ShowFieldList="false" ShowTooltip=false>
    <PivotViewDataSourceSettings TValue="Order" DataSource="@Orders.GetAllOrders()">
        <PivotViewColumns>
            <PivotViewColumn Name="ShipName"></PivotViewColumn>
        </PivotViewColumns>
        <PivotViewRows>
            <PivotViewRow Name="CustomerID" ExpandAll=true></PivotViewRow>
            <PivotViewRow Name="OrderDate"></PivotViewRow>
        </PivotViewRows>
        <PivotViewValues>
            <PivotViewValue Name="Freight"></PivotViewValue>
        </PivotViewValues>
        <PivotViewFormatSettings>
            <PivotViewFormatSetting Name="Freight" Type="FormatType.Number" Format="N2"></PivotViewFormatSetting>
            <PivotViewFormatSetting Name="OrderDate" Type="FormatType.DateTime" Format="dd/MM/yyyy"></PivotViewFormatSetting>
        </PivotViewFormatSettings>
    </PivotViewDataSourceSettings>
    <PivotViewCellEditSettings AllowEditing=true AllowAdding=true AllowDeleting=true></PivotViewCellEditSettings>
    <PivotViewEvents TValue="Order" EditCompleted="EditCompleted"></PivotViewEvents>
</SfPivotView>

@code{
    private void EditCompleted(EditCompletedEventArgs<Order> args)
    {
        // The modified orders can be obtained from "args.ModifiedData" and used to update specified records in the SQL database.
        if (args.ModifiedData?.Count > 0)
        {
            foreach (var key in args.ModifiedData.Keys)
            {
                Orders.UpdateOrder(args.ModifiedData[key]);
            }
        }
    }
}
Refer to the gif image.
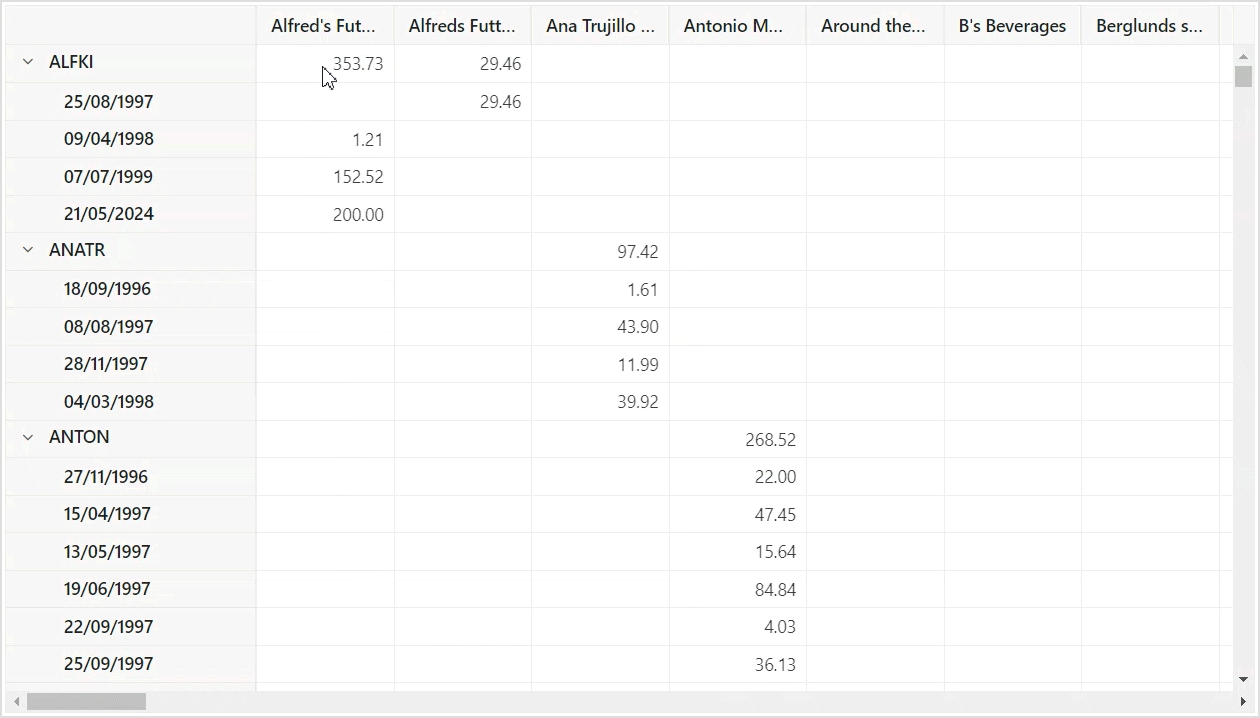
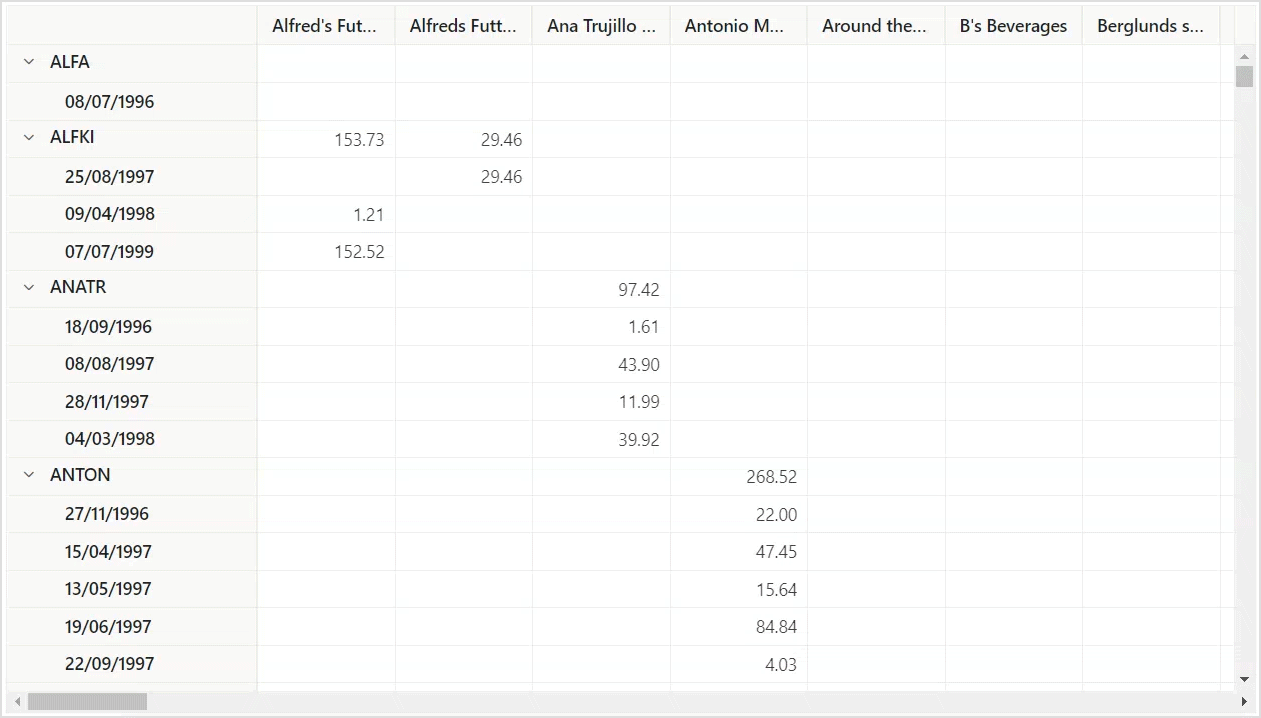
Deleting a record
You can delete records from both the pivot table and the SQL database. To do so, double-click the value 403.73 in the pivot table below. An editable dialog will appear, displaying the underlying data, including order details for 5/21/2024.
After selecting the order in the dialog, click the Delete button in the toolbar. This will delete the selected order data from the editable table.
When the dialog is closed by clicking the close icon in the top-right corner, the EditCompleted event is triggered. This event sends a collection of deleted records to the OrderDataAccessLayer instance. The records can then be searched for and identified using the OrderID and deleted in the SQL Server database.
Refer to the following code example for deleting a record from the table.
@page "/"
@using MyBlazorApp.Data
@using Syncfusion.Blazor.PivotView
@using Syncfusion.Blazor.Data
@inject OrderDataAccessLayer Orders;
<SfPivotView TValue="Order" Width="650" Height="340" EnableVirtualization="true" ShowFieldList="false" ShowTooltip=false>
    <PivotViewDataSourceSettings TValue="Order" DataSource="@Orders.GetAllOrders()">
        <PivotViewColumns>
            <PivotViewColumn Name="ShipName"></PivotViewColumn>
        </PivotViewColumns>
        <PivotViewRows>
            <PivotViewRow Name="CustomerID" ExpandAll=true></PivotViewRow>
            <PivotViewRow Name="OrderDate"></PivotViewRow>
        </PivotViewRows>
        <PivotViewValues>
            <PivotViewValue Name="Freight"></PivotViewValue>
        </PivotViewValues>
        <PivotViewFormatSettings>
            <PivotViewFormatSetting Name="Freight" Type="FormatType.Number" Format="N2"></PivotViewFormatSetting>
            <PivotViewFormatSetting Name="OrderDate" Type="FormatType.DateTime" Format="dd/MM/yyyy"></PivotViewFormatSetting>
        </PivotViewFormatSettings>
    </PivotViewDataSourceSettings>
    <PivotViewCellEditSettings AllowEditing=true AllowAdding=true AllowDeleting=true></PivotViewCellEditSettings>
    <PivotViewEvents TValue="Order" EditCompleted="EditCompleted"></PivotViewEvents>
</SfPivotView>
@code{
    private void EditCompleted(EditCompletedEventArgs<Order> args)
    {
        // The removed orders can be obtained from "args.RemovedData" and used to delete specified records in the SQL database.
        if (args.RemovedData?.Count > 0)
        {
            foreach (int key in args.RemovedData.Keys)
            {
                Orders.DeleteOrder(args.RemovedData[key].OrderID);
            }
        }
    }
}
Refer to the gif image.

GitHub reference
For more details, refer to the complete project on GitHub.

Conclusion
Thanks for reading this blog post, which explored integrating the Syncfusion Blazor Pivot Table with an SQL database using Entity Framework for CRUD operations. We set up the project, configured the database, enabled editing, and updated the Pivot Table with the latest data after each operation.
You can easily create interactive, data-driven applications using Syncfusion Blazor Pivot Table and Entity Framework. We hope you found the information valuable. Take a hands-on approach by following the outlined steps and share your thoughts in the comments below.
For our existing Syncfusion customers, the new version of Essential Studio® is available on the License and Downloads page. If you’re not yet part of our community, sign up for a 30-day free trial to evaluate these features.
For questions, you can contact us through our support forum, support portal, or feedback portal. Your satisfaction is our priority, and we look forward to assisting you on your Syncfusion journey!