TL;DR: Explore global Gross National Income (GNI) per capita and income thresholds through a line chart created with Syncfusion’s .NET MAUI Cartesian Chart control. Discover how to gather and link data to the chart while enhancing visualization by customizing elements such as title, axis, and tooltip.
Welcome to our Chart of the Week blog series!
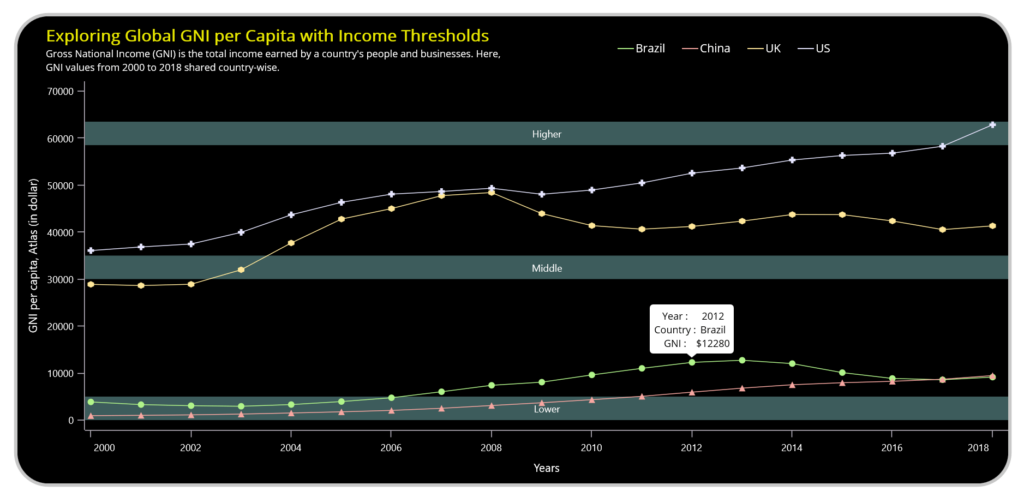
Today, we’ll use Syncfusion’s .NET MAUI Cartesian Chart control to create a line chart with plot bands. This chart will help us explore global Gross National Income (GNI) per capita alongside income thresholds.
GNI represents the total income earned by people and businesses in a country. We will analyze GNI values from 2000 to 2018, categorized by country. This control is compatible with desktop platforms such as Windows and Mac, as well as mobile platforms like Android and iOS.

Let’s get started!
Step 1: Gathering GNI data by country
First, gather data on the GNI per capita. Choose the countries in which you need data and the format for downloading it. For example, obtain GNI data for Brazil, China, the UK, and the US, and download it in CSV format. After downloading, use the data from 2000 to 2018.
Step 2: Preparing data for the chart
Create a model class that includes properties for storing information about GNI (Gross National Income) country-by-country, along with the corresponding year.
Refer to the following code example.
public class Model
{
    public DateTime Year { get; set; }
    public double BrazilGNI { get; set; }
    public double ChinaGNI { get; set; }
    public double UKGNI { get; set; }
    public double USGNI { get; set; }
    public Model(DateTime year, double brazilGNI, double chinaGNI, double ukGNI, double usGNI)
    {
        Year = year;
        BrazilGNI = brazilGNI;
        ChinaGNI = chinaGNI;
        UKGNI = ukGNI;
        USGNI = usGNI;
    }
}
Next, read the CSV file and store the GNI values country-wise with the corresponding year in the observable collection of the EconomicRate property. Refer to the following code example.
public class ViewModel
{
    private DateTime year;
    public ViewModel()
    {
        EconomicRate = new ObservableCollection();
        ReadCSVFile();
    }
    private void ReadCSVFile()
    {
        Assembly executingAssembly = typeof(App).GetTypeInfo().Assembly;
        Stream inputStream = executingAssembly.GetManifestResourceStream("EconomicRatesDemo.Resources.dataset.csv");
        string line;
        ObservableCollection lines = new ObservableCollection();
        if (inputStream != null)
        {
            using (StreamReader reader = new StreamReader(inputStream))
            {
                while ((line = reader.ReadLine()) != null)
                {
                    lines.Add(line);
                }
            }
            lines.RemoveAt(0);
            foreach (var items in lines)
            {
                string[] data = items.Split(',');
                if (int.TryParse(data[0], out int yearValue))
                {
                    year = new DateTime(yearValue, 1, 1);
                }
                double brazilGNI = Convert.ToDouble(data[1]);
                double chinaGNI = Convert.ToDouble(data[2]);
                double ukGNI = Convert.ToDouble(data[3]);
                double usGNI = Convert.ToDouble(data[4]);
                EconomicRate.Add(new Model(year, brazilGNI, chinaGNI, ukGNI, usGNI));
            }
        }
    }
}
Step 3: Layout definition
Define the layout using a Border element. Inside the border, we’ll utilize a Grid to place our elements.
Refer to the following code example.
<Border Background="#e8ebe0"
                 StrokeThickness="4"
                StrokeShape="{OnPlatform Default= RoundRectangle 40, Android= RoundRectangle 35}"
                Margin="{OnPlatform Default=30, Android= 10}">
 <Grid RowDefinitions="80,*" ColumnDefinitions="*,*" BackgroundColor="Black">
     <VerticalStackLayout Grid.Row="0" Grid.Column="0">
         …
    </VerticalStackLayout>
    <HorizontalStackLayout  Grid.Row="0" Grid.Column="1">
       …
    </HorizontalStackLayout>
  </Grid>
</Border>
Step 4: Configuring the Syncfusion .NET MAUI Cartesian Charts
Now, configure the Syncfusion .NET MAUI Cartesian Charts control using this documentation.
Refer to the following code example.
 <chart:SfCartesianChart Grid.Row="1" Grid.ColumnSpan="2">
 <chart:SfCartesianChart.XAxes>
     <chart:DateTimeAxis >
           …
     </chart:DateTimeAxis>
 </chart:SfCartesianChart.XAxes>
 <chart:SfCartesianChart.YAxes>
     <chart:NumericalAxis >
           …
     </chart:NumericalAxis>
 </chart:SfCartesianChart.YAxes>
</chart:SfCartesianChart>
Step 5: Binding data to the chart
We’ll utilize the Syncfusion Line series instances to visualize the GNI per country yearly. Bind the ViewModel to the page’s binding context to enable access to ViewModel properties. Then, bind the Year and GNI properties to the X and Y axes using the XBindingPath and YBindingPath respectively. Additionally, bind the collection to ItemsSource to the EconomicRate.
Refer to this code example.
<ContentPage.BindingContext>
     <local:ViewModel/>
</ContentPage.BindingContext>
<chart:SfCartesianChart Grid.Row="1" Grid.ColumnSpan="2">
    <chart:LineSeries ItemsSource="{Binding EconomicRate}"
                                    XBindingPath="Year"
                                   YBindingPath="BrazilGNI" />
    <chart:LineSeries ItemsSource="{Binding EconomicRate}"
                                    XBindingPath="Year"
                                    YBindingPath="ChinaGNI" />
    <chart:LineSeries ItemsSource="{Binding EconomicRate}"
                                    XBindingPath="Year"
                                    YBindingPath="UKGNI" />
    <chart:LineSeries ItemsSource="{Binding EconomicRate}"
                                    XBindingPath="Year"
                                    YBindingPath="USGNI" />
</chart:SfCartesianChart>
Step 6: Setting plot bands to the Y-axis.
We use NumericalPlotBand to shade three regions: lower GNI, middle GNI, and upper GNI regions and also add corresponding text. These plot bands are created and added to the NumericalPlotBandCollection. The Start and End APIs determine each shading region’s beginning and end positions. We can customize the text for the plot bands using ChartPlotBandLabelStyle.
Refer to the following code example.
<chart:SfCartesianChart.YAxes>
     <chart:NumericalAxis >
    <!—Lower GNI plot band-->
         <chart:NumericalAxis.PlotBands>
             <chart:NumericalPlotBandCollection>
                 <chart:NumericalPlotBand Start="0" End="5000"
                                                                  Fill="#3d5c5c"
                                                                  Text="Lower">
                     <chart:NumericalPlotBand.LabelStyle>
                         <chart:ChartPlotBandLabelStyle TextColor="White"/>
                     </chart:NumericalPlotBand.LabelStyle>
                 </chart:NumericalPlotBand>
                   <!--Middle GNI plot band-->
                 <chart:NumericalPlotBand Start="30000" End="35000"
                                                                   Fill="#3d5c5c"
                                                                   Text="Middle">
                     <chart:NumericalPlotBand.LabelStyle>
                         <chart:ChartPlotBandLabelStyle TextColor="White"/>
                     </chart:NumericalPlotBand.LabelStyle>
                 </chart:NumericalPlotBand>
                  <!--Higher GNI plot band-->
                 <chart:NumericalPlotBand Start="58500" End="63500"
                                                                  Fill="#3d5c5c"
                                                                  Text="Higher">
                     <chart:NumericalPlotBand.LabelStyle>
                         <chart:ChartPlotBandLabelStyle TextColor="White"/>
                     </chart:NumericalPlotBand.LabelStyle>
                 </chart:NumericalPlotBand>
             </chart:NumericalPlotBandCollection>
         </chart:NumericalAxis.PlotBands>
     </chart:NumericalAxis>
 </chart:SfCartesianChart.YAxes>
Step 7: Customizing the chart appearance
Let’s enhance the visual appeal of the line series along with plot bands and their elements. We’ll customize the look of the line graph by adjusting various properties and styles.
Adding chart title
In the VerticalStackLayout, a Label element is used to place the chart title and description vertically. In the HorizontalStackLayout, BoxView elements and labels are added to indicate the countries corresponding to each line series, using color in the BoxView. Customize the chart title like in the following code example.
<VerticalStackLayout Grid.Row="0" Grid.Column="0">
     <Label Text="Exploring Global GNI per Capita with Income Thresholds"
                  TextColor="#e6e600"
                  FontAttributes="Bold"
                  FontSize="{OnPlatform Android=15, iOS= 15, Default= 20 }"
                  Margin="{OnPlatform Default='35,10,0,0'}"/>
     <Label Text="Gross National Income (GNI) is the total income earned by a country's people and businesses. Here, GNI values from 2000 to 2018 shared country-wise."
                  TextColor="White"
                   FontSize="12"
                   Margin="{OnPlatform Default='35,0,0,0'}"/>
 </VerticalStackLayout>
 <HorizontalStackLayout  Grid.Row="0" Grid.Column="1" HeightRequest="40" WidthRequest="350">
     <BoxView HeightRequest="1" WidthRequest="20"
                        BackgroundColor="#b1f48a"/>
     <Label Text="Brazil" TextColor="White" Margin="{OnPlatform Default='2,9,0,0'}" />
     <BoxView HeightRequest="1" WidthRequest="20"
                       BackgroundColor="#f7a7a1" Margin="{OnPlatform Default='20,0,0,0'}"/>
     <Label Text="China" TextColor="White"  Margin="{OnPlatform Default='2,9,0,0'}"/>
     <BoxView HeightRequest="1" WidthRequest="20"
                        BackgroundColor="#ffe799" Margin="{OnPlatform Default='20,0,0,0'}"/>
     <Label Text="UK" TextColor="White"  Margin="{OnPlatform Default='2,9,0,0'}"/>
     <BoxView HeightRequest="1" WidthRequest="20"
                        BackgroundColor="#e6e6ff" Margin="{OnPlatform Default='20,0,0,0'}"/>
     <Label Text="US" TextColor="White" Margin="{OnPlatform Default='2,9,0,0'}"/>
 </HorizontalStackLayout>
Customizing the axes
Let’s customize the primary and secondary axes using the following properties:
ShowMajorGridLines – Control the visibility of grid lines.
PlotOffsetStart – Used to provide padding to the axis at the start position.
PlotOffserEnd – Used to provide padding to the axis at the end position.
Title – Used to set titles for chart axes.
ChartAxisLabelStyle – Used to customize axis labels.
Refer to the following code example.
<chart:SfCartesianChart.XAxes>
      <chart:DateTimeAxis ShowMajorGridLines="False" PlotOffsetStart="7" PlotOffsetEnd="20">
          <chart:DateTimeAxis.Title>
              <chart:ChartAxisTitle Text="Years" TextColor="White"/>
          </chart:DateTimeAxis.Title>
          <chart:DateTimeAxis.LabelStyle>
              <chart:ChartAxisLabelStyle TextColor="White"/>
          </chart:DateTimeAxis.LabelStyle>
      </chart:DateTimeAxis>
  </chart:SfCartesianChart.XAxes>
  <chart:SfCartesianChart.YAxes>
      <chart:NumericalAxis ShowMajorGridLines="False" PlotOffsetStart="{OnPlatform Android=5}" >
          <chart:NumericalAxis.Title>
              <chart:ChartAxisTitle Text="GNI per capita, Atlas (in dollar)" TextColor="White"/>
          </chart:NumericalAxis.Title>
          <chart:NumericalAxis.LabelStyle>
              <chart:ChartAxisLabelStyle TextColor="White"/>
          </chart:NumericalAxis.LabelStyle>
    </chart:NumericalAxis>
</chart:SfCartesianChart.YAxes>
Customizing the line series marker
Let’s customize the line series marker using the following properties:
ShowMarker: Used to highlight the position of the data point.
MarkerSettings: To change the series markers’ appearance, create an instance of the MarkerSettings property. The following properties are used to customize marker appearance.
- Type: Used to describe the marker shape.
- Height: Indicates the height of the marker.
- Width: Indicates the width of the marker.
Refer to the following code example.
<chart:SfCartesianChart>
 <chart:LineSeries ItemsSource="{Binding EconomicRate}"
                                XBindingPath="Year"
                                YBindingPath="BrazilGNI"
                                ShowMarkers="True">
     <chart:LineSeries.MarkerSettings>
         <chart:ChartMarkerSettings Type="Circle" Height="8" Width="8" />
     </chart:LineSeries.MarkerSettings>
 </chart:LineSeries>

 <chart:LineSeries ItemsSource="{Binding EconomicRate}"
                                 XBindingPath="Year"
                                 YBindingPath="ChinaGNI"
                                 ShowMarkers="True">
     <chart:LineSeries.MarkerSettings>
         <chart:ChartMarkerSettings Type="Triangle" Height="8" Width="8"/>
     </chart:LineSeries.MarkerSettings>
 </chart:LineSeries>

 <chart:LineSeries ItemsSource="{Binding EconomicRate}"
                                 XBindingPath="Year"
                                 YBindingPath="UKGNI"
                                 ShowMarkers="True">
     <chart:LineSeries.MarkerSettings>
         <chart:ChartMarkerSettings Type="Hexagon" Height="8" Width="8"/>
     </chart:LineSeries.MarkerSettings>
 </chart:LineSeries>

 <chart:LineSeries ItemsSource="{Binding EconomicRate}"
                                 XBindingPath="Year"
                                 YBindingPath="USGNI"
                                 ShowMarkers="True">
     <chart:LineSeries.MarkerSettings>
         <chart:ChartMarkerSettings Type="Plus"/>
     </chart:LineSeries.MarkerSettings>
 </chart:LineSeries>
</chart:SfCartesianChart>
Customizing the line series appearance
Using the PaletteBrushes property, we can apply custom brushes to line series. This property is bound to a collection of brushes named CustomBrushes.
<chart:SfCartesianChart PaletteBrushes="{Binding CustomBrushes}">
      …
</chart:SfCartesianChart>
public List<Brush> CustomBrushes { get; set; }
CustomBrushes = new List<Brush>()
{
new SolidColorBrush(Color.FromArgb("#b1f48a")),
new SolidColorBrush(Color.FromArgb("#f7a7a1")),
new SolidColorBrush(Color.FromArgb("#ffe799")),
new SolidColorBrush(Color.FromArgb("#e6e6ff")),
};
Customizing the tooltip using a template
Using the TooltipTemplate property in the series allows customization of the tooltip’s appearance. A data template with the data points’ year, country name, and GNI values is created and bound to the TooltipTemplate property, with the tooltip enabled. Each line series data point displays its information in the tooltip template.
<chart:SfCartesianChart>
  <chart:SfCartesianChart.Resources>
     <!--BrazilGNI line series tooltip template-->
     <DataTemplate x:Key="tooltipTemplate1">
         <Grid RowDefinitions="*,*,*" ColumnDefinitions="Auto,*">
             <Label Grid.Row="0" Grid.Column="0"
                           Text="Year : "
	             TextColor="Black"
	             FontSize="12"
                           VerticalTextAlignment="Center"
                           HorizontalTextAlignment="Center"/>
             <Label Grid.Row="0" Grid.Column="1"
                           Text="{Binding Item.Year,StringFormat='{0:yyyy}'}"
                           TextColor="Black"
                           FontSize="12"
                           VerticalTextAlignment="Center"
                           HorizontalTextAlignment="Center"/>
             <Label Grid.Row="1" Grid.Column="0"
                          Text="Country : "
                          TextColor="Black"
	           FontSize="12"
                         VerticalTextAlignment="Center"
                         HorizontalTextAlignment="Center"/>
             <Label Grid.Row="1" Grid.Column="1"
                          Text="Brazil"
                          TextColor="Black"
                          FontSize="12"
                          VerticalTextAlignment="Center"
                          HorizontalTextAlignment="Center" />
             <Label Grid.Row="2" Grid.Column="0"
                          Text="GNI : "
                          TextColor="Black"
                          FontSize="12"
                         VerticalTextAlignment="Center"
                         HorizontalTextAlignment="Center"/>
             <Label Grid.Row="2" Grid.Column="1"
                          Text="{Binding Item.BrazilGNI,StringFormat='${0}'}"
                           TextColor="Black"
                           FontSize="12"
                           VerticalTextAlignment="Center"
                           HorizontalTextAlignment="Center"/>
         </Grid>
     </DataTemplate>
     <!--ChinaGNI line series tooltip template-->
     <DataTemplate x:Key="tooltipTemplate2">
         <Grid RowDefinitions="*,*,*" ColumnDefinitions="Auto,*" >
             <Label Grid.Row="0" Grid.Column="0"
                           Text="Year :"
                           TextColor="Black"
                           FontSize="12"
                           VerticalTextAlignment="Center"
                           HorizontalTextAlignment="Center"/>
             <Label Grid.Row="0" Grid.Column="1"
                           Text="{Binding Item.Year,StringFormat='{0:yyyy}'}"
                           TextColor="Black"
                           FontSize="12"
                           VerticalTextAlignment="Center"
                           HorizontalTextAlignment="Center"/>
             <Label Grid.Row="1" Grid.Column="0"
                          Text="Country : "
                          TextColor="Black"
                          FontSize="12"
                          VerticalTextAlignment="Center"
                          HorizontalTextAlignment="Center"/>
             <Label Grid.Row="1" Grid.Column="1"
                           Text="China"
                            TextColor="Black"
                            FontSize="12"
                            VerticalTextAlignment="Center"
                            HorizontalTextAlignment="Center"/>
             <Label Grid.Row="2" Grid.Column="0"
                          Text="GNI : "
                          TextColor="Black"
                           FontSize="12"
                           VerticalTextAlignment="Center"
                           HorizontalTextAlignment="Center"/>
             <Label Grid.Row="2" Grid.Column="1"
                          Text="{Binding Item.ChinaGNI,StringFormat='${0}'}"
                          TextColor="Black"
                          FontSize="12"
                         VerticalTextAlignment="Center"
                         HorizontalTextAlignment="Center"/>
         </Grid>
     </DataTemplate>
     <!--UKGNI line series tooltip template-->
     <DataTemplate x:Key="tooltipTemplate3">
         <Grid RowDefinitions="*,*,*" ColumnDefinitions="Auto,*" >
             <Label Grid.Row="0" Grid.Column="0"
                           Text="Year :"
                           TextColor="Black"
                           FontSize="12"
                           VerticalTextAlignment="Center"
                           HorizontalTextAlignment="Center"/>
             <Label Grid.Row="0" Grid.Column="1"
                          Text="{Binding Item.Year,StringFormat='{0:yyyy}'}"
                          TextColor="Black"
                          FontSize="12"
                          VerticalTextAlignment="Center"
                           HorizontalTextAlignment="Center"/>
             <Label Grid.Row="1" Grid.Column="0"
                          Text="Country :  "
                          TextColor="Black"
                           FontSize="12"
                           VerticalTextAlignment="Center"
                           HorizontalTextAlignment="Center"/>
             <Label Grid.Row="1" Grid.Column="1"
                          Text="UK"
                          TextColor="Black"
                          FontSize="12"
                          VerticalTextAlignment="Center"
                          HorizontalTextAlignment="Start"/>
             <Label Grid.Row="2" Grid.Column="0"
                          Text="GNI : "
                           TextColor="Black"
                           FontSize="12"
                           VerticalTextAlignment="Center"
                           HorizontalTextAlignment="Center"/>
             <Label Grid.Row="2" Grid.Column="1"
                          Text="{Binding Item.UKGNI,StringFormat='${0}'}"
                          TextColor="Black"
                          FontSize="12"
                          VerticalTextAlignment="Center"
                           HorizontalTextAlignment="Center"/>
         </Grid>
     </DataTemplate>
     <!--USGNI line series tooltip template-->
     <DataTemplate x:Key="tooltipTemplate4">
         <Grid RowDefinitions="*,*,*" ColumnDefinitions="Auto,*" >
             <Label Grid.Row="0" Grid.Column="0"
                          Text="Year :"
                          TextColor="Black"
                          FontSize="12"
                          VerticalTextAlignment="Center"
                          HorizontalTextAlignment="Center"/>
             <Label Grid.Row="0" Grid.Column="1"
                          Text="{Binding Item.Year,StringFormat='{0:yyyy}'}"
                          TextColor="Black"
                          FontSize="12"/>
             <Label Grid.Row="1" Grid.Column="0"
                          Text="Country : "
                          TextColor="Black"
                           FontSize="12"
                           VerticalTextAlignment="Center"
                           HorizontalTextAlignment="Center"/>
             <Label Grid.Row="1" Grid.Column="1"
                          Text="US"
                          TextColor="Black"
                          FontSize="12"
                          VerticalTextAlignment="Center"
                          HorizontalTextAlignment="Start"/>
             <Label Grid.Row="2" Grid.Column="0"
                          Text="GNI :"
                          TextColor="Black"
                          FontSize="12"
                         VerticalTextAlignment="Center"
                         HorizontalTextAlignment="Center"/>
             <Label Grid.Row="2" Grid.Column="1"
                          Text="{Binding Item.USGNI,StringFormat='${0}'}"
                          TextColor="Black"
                           FontSize="12"
                           VerticalTextAlignment="Center"
                         HorizontalTextAlignment="Center"/>
         </Grid>
     </DataTemplate>
  </chart:SfCartesianChart.Resources>
  <chart:SfCartesianChart.TooltipBehavior>
      <chart:ChartTooltipBehavior Background="White"/>
  </chart:SfCartesianChart.TooltipBehavior>
  <chart:LineSeries EnableTooltip="True"
                   TooltipTemplate="{StaticResource tooltipTemplate1}"/>
  <chart:LineSeries EnableTooltip="True"
                   TooltipTemplate="{StaticResource tooltipTemplate2}"/>
  <chart:LineSeries EnableTooltip="True"
                   TooltipTemplate="{StaticResource tooltipTemplate3}"/>
  <chart:LineSeries EnableTooltip="True"
                   TooltipTemplate="{StaticResource tooltipTemplate4}"/>
</chart:SfCartesianChart>
After executing the above code examples, we will get the output that resembles the following image.

GitHub reference
For more details, refer to the Line chart with plot bands to explore global GNI per capita with income thresholds demo.
Conclusion
Thank you for reading! We have demonstrated how to explore global GNI per capita with an income thresholds line chart using the Syncfusion .NET MAUI Cartesian Charts control. We encourage you to follow these steps and share your thoughts on the experience in the comment section below.
The existing customers can download the latest version of Essential Studio® from the License and Downloads page. If you are new, try our 30-day free trial to explore our incredible features.
If you require assistance, please don’t hesitate to contact us via our support forums, support portal, or feedback portal. We are always eager to help you!


