Bundling is the process of combining multiple files into a single file. Minifying is the process of removing unnecessary data such as comments and extra spaces, as well as converting a large variable name into a smaller name without affecting its functionalities.
To bundle and minify the CSS and JS files in a Blazor application, follow these steps:
Install the BuildBundlerMinifier NuGet package and reference it in the .csproj file, as shown.
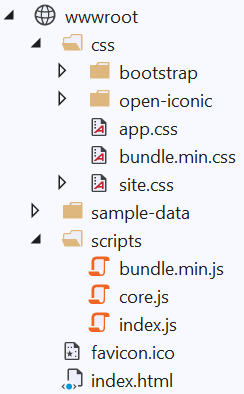
After you build your application, the bundled and minified files are generated as shown in the following image. You can reference these files in your application based on the requirement.
SEO is an abbreviation for search-engine optimization,
and it refers to the process of optimizing a website for search engines. In
simpler words, it refers to the process of improving your website in order to
increase its visibility when people use Google, Bing, and other search engines
to find what they’re looking for.
The best way to make your Blazor WebAssembly application SEO-friendly is to work on the title, meta description, and H1 tag in the index.html common page or in individual pages based on your requirements and development activities. If you include keywords in the title, meta description, and H1 tag of your Blazor WebAssembly application, the app will appear near the top of search engine results when people search for general information using those keywords.
Title: The title must be text-only and appears in the browser’s title bar or in the page’s tab.
H1 tag: The H1 tag will be displayed as the application’s top-level heading.
Meta description: The meta description will be displayed as compressed content just below the search-related link.
Meta keywords: If anyone searches for a keyword mentioned in your Blazor application, it will appear at the top of the search engine results. However, Googlebot no longer considers meta keywords to be SEO-friendly.
Note: Make sure that your
title, H1 tag, and meta description are unique. If the description or title is
too long, Google will limit the content to a specific range. Follow these guidelines to avoid unwanted
content loss:
Title: should be
between 20 and 70 characters long.
Meta description:
should be between 100 and 160 characters long.
SEO is an abbreviation for search-engine optimization,
and it refers to the process of optimizing a website for search engines. In
simpler words, it refers to the process of improving your website in order to
increase its visibility when people use Google, Bing, and other search engines
to find what they’re looking for.
The best way to make your Blazor Server application SEO-friendly is to work on the title, meta description, and H1 tag in the _Host.cshtml common page or in individual pages based on your requirements and development activities. If you include keywords in the title, meta description, and H1 tag of your Blazor Server application, the app will appear near the top of search engine results when people search for general information using those keywords.
Title: The title must be text-only and appears in the browser’s title bar or in the page’s tab.
H1 tag: The H1 tag will be displayed as the application’s top-level heading.
Meta description: The meta description will be displayed as compressed content just below the search-related link.
Meta keywords: If anyone searches for a keyword mentioned in your Blazor application, the app will appear at the top of the search engine results. However, Googlebot no longer considers meta keywords to be SEO-friendly.
Note: Make sure that your
title, H1 tag, and meta description are unique. If the description or title is
too long, Google will limit the content to a specific range. Follow these guidelines to avoid unwanted
content loss:
Title: should be
between 20 and 70 characters long.
Meta description:
should be between 100 and 160 characters long.
Use HttpContext through the IHttpContextAccessor interface to get the user agent details in a Blazor Server application. The following example demonstrates how to use HttpContext to get the user agent and IP address details by default. Extend the AddHttpContextAccessor() method in the Program.cs file.
Use the System.Timers.Timer class to wait until the user has finished typing in the text field. The onkeyup event triggers for each key press and resets the timer until the last timer raises the OnUserFinish event.
In the following example, the cookie consent banner temple will display to notify you to accept cookies. Follow the below steps to create a consent cookie in Blazor.
1. Configure the HttpContextAccessor and CookiePolicyOptions to the Program.cs file to create a consent cookie.
Configure the logger in the builder in the Program.Main configuration file. Add a package reference for Microsoft.Extensions.Logging.Configuration to the Blazor app’s project file using the NuGet package manager.
Now, add the namespace as Microsoft.Extensions.Logging to Program.cs and add the builder logging configuration. This configuration will prevent the logging info in the browser console.
Blazor virtualization is a technique for limiting UI rendering to just the parts that are currently visible. It improves the perceived performance of component rendering using the Blazor framework’s built-in virtualization support with the virtualize component. When you are using a long list-item component with a loop, you can use virtualization for better performance.
Use the Virtualize component when:
A set of data items in a loop needs to be rendered.
Blazor detects the UI changes in common scenarios like EventCallback (button click, dropdown select, etc.), and refreshes the component. However, there are some situations in an app where a UI refresh needs to be triggered manually to re-render the component. The StateHasChanged method is used to force re-render a component UI.
@using System.Threading;<h1>@Count</h1><button @onclick=@StartCountdown>Start Timer</button>@functions {
private int Count { get; set; } = 10;
void StartCountdown()
{
var timer = new Timer(new TimerCallback(_ =>
{
if (Count > 0)
{
Count--;
// Note that the following line is necessary because otherwise
// Blazor would not recognize the state change and not refresh the UI
InvokeAsync(() =>
{
StateHasChanged();
});
}
}), null, 1000, 1000);
}
}
Blazor application renders UI as HTML content in client-side (browser). So, you can determine whether it is a Desktop, or a Mobile device based on the viewport’s width.
The meta tag named “viewport” is used to design the webpage responsiveness and this is included in all Blazor applications, _Host.cshtml file in Blazor server-side application and index.html file in Blazor Web Assembly application. CSS styling makes designs responsive in Blazor apps.
Another way, you can create a responsive design using media queries that adjusts to the size of the user’s screen based on desktop or mobile browser.
For example, you define breakpoints for small, medium, and large screen sizes.
<style>/* Default styles */@media (max-width:576px) {
/* Styles for small screens */
}
@media (min-width:577px) and (max-width:992px) {
/* Styles for medium screens */
}
@media (min-width:993px) {
/* Styles for large screens */
}
</style>
To reconnect the Blazor server automatically you need to include the following code in the script of the Blazor application. This will refresh the Blazor server automatically when it is up again.
String comparison with case insensitivity can be carried out using the String.Compare method, where the first and second parameters are the strings to be compared and the third parameter is for ignoring case sensitivity (case insensitive comparison).
To access browser localStorage in Blazor apps, write a custom code or use a third party package. The difference between localStorage and sessionStorage is: The localStorage is scoped to the user’s browser. If the user reloads the page or closes and reopens the browser, the state persists. Session storage is similar to local storage but the data in the session storage will be cleared after the session.
The Blazored.LocalStorage package can be used to access the browser’s local storage in Blazor. For this you need to install the package and add the service to the application.
You can get the current page title in Blazor by using the “title” property of the document object in JavaScript and by using a .JavaScript interop since there is no DOM accessibility in Blazor. The following example shows how to get the page name.
A query string stores values in the URL that are visible to users. It is mostly used to pass the data from one page to another. In Blazor, the query string can be added using the NavigationManager. You can pass multiple parameters through the URL and access it via queryhelpers,
1. Install the package Microsoft.AspNetCore.WebUtilities from NuGet.
2. Use the QueryHelpers.ParseQuery.TryGetValue method
@page "/queryparam"@inject NavigationManager navManager<h3>Query Paramter Demo</h3><div>Id = @Id</div><div>Name = @Name</div>@code{
string Id { get; set; }
string Name { get; set; }
protected override void OnInitialized()
{
GetId();
GetName();
}
public void GetId()
{
var uri = new Uri(navManager.Uri);
Id = Microsoft.AspNetCore.WebUtilities.QueryHelpers.ParseQuery(uri.Query).TryGetValue("id", out var type) ? type.First() : "";
}
public void GetName()
{
var uri = new Uri(navManager.Uri);
Name = Microsoft.AspNetCore.WebUtilities.QueryHelpers.ParseQuery(uri.Query).TryGetValue("name", out var type) ? type.First() : "";
}
}
We can define specific instances for custom components by using @ref while defining the component in a Razor file.
In this sample, we have created the component reference for the card components with specific names. Using this reference, we can access the card component properties and modify them. Here we have changed the display property using the component reference.
There is
no direct way to detect whether the page is loaded on mobile or desktop in
Blazor. We have to find out through the userAgent property from the JavaScript
side using a JSInterop call. In order to find out, add a “script.js” file in
the wwwroot folder and include the isDevice method call. You can then invoke
the isDevice method to identify the correct device.
If you want to show a message using a simple browser alert message box, it is easy to do in Blazor. In Blazor, you can call a JavaScript method using JavaScript interop.
In the following code snippets, the text entered in the text box will be displayed in the alert box. In order to call the JavaScript method in Blazor, you should register the method in the browser window class. You can pass the message you want to show by passing method parameters in the JSRuntime.InvokeAsync method.
You can redirect to a page in Blazor using the Navigation Manager’s NavigateTo method. In the following code snippet, it will redirect to the home page when this page gets loaded. Similarly, you can call NavigateTo() method from NavigationManager class anywhere to redirect to another page.
A URL can be opened in a new tab either by using the NavLink component or by using JavaScript. In the NavLink component, we can specify the URL to be opened in a new tab in the href parameter. In interop’s IJSRuntime instances, the method InvokeAsyncwith parameters open, URL, and _blank are used. Here, the third parameter, _blank, is used to notify that the URL needs to be opened in the new tab.
You can change the default icon provider for Blazor by importing the required icons in the site.css (\wwwroot\css\site.css or app.css). The imported icons can be used throughout the application. In the sample, I’ve imported the Material theme icons and used them.
In Blazor, you can retrieve the IP address of the current request by utilizing the IHttpContextAccessor service. To do this,
Add builder.Services.AddHttpContextAccessor in your Program.cs file.
Then, inject IHttpContextAccessor into your component or service where you require the IP address.
Finally, obtain the client’s IP address using HttpContext.Connection.RemoteIpAddress.
@page "/" @using Microsoft.AspNetCore.Http <h3> Here's an example of how to retrieve the IP address from HttpContext in Blazor</h3><p>Localhost IP address: @ipAddress</p>@code {
private string? ipAddress;
[Inject]
private IHttpContextAccessor? httpContextAccessor { get; set; }
protected override void OnInitialized ()
{
ipAddress = httpContextAccessor?.HttpContext?.Connection?.RemoteIpAddress?.ToString();
}
}
To load a dialog on demand in Blazor, we can create a modal dialog with a conditional attribute (@if). We can load the dialog in the HTML page by using the conditional attribute, which will render based on the Boolean property. In the following code, we render the dialog on a button-click event in which the ShowPopup property will be set as true and the dialog will be shown on the page. We can remove the dialog by setting the ShowPopup property as false.
[index.razor]
@page "/"
@using BlazorApp.Data@inject WeatherForecastService ForecastService<h3>Dialog</h3><buttonclass="btn btn-primary"
@onclick="OpenDialog">
Open Dialog
</button>@if (ShowPopup)
{<!-- This is the popup to create or edit a forecast --><divclass="modal"tabindex="-1"style="display:block"role="dialog"><divclass="modal-dialog"><divclass="modal-content"><divclass="modal-header"><h3class="modal-title">Modal Dialog</h3><!-- Button to close the popup --><buttontype="button"class="close"
@onclick="ClosePopup"><spanaria-hidden="true">X</span></button></div><!-- Edit form for the current forecast --><divclass="modal-body"><inputclass="form-control"type="text"placeholder="Celsius forecast"
@bind="forecasts[0].TemperatureC" /><inputclass="form-control"type="text"placeholder="Summary"
@bind="forecasts[0].Summary" /><br /><!-- Button to save the forecast --><buttonclass="btn btn-primary"
@onclick="Save">
Save
</button></div></div></div></div>}@code {
private WeatherForecast[] forecasts;
protected override async Task OnInitializedAsync()
{
forecasts = await ForecastService.GetForecastAsync(DateTime.Now);
}
bool ShowPopup = false;
void OpenDialog()
{
// Open the Popup
ShowPopup = true;
}
void ClosePopup()
{
// closes the Popup
ShowPopup = false;
}
void Save()
{
//closes dialog after the save execution
ShowPopup = false;
}
}
We can focus an InputText Blazor element not directly but by using JavaScript in Blazor. We can set an ID for the InputText and then pass it to JavaScript using interop by method InvokeVoidAsync. In the JavaScript function, use the focus DOM input method for focusing the input element with the received ID from Blazor.
We can change a C# property’s value in Blazor from JavaScript by invoking the method DotNet.invokeMethodAsync in the script file (.js file). It takes the parameters Assembly name (Application name), the method name (public static method), and method parameter where we can change the C# static parameter.
Refer to
the following code snippet for more details.
[script.js]
functionChangeContentJS() {
DotNet.invokeMethodAsync('InvokeFromJsApp', "ChangeParaContentValue", "New Content");
}
In the previous
example, we have changed the ParaContent C# field value from the JavaScript by
calling the static method ChangeParaContentValue from JavaScript, along
with the new value as one of parameters in invokeMethodAsync.
The C# method should be defined as static and it should have a JSInvokable attribute.
The arguments in the JavaScript method Dotnet.invokeMethodAsync should be
Blazor does not have support to manipulate DOM elements directly, but we can still achieve it by using JavaScript interop. By creating a reference to an element, we can send it as a parameter to the JavaScript method via interop. In that JavaScript method, we can manipulate the DOM elements.
You can perform routing without changing the URL with the help of NavigationManager. You need to inject NavigationManager to use this service. You can use this service to perform routing programmatically.
Blazor automatically refreshes the component for event updates and UI updates. However, there are some cases where we need to re-render a component while updating asynchronously. In that case, we need to call the StateHasChanged() method to re-render the component
We can handle the 404 error for query string parameters by checking whether the query is available in the parameter. If the parameter is not found, we can handle the error. We can also log an exception in Visual Studio by using the service ILogger in the application.
[Product.razor]
@page "/product-details/{ProductId:int}"
@using Microsoft.Extensions.Logging
@inject ILogger<ProductDetails> Logger
@if (details != null)
{
<h1>@details.ProductId</h1>
<p>@details.Products</p>
}
elseif (loadFailed)
{
<h1>Product ID:@ProductId not found. Sorry, we could not load this product due to an error. Click <a href="/product-details/1001">here</a> to go back to first product page</h1>
}
else
{
<h1>Loading...</h1>
}
@code {
[Parameter] publicint ProductId { get; set; }
ProductDetails details;
bool loadFailed;
public List<ProductDetails> Data { get; set; }
static ProductDetails Product_Details = new ProductDetails();
protectedoverrideasync Task OnParametersSetAsync()
{
try
{
loadFailed = false;
details = await Product_Details.GetProductId(ProductId);
}
catch (Exception ex)
{
loadFailed = true;
Logger.LogWarning(ex, "Failed to load product {ProductId}", ProductId);
}
}
publicclassProductDetails
{
publicint ProductId { get; set; }
publicint In_Stock { get; set; }
publicint Sold { get; set; }
publicdouble Amount { get; set; }
publicstring Country { get; set; }
publicstring Product_Categories { get; set; }
publicstring Products { get; set; }
publicstring Order_Source { get; set; }
publicstring Year { get; set; }
publicstring Quarter { get; set; }
publicasync Task<ProductDetails> GetProductId(int id)
{
List<ProductDetails> Product_Data = new List<ProductDetails>();
Product_Data.Add(new ProductDetails { ProductId = 1001, In_Stock = 34, Sold = 51, Amount = 383, Country = "France", Product_Categories = "Accessories", Products = "Bottles and Cages", Order_Source = "Retail Outlets", Year = "FY 2015", Quarter = "Q1" });
Product_Data.Add(new ProductDetails { ProductId = 1002, In_Stock = 4, Sold = 423, Amount = 3595.5, Country = "France", Product_Categories = "Accessories", Products = "Bottles and Cages", Order_Source = "Sales Person", Year = "FY 2015", Quarter = "Q1" });
Product_Data.Add(new ProductDetails { ProductId = 1004, In_Stock = 38, Sold = 234, Amount = 1813.5, Country = "France", Product_Categories = "Accessories", Products = "Bottles and Cages", Order_Source = "Teleshopping", Year = "FY 2015", Quarter = "Q1" });
Product_Data.Add(new ProductDetails { ProductId = 1005, In_Stock = 42, Sold = 127, Amount = 952.5, Country = "France", Product_Categories = "Accessories", Products = "Bottles and Cages", Order_Source = "App Store", Year = "FY 2015", Quarter = "Q1" });
Product_Data.Add(new ProductDetails { ProductId = 1005, In_Stock = 36, Sold = 89, Amount = 668, Country = "France", Product_Categories = "Accessories", Products = "Bottles and Cages", Order_Source = "Retail Outlets", Year = "FY 2015", Quarter = "Q2" });
if (id == Product_Data[0].ProductId)
{
return Product_Data[0];
}
elseif (id == Product_Data[1].ProductId)
{
return Product_Data[1];
}
elseif (id == Product_Data[2].ProductId)
{
return Product_Data[2];
}
elseif (id == Product_Data[3].ProductId)
{
return Product_Data[3];
}
elseif (id == Product_Data[4].ProductId)
{
return Product_Data[4];
}
elseif(id == Product_Data[5].ProductId)
{
return Product_Data[5];
}
returnnull;
}
}
}
Blazor will
check for an HTML ID on initializing the HTML element. If such an ID does not
exist on the page, then it will use the default handler to display messages. To
display custom messages on connection
loss, we can define a div element
with the ID components-reconnect-modal in the body of _Host.cshtml to
manipulate the overlay that shows up in the case of a connection loss. If this
element exists, this element’s class will be :
components-reconnect-show: A lost connection. The client is attempting
to reconnect. Show the modal. Then, you can apply your custom styling to the
screen overlay with CSS. If you want to remove them all, you can just choose not
to display them at all.
components-reconnect-hide: An active connection is re-established to the server. Hide the
modal.
components-reconnect-failed: Reconnection failed, probably due to a network failure. To attempt
reconnection, call window.Blazor.reconnect().
components-reconnect-rejected: Reconnection rejected. The server was reached but refused the
connection, and the user’s state on the server is lost. To reload the app, call
location.reload().
[_Host.cshmtl]
<body>
……
<divid="components-reconnect-modal"class="my-reconnect-modal components-reconnect-hide"><divclass="show"><p>
// Message when attempting to connect to server
</p></div><divclass="failed"><p>
// Message when failing to connect
</p></div><divclass="rejected"><p>
// Message when refused
</p></div></div>
……
<app>@(await Html.RenderComponentAsync<App>(RenderMode.ServerPrerendered))</app></body>
You can capture input keyboard events by attaching the event handler to the keyboard events such as Keydown, Keypress, or Keyup with the input control. In the following example, the keyboard event handler is attached to all these three events. If you want to identify which keyboard event is captured, you can get the type using the KeyboardEventArg.Type property.
After the database is updated, StateHasChanged method can be called to refresh the page/UI. When called, this will rerender the component or the page based on the new changes from the database.
The lifecycle methods OnAfterRenderAsync and OnAfterRender are called only when a component has finished rendering. The element and component references are populated at this point. By using these methods, the user can activate third-party JavaScript libraries that operate based on the DOM elements.
Razor file
@page "/"
<input type="text" @bind="@message" />
@code{
privatestring? message { get; set; }
protectedoverrideasync Task OnAfterRenderAsync (bool firstRender )
{
// Perform any asynchronous operations after the component has been rendered if (firstRender)
{
message = "Component rendering finished";
await Task.Yield(); // Ensure the UI rendering is complete
StateHasChanged(); // Trigger UI update
}
}
protectedoverridevoidOnAfterRender (bool firstRender )
{
// Perform any synchronous operations after the component has been rendered
Console.WriteLine("Component rendering completed");
base.OnAfterRender(firstRender);
}
}
Blazor provides support for suppressing
events of the HTML DOM element in two ways
Suppressing default event
Suppressing event propagation
Suppressing
default event:
The default events
of the HTML DOM element can be suppressed by using the @on{Event}:preventDefault directive attribute provided in Blazor.
This is useful in scenarios like suppressing the on key press event of an input
text box.
<inputtype="text" @onkeypress:preventDefault />
You can also add your own event listener as done for event handling.
HTML DOM element’s
events tend to propagate some events to their parent element and then its
parent element, and so on. Blazor provides support to supress the event
propagation using the @on{EVENT}:stopPropagation directive attribute. This takes a Boolean
variable as the input. This is visualized as follows.
As the stopPropagation attribute which takes the value of a Boolean variable can be bound to a property, the propagation can be stopped based on the user requirement.
You can call the preventDefault action in onclick event of an anchor tag. Refer to the following code sample to prevent opening a link when the link is clicked.
Here we are defining a JavaScript function “CSMethod”. This function will have a callback to our .NET function “CSCallBackMethod” which is defined in index.razor.
To invoke C# method from JavaScript,
The method must be decorated with “JSInvokable” attribute.
The method must be public.
The method may either be static or instance-level (this is only supported by Blazor 0.5.0 and above).
Currently, Blazor doesn’t provide any direct way to access the browser’s DOM or APIs. But there is an option to invoke/call JavaScript functions via JS Interop, thereby letting Blazor access the DOM and its APIs. In the below example we have accessed the button’s DOM element in the script by using javascript interop.
[_Host.cshtml/index.html]
<script>functionaccessDOMElement() {
var btn;
// access DOM here
btn = document.getElementById('btn');
btn.innerText = "Button Textchanged";
}
</script>
You have to define and bind the EditContext with EditForm and then call the method editContext.Validate() on button click to manually trigger the validation.
DOM attributes are rendered based on .NET parameters. If the parameter value is true, the attribute is rendered minimized, otherwise it’s not. Refer to the code example to render the checked attribute conditionally.
To check if a browser supports WebAssembly, you can use the following code snippet in JavaScript:
<script>if (typeof WebAssembly !== 'undefined') {
// WebAssembly is supported console.log(' WebAssembly is supported')
} else {
// WebAssembly is not supported console.log('WebAssembly is not supported')
}
</script>