TL;DR: Let’s build an AI-powered chat app using Syncfusion WinUI AI AssistView control and OpenAI GPT. This blog guides you through setting up a WinUI project, integrating the OpenAI API to generate responses, and customizing the AI AssistView for an optimized user experience. By leveraging OpenAI GPT, the app delivers human-like conversational interactions, ideal for AI-driven chat solutions across various apps.
Conversational AI is transforming user experiences across industries. This blog explores building an AI chat experience using Syncfusion WinUI AI AssistView control and OpenAI’s GPT model.
The WinUI AI AssistView control simplifies developing AI-driven chat interfaces, handling user input, and switching templates efficiently. Integrating OpenAI’s GPT enhances these interfaces by generating human-like responses, creating a dynamic conversational AI.
Key features of the WinUI AI AssistView control
The key features of the WinUI AI AssistView control are as follows:
- Suggestions: Offers selectable response suggestions to expedite the conversation flow.
- Typing indicator: Displays a loading indicator representing asynchronous communication with AI services.
- Formatted responses: Visualizes responses using customizable templates.
- Styling: Allows customization of the appearance of both request and response items.
- UI virtualization: Optimizes performance for handling large conversations.
Integrating OpenAI GPT for AI-powered chat experience
OpenAI’s GPT models are known for their ability to generate human-like text and engage users in meaningful conversations. By integrating GPT with the WinUI AI AssistView control, you can create a conversational AI that mimics real-world chat apps, enhancing the functionality and user experience.
Building an AI chat app with WinUI AI AssistView
Let’s walk through the process of building an AI-powered chat app using the WinUI AI AssistView and OpenAI GPT.
Step 1: Set up the project
To begin, create a new WinUI project. Install the necessary packages for OpenAI API integration and include the AI AssistView control in your project.
Step 2: Import the necessary dependencies
Import the following dependencies at the beginning.
using Microsoft.SemanticKernel.ChatCompletion;
using Microsoft.SemanticKernel;
using Syncfusion.UI.Xaml.Chat;
Step 3: Configure the OpenAI API
We need an API key from OpenAI to interact with its GPT model. Configure your app to make API requests and handle responses from OpenAI. Here’s an example of how to set it up. Create:
- OPENAI_KEY: A string variable where we should add our valid OpenAI API key.
- OPENAI_MODEL: A string variable representing the OpenAI language model we want to use.
- API_ENDPOINT: A string variable representing the URL endpoint of the OpenAI API.
public class AIAssistChatService
{
    private string OPENAI_KEY = ""; // Add a valid OpenAI key here.
    private string OPENAI_MODEL = "gpt-4o-mini";
    private string API_ENDPOINT = "https://openai.azure.com";
}
Step 4: Define the AIAssistChatService class and configure the OpenAI API
The following is the code example for the AIAssistChatService class and an explanation of each part.
We declare a private field gpt of type ChatClient, which will store the instance of the chat client once it is initialized. The ChatClient interacts with the GPT model to send messages and receive responses.
The ResponseChat method handles sending a message to the GPT model and receiving its response.
- It takes a string line (the user’s input) as a parameter.
- The Response property is initially set to an empty string.
- The ResponseChat method then calls gpt.CompleteChatAsync(line) to send the input message to the GPT model and waits for the completion response.
- Finally, the response is converted to a string and assigned to the Response property.
public class AIAssistChatService
{
    IChatCompletionService gpt;
    Kernel kernel;

    public string Response { get; set; }

    public async Task Initialize()
    {
        var builder = Kernel.CreateBuilder().AddAzureOpenAIChatCompletion(OPENAI_MODEL, API_ENDPOINT, OPENAI_KEY);

        kernel = builder.Build();
        gpt = kernel.GetRequiredService<IChatCompletionService>();
    }

    public async Task ResponseChat(string line)
    {
        Response = string.Empty;
        var response = await gpt.GetChatMessageContentAsync(line);
        Response = response.ToString();
    }
}
Step 5: Create a ViewModel class
Now, create a ViewModel class with the necessary properties.
internal class AssistViewModel : INotifyPropertyChanged
{
AIAssistChatService service;
private Author currentUser;
private ObservableCollection<object> chats;
private bool showTypingIndicator;
public Author CurrentUser { get ; set ; }
public bool ShowTypingIndicator {get ; set ; }
public ObservableCollection<string> Suggestion {get ; set ; }
public ObservableCollection<object> Chats {get ; set ; }
public event PropertyChangedEventHandler PropertyChanged;
public void RaisePropertyChanged(string propName)
{
if (PropertyChanged != null)
{
PropertyChanged(this, new PropertyChangedEventArgs(propName));
}
}
public AssistViewModel ()
{
this.Chats = new ObservableCollection<object>();
this.CurrentUser = new Author() { Name = "User" };
service = new AIAssistChatService();
service.Initialize();
Chats.Add(new TextMessage
{
Author = new Author { Name = "Bot"},
DateTime = DateTime.Now,
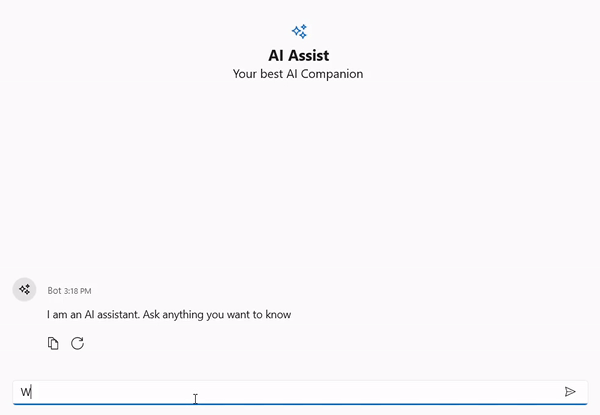
Text = "I am an AI assistant.\n" +
"Ask anything you want to know",
});
}Step 6: Hook the chat collection change event
Hook the chat collection change event in the ViewModel constructor and update the response AI message in the AI AssistView control.
public AssistViewModel()
{
    this.Chats.CollectionChanged += Chats_CollectionChanged;
}

private async void Chats_CollectionChanged(object sender, System.Collections.Specialized.NotifyCollectionChangedEventArgs e)
{
    var item = e.NewItems?[0] as ITextMessage;
    if (item != null)
    {
        if (item.Author.Name == currentUser.Name)
        {
            ShowTypingIndicator = true;
            await service.ResponseChat(item.Text);
            Chats.Add(new TextMessage
            {
                Author = new Author { Name = "Bot", ContentTemplate = AIIcon },
                DateTime = DateTime.Now,
                Text = service.Response
            });
            ShowTypingIndicator = false;
        }
    }
}
Step 7: Creating the WinUI AI AssistView UI
Let’s define the necessary XML namespaces and initialize the Syncfusion WinUI AI AssistView control.
<syncfusion:SfAIAssistView
     x:Name="chat"
     CurrentUser="{Binding CurrentUser}"
     Messages="{Binding Chats}"
     ShowTypingIndicator="{Binding ShowTypingIndicator}">
Finally, define a banner template as shown in the following code example.
<syncfusion:SfAIAssistView
     x:Name="chat"
     CurrentUser="{Binding CurrentUser}"
     Messages="{Binding Chats}"
     ShowTypingIndicator="{Binding ShowTypingIndicator}">
  <syncfusion:SfAIAssistView.BannerTemplate>
    <DataTemplate>
      <StackPanel
         Orientation="Vertical"
         VerticalAlignment="Bottom"
         Margin="0,10,0,0">
                       <TextBlock Text="AI Assist" FontSize="20" HorizontalAlignment="Center" FontWeight="Bold"/>
         <TextBlock Text="Your best AI Companion" HorizontalAlignment="Center" FontSize="16"/>
     </StackPanel>
   </DataTemplate>
</syncfusion:SfAIAssistView.BannerTemplate>
Refer to the following output image.
GitHub reference
For more details, refer to the WinUI AI AssistView GitHub demo.
Conclusion
Thanks for reading! In this blog, we’ve explored how combining OpenAI’s GPT models with the Syncfusion WinUI AI AssistView control allows you to create a sophisticated AI chat interface that provides a natural and intuitive user experience. The AI AssistView control simplifies key tasks such as message handling, template switching, and input management, making it an excellent choice for building conversational apps. Whether you’re developing customer support bots, personal assistants, or interactive learning tools, this setup provides a solid foundation for creating advanced AI chat systems.
The WinUI AI AssistView control is available in our Essential Studio® 2024 Volume 3 release. You can also check out all the other new features in our Release Notes and What’s New pages.
Additionally, we highly recommend exploring Syncfusion’s extensive collection of WinUI controls. These tools provide developers with a wide range of customization options and intuitive APIs, seamlessly integrating into the WinUI framework. By utilizing Syncfusion controls, you can create visually stunning, cross-platform apps with enhanced functionality.
Our customers can access the latest version of Essential Studio® for WinUI from the License and Downloads page. If you are not a Syncfusion customer, you can download our free evaluation to explore all our controls.
For questions, you can contact us through our support forum, support portal, or feedback portal. We are always happy to assist you!