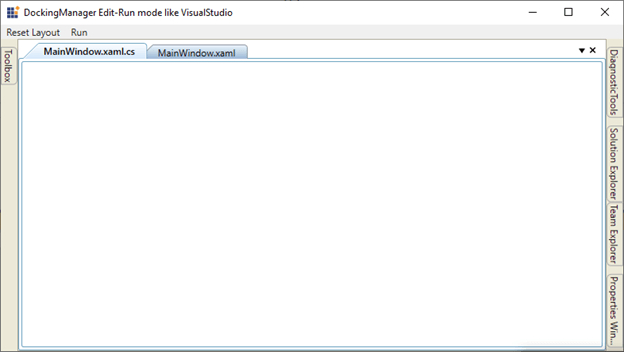
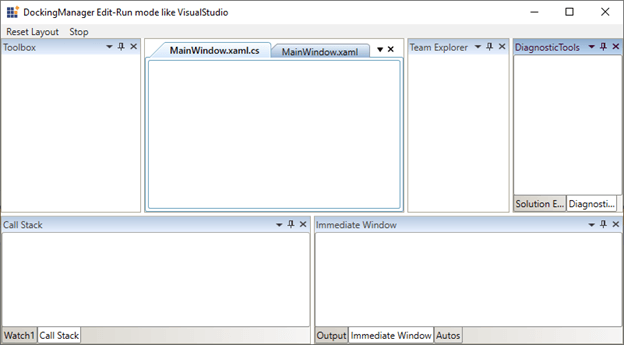
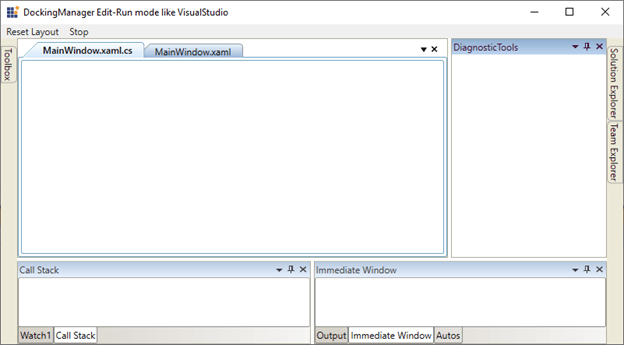
Visual Studio supports a sophisticated layout system which is used to organize multiple windows interactively. In this blog, we’ll see how to achieve this Visual Studio like layout state persistence using the Syncfusion WPF Docking control. Before starting with it, let’s explore Visual Studio’s layout and its state persistence.
Visual Studio also has multiple layouts that dynamically change based on programming, compiling, and debugging modes. Any changes in the layout will be saved so that the layout is intact when Visual Studio is closed and reopened.
Visual Studio’s layout based on project state
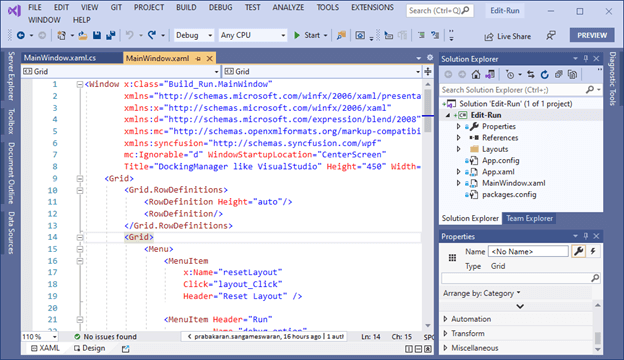
The following image illustrates Visual Studio in the programming state. We can call this state the edit mode. Here, the region for typing code is given the maximum amount of space so that users can focus on coding.
The following image shows Visual Studio in the debugging state. We can call this state the run mode. When a project is executed, you can see that the layout changes to make it suitable for a debugging environment. Note the following changes:
- Added additional windows like Auto, Locals, Watch, Diagnostic Tools, etc.
- Solution Explorer goes to an autohidden state.
- Toolbox and Properties panels are removed.
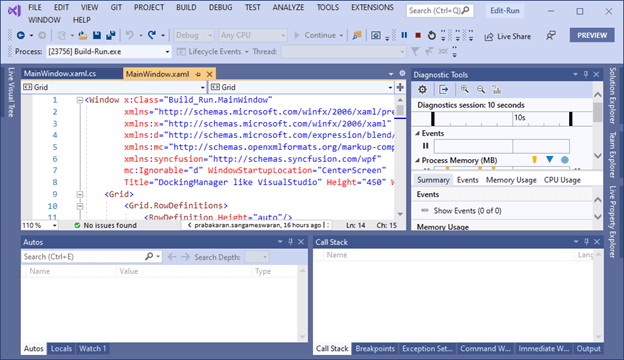
When you stop debugging, Visual Studio goes back to its original state, the edit mode, so that you can continue editing your project.
Save changes in layout
Supplementing the multiple layouts in Visual Studio is the fact that Visual Studio automatically saves your changes in the layout. For instance, if you auto-hide the Properties window in edit mode, the layout is saved. Switching to run mode and then coming back to edit mode, or even after closing and opening the application, the layout will be retained.
Reset layout back to Visual Studio’s default setting.
Because Visual Studio saves any layout changes that you do, there might be a situation where you have totally messed it up, or you may want to switch back to the default setting. You can easily restore the original layout by choosing Window > Reset Window Layout in the toolbar.
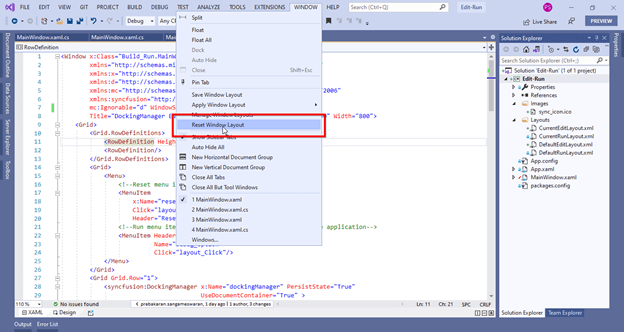
Change Docking control layout based on a project’s state like Visual Studio
In the previous section, we saw how Visual Studio performs layout switching based on the project’s state. Now, we’re going to see how this functionality can be achieved using the Syncfusion Docking control.
By default, the Docking control does not contain any saved layouts that are similar to Visual Studio, but you can make some at the application level. You can also save layout changes and reload them on reopening the application. In the upcoming sections, we will see this in depth.
Configuring Docking control in a WPF application
Configure the WPF application for the Docking control by following these steps:
- Install the Syncfusion.Tools.WPF NuGet package in your WPF project.
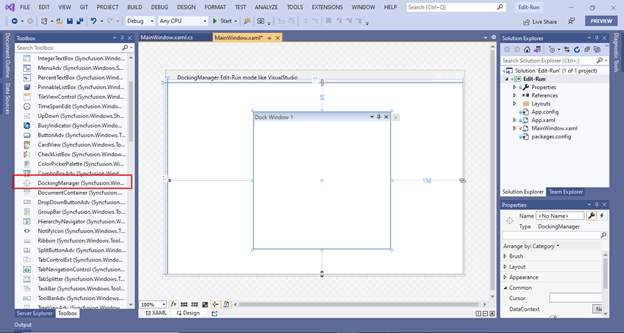
- After installing the NuGet package, drag and drop the DockingManager from the Toolbox into the MainWindow.

Adding DockingManager into the MainWindow Add child windows to the DockingManager. Refer to the Adding control manually in C# documentation for more information on how to do this.
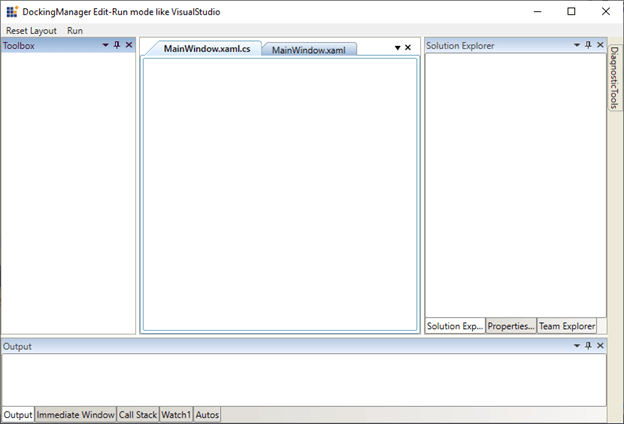
- Arrange the child window states like in Visual Studio. Refer to the Getting Started documentation on creating and arranging child windows in the Docking control. Also refer to the Create Visual Studio-like Docking Layout in WPF blog post for a step-by-step procedure on arranging child windows in the Docking control like in Visual Studio.
<Window x:Class="Edit_Run.MainWindow"
        xmlns="http://schemas.microsoft.com/winfx/2006/xaml/presentation"
        xmlns:x="http://schemas.microsoft.com/winfx/2006/xaml"
        xmlns:d="http://schemas.microsoft.com/expression/blend/2008"
        xmlns:mc="http://schemas.openxmlformats.org/markup-compatibility/2006"
        xmlns:syncfusion="http://schemas.syncfusion.com/wpf"
        mc:Ignorable="d" WindowStartupLocation="CenterScreen"
        Title="DockingManager Edit-Run mode like VisualStudio" Height="450" Width="800">
    <Grid>
        <Grid.RowDefinitions>
            <RowDefinition Height="auto"/>
            <RowDefinition/>
        </Grid.RowDefinitions>
        <Grid>
            <Menu>
                <!--Reset menu item to reset the layout-->
                <MenuItem
                    x:Name="resetLayout"
                    Header="Reset Layout" />
                <!--Run menu item to load the run or stop layouts for the application-->
                <MenuItem Header="Run"
                          Name=" runButton"/>
            </Menu>
        </Grid>
        <Grid Grid.Row="1">
            <syncfusion:DockingManager x:Name="dockingManager"
                                       UseDocumentContainer="True" >
                 <!--Output docking window-->
                <ContentControl x:Name="Output"
                            syncfusion:DockingManager.Header="Output"
                            syncfusion:DockingManager.SideInDockedMode="Bottom"
                            syncfusion:DockingManager.DesiredWidthInDockedMode="150" />

                <!--Autos docking window-->
                <ContentControl x:Name="Autos"
                            syncfusion:DockingManager.Header="Autos"
                            syncfusion:DockingManager.SideInDockedMode="Tabbed"
                            syncfusion:DockingManager.TargetNameInDockedMode="Output" />

                <!--Watch1 docking window-->
                <ContentControl x:Name="Watch1"
                            syncfusion:DockingManager.Header="Watch1"
                            syncfusion:DockingManager.SideInDockedMode="Tabbed"
                            syncfusion:DockingManager.TargetNameInDockedMode="Output" />

                <!--CallStack docking window-->
                <ContentControl x:Name="CallStack"
                            syncfusion:DockingManager.Header="Call Stack"
                            syncfusion:DockingManager.SideInDockedMode="Tabbed"
                            syncfusion:DockingManager.TargetNameInDockedMode="Output" />

                <!--Immediate docking window-->
                <ContentControl x:Name="ImmediateWindow"
                            syncfusion:DockingManager.Header="Immediate Window"
                            syncfusion:DockingManager.SideInDockedMode="Tabbed"
                            syncfusion:DockingManager.TargetNameInDockedMode="Output" />

                <!-- Toolbox docking window -->
                <ContentControl x:Name="Toolbox"
                            syncfusion:DockingManager.Header="Toolbox"
                            syncfusion:DockingManager.State="Dock"
                            syncfusion:DockingManager.DesiredWidthInDockedMode="180" />

                <!-- SolutionExplorer docking window -->
                <ContentControl x:Name="SolutionExplorer"
                            syncfusion:DockingManager.Header="Solution Explorer"
                            syncfusion:DockingManager.SideInDockedMode="Right"
                            syncfusion:DockingManager.DesiredWidthInDockedMode="200" />

                <!-- DiagnosticTools docking window -->
                <ContentControl x:Name="DiagnosticTools"
                            syncfusion:DockingManager.Header="DiagnosticTools"
                            syncfusion:DockingManager.State="AutoHidden"
                            syncfusion:DockingManager.SideInDockedMode="Tabbed"
                            syncfusion:DockingManager.TargetNameInDockedMode="SolutionExplorer" />

                <!-- TeamExplorer docking window -->
                <ContentControl x:Name="TeamExplorer"
                            syncfusion:DockingManager.Header="Team Explorer"
                            syncfusion:DockingManager.SideInDockedMode="Tabbed"
                            syncfusion:DockingManager.TargetNameInDockedMode="SolutionExplorer" />

                <!-- Properties docking window -->
                <ContentControl x:Name="Properties"
                            syncfusion:DockingManager.Header="Properties Window"
                            syncfusion:DockingManager.SideInDockedMode="Tabbed"
                            syncfusion:DockingManager.TargetNameInDockedMode="SolutionExplorer" />

                <!-- Tabbed document window -->
                <ContentControl x:Name="MainWindowXAMLView"
                            syncfusion:DockingManager.Header="MainWindow.xaml"
                            syncfusion:DockingManager.State="Document" />

                <!-- Tabbed document window -->
                <ContentControl x:Name="MainWindowCSView"
                            syncfusion:DockingManager.Header="MainWindow.xaml.cs"
                            syncfusion:DockingManager.State="Document" />
            </syncfusion:DockingManager>
        </Grid>
    </Grid>
</Window>
Docking Child Windows Arranged like in Visual Studio
Save the layout in an XML file
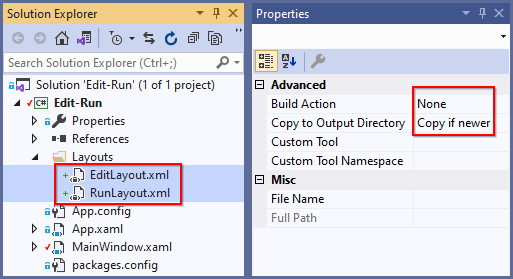
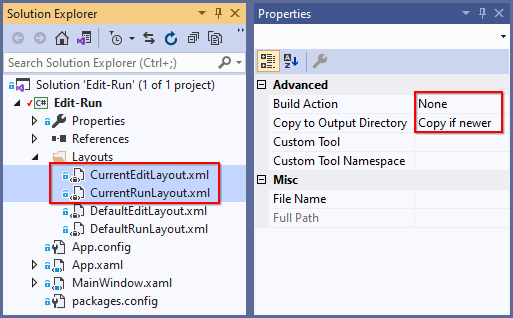
Step 1: Create an XML file, set its build action as None, and set Copy to Output Directory to Copy if newer in the Properties.
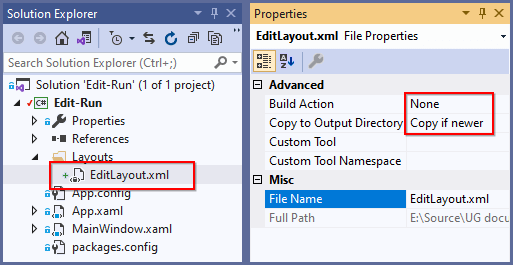 Step 2: To save the layout into the created XML file, pass the formatter, storage format, and file path as parameters to the SaveDockState method.
//Saving the current docking states by using XML file.
BinaryFormatter formatter = new BinaryFormatter();
dockingManager.SaveDockState (formatter, StorageFormat.Xml, @"Layouts/EditLayout.xml");
Load the saved layout from the XML file
You can load the saved layout at any time by passing the formatter, storage format, and the XML file’s path as parameters to the LoadDockState method.
//Loading the saved docking states from XML file.
BinaryFormatter formatter = new BinaryFormatter();
dockingManager.LoadDockState (formatter, StorageFormat.Xml, @"Layouts/EditLayout.xml");
You can save and load the docking states in various formats, as explained in this documentation.
Default layout in Docking control
If you want to set a default layout for your application, change the layout as needed and save it into the XML file. Then, load that layout using the DockingManager.Loaded event wherever you need.
With the Docking control, you can create and save your own layouts for edit and run modes like in Visual Studio. If your application does not contain any built-in layouts, or you need to change the existing layout, you can easily apply your own layouts with the Docking control by following these steps:
- Create two temporary XML files named EditLayout.XML and RunLayout.XML that will be used to store the default layouts for edit mode and run mode separately. Build Action should be set to None and Copy to Output Directory should be set to Copy if newer for both files.

- Align the window states how you want for your application’s edit mode, and then save that layout in the EditLayout.XML file by using the SaveDockState method. Similarly, rearrange the window states for the run mode and save the layout in the RunLayout.XML file.
- Rename the EditLayout.XML file as DefaultEditLayout.XML and rename RunLayout.XML to DefaultRunLayout.XML. Then, add those XML files into your application.
- To load the default edit layout when the application launches, load the DefaultEditLayout.XML file using the LoadDockState method in the DockingManager.Loaded event.
//Invoking the docking manager loaded event dockingManager.Loaded += OnLoading; //Load the default Edit mode layout private void OnLoading(object sender, RoutedEventArgs e) { BinaryFormatter formatter = new BinaryFormatter(); dockingManager.LoadDockState (formatter, StorageFormat.Xml, @"Layouts/DefaultEditLayout.xml"); } - When switching to run mode, load the DefaultRunLayout.XML file. When coming back to edit mode from run mode, load the DefaultEditLayout.XML file.
//Invoking the Stop and Run mode switch button click event
runButton.Click += OnRunButtonClicked;

private void OnRunButtonClicked(object sender, RoutedEventArgs e)
{
    string layout_Header = (sender as MenuItem).Header.ToString();

    //Loading the default run mode layout
    if (layout_Header == "Run")
    {
        (sender as MenuItem).Header = "Stop";
        BinaryFormatter formatter = new BinaryFormatter();
        dockingManager.LoadDockState (formatter, StorageFormat.Xml, @"Layouts/DefaultRunLayout.xml");
    }

    //Loading the default run mode layout
    else if (layout_Header == "Stop")
    {
        (sender as MenuItem).Header = "Run";
      BinaryFormatter formatter = new BinaryFormatter();
      dockingManager.LoadDockState (formatter, StorageFormat.Xml, @"Layouts/DefaultEditLayout.xml");
    }
}
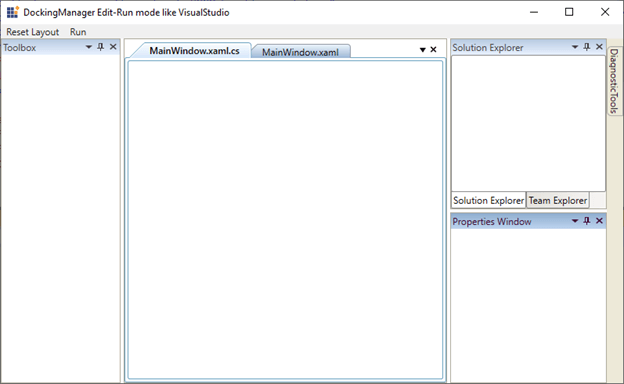
Default edit mode layout:

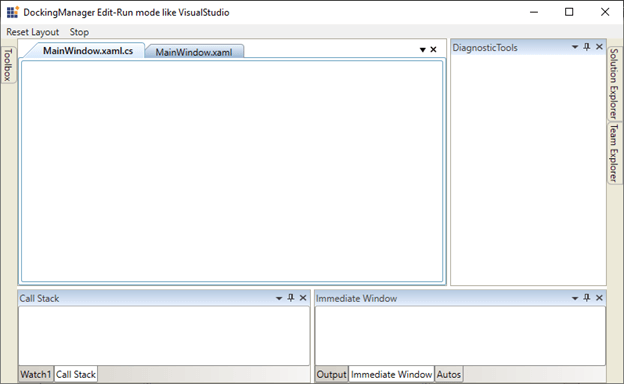
WPF Docking Control in Default Edit Mode Default run mode layout:

WPF Docking Control in Default Run Mode State
Separate layouts for edit and run modes in Docking control
If you want to retain your current layout changes when switching modes, you need to save the current mode’s layout separately so that you can load it later. That is, if you switch from edit mode to run mode, you must save the layout of edit mode and then load the saved layout of run mode, and vice versa when switching back.
Follow these steps to retain dynamic layout changes in your application:
- First, you need to create two XML files named CurrentEditLayout.XML and CurrentRunLayout.XML, that will be used to save and load the layout changes separately for edit mode and run mode.

- Create Save and Load methods that are used to save and load the layouts from their respective XML files.
/// <summary> /// To save the previous mode layout /// </summary> /// <param name="saveLayoutPath">Path of the saving layout file</param> private void Save(string saveLayoutPath) { BinaryFormatter formatter = new BinaryFormatter(); this.dockingManager.SaveDockState(formatter, StorageFormat.Xml, saveLayoutPath); } /// <summary> /// Load the current mode layout /// </summary> /// <param name="loadLayoutPath">Path of the loading layout path</param> private void Load(string loadLayoutPath) { BinaryFormatter formatter = new BinaryFormatter(); this.dockingManager.LoadDockState(formatter, StorageFormat.Xml, loadLayoutPath); } - Create string variables to store the file paths for the default and current run and edit mode layout XML files and create a VisualStudioMode enum with EditMode and RunMode values. Create the CurrentMode property as the type of VisualStudioMode enum that is used to update and track the current active mode of the Docking control.
public partial class MainWindow : Window { // String variables that store the default and current run and edit mode layout XML file paths string defaultEditLayout = @"Layouts/DefaultEditLayout.xml"; string defaultRunLayout = @"Layouts/DefaultRunLayout.xml"; string currentEditLayout = @"Layouts/CurrentEditLayout.xml"; string currentRunLayout = @"Layouts/CurrentRunLayout.xml"; /// <summary> /// Enum for active mode /// </summary> public enum VisualStudioMode { EditMode, RunMode } /// <summary> /// Gets or sets the current active mode /// </summary> public VisualStudioMode CurrentMode { get; set; } //Gets or sets bool value to load the default layout // public bool IsEnableResetLayout { get; set; } public MainWindow() { InitializeComponent(); } } - Create a Switch method to decide on the layout to be loaded into the application. When launching the application for the first time, the current edit and run mode layout XML files have no saved window states. So, we need to load the default edit mode and run mode layouts.On clicking the Run button, when switching from edit mode to run mode, save the current edit mode layout in the CurrentEditLayout.XML file and then call the Switch method to load the CurrentRunLayout.XML. When coming back to edit mode from run mode, save the current run mode layout in CurrentRunLayout.XML and then call the Switch method to load the CurrentEditLayout.XML file.
//Save the previous mode layout and load the current mode layout
private void Switch(VisualStudioMode mode)
{
    string currentLayoutPath;
    string defaultLayoutPath;
    if(mode == VisualStudioMode.EditMode)
    {
        currentLayoutPath = currentEditLayout;
        defaultLayoutPath = defaultEditLayout;
    }
    else
    {
        currentLayoutPath = currentRunLayout;
        defaultLayoutPath = defaultRunLayout;
    }

    XmlDocument document = new XmlDocument();
    document.Load(currentLayoutPath);

    //Load the default layout and save the current layout or load the currently saved layout
    if (document.ChildNodes[1].ChildNodes.Count < 1)
    {
        Load(defaultLayoutPath);

        Save(currentLayoutPath);
    }
    else
    {
        Load(currentLayoutPath);
    }
}

//Invoking the stop and run mode switch button click event
runButton.Click += OnRunButtonClicked;

//Based on the mode, set the save and load current layout file path
private void OnRunButtonClicked(object sender, RoutedEventArgs e)
{
    string layout_Header = (sender as MenuItem).Header.ToString();

    //Saving the current edit mode layout and loading the run mode layout
    if (layout_Header == "Run")
    {
        (sender as MenuItem).Header = "Stop";
        CurrentMode = VisualStudioMode.RunMode;
        Save(currentEditLayout);
        Switch(CurrentMode);
    }

    //Saving the current run mode layout and loading the edit mode layout
    else if (layout_Header == "Stop")
    {
        (sender as MenuItem).Header = "Run";
        CurrentMode = VisualStudioMode.EditMode;
        Save(currentRunLayout);
        Switch(CurrentMode);
    }
}
Reopen application with layout you left before closing
If you want to retain the layout changes while reopening the application, follow these steps:
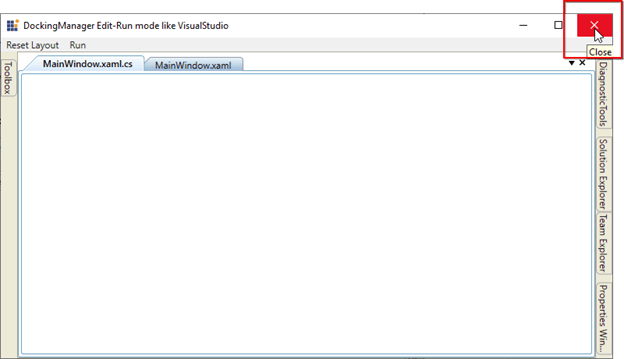
- First, you need to save the current layout when closing the application by invoking the Window.Closing event, which is done by calling the Save method and passing the current mode layout file path. That is, if you are closing the application in edit mode, you must save the current layout in the CurrentEditLayout.XML file.
//Invoking the window closing event this.Closing += OnClosing; //Saving the current mode layout private void OnClosing(object sender, System.ComponentModel.CancelEventArgs e) { string layoutPath; //Save the current active mode layout while closing the application if (CurrentMode == VisualStudioMode.EditMode) { layoutPath = currentEditLayout; } else { layoutPath = currentRunLayout; } Save(layoutPath); } - Then, load the CurrentEditMode.XML file during application launch by invoking the DockingManager.Loaded event and calling the Switch method to load the edit mode layout.
//Invoking the docking manager loaded event
dockingManager.Loaded += OnLoading;

//Load the currently saved edit mode layout
private void OnLoading(object sender, RoutedEventArgs e)
{
    Switch(CurrentMode);
}
The following images illustrates the retained changes in the Docking control when reopening the application.
Before closing the application in edit mode:

WPF Docking Control Saving the Layout while Closing the Application Reopening the application in edit mode:

WPF Docking Control Retains the Layout Changes while Reopening
Load removed windows in the Docking control
If you unexpectedly removed any window from the DockingManager.Children collection, this may result in an improper layout while reloading the saved layout. This is because the Load method will load the saved layout, and if a child window of the saved layout is not present in the DockingManager.Children collection, it will ignore that child window and load the layout without it. So, you need to find and add that child window manually into the DockingManager.Children collection and then load the layout. After that, the saved layout will deserialize properly. If DockingManager fails to load the saved layout properly, the LoadDockState method will return false.
For example, if you remove the Call Stack window from the DockingManager.Children collection after saving the run mode layout, it will skip the missing window and result in an improper layout when reloading the saved layout. So, the run mode layout will not be properly deserialized for upcoming uses.
Follow these steps to load the saved layout properly when a window has been removed:
- First, create a GetSavedWindowList method to get the list of windows available in the saved layout XML file.
/// <summary> /// Get the layout windows from the saved XML file. /// </summary> /// <param name="layoutPath">Path of the loading XML file</param> /// <returns></returns> private List<string> GetSavedWindowList(string layoutPath) { List<string> savedControlNameList = new List<string>(); XmlDocument xmlDoc = new XmlDocument(); xmlDoc.Load(layoutPath); XmlNodeList nodes = xmlDoc.DocumentElement.ChildNodes; foreach (XmlNode node in nodes) { if (node.HasChildNodes) { //Adding the windows name to the list savedControlNameList.Add(node.SelectSingleNode("Name").InnerText); } } return savedControlNameList; } - After getting the windows list from the saved XML file, compare this list with the DockingManager.Children collection and collect the missing windows into a missedChildrens list using the FindMissingChidren method.
/// <summary> /// Check and get the missing windows list /// </summary> /// <param name="contentControl">Instance of DockingManager</param> /// <param name="savedControlList">List of windows name from saved layouts</param> private List<string> FindMissingChidren(DockingManager contentControl, List<string> savedControlList) { var missedChildrens = new List<string>(); if (contentControl != null && savedControlList != null) { foreach (string savedChild in savedControlList) { foreach (FrameworkElement element in contentControl.Children) { if (element.Name == savedChild) { break; } } missedChildrens.Add(savedChild); } } return missedChildrens; } - Add the missing windows into the DockingManager.Children collection using the AddMissedChildrensIntoDockingManager method.
/// <summary> /// Adding the missing windows that are not available in DockingManager /// </summary> /// <param name="missedChildrens">Contains the missing children window list.</param> private void AddMissedChildrensIntoDockingManager(List<string> missedChildrens) { if (missedChildrens.Count > 0) { foreach (string children in missedChildrens) { ContentControl dummyChild = new ContentControl(); dummyChild.Name = children; dockingManager.Children.Add(dummyChild); } } } - In the Load method, check and add the missing elements into the DockingManager.Children collection and then load the layout. It will automatically deserialize the saved layout properly.
/// <summary>
/// Load the current mode layout
/// </summary>
/// <param name="loadLayoutPath">Path of the loading layout path</param>
private void Load(string loadLayoutPath)
{
    BinaryFormatter formatter = new BinaryFormatter();

    //Check and load the missing windows from saved layout
    if (!dockingManager.LoadDockState(loadLayoutPath))
    {
        var savedWindows = GetSavedWindowList(loadLayoutPath);
        var missingChildren = FindMissingChidren(dockingManager, savedWindows);
        AddMissedChildrensIntoDockingManager(missingChildren);
    }
    this.dockingManager.LoadDockState(formatter, StorageFormat.Xml, loadLayoutPath);
}
Reset layout back to Docking control’s default setting
Since the Docking control saves any layout changes you make, there may be a situation where you really mess up the layout, and you may want to switch back to the control’s default setting. You can easily do this by creating a Reset Layout menu item.
Follow these steps to implement a reset layout option:
- First, you need to resave both the edit and run modes’ current layout XML files with default layout elements. So, create a ResetToDefaultLayout method to resave the current layout XML file with default layouts.
/// <summary> /// Replace the default layout with current layout when "Reset Layout" menu item is clicked. /// </summary> /// <param name="currentLayoutPath">The current active mode layout path.</param> /// <param name="defaultLayoutPath">The default layout path of the active mode.</param> public void ResetToDefaultLayout(string currentLayoutPath, string defaultLayoutPath) { XmlDocument document = new XmlDocument(); document.Load(defaultLayoutPath); //Save the default layout into Current mode layout file document.Save(currentLayoutPath); } - Invoke the ResetLayout menu item Click event and call the ResetToDefaultLayout It will reset both the edit and run modes’ current layouts with the default layouts.
//Invoking the reset layout button click event
resetLayout.Click += OnResetLayoutClicked;

//Reset the current layout to default layout
private void OnResetLayoutClicked(object sender, RoutedEventArgs e)
{
    string currentLayout;

    //Resetting the current edit layout with default edit layout
    ResetToDefaultLayout(currentEditLayout, defaultEditLayout);

    //Resetting the current run layout with default run layout
    ResetToDefaultLayout(currentRunLayout, defaultRunLayout);

    if (CurrentMode == VisualStudioMode.RunMode)
    {
        currentLayout = currentRunLayout;
    }
    else
    {
        currentLayout = currentEditLayout;
    }

    Load(currentLayout);
}
Before resetting to default run mode layout:

WPF Docking Control with Current Layout Changes After resetting to default run mode layout:

WPF Docking Control Reset to Default Layout
Resources
For more information, refer to Visual Studio Like Advanced Layout State Persistence in WPF demo.
Conclusion
I hope you now have a clear idea about how to implement Visual Studio like layout to save and load the docking states of windows in the WPF Docking control. With this feature, you can dynamically change the layouts for different modes, like the edit and run modes available in Visual Studio. Try it out and leave your feedback in the comments below.
For existing customers, the latest version is available for download from the License and Downloads page. If you are not yet a Syncfusion customer, you can try our 30-day free trial to check out our available features. Also, try our samples from this GitHub location.
You can also contact us through our support forums, Direct-Trac, or feedback portal. We are always happy to assist you!
If you like this blog post, we think you’ll also like the following articles too:

