
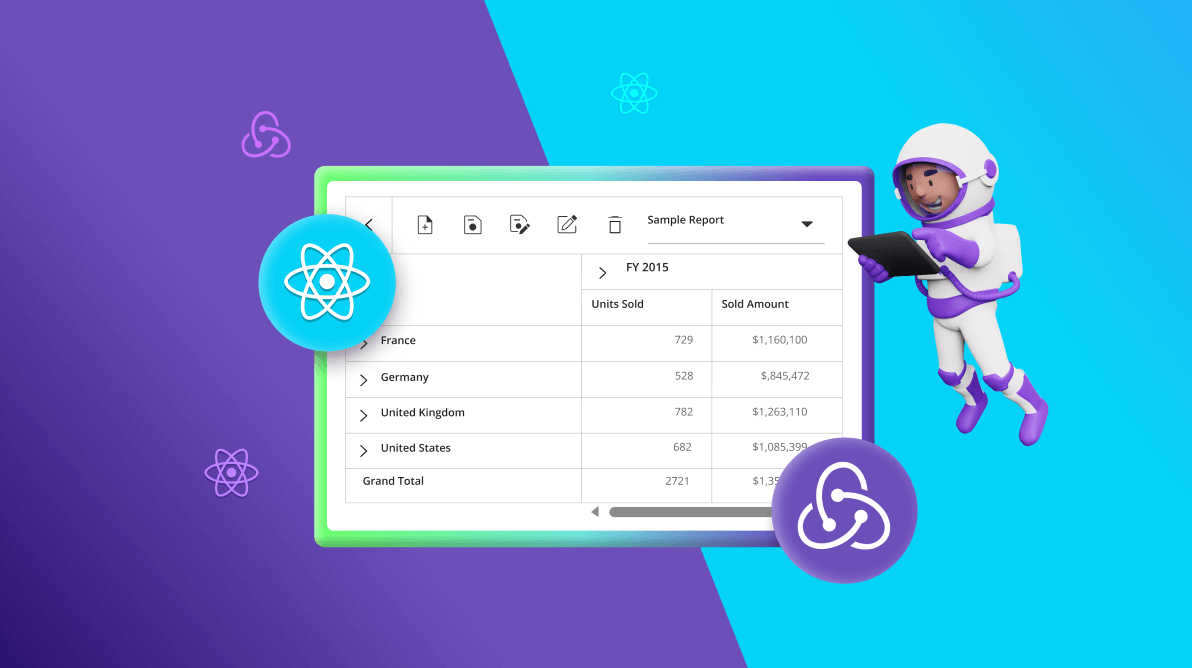
TL;DR: The React Pivot Table is a high-performance component for advanced data analysis, enabling robust data interaction. Integrating Redux with React Pivot Table simplifies state handling, making it easy to save, load, and manage reports within your app.
Syncfusion React Pivot Table is an advanced component for dynamic data analysis and reporting, giving users significant tools for analyzing and engaging with intricate data sets. As applications evolve and the requirement to manage several reports grows, operations such as saving, renaming, removing, fetching, and loading reports can get more complicated.
Here is where Redux comes into play! Redux is a state management library that provides a consistent and centralized approach for managing app states. Integrating Redux with React Pivot Table simplifies and streamlines report operations. Redux’s organized state management ensures that report data is handled consistently, making app maintenance, debugging, and scaling easier.
In this blog, we’ll see how to integrate Redux with React Pivot Table to efficiently handle report-related operations.
Why use Redux?
Redux is ideal for apps requiring robust, scalable state management. Here’s why it may be perfect for your project:
- Centralized state management: Redux consolidates the entire app’s state into a single store, simplifying data management and updates.
- Predictable state updates: With a unidirectional data flow, Redux ensures consistent and traceable state changes, making debugging easier.
- Enhanced debugging: Redux DevTools provide detailed insights into each action and state change, helping developers diagnose and resolve issues more effectively.
- Separation of concerns: Redux separates state management from UI logic, leading to cleaner and more modular code.
- Scalability: Designed to manage complex states, Redux scales effectively with growing app requirements, making it suitable for apps that handle increasing complexity.
- Consistent state across components: By maintaining a single source of truth, Redux ensures that all components stay synchronized with the latest state, eliminating inconsistencies.
- Improved testability: Redux’s reliance on pure functions makes unit testing straightforward and dependable, enhancing code reliability and simplifying the testing process.
Prerequisites
Before you begin, make sure you have the following:
- Basic knowledge of React: Familiarity with React and its component-based architecture.
- Redux basics: A basic knowledge of Redux for state management, including actions, reducers, and the store.
- Node.js and npm: Ensure Node.js and npm are installed to manage dependencies and run the development server.
Setting up the project
To start, set up a new React project if you don’t already have one:
npx create-react-app pivot-table-redux-example
cd pivot-table-redux-example
Install the required packages
Install the React Pivot Table component along with the Redux-related packages.
npm install @syncfusion/ej2-react-pivotview redux react-redux @reduxjs/toolkit
Configuring Redux for state management
Step 1: Create a Redux slice
In the reportSlice.js file, define the state and reducers to manage reports. Refer to the following code example.
import { createSlice } from '@reduxjs/toolkit';
import { dataSource } from './data';

let defaultReport = {
  reportName: 'Sample Report', report: JSON.stringify({
    dataSourceSettings: {
      columns: [{ name: 'Year', caption: 'Production Year' }, { name: 'Quarter' }],
      dataSource: dataSource,
      expandAll: false,
      filters: [],
      formatSettings: [{ name: 'Amount', format: 'C0' }],
      rows: [{ name: 'Country' }, { name: 'Products' }],
      values: [{ name: 'Sold', caption: 'Units Sold' }, { name: 'Amount', caption: 'Sold Amount' }]
    }
  })
};

const reportSlice = createSlice({
  name: 'reports',
  initialState: {
    reports: [{
      reportName: 'Sample Report',
      report: defaultReport
    }],
    reportList: ['Sample Report'],
    currentReport: defaultReport,
    isInitial: true
  },
  reducers: {
    saveReport(state, action) {
      let isSave = state.reports.filter(report => report.reportName === action.payload.reportName).length > 0;
      if (!isSave) {
        state.reports.push(action.payload);
        state.reportList = state.reports.map(report => report.reportName);
      } else {
        state.reports = state.reports.map(report =>
          report.reportName === action.payload.reportName ? action.payload : report
        );
        state.isInitial = false;
      }
      state.currentReport = action.payload;
    },
    removeReport(state, action) {
      state.reports = state.reports.filter(report => report.reportName !== action.payload);
      state.reportList = state.reports.map(report => report.reportName);
      state.currentReport = state.reports[state.reports.length - 1];
    },
    renameReport(state, action) {
      state.reports = state.reports.map(report =>
        report.reportName === action.payload.reportName ? { ...report, reportName: action.payload.rename } : report
      );
      state.reportList = state.reports.map(report => report.reportName);
    },
    fetchReports(state) {
      state.reportList = state.reports.map(report => report.reportName);
    },
    loadReport(state, action) {
      state.currentReport = state.reports.filter(report => report.reportName === action.payload)[0];
    },
  },
});

export const {
  saveReport,
  saveAsReport,
  removeReport,
  renameReport,
  fetchReports,
  loadReport,
} = reportSlice.actions;

export default reportSlice.reducer;
In the above code example, we’ve defined the slice using currentReport, reportList, and reports based on the default report. Then, we created reducer actions for each report manipulation operation (Save, save as, rename, remove, fetch, and load) to update the reports in the Redux state.
- Actions: These are plain JavaScript objects that describe app events or changes. For example, saveReport and loadReport represent actions for the pivot table report.
- Reducers: These are functions that handle state changes in response to actions. They specify how the state should be updated based on the action received. The createSlice function simplifies this by combining actions and reducers.
Step 2: Set up the Redux store
Now, create a file named store.js to configure your Redux store.
import { configureStore } from '@reduxjs/toolkit';
import reportReducer from './reportSlice'; // Ensure this is the correct path to your reducer

const store = configureStore({
    reducer: {
        reports: reportReducer,
    },
});

export default store;
Store: The Redux store is the central repository of the app state. In our example, the store is where we keep our pivot table reports.
Step 3: Configure the Provider
Wrap your app with Redux Provider in the index.js file.
import React from 'react';
import ReactDOM from 'react-dom/client';
import './index.css';
import App from './App';
import { Provider } from 'react-redux';
import store from './store';

const root = ReactDOM.createRoot(document.getElementById('root'));
root.render(
  <Provider store={store}>
    <App />
  </Provider>
);
Provider: It is a component that makes the Redux store available to the rest of your app. It is used to wrap the root component so that all components have access to the store.
Integrate the React Pivot Table in your app
The React Pivot Table has a user-friendly toolbar that includes predefined options for report manipulation. These options enable you to dynamically perform operations such as save, save as, rename, load, delete, and add reports. This documentation will guide you through the process of integrating these predefined report manipulation options into the toolbar UI.
Refer to the following code example to implement the code logic for the toolbar UI actions.
[App.js]
import React, { useEffect } from 'react';
import { useSelector, useDispatch } from 'react-redux';
import { PivotViewComponent, Inject, FieldList, CalculatedField, Toolbar, PDFExport, ExcelExport, ConditionalFormatting, NumberFormatting } from '@syncfusion/ej2-react-pivotview';
import { saveReport, removeReport, renameReport, loadReport, fetchReports } from './reportSlice';
import './App.css';

function App() {
  const dispatch = useDispatch();
  const currentReport = useSelector(state => state.reports.currentReport);
  const reportList = useSelector(state => state.reports.reportList);
  const isInitial = useSelector(state => state.reports.isInitial);
  const dataSourceSettings = JSON.parse(currentReport.report).dataSourceSettings;

  useEffect(() => {
    updateReportList(reportList, currentReport.reportName);
  });

  let pivotObj;
  let toolbarOptions = ['New', 'Save', 'SaveAs', 'Rename', 'Remove', 'Load',
    'Grid', 'Chart', 'Export', 'SubTotal', 'GrandTotal', 'Formatting', 'FieldList'];
  function savePivotReport(args) {
    if (!isInitial) {
      dispatch(saveReport(args));
    }
  }
  function fetchReport() {
    dispatch(fetchReports());
  }
  function updateReportList(list, reportName) {
    if (pivotObj) {
      const reportListObj = (
        document.querySelector(
          '#' + pivotObj.element.id + '_reportlist'
        )
      ).ej2_instances;
      if (reportListObj) {
        reportListObj[0].dataSource = list;
        reportListObj[0].value = reportName;
        reportListObj[0].refresh();
      }
    }
  }
  function loadPivotReport(args) {
    dispatch(loadReport(args.reportName));
  }
  function removePivotReport(args) {
    dispatch(removeReport(args.reportName));
  }
  function renamePivotReport(args) {
    dispatch(renameReport(args));
  }
  function newReport() {
    pivotObj.setProperties({ dataSourceSettings: { columns: [], rows: [], values: [], filters: [] } }, false);
  }
  function dataBound() {
    if (pivotObj) {
      if (isInitial) {
        dispatch(saveReport({ reportName: 'Sample Report', report: pivotObj.getPersistData() }));
      }
      pivotObj.isModified = false;
    }
  }
  return (<PivotViewComponent id='PivotView' ref={d => pivotObj = d} dataSourceSettings={dataSourceSettings} width={'100%'} height={350} showFieldList={true} allowExcelExport={true} allowConditionalFormatting={true} allowNumberFormatting={true} allowPdfExport={true} showToolbar={true} allowCalculatedField={true} displayOption={{ view: 'Both' }} gridSettings={{ columnWidth: 120 }} toolbar={toolbarOptions} dataBound={dataBound.bind(this)} newReport={newReport.bind(this)} renameReport={renamePivotReport.bind(this)} removeReport={removePivotReport.bind(this)} loadReport={loadPivotReport.bind(this)} fetchReport={fetchReport.bind(this)} saveReport={savePivotReport.bind(this)}><Inject services={[FieldList, CalculatedField, Toolbar, PDFExport, ExcelExport, ConditionalFormatting, NumberFormatting]} /></PivotViewComponent>);
};

export default App;
Dispatch: It is the process of sending actions to the Redux store. When we save or load a report, we dispatch the actions to update the state.
Selectors: They are functions that retrieve specific pieces of state from the Redux store. For instance, the useSelector can obtain the current report or the list of saved reports.
Refer to the following code examples.
[reportSlice.js]
import { createSlice } from '@reduxjs/toolkit';
import { dataSource } from './data';

let defaultReport = {
  reportName: 'Sample Report', report: JSON.stringify({
    dataSourceSettings: {
      columns: [{ name: 'Year', caption: 'Production Year' }, { name: 'Quarter' }],
      dataSource: dataSource,
      expandAll: false,
      filters: [],
      formatSettings: [{ name: 'Amount', format: 'C0' }],
      rows: [{ name: 'Country' }, { name: 'Products' }],
      values: [{ name: 'Sold', caption: 'Units Sold' }, { name: 'Amount', caption: 'Sold Amount' }]
    }
  })
};

const reportSlice = createSlice({
  name: 'reports',
  initialState: {
    reports: [{
      reportName: 'Sample Report',
      report: defaultReport
    }],
    reportList: ['Sample Report'],
    currentReport: defaultReport,
    isInitial: true
  },
  reducers: {
    saveReport(state, action) {
      let isSave = state.reports.filter(report => report.reportName === action.payload.reportName).length > 0;
      if (!isSave) {
        state.reports.push(action.payload);
        state.reportList = state.reports.map(report => report.reportName);
      } else {
        state.reports = state.reports.map(report =>
          report.reportName === action.payload.reportName ? action.payload : report
        );
        state.isInitial = false;
      }
      state.currentReport = action.payload;
    },
    removeReport(state, action) {
      state.reports = state.reports.filter(report => report.reportName !== action.payload);
      state.reportList = state.reports.map(report => report.reportName);
      state.currentReport = state.reports[state.reports.length - 1];
    },
    renameReport(state, action) {
      state.reports = state.reports.map(report =>
        report.reportName === action.payload.reportName ? { ...report, reportName: action.payload.rename } : report
      );
      state.reportList = state.reports.map(report => report.reportName);
    },
    fetchReports(state) {
      state.reportList = state.reports.map(report => report.reportName);
    },
    loadReport(state, action) {
      state.currentReport = state.reports.filter(report => report.reportName === action.payload)[0];
    },
  },
});

export const {
  saveReport,
  saveAsReport,
  removeReport,
  renameReport,
  fetchReports,
  loadReport,
} = reportSlice.actions;

export default reportSlice.reducer;
[store.js]
import { configureStore } from '@reduxjs/toolkit';
import reportReducer from './reportSlice'; // Ensure this is the correct path to your reducer

const store = configureStore({
    reducer: {
        reports: reportReducer,
    },
});

export default store;
[index.js]
import React from 'react';
import ReactDOM from 'react-dom/client';
import './index.css';
import App from './App';
import { Provider } from 'react-redux';
import store from './store';

const root = ReactDOM.createRoot(document.getElementById('root'));
root.render(
  <Provider store={store}>
    <App />
  </Provider>
);
Let’s take a look at how to use the built-in toolbar options to save, load, and perform other report-related operations in the React Pivot Table using Redux one by one.
Saving a report
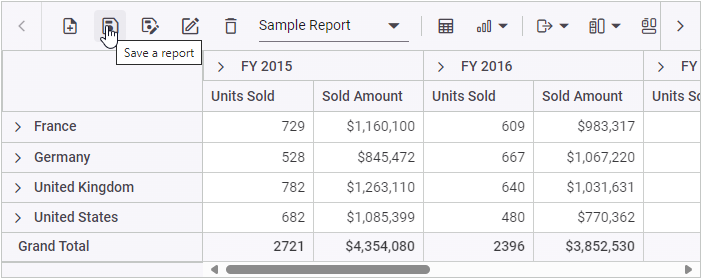
When the Save option in the toolbar is clicked, the app prompts the user to enter the report name. Then, the saveReport event is triggered. The name of the current report and its Pivot Table settings are saved in the Redux store via the Redux action saveReport (defined in the reportSlice.js file).
For example, the report shown below will be passed to the saveReport action (defined in the reportSlice.js file) with the name Sample Report (the name Sample Report comes from the source code by default, but you can change it in the code), and saved in the Redux store.
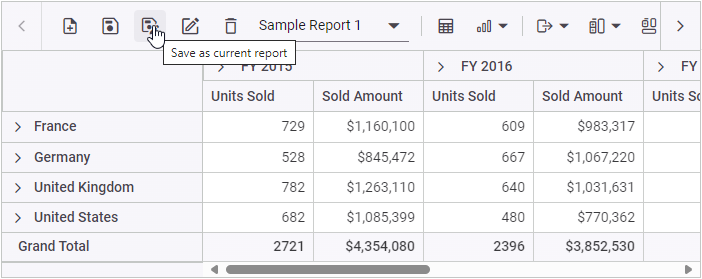
If you want to save a copy of the current report to the Redux store under a different name, select the Save as current report option from the toolbar UI.
When you click the Save as current report icon in the toolbar, the app prompts you to enter the new report name. The Pivot Table’s saveReport event is then triggered, including the current (Sample Report) and latest report names(Sample Report 1). As mentioned, these details are saved to the Redux store and passed to the Redux action saveReport (defined in the reportSlice.js file).
Note: The code snippets for the Save and Save as reports are the same as mentioned above.
Loading a report
When you select an item from the dropdown menu in the toolbar, the loadReport event is triggered. In this event, the Redux action loadReport (defined in the reportSlice.js file) is invoked, with the selected report’s name as the parameter. This action retrieves the selected report from the Redux store using the provided report name and loads it into the Pivot Table.
For example, suppose the report Sample Report is selected from the dropdown menu. In that case, the Redux action loadReport (defined in the reportSlice.js file) will search for it in the Redux store, retrieve it, and load it into the Pivot Table.

Renaming a report
When you select the Rename a Current Report option from the toolbar, you are prompted to provide the new report name. Afterward, the renameReport event is triggered with the latest report name. In this event, the Redux action renameReport (defined in the reportSlice.js file) is invoked, passing the current and new report names. The report is identified using its current name and then updated with the new name in the Redux store.
For example, suppose we rename the current report from Sample Report 1 to Sample Report 2. In that case, Sample Report 1 and Sample Report 2 will be sent to the renameReport Redux action (defined in the reportSlice.js file), which will rename the current report to Sample Report 2 in the Redux store.

Deleting a report
When you select the Delete a Current Report option from the toolbar, the removeReport event is triggered with the current report name. In this event, the Redux action removeReport (defined in the reportSlice.js file) is invoked, using the current report name to locate and delete the appropriate report from the Redux store.
For example, if you delete the current report Sample Report 2 from the Pivot Table, the report name Sample Report 2 is sent to the removeReport Redux action (defined in the reportSlice.js file). This action then locates and removes the report from the Redux store.

Note:
1. If the Pivot Table’s current report n is removed, it will automatically load the last report in the list. This can be customized in the reducer action.
2. If only one report is in the Pivot Table’s report list and removed, it will show the removed report state until a new report is added.
Adding a report
When you select the Create a New Report option from the toolbar, the newReport event is triggered first, followed by the saveReport event. The saveReport event then saves the new report to the Redux store using the same Redux action saveReport (defined in the reportSlice.js file).

GitHub reference
For more details, refer to the saving and loading reports in the React Pivot Table using Redux GitHub demo.

Conclusion
Thank you for reading! In this blog, we’ve seen how to save, load, and perform other report-related operations in the Syncfusion React Pivot Table using Redux. We hope it helps you create a more dynamic and efficient data management system in your React apps.
For existing customers, the newest version of Essential Studio® is available for download from the License and Downloads page. If you are not a Syncfusion customer, try our 30-day free trial to check out the available features.
If you have questions, contact us through our support forum, support portal, or feedback portal. We are always happy to assist you!


 No spam, just valuable updates.