TL;DR: Discover how to harness the power of Syncfusion’s AI-Powered Blazor Scheduler for effortless event management. By integrating the SmartPaste Component, you can easily convert natural language from emails and chats into scheduled events, streamlining your scheduling process. Learn how to set up your Blazor app and elevate your scheduling capabilities with AI!
The Syncfusion Blazor Scheduler is a robust and flexible component ideal for web applications that need calendar or event scheduling functionality. It seamlessly integrates with artificial intelligence, enhancing its capabilities.
One standout feature is Syncfusion’s SmartPaste Component. This tool can interpret natural language content from various sources, including emails and chat messages. When you receive information about schedules or events, the SmartPaste Component automatically extracts and converts it into structured data. This data can then be easily added to the Scheduler. As a result, managing and organizing events becomes a streamlined process.
In this blog post, we’ll take you through the steps to create a Blazor Scheduler application. Get ready to visualize the powerful features of the AI-powered Syncfusion Blazor Scheduler!
Prerequisites
- Visual Studio 2022
- AI Service Provider (For this demo, we are using Azure OpenAI)
Creating a Blazor web app and configuring Azure OpenAI
To begin, create a Blazor Web app by following one of these tutorials:
After setting up your Blazor app, deploy an Azure OpenAI Service resource and generate an OpenAI key. Use the following links for guidance:
Once the key and endpoint are ready, let’s integrate them into the Blazor application:
Install Syncfusion smart components:
Use the NuGet Package Manager to install the Syncfusion.Blazor.SmartComponents package.Configure the program.cs file:
Add your Azure OpenAI key, endpoint, and deployment name to the program.cs file and inject Syncfusion Smart Components.Refer to the following code example.
using Syncfusion.Blazor.SmartComponents;

var builder = WebApplication.CreateBuilder(args);

// Add services to the container.
builder.Services.AddRazorComponents()
                .AddInteractiveServerComponents();

// OpenAI Service
string apiKey = "your-api-key";
string deploymentName = "your-deployment-name";
string endpoint = "your-azure-endpoint-url";

// Injecting Smart Components
builder.Services.AddSyncfusionSmartComponents()
                .ConfigureCredentials(new AIServiceCredentials(apiKey, deploymentName, endpoint)) // Configuring credentials for AI functionality to work
                .InjectOpenAIInference(); // Injecting OpenAI Services

var app = builder.Build();
With the configuration in place, let us create the AI-powered Scheduler.
Creating the AI-powered scheduler
To simulate a real-world scenario, we will utilize the Tab component and render two tabs: one for displaying contents from email or chat conversations and the other for showcasing the scheduler.
Let’s walk through the steps to get started.
Step 1: Installing dependencies
You’ll need to install the following dependencies to build this scheduler efficiently.
- Syncfusion.Blazor.Cards
- Syncfusion.Blazor.DataForm
- Syncfusion.Blazor.Schedule
- Syncfusion.Blazor.Notifications
After installing these dependencies, configure them in your application.
Step 2: Register Blazor service
Open ~/_Imports.razor file and import the necessary Syncfusion.Blazor namespace for the required components.
@using Syncfusion.Blazor
@using Syncfusion.Blazor.Schedule
@using Syncfusion.Blazor.Notifications
@using Syncfusion.Blazor.DataForm
@using Syncfusion.Blazor.Cards
Then, register the Syncfusion Blazor Service in the ~/Program.cs file.
....
using Syncfusion.Blazor;
....
builder.Services.AddSyncfusionBlazor();
....
Step 3: Add stylesheet and script resources
The theme stylesheet and script can be accessed from NuGet through Static Web Assets. Include the stylesheet reference in the <head> section and the script reference at the end of the <body> in the ~/Components/App.razor file.
Refer to the following code example.
<head>
    ....
    <link href="_content/Syncfusion.Blazor.Themes/bootstrap5.css" rel="stylesheet" />
</head>

<body>
    ....
    <script src="_content/Syncfusion.Blazor.Core/scripts/syncfusion-blazor.min.js" type="text/javascript"></script>
</body>
Step 4: Add Syncfusion Blazor component
You can now add the Syncfusion Blazor component in the ~/Components/Pages/*.razor file. To define an interactivity location for each page/component, set a render mode at the top of the ~Pages/*.razor component.
@* desired render mode define here *@
@rendermode InteractiveAuto
Note: Refer to the documentation for detailed instructions on how to add Syncfusion components to your Blazor web application in Visual Studio.
Step 5: Configuring the Tab component
For this demo, we will use the Tab Component to display sample content in a card format. In a real-world application, any relevant content from the clipboard that includes schedules can be transformed into appointments within the scheduler.
Refer to the code example.
<div class="scheduler-ai-container">
<SfTab @ref="TabObj">
<TabEvents Selected="OnTabChange"></TabEvents>
<TabAnimationSettings>
<TabAnimationPrevious Effect="AnimationEffect.None"></TabAnimationPrevious>
<TabAnimationNext Effect="AnimationEffect.None"></TabAnimationNext>
</TabAnimationSettings>
<TabItems>
<TabItem>
<ChildContent>
<TabHeader Text="Meeting Contents"></TabHeader>
</ChildContent>
</TabItem>
<TabItem>
<ChildContent>
<TabHeader Text="Scheduler"></TabHeader>
</ChildContent>
</TabItem>
</TabItems>
</SfTab>
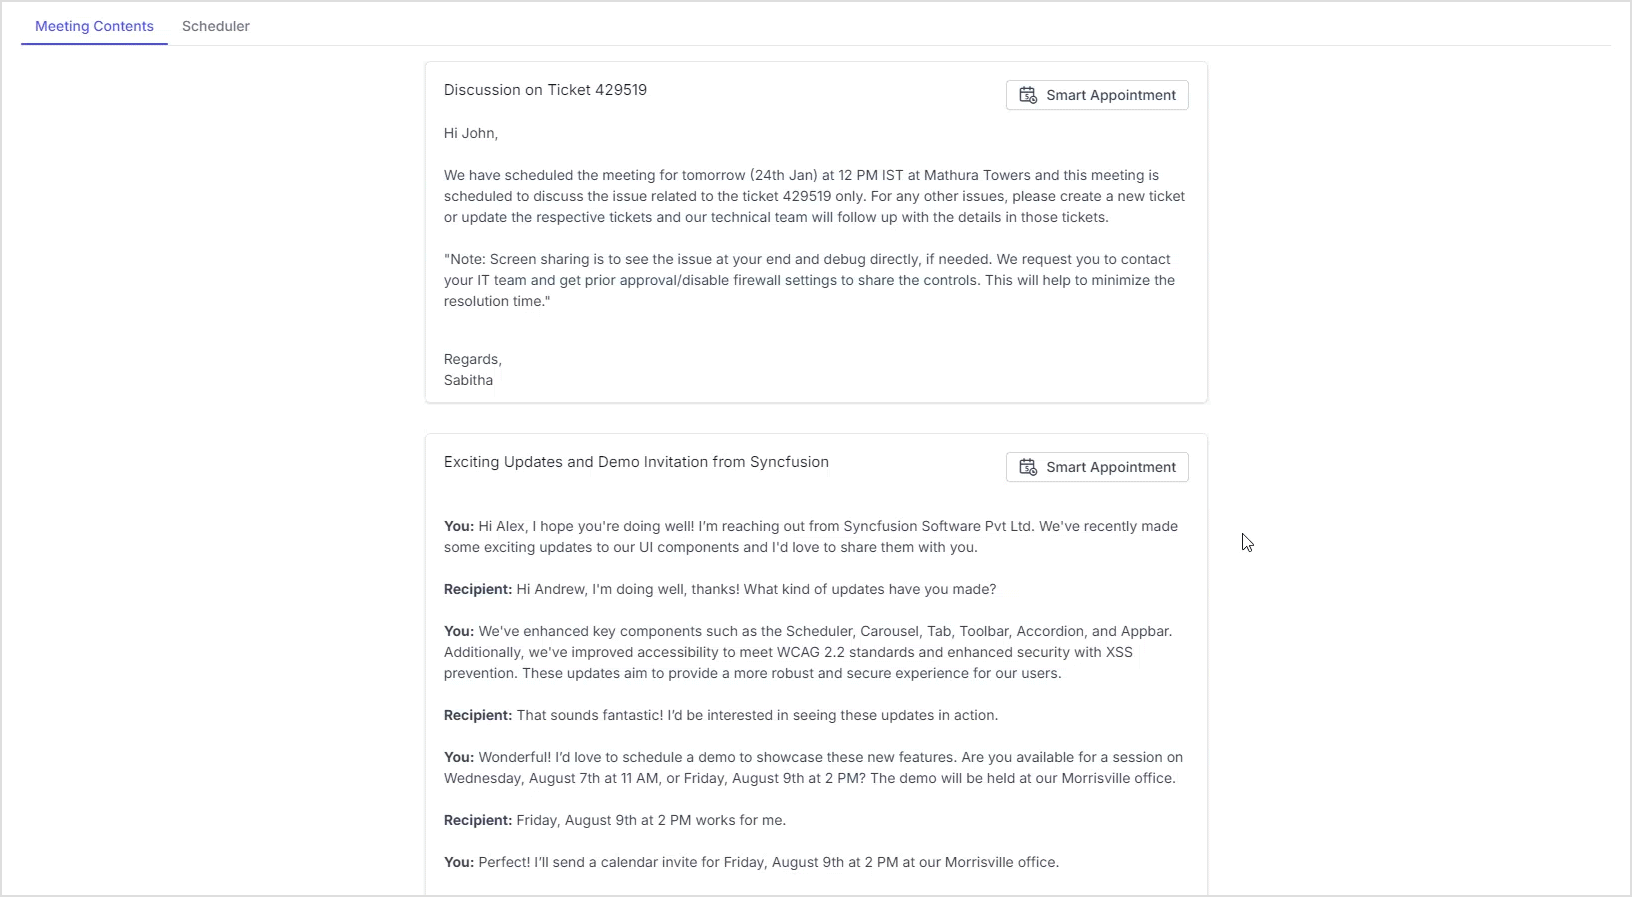
</div>This setup creates a Syncfusion Tab component with two tabs: Meeting Contents and Scheduler. Next, let’s dive into populating the content for the first tab item.
We will display natural language contents, such as those from emails and chat messages, inside a Card Component. The card will include a button that, when clicked, copies the contents and opens a Form dialog. Using the Syncfusion Smart Paste component, we will fill the forms fields with the extracted information.
Refer to the following code example.
<TabItem>
    <ChildContent>
        <TabHeader Text="Meeting Contents"></TabHeader>
    </ChildContent>
    <ContentTemplate>
        <div class="control-section">
            <div class="row">
                <div class="col-xs-6 col-sm-6 col-lg-6 col-md-6" style="margin-bottom: 15px; margin-top:15px">
                    <SfCard>
                        <CardHeader>
                            <ChildContent>
                                <div>Discussion on Ticket 429519</div>
                                <div class="schedule-button" title="Smart Schedule">
                                    <SfButton IconCss=@copyBtnIcon Content="@copyBtnContent" OnClick="() => CopyToClipboard(cardContent1)"></SfButton>
                                </div>
                            </ChildContent>
                        </CardHeader>
                        <CardContent>
                            <ChildContent>
                                <div>
                                    <span>Hi John,</span><br /><br />
                                    <span>We have scheduled the meeting for tomorrow (24th Jan) at 12 PM IST at Mathura Towers and this meeting is scheduled to discuss the issue related to the ticket 429519 only.</span>
                                    <span>For any other issues, please create a new ticket or update the respective tickets and our technical team will follow up with the details in those tickets.</span><br /><br />
                                    <p>
                                        "Note: Screen sharing is to see the issue at your end and debug directly,
                                        if needed. We request you to contact your IT team and get prior approval/disable firewall settings to share the controls.
                                        This will help to minimize the resolution time."
                                    </p><br />
                                    <span>Regards,</span><br />
                                    <span>Sabitha</span>
                                </div>
                            </ChildContent>
                        </CardContent>
                    </SfCard>
                </div>
            </div>
        </div>
    </ContentTemplate>
</TabItem>
This code creates a card with scheduling content and a button in its header.
Step 6: Configuring the Scheduler component
Now, we will render the Syncfusion Scheduler component on the second tab, where events will be displayed.
Refer to the following code example.
<TabItem>
    <ChildContent>
        <TabHeader Text="Scheduler"></TabHeader>
    </ChildContent>
    <ContentTemplate>
        <SfSchedule @ref="ScheduleObj" TValue=AppointmentData Height="750px">
            <ScheduleEventSettings DataSource="@DataSource"></ScheduleEventSettings>
            <ScheduleViews>
                <ScheduleView Option="View.Day"></ScheduleView>
                <ScheduleView Option="View.Week"></ScheduleView>
                <ScheduleView Option="View.WorkWeek"></ScheduleView>
                <ScheduleView Option="View.Month"></ScheduleView>
                <ScheduleView Option="View.Agenda"></ScheduleView>
            </ScheduleViews>
        </SfSchedule>
    </ContentTemplate>
</TabItem>
This configuration will render the scheduler on the second tab. Now that all the components are set up, let’s dive deeper into adding AI functionality to the scheduler.
Step 7: Adding AI functionality to the Scheduler
In this section, we will focus on converting the natural language content from the cards into scheduler appointments. When the button on the card header is clicked, it triggers a method that copies the content to the clipboard using JSRuntime.
Refer to the following code example.
<CardHeader>
    <ChildContent>
        <div>Discussion on Ticket 429519 </div>
        <div class="schedule-button" title="Smart Schedule">
            <SfButton IconCss=@copyBtnIcon Content="@copyBtnContent" OnClick="() => CopyToClipboard(cardContent1)">
            </SfButton>
        </div>
    </ChildContent>
</CardHeader>

@code {
    private string cardContent1 = "Title: Discussion on Ticket 429519" +
        "Hi John,\n\n" +
        "We have scheduled the meeting for tomorrow (24th Jan) at 12 PM IST at Mathura Towers and this meeting is scheduled to discuss the issue related to the ticket 429519 only. " +
        "For any other issues, please create a new ticket or update the respective tickets and our technical team will follow up with the details in those tickets.\n\n" +
        "Note: Screen sharing is to see the issue at your end and debug directly, if needed. We request you to contact your IT team and get prior approval/disable firewall settings to share the controls. This will help to minimize the resolution time.\n\n" +
        "Regards,\n\n" +
        "Sabitha";

    private async Task CopyToClipboard(string text)
    {
        await JSRuntime.InvokeVoidAsync("navigator.clipboard.writeText", text);
        Visibility = true;
    }
}
Upon clicking the button, the content is copied, and a dialog containing SfDataForm will open simultaneously.
We will implement Syncfusion’s Dialog component, which contains a DataForm Component with smart paste functionality. The Smart Paste Button component will be added inside the SfDataForm to populate the form fields based on the content from the clipboard.
Refer to the following code example.
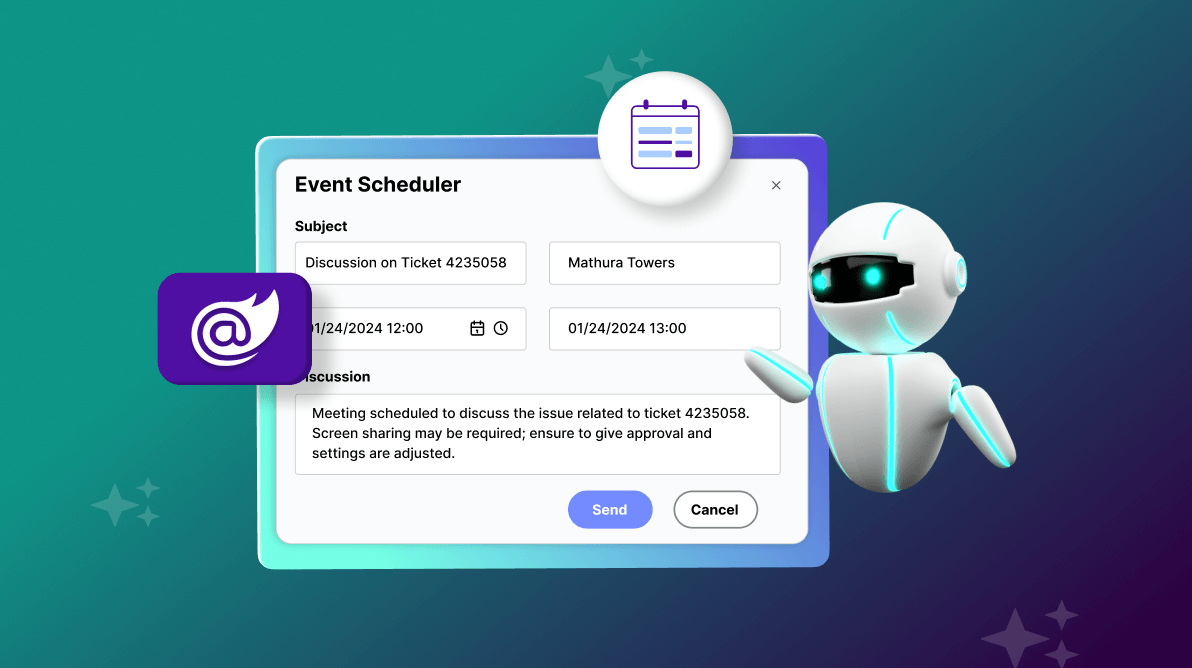
<div class="event-schedule-dialog">
    <SfDialog Target="#target" Width="300px" ShowCloseIcon="true" @bind-Visible="Visibility" AllowPrerender="true" IsModal="true">
        <DialogTemplates>
            <Header> Event Scheduler </Header>
            <Content>
                <SfDataForm ID="bugReport"
                            Model="@BugRptModel"
                            ColumnCount="2"
                            ColumnSpacing="20px"
                            ButtonsAlignment="FormButtonsAlignment.Right"
                            @ref="DataFormInstance">
                    <FormValidator>
                        <DataAnnotationsValidator></DataAnnotationsValidator>
                    </FormValidator>
                    <FormItems>
                        <FormItem Field="@nameof(BugRptModel.Subject)" ColumnSpan="1">
                            <Template>
                                <label class="e-form-label">Subject</label>
                                <SfTextBox HtmlAttributes="subjectAttr" @bind-Value="BugRptModel.Subject"></SfTextBox>
                            </Template>
                        </FormItem>
                        <FormItem Field="@nameof(BugRptModel.Location)" ColumnSpan="1">
                            <Template>
                                <label class="e-form-label">Location</label>
                                <SfTextBox HtmlAttributes="locationAttr" @bind-Value="BugRptModel.Location"></SfTextBox>
                            </Template>
                        </FormItem>
                        <FormItem Field="@nameof(BugRptModel.StartTime)" ColumnSpan="1">
                            <Template>
                                <label class="e-form-label">StartTime</label>
                                <SfDateTimePicker Id="StartTime" Name="StartTime" Format="MM/dd/yyyy HH:mm" HtmlAttributes="startTimeAttr" @bind-Value="BugRptModel.StartTime"></SfDateTimePicker>
                            </Template>
                        </FormItem>
                        <FormItem Field="@nameof(BugRptModel.EndTime)" ColumnSpan="1">
                            <Template>
                                <label class="e-form-label">EndTime</label>
                                <SfDateTimePicker Id="EndTime" Name="EndTime" Format="MM/dd/yyyy HH:mm" HtmlAttributes="endTimeAttr" @bind-Value="BugRptModel.EndTime"></SfDateTimePicker>
                            </Template>
                        </FormItem>
                        <FormItem Field="@nameof(BugRptModel.Description)" ColumnSpan="1">
                            <Template>
                                <label class="e-form-label">Description</label>
                                <SfTextBox Multiline="true" HtmlAttributes="descriptionAttr" @bind-Value="BugRptModel.Description"></SfTextBox>
                            </Template>
                        </FormItem>
                    </FormItems>

                    <FormButtons>
                        <SfSmartPasteButton @ref="smartButton" Content="Smart Paste" IconCss="e-icons e-paste" CssClass="smart-button">
                        </SfSmartPasteButton>
                        <SfButton Disabled="@AreFieldsPopulated" OnClick="SaveToScheduler" IsPrimary="true">Save</SfButton>
                        <SfButton OnClick="CloseEditorDialog">Cancel</SfButton>
                    </FormButtons>
                    <SfSpinner @bind-Visible="@SpinnerVisibility">
                    </SfSpinner>
                </SfDataForm>
            </Content>
        </DialogTemplates>
        <DialogEvents Opened="@OpenedHandler" Closed="@ClosedHandler" OnOpen="@OnOpenHandler"></DialogEvents>
    </SfDialog>
</div>

@code {
    private BugReportModel BugRptModel = new BugReportModel();

    public class BugReportModel
    {
        [Display(Name = "Subject")]
        public string Subject { get; set; }

        [Display(Name = "Location")]
        public string Location { get; set; }

        [Display(Name = "StartTime")]
        public DateTime StartTime { get; set; }

        [Display(Name = "EndTime")]
        public DateTime EndTime { get; set; }

        [Display(Name = "Description")]
        public string Description { get; set; }

        [Display(Name = "Recurrence")]
        public string Recurrence { get; set; }

        [Display(Name = "IsAllDay")]
        public bool IsAllDay { get; set; }
    }
}
In this dialog, we’ve integrated Syncfusion’s SfSmartPasteButton component. When triggered, this smart button pastes the copied content into the appropriate fields, streamlining the user experience.
The following code example shows how it works for the subject text box.
<SfTextBox HtmlAttributes="subjectAttr" @bind-Value="BugRptModel.Subject"></SfTextBox>
The text box includes an HtmlAttributes property, allowing the smart paste component to effectively populate the contents.
The following code example shows the dictionary definition for the subject attribute.
Dictionary<string, object> subjectAttr = new Dictionary<string, object>()
     {
         { "data-smartpaste-description", "Subject must follow the core content of the input" }
     };
The data-smartpaste-description attribute acts as a prompt for the AI model, enabling it to extract the required content from the copied data and, using HtmlAttributes, populate the value into the appropriate fields.
The following code example shows the HtmlAttributes defined for each field used in the dialog component.
Dictionary<string, object> subjectAttr = new Dictionary<string, object>()
{
    { "data-smartpaste-description", "Subject must follow the core content of the input" }
};

Dictionary<string, object> descriptionAttr = new Dictionary<string, object>()
{
    { "data-smartpaste-description", "Description must be the summary of the entire input" }
};

Dictionary<string, object> startTimeAttr = new Dictionary<string, object>()
{
    { "data-smartpaste-description", $"Get Start Time from the input, The current time is {DateTime.Now.Date} Date must follow the format: MM/dd/yyyy HH:mm" }
};

Dictionary<string, object> endTimeAttr = new Dictionary<string, object>()
{
    { "data-smartpaste-description", "If there is End Time in the input get the End Time, If the End Time is not present in the input, add 1hr to the StartTime and Provide the date,  Date must follow the format: MM/dd/yyyy HH:mm" }
};

Dictionary<string, object> locationAttr = new Dictionary<string, object>()
{
    { "data-smartpaste-description", "Check if there is any location given in the input, if there is any location then add it, if not ignore it" }
};

Dictionary<string, object> allDayAttr = new Dictionary<string, object>()
{
    { "data-smartpaste-description", "Check if the input is an all-day event, if it is an all-day event, then set the IsAllDay property to true, otherwise set it to false" },
};
By utilizing these attributes, the SfSmartPasteButton component intelligently parses and populates the fields based on the copied content, enhancing the user experience and ensuring data consistency.
Step 8: Saving data into the Scheduler
With AI integration in place, let’s explore its functionality and how to save data into the scheduler. When the user clicks the Smart Paste Button in the card header, a dialog appears. Once the dialog opens, we programmatically trigger the smart paste button, which invokes the AI to populate the content into the appropriate fields.
Refer to the following code example.
public async Task OpenedHandler(Syncfusion.Blazor.Popups.OpenEventArgs args)
{
    await JSRuntime.InvokeVoidAsync("clickButton", "smart-button");
    while (string.IsNullOrEmpty(BugRptModel.Subject))
    {
        await Task.Delay(1000);
    }
    AreFieldsPopulated = false;
    SpinnerVisibility = false;
    StateHasChanged();
}

public void ClosedHandler(CloseEventArgs args)
{
    BugRptModel.Subject = String.Empty;
    BugRptModel.Location = String.Empty;
    BugRptModel.Description = String.Empty;
    BugRptModel.EndTime = DateTime.Now.Date.AddHours(13);
    BugRptModel.StartTime = DateTime.Now.Date.AddHours(12);
    DataFormInstance?.Refresh();
    AreFieldsPopulated = true;
}
By default, the save button remains disabled to prevent users from clicking it until all values are populated. Once the dialog is open, we trigger the smart paste button and continuously check if the values have been populated. Once the values are populated, we enable the save button.
When the user clicks the save button, a new event is created, and the data source of the scheduler is updated to reflect this new appointment.
Refer to the following code example.
public async Task SaveToScheduler()
{
    Visibility = false;
    newAppointment = new AppointmentData
    {
        Id          = DataSource.Count + 1,
        Subject     = BugRptModel.Subject,
        StartTime   = BugRptModel.StartTime,
        EndTime     = BugRptModel.EndTime,
        Location    = BugRptModel.Location,
        Description = BugRptModel.Description,
    };
    var dataSourceCopy = new List(DataSource);
    dataSourceCopy.Add(newAppointment);
    DataSource = dataSourceCopy;
    SwitchToSchedule(newAppointment);
}

private async Task SwitchToSchedule(AppointmentData newAppointment)
{
    await TabObj.EnableTabAsync(1, true);
    await TabObj.SelectAsync(1);
    await GenerateToastContent(newAppointment);
}
After executing the code examples, the output will look like the following image.
GitHub Reference
For more details, refer to the AI Powered Smart Scheduler in Blazor GitHub demo.
Conclusion
Thank you for reading! In this blog, we’ve seen how to build an AI-powered smart Scheduler using Syncfusion Blazor components. This feature is available in the 2024 Volume 3 release. For a complete overview of this release’s new features, check out our Release Notes and What’s New pages. Try these features, and don’t forget to share your thoughts in the comments!
If you’re an existing Syncfusion user, you can download the latest version of Essential Studio® from the License and Downloads page. For those new to Syncfusion, we offer a 30-day free trial so you can experience these exciting features firsthand.
Need help? Feel free to reach out via our support forum, support portal, or feedback portal. We’re always here to assist you!