When developing web applications, there are instances where our code seems complex, heavy, and less maintainable. There can be repetitive and lengthy code and unused assets. These conditions can slow down application performance, reduce efficiency, and even make it hard for the browser to load content.
However, Webpack and Babel are great tools for effectively manipulating JavaScript, CSS, and other webpage assets to make them smooth and efficient.
In this article, let’s see about the Webpack and Babel tools and how to use them with Vanilla JS projects.
What Are Webpack and Babel?
Webpack and Babel are tools for developers that optimize JavaScript applications.
Webpack is a module bundler we can use to minify multiple files in a JavaScript project and increase the overall efficiency. A module bundler takes in all the assets and comes up with a single output file. This artefact can be imported into our HTML, making it a more lightweight project.
As for Babel, it is a syntax converter and a transpiler. There may be times you want your code to be compatible with all browsers and environments, including the older ones. In such instances, a great option to try out is Babel.

Syncfusion JavaScript UI controls are the developers’ choice to build user-friendly web applications. You deserve them too.
Why Use Webpack and Babel with Vanilla JS?
A simple project with a small number of lines in the script file is fine on its own. But consider a situation where there are hundreds of lines of code within the script file. In such instances, we have to break the code into several files to make it much simpler to comprehend. Then, we can concatenate the files to get the same output by calling only one script file in the main file.
But this can be troublesome as we cannot determine the dependencies and the proper order on our own. So, for that, Webpack is an essential tool, as it analyses the files, creates a dependency graph, and bundles up the files in the best possible manner.
Then, Webpack recursively explores all the files and identifies the dependencies. After that, it generates the minified output file and removes unnecessary assets. The whole process makes our Vanilla JS project easier to maintain and more efficient.
Babel, in turn, translates the latest JavaScript code (ES6+) into older JavaScript code (ES5). This makes the code compatible with all browsers, even when you use the latest JavaScript version to code.
Advantages of Using Webpack and Babel with Vanilla JS
- Removes unused and unnecessary assets from the code, making it cleaner.
- Makes the code compatible with all web browsers.
- Bundles up the assets and minifies the components, making it easier for the browsers to load content.
- Improves the maintainability.
- Generates a dependency graph based on the dependencies of the assets.
How to Use Webpack and Babel with Vanilla JS
It might be a bit complex to set up Webpack and Babel in a project. So, let me guide you through using Webpack and Babel in a Vanilla JS project step by step.
The Folder Structure
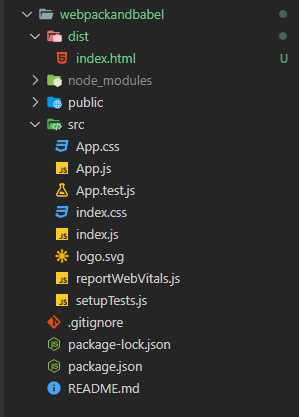
There is a specific folder structure to be followed when using Webpack and Babel in your project.
We need two separate folders, dist for the output files and src for the input files. You have to keep the index.html file inside the dist folder. Next to the index.html file, within that folder, the minified output file will be generated by Webpack.
Refer to the following screenshot for the folder structure.


Every property of the Syncfusion JavaScript controls is completely documented to make it easy to get started.
Installing Packages
We can initialize the project with yarn init or npm init and add the required dependencies using one of the following commands.
// with yarn |
After installing the dependencies, create a file with the name webpack.config.js in the root folder and add the following code into that file.
const path = require('path');

module.exports = {
  "mode": "none",
  "entry": "./src/index.js",
  "output": {
    "path": __dirname + '/dist',
    "filename": "bundle.js"
  },
  devServer: {
    contentBase: path.join(__dirname, 'dist')
  }
}
Enter the main JavaScript file as the entry in the previous code and set the path to where you want the output file to appear.
In the index.html file, attach the bundle.js file using the following command:
<script src="bundle.js"> |
And inside the package.json file, don’t forget to add the following script to run Webpack.
"scripts":{
  "build" : "webpack watch",
  "dev-server": "webpack serve --open"
}
Now, we can complete the implementation of the project and build to see the output. The re-bundling process is automatic and will take place every time you save after making a change.
Style Sheets
When using Webpack, getting the styles to work is a bit different. This is because we first have to install style loaders and then import the CSS styles.
// npm |
Inside the webpack.config file, add the following piece of code to use the loaders we installed in the previous step.
const path = require('path');

module.exports = {
  "mode": "none",
  "entry": "./src/index.js",
  "output": {
    "path": __dirname + '/dist',
    "filename": "bundle.js" },
    devServer: {
      contentBase: path.join(__dirname, 'dist')
    },
    "module": {
      "rules": [{
        "test": /\.css$/,
        "use": [ "style-loader",
                 "css-loader"
        ]
      },]
   }
};
We can now add our styles in CSS files and start the dev-server to see the output.
Now, we have reached the final step. We have to install the Babel dependencies and load them.
// npm |
To get the loaders working, update the webpack.config file just like in the style loaders, with babel-loaders.
const path = require('path');

module.exports = {
  "mode": "none",
  "entry": "./src/index.js",
  "output": {
  "path": __dirname + '/dist',
  "filename": "bundle.js"
},
devtool: 'cheap-module-eval-source-map',
devServer: {
  contentBase: path.join(__dirname, 'dist')
},
"module": {
  "rules": [ {
    "test": /\.css$/,
    "use": [ "style-loader", "css-loader" ]
  },
  {
    "test": /\.js$/,
    "exclude": /node_modules/,
    "use": {
      "loader": "babel-loader",
      "options": {
        "presets": [ "@babel/preset-env", ]
      }
    }
  },
] }};,
And now you should have a JavaScript project together with Webpack and Babel support.

To make it easy for developers to include Syncfusion JavaScript controls in their projects, we have shared some working ones.
Best Practices to Follow
Following best practices when using these tools is essential, because otherwise, setting up can get complex. Webpack and Babel are tools that have a set of prerequisites, like an accurate folder structure and the correct packages.
It is crucial to install the necessary loader when bundling assets such as CSS, fonts, images, etc. So, here are a few tips to make your experience with Webpack and Babel easier.
Keep your code clean and stick to the specified folder structure
You must follow the specified folder structure. For example, especially when using Webpack, the index.html file should be there with the output file inside the dist folder.
Set “private”: true in package.json
This is a best practice to follow to prevent your code from accidentally publishing.
Use code-splitting for big bundles
If the bundles are large, we can activate code splitting with optimization.splitChunks to chunk the bundle into several pieces. The recommended size of the Webpack bundle is 200KB maximum.
Follow the standard methods and documentation
There are separate documentation for Webpack and Babel. Both of them have step-by-step instructions on properly setting up these tools and using them for different file types. By referring to these, you can learn almost everything about Webpack and Babel, including plugins, loaders, and presets.

Easily build real-time apps with Syncfusion’s high-performance, lightweight, modular, and responsive JavaScript UI components.
Final Thoughts
This article discussed what Webpack and Babel are and how to use them in a Vanilla JavaScript project. We discussed the advantages of using them and where to use them, too. It is worth considering using these tools because they can make your application load faster and make it more maintainable.
I hope you have found this article useful. Thank you for reading!
The Syncfusion JavaScript suite will be the only suite you will ever need to build an application. It contains over 80 high-performance, lightweight, modular, and responsive UI components in a single package. Download the FREE trial and evaluate the controls today.
If you have any questions or comments, you can contact us through our support forums, support portal, or feedback portal. We are always happy to assist you!
Related blogs
- Pros and Cons of Using JavaScript Interop in Blazor
- 10 JavaScript Naming Conventions Every Developer Should Know
- How to Bulk Edit Columns in JavaScript DataGrid
- Pure and Impure Functions in JavaScript: A Complete Guide

Comments (1)
[webpack-cli] Invalid configuration object. Webpack has been initialized using a configuration object that does not match the API schema.
– configuration.devtool should match pattern “^(inline-|hidden-|eval-)?(nosources-)?(cheap-(module-)?)?source-map$”.
BREAKING CHANGE since webpack 5: The devtool option is more strict.
Please strictly follow the order of the keywords in the pattern. I followed the guide step by step and got this error.