Syncfusion Blazor Code Snippets in Visual Studio Code extends its support to Mac operating system. It is a utility for adding Syncfusion Blazor components to the Razor file of a Blazor application. This code snippet utility saves significant time for developers in adding Syncfusion Blazor components to their projects.
In this blog, I am going to explain how to use the Code Snippets in Visual Studio Code utility to add Syncfusion Blazor components to your applications in the Mac operating system.
Prerequisites
The prerequisites for using Syncfusion Blazor Snippets are:
Install Syncfusion Blazor Snippets
The Syncfusion Blazor Snippets utility is included as part of Blazor VS Code Extensions.
Installing from Visual Studio Marketplace
To install the Syncfusion Blazor VS Code Extensions from Visual Studio Marketplace, follow these steps:
- Open Visual Studio Code.
- Then, open the Command Palette by navigating to View> Command Palette.
- Search for Install Extensions in the Command Palette and expand Install Extensions when it appears.
- Search for Syncfusion Blazor in the search box to locate the Blazor VSCode Extensions – Syncfusion.
- Then, install the Blazor VSCode Extensions – Syncfusion extension.
Installing from a VSIX package
To install the Syncfusion Blazor VS Code Extensions from a VSIX package, follow these steps:
- Download Syncfusion Blazor VS Code Extensions from the Visual Studio Marketplace.
- Open Visual Studio Code.
- Open the Command Palette by navigating to View > Command Palette.
- Search for Install, and then click Install from VSIX in the Command Palette.
- Locate the downloaded VSIX file using the Browse option. The extension will be installed.
Adding Syncfusion Blazor components using the code snippet utility
To add a Syncfusion Blazor component to a Blazor application using the code snippet utility:
- Open an existing Blazor application or create a new Blazor application in Visual Studio Code.
- Then, open the required Razor file.
- Now, start typing the name of a Syncfusion Blazor component, which will begin with sf. As you type in the name, you will see a list of components along with their features in the following format.
sf<Syncfusion component name>-<Syncfusion component feature>
For example: sfgrid-grouping.
Choose a Syncfusion component-feature pair and press Enter or the Tab key. The Syncfusion Blazor component, along with the code to use the feature, will be added to the Razor file.
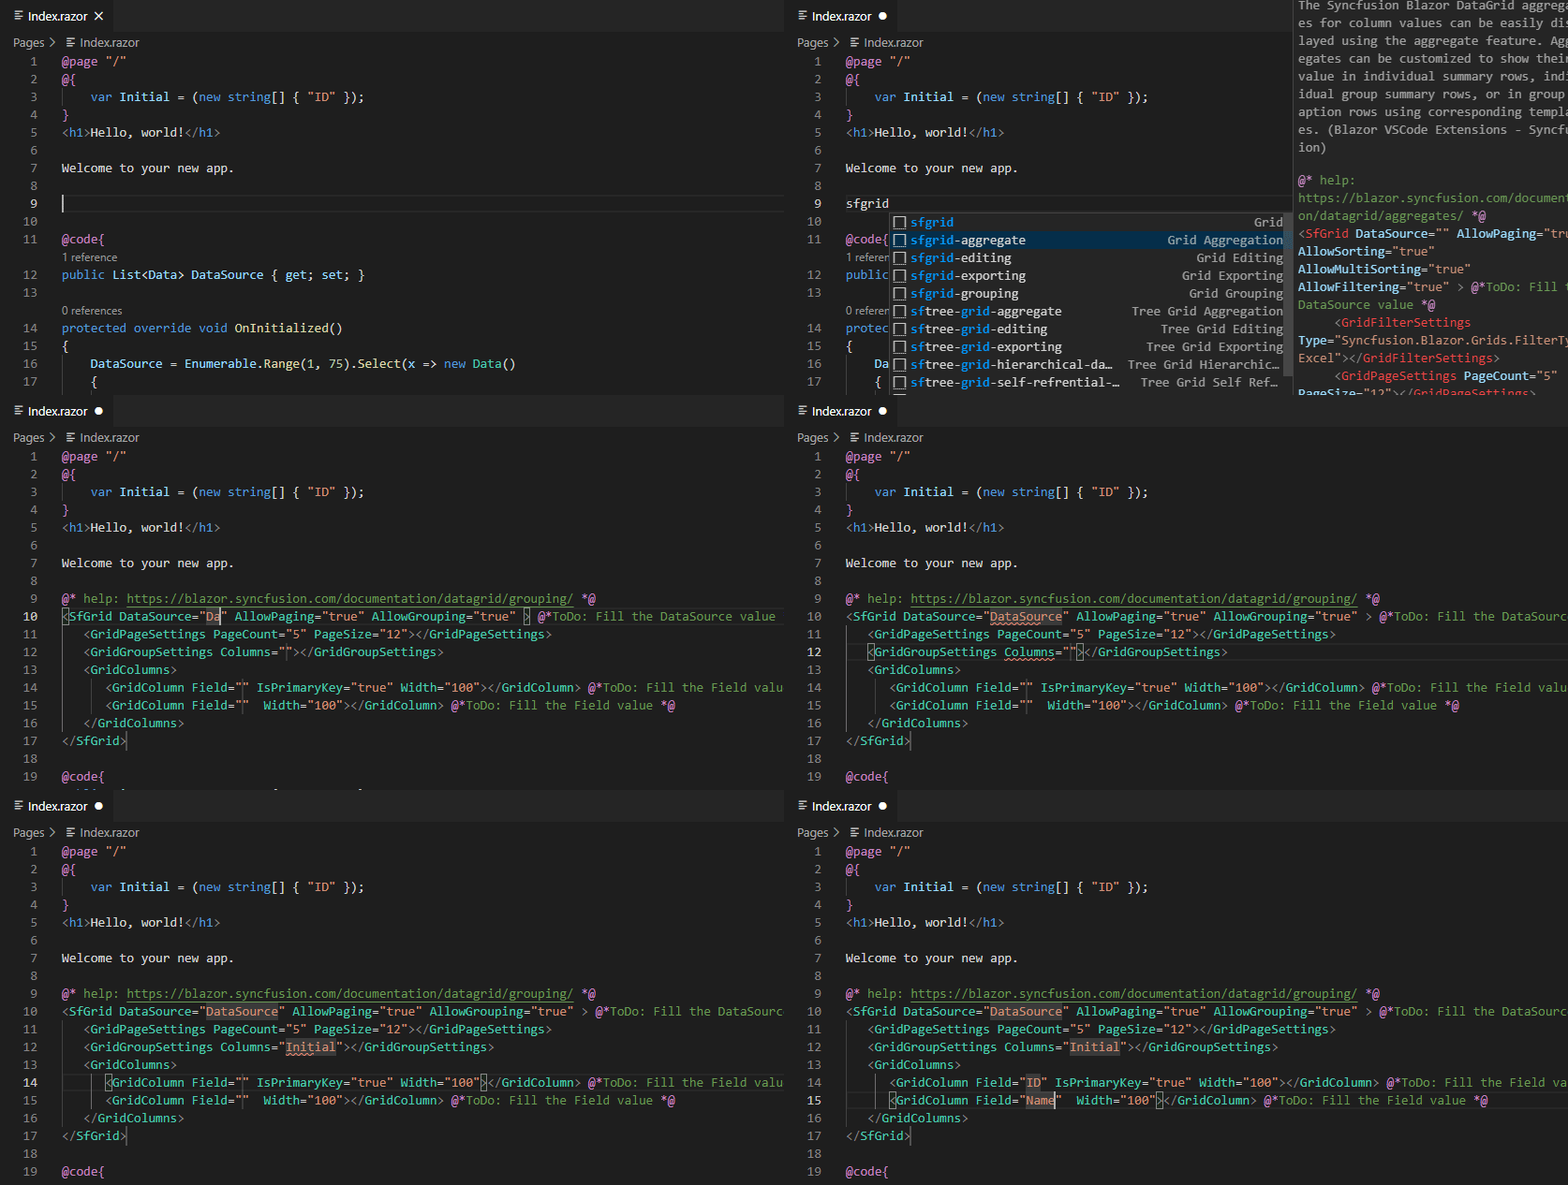
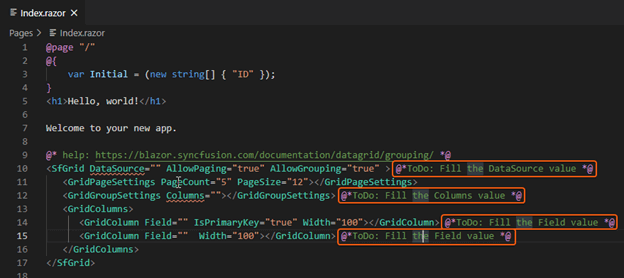
- After adding the Syncfusion Blazor component code in the Razor file, use the tab key to fill the values required to render the component. The comments in the code snippet will help you find the values to be filled.
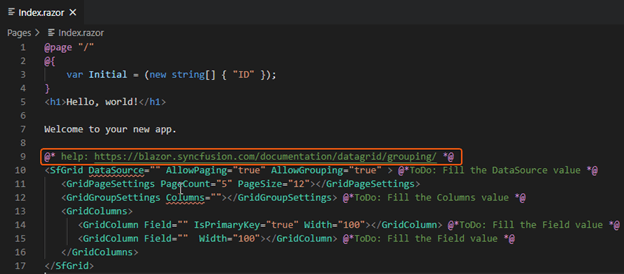
 The help link at the top of the code snippet will take you to the documentation page to learn more about the added component feature.
Configuring the Blazor application
The Syncfusion Blazor Code Snippets in Visual Studio Code for Mac utility only adds the code in the Razor file. So, we need to install the required NuGet packages, add namespaces and themes, and register the Syncfusion Blazor Service to use the component. Follow these steps:
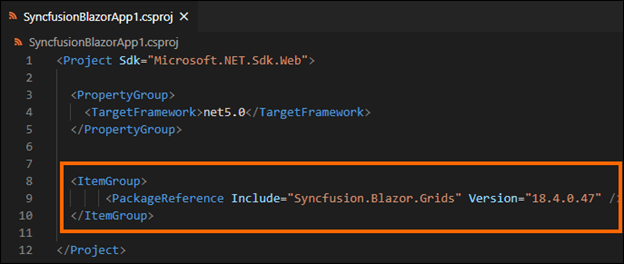
- First, open the Blazor project file and add the required NuGet package(s) as a package reference manually. Refer to our documentation to learn the benefits of using individual NuGet packages. These NuGet packages will be automatically restored when building the application.
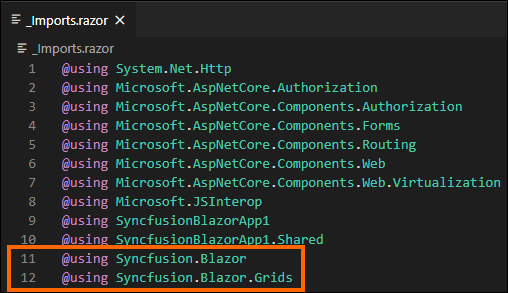
- Then, open the _Imports.razor file and add the required namespaces to render the Syncfusion component in your application.
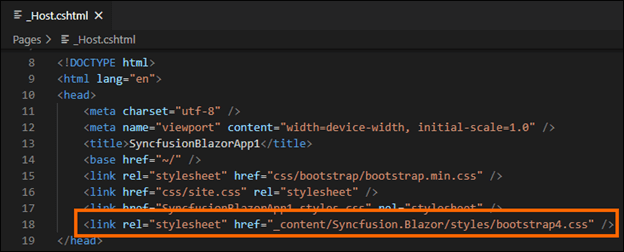
- Now, add the theme details in the <head> element of the ~/Pages/_Host.html page for the server application and the ~/wwwroot/index.html page for the client application.
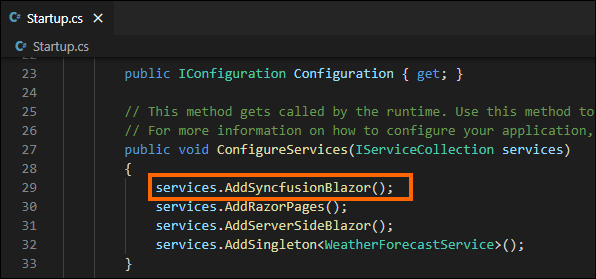
- Open the ~/Startup.cs file for the server application and the ~/Program.cs file for the client application. Then, register the Syncfusion Blazor Service.
- Finally, run the application to see the Syncfusion Blazor component.
Special mention: Syncfusion® Document Viewer Extension
If you often find yourself switching between apps just to check a Word or Excel file, this handy tool is for you. The Syncfusion® Document Viewer Extension for Visual Studio Code lets you open and view documents like Word, Excel, and more; right inside your coding environment.
You can preview high-fidelity files and even make light edits such as text changes and formatting tweaks, all without leaving VS Code. It’s a simple way to stay focused and keep your project documentation within reach.
Available for free download on the Visual Studio Code Marketplace.
Conclusion
Thanks for reading! I hope this blog helps you use our Code Snippets in Visual Studio Code utility to add Syncfusion Blazor components to your Blazor applications in the Mac operating system. This will help you add many Syncfusion components to your applications in less time. For more details, refer to our Add Syncfusion Blazor components to a Blazor application documentation.
Syncfusion provides more than 65 high-performance, lightweight, modular, and responsive Blazor UI controls such as DataGrid, Charts, and Scheduler to ease the work of developers.
If you have any questions, please let us know in the comments section below. You can also contact us through our support forum, Direct-Trac, or feedback portal. We are always happy to assist you!
