PDF files are widely used in various industries, and adding digital signatures to them is a necessary security measure. Digital signatures ensure the authenticity and integrity of a document, and they are legally binding. This blog post will explain the procedure to create a PDF digital signature service using Azure Key Vault and the Syncfusion PDF Library.
Azure Key Vault is a cloud-based key management service that allows you to create, store, and manage cryptographic keys and certificates. The Syncfusion PDF Library is a .NET library enabling you to programmatically create and manipulate PDF documents. Combining these powerful tools can create a robust and secure PDF digital signature service.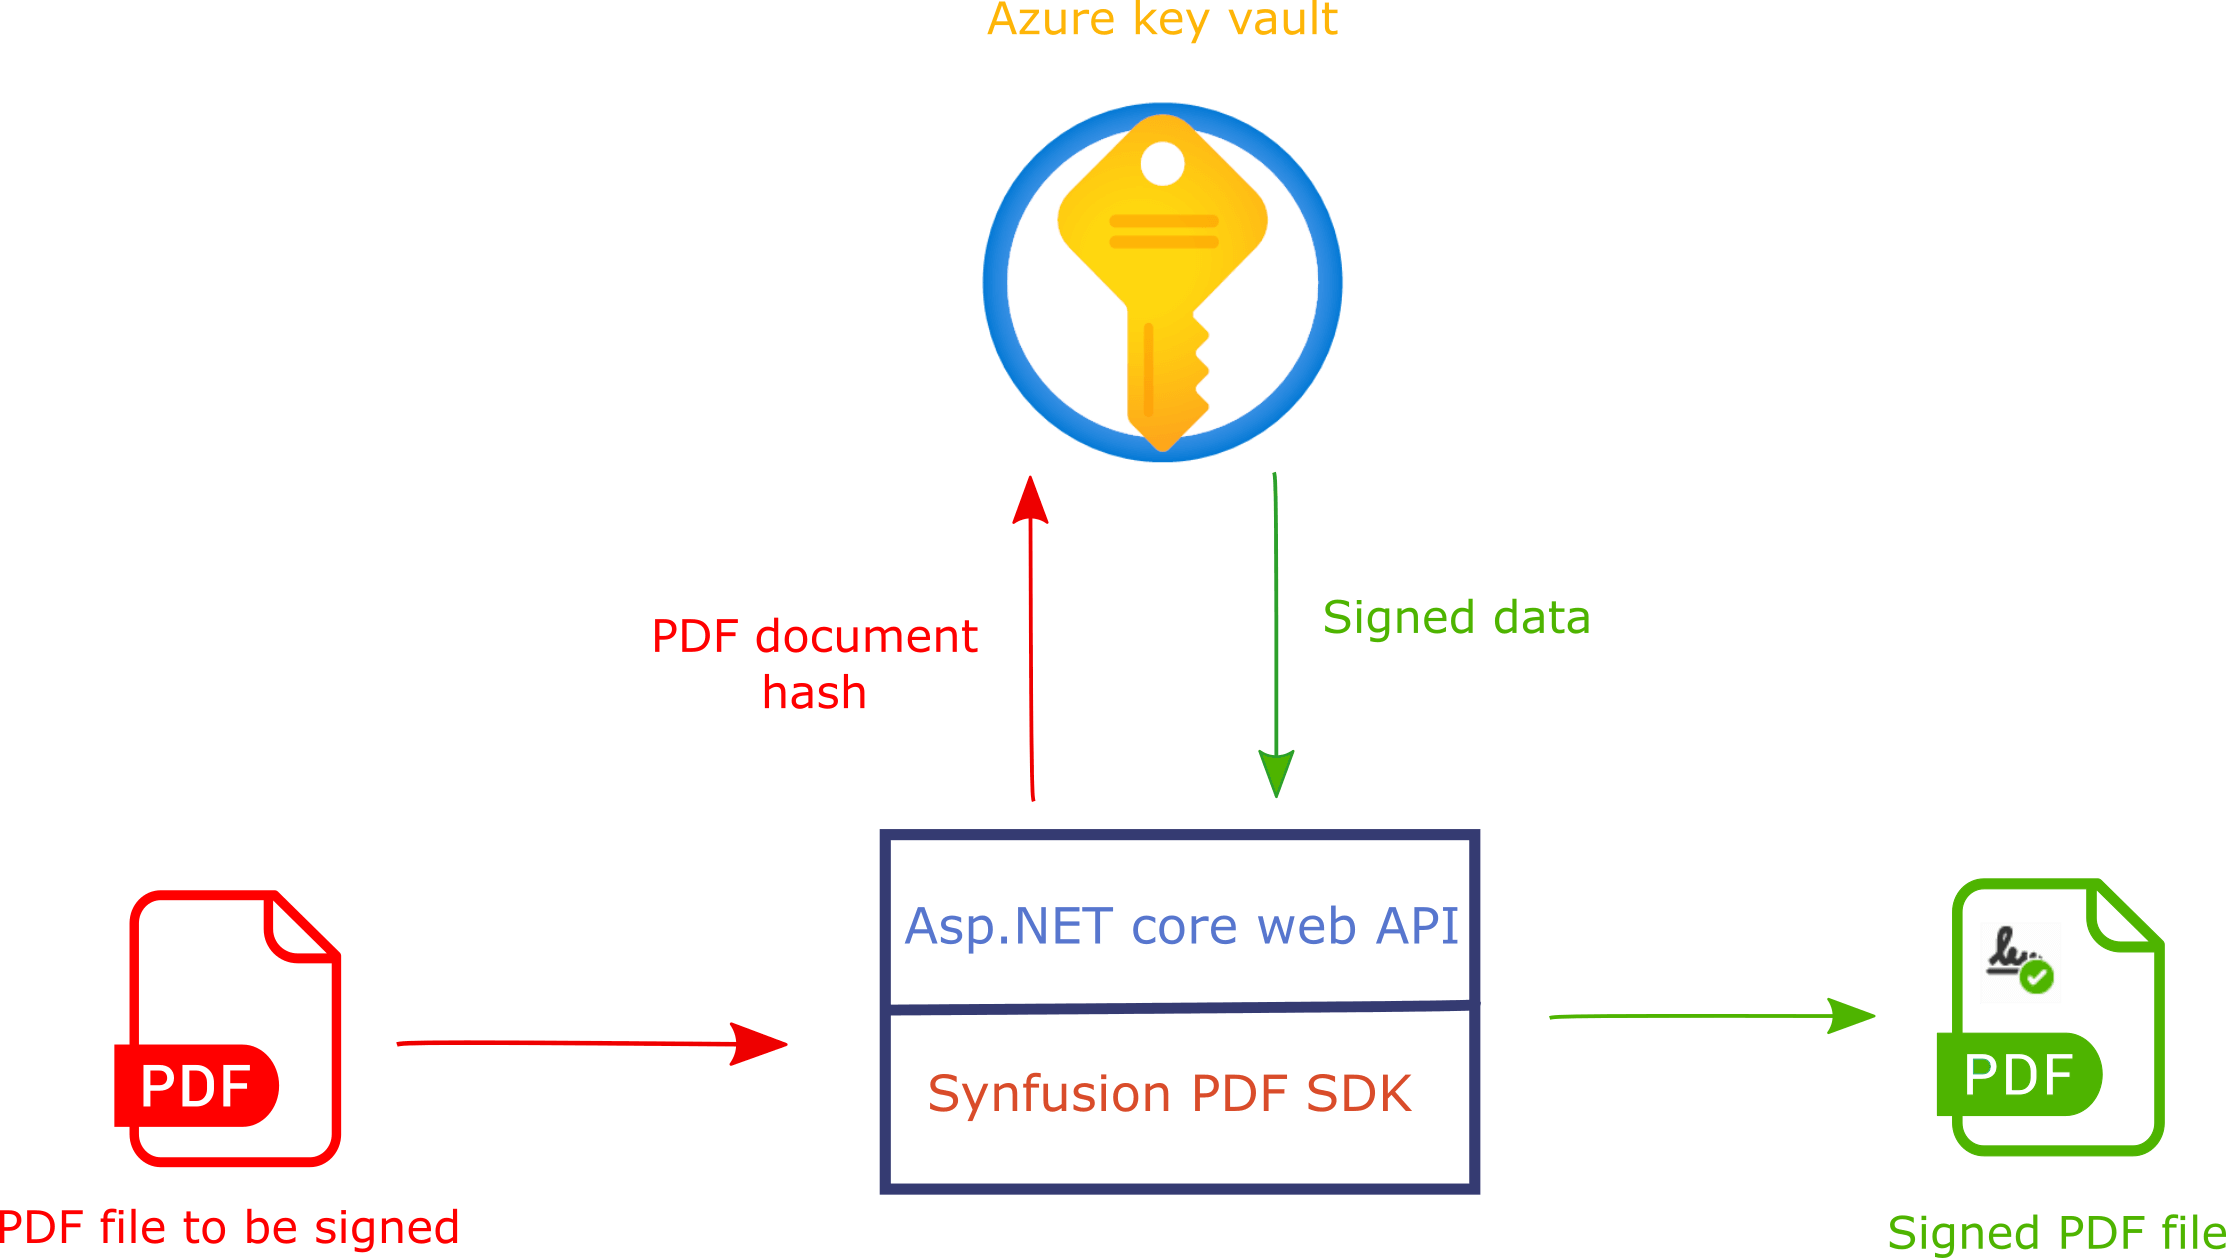
In this blog, we will follow these steps to accomplish this goal:
- Create an Azure key vault and certificate.
- Register the app to access the Azure key vault.
- Add the access policy to the Azure key vault.
- Create a PDF digital signature Web API service.
- Create a Blazor WebAssembly application with .NET 7.0.
- Launch the server and invoke the PDF digital signature service API from the client.

Experience a leap in PDF technology with Syncfusion's PDF Library, shaping the future of digital document processing.
Create an Azure key vault and certificate
Let’s first create an Azure key vault and certificate:
Step 1: First, create an Azure key vault resource in the Azure portal; please refer to this link.
Step 2: Once the resource is created, go to the key vault, choose Certificates, and click Generate/Import.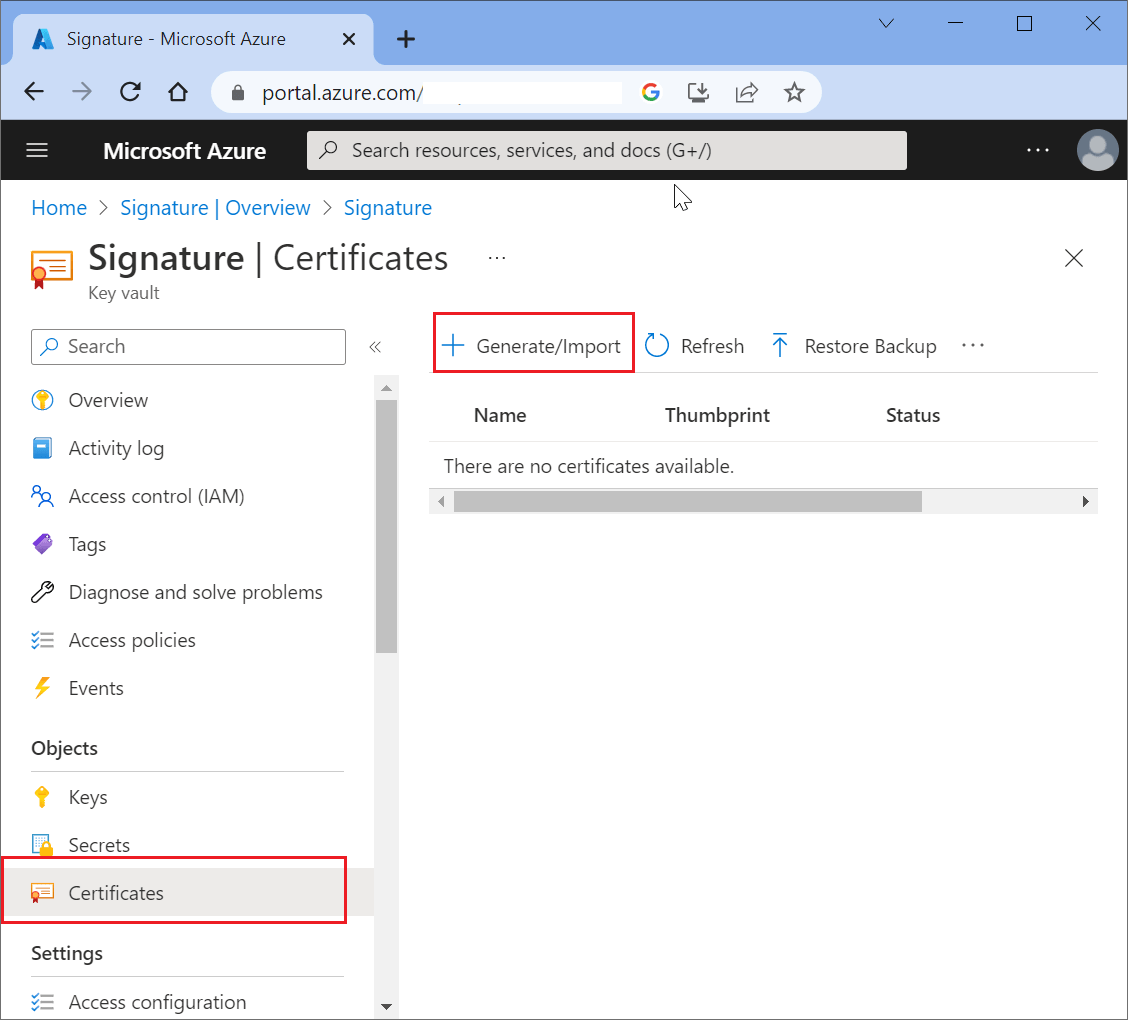
Step 3: Choose Generate in the Method of Certificate Creation field. This option generates a new certificate. In this example, we have chosen Self-signed certificate as the type of certification authority.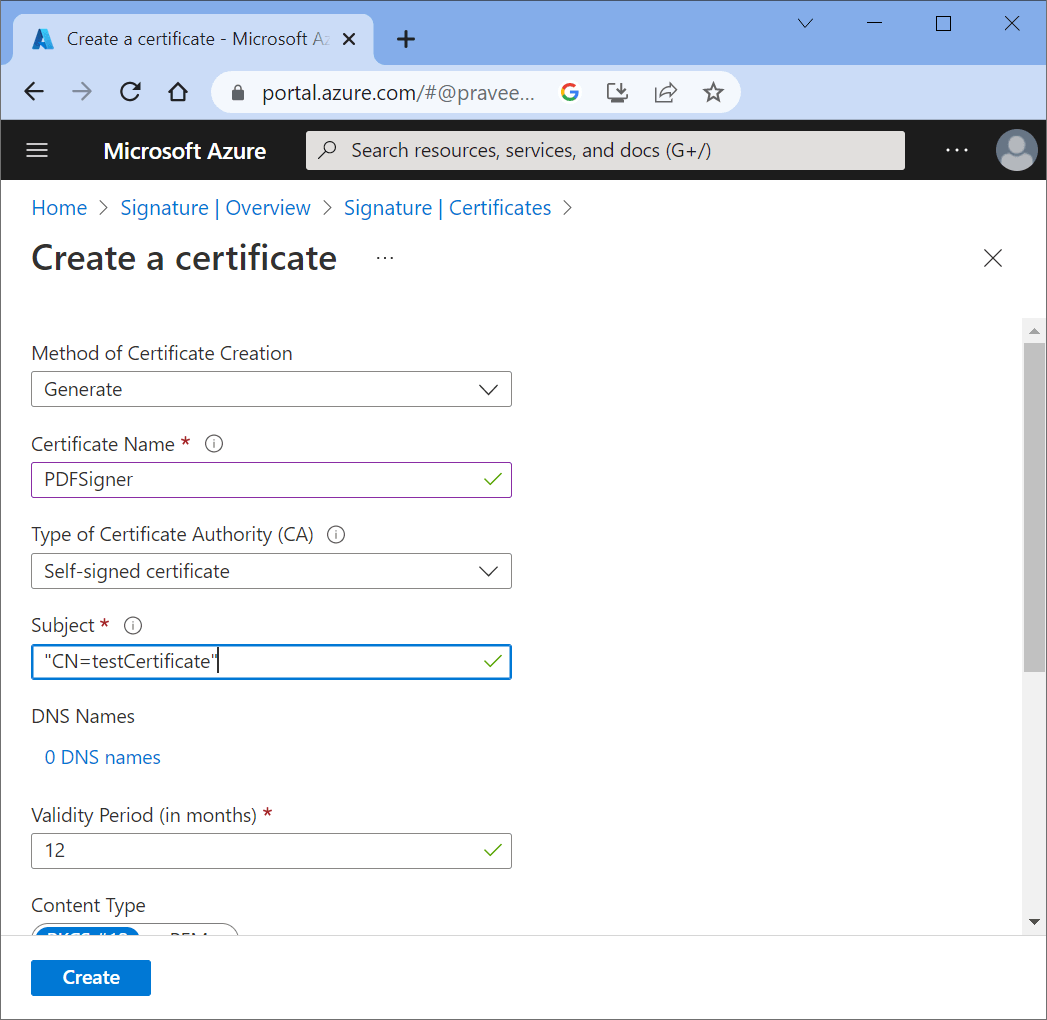
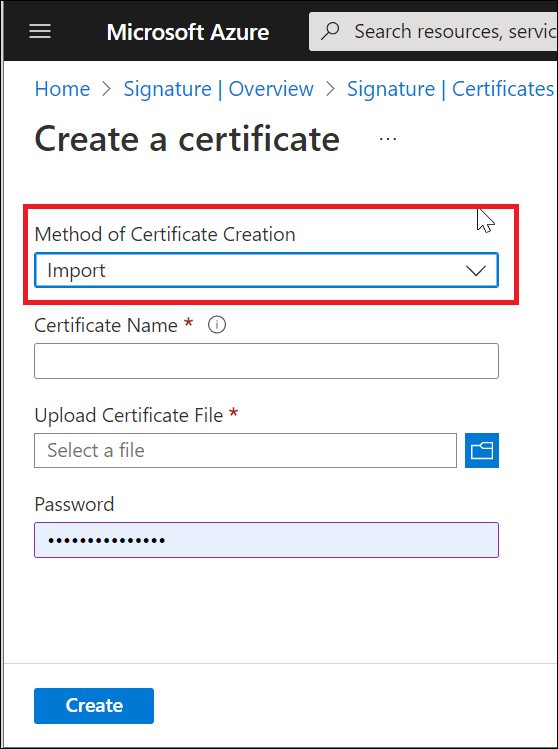
Note: You can also import a certificate from your local device by selecting Import.
Step 4: Next, select Advanced Policy Configuration. Choose No in the private key export option.
Step 5: Finally, click Create. The key vault certificate is now created under your account.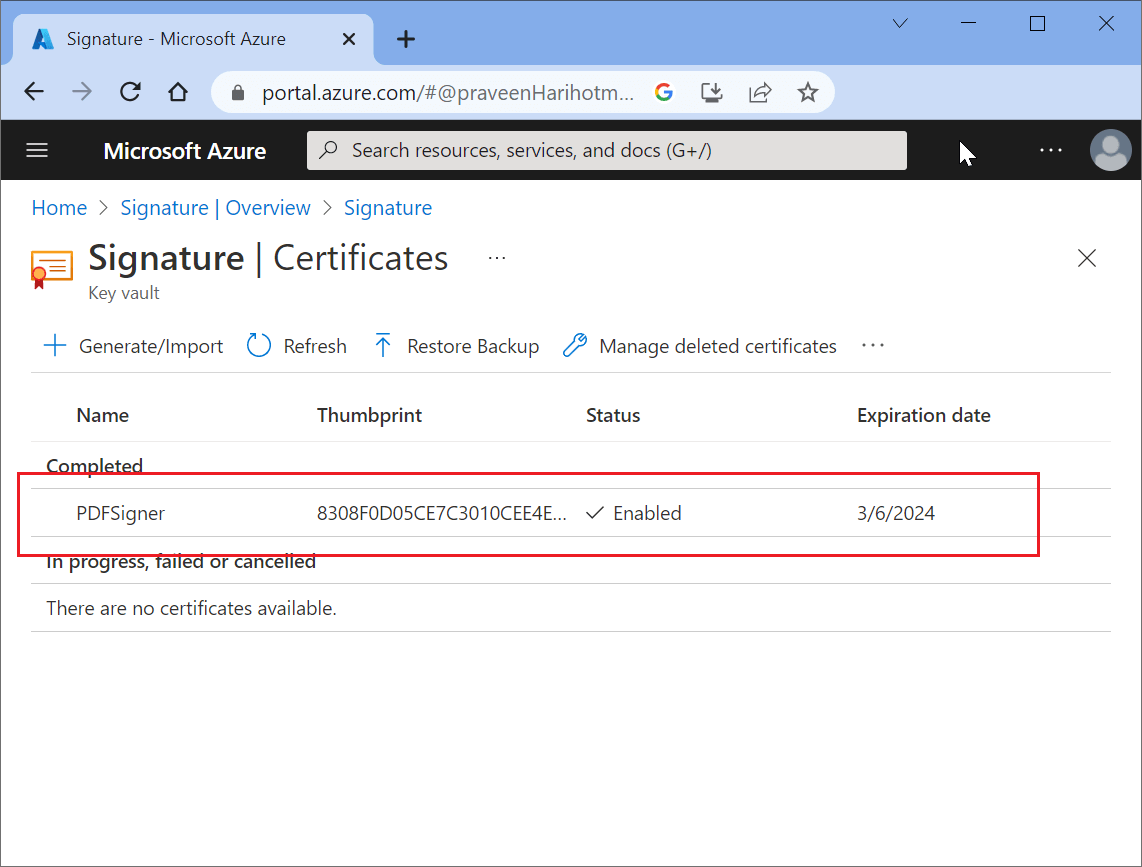
You can click and open the properties of the certificate as follows.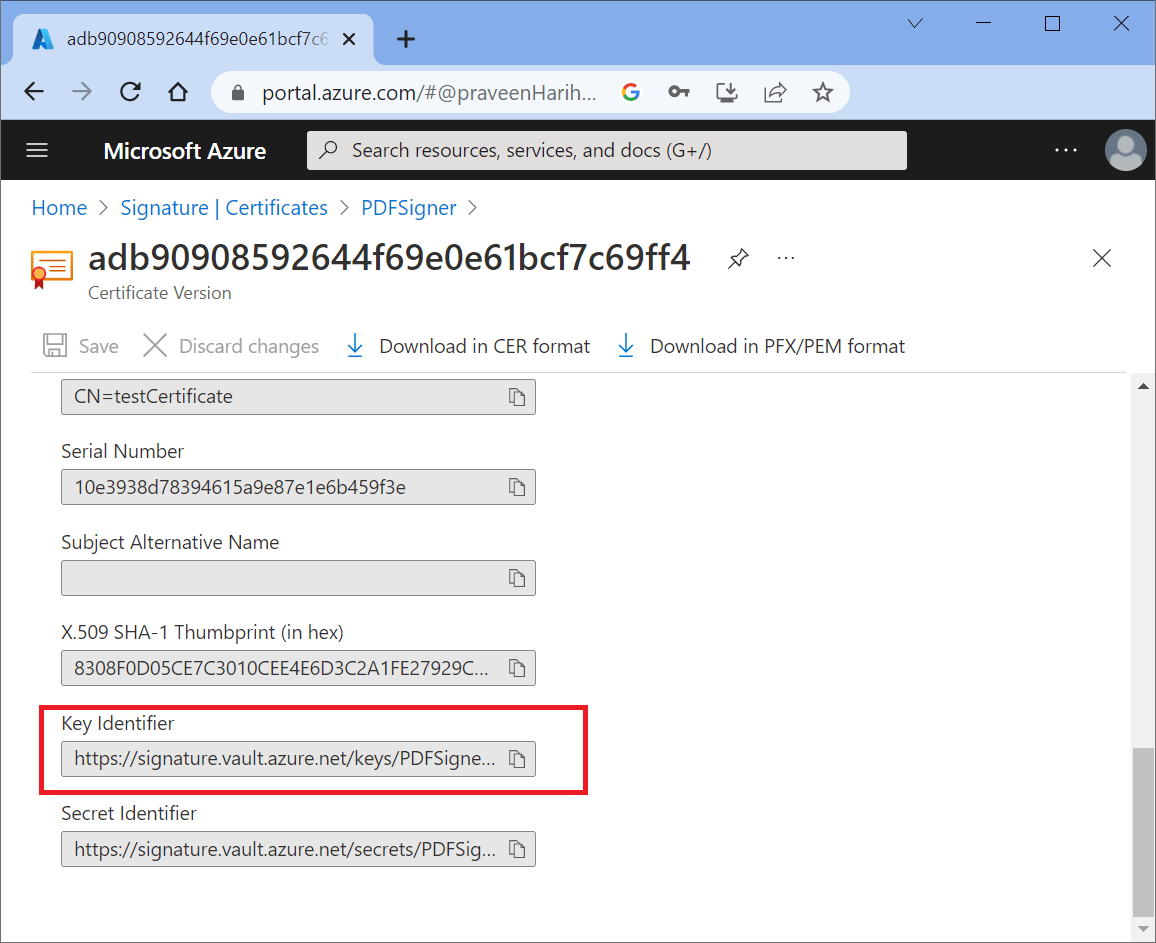
Register the app to access the Azure key vault
To access the Azure key vault from the Web API, we must register it in Azure Active Directory:
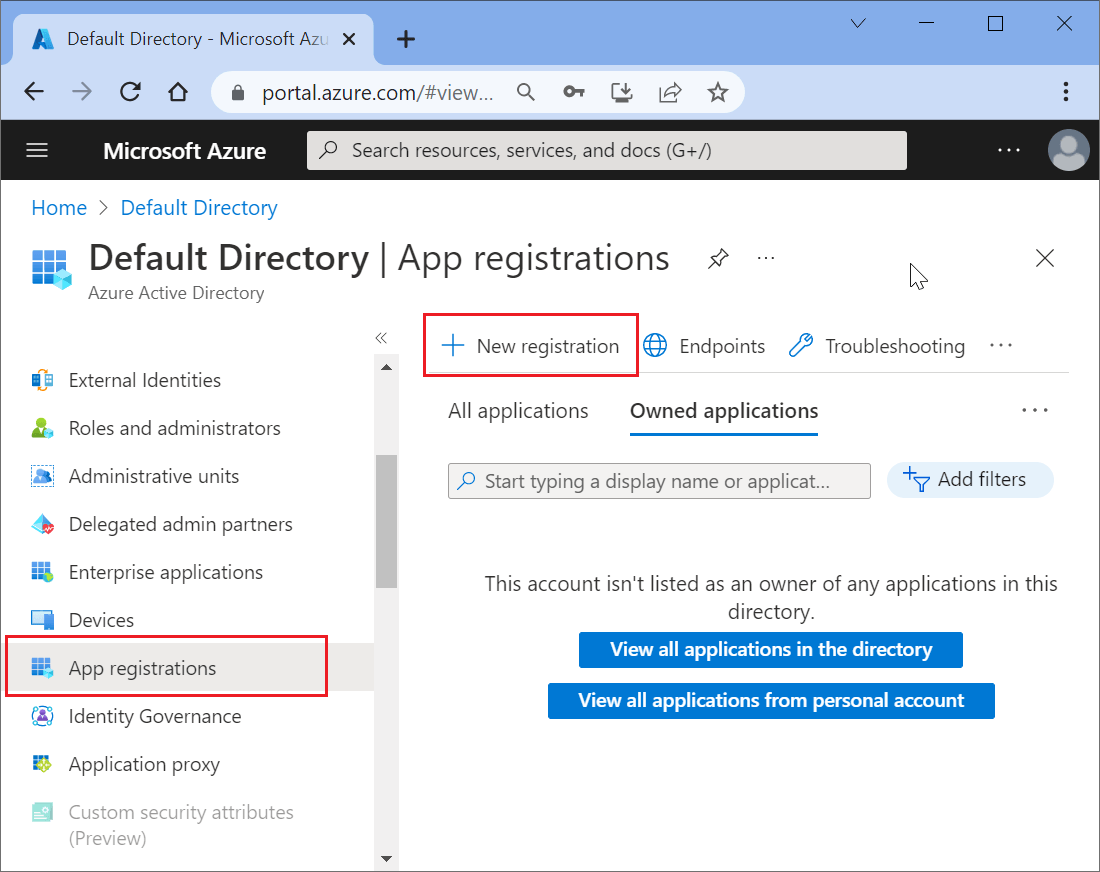
Step 1: Open Azure Active Directory. Select App Registration and click New Registration.
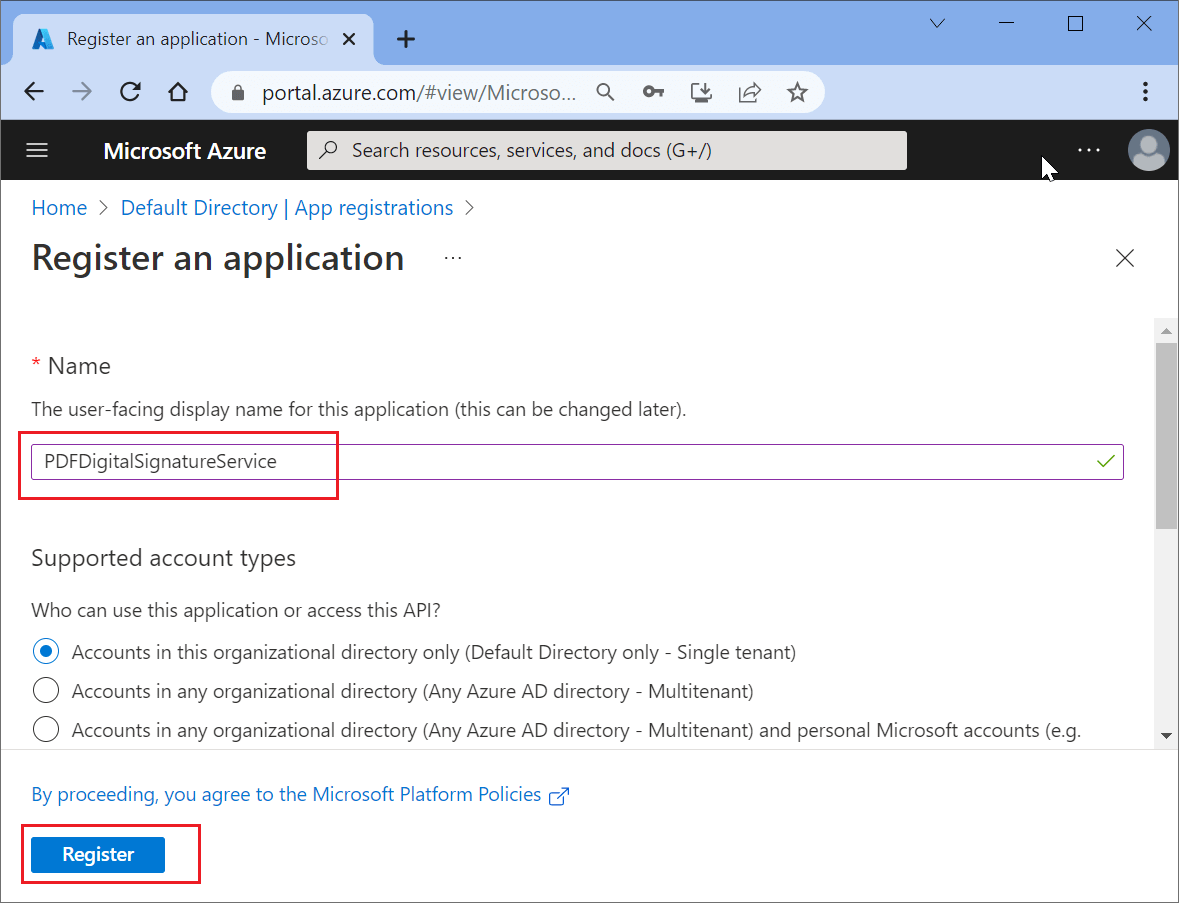
Step 2: Enter your app name and proceed to register.
Once registered, you will get the following information. Copy the client ID and tenant ID to use in the Web API.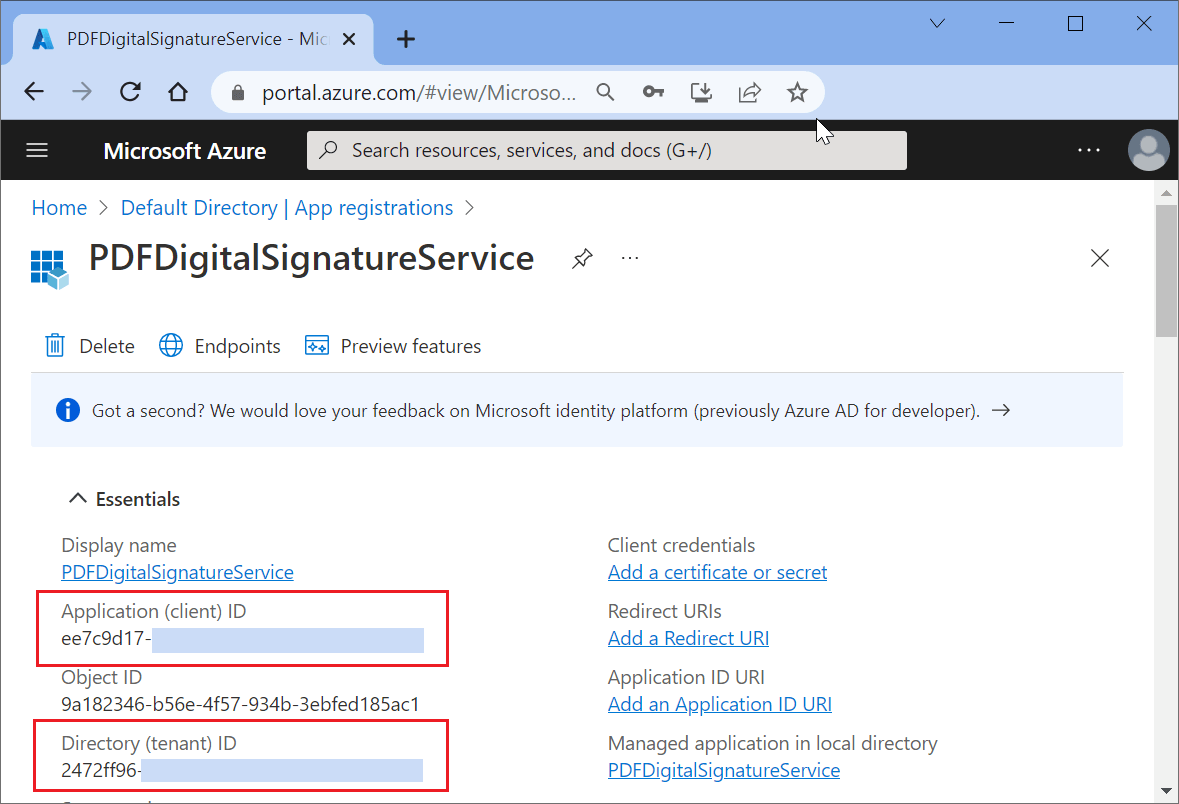
Step 3: Now select API permissions from the side menu and click Add permission. Select the Azure key vault, choose full access, and complete this process by clicking Add permissions.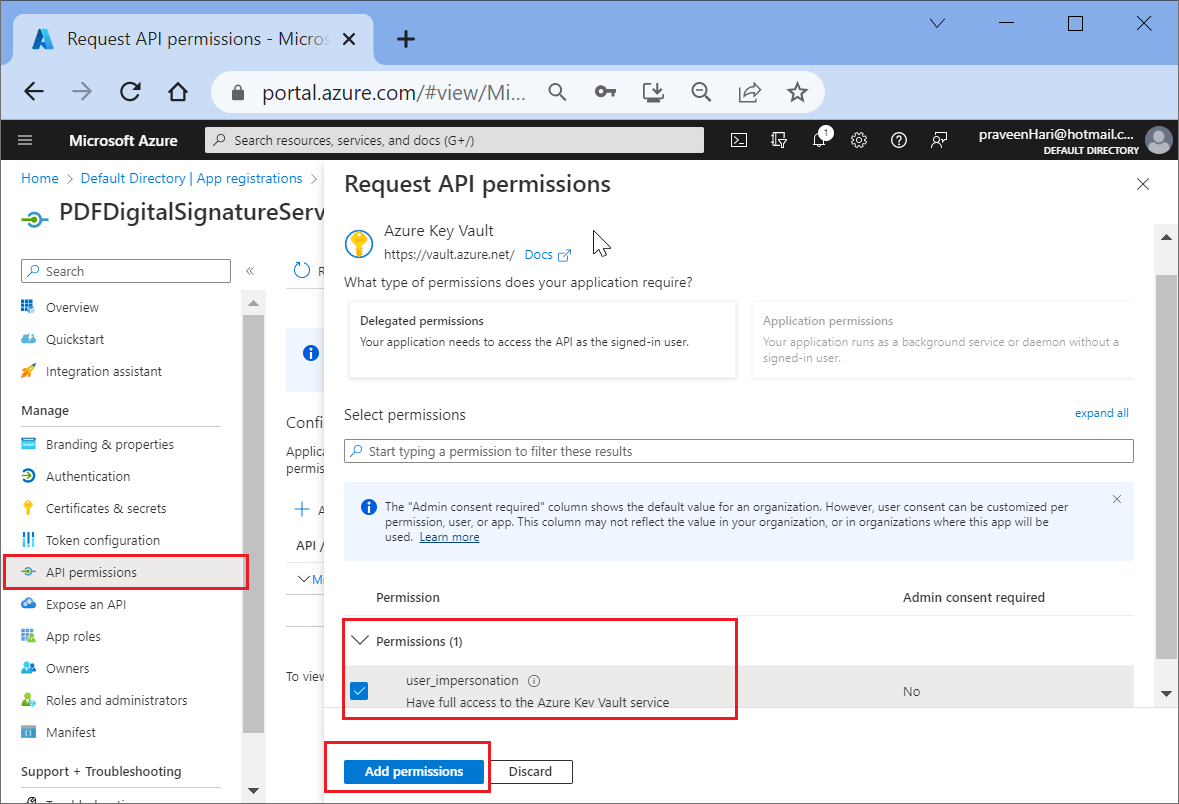
Step 4: Select the Certificate & secrets and click New client secret to create a new secret key. Copy this key to access it from Web API.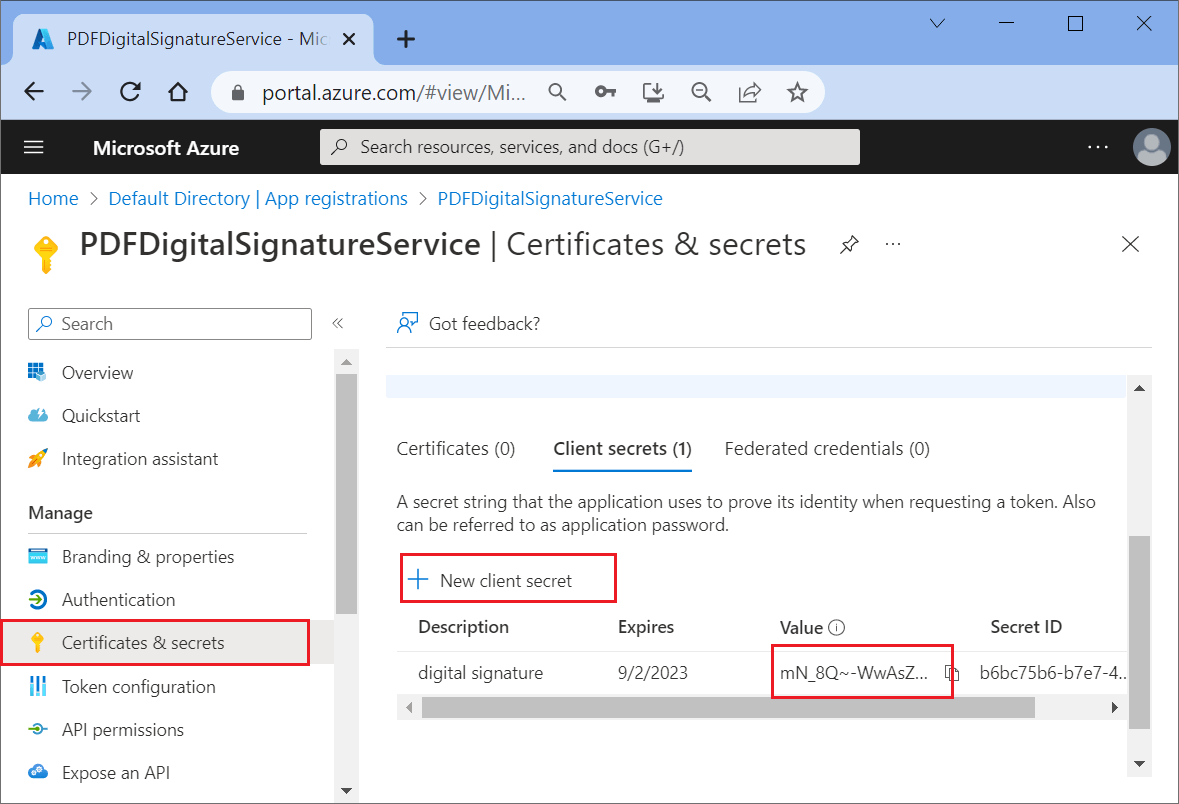

Explore the wide array of rich features in Syncfusion's PDF Library through step-by-step instructions and best practices.
Add the access policy to the Azure key vault
In the previous section, we created and registered the application. Now, we must provide Azure key vault access to this newly created application:
Step 1: Go to the Azure key vault, select Access policies, and click Create.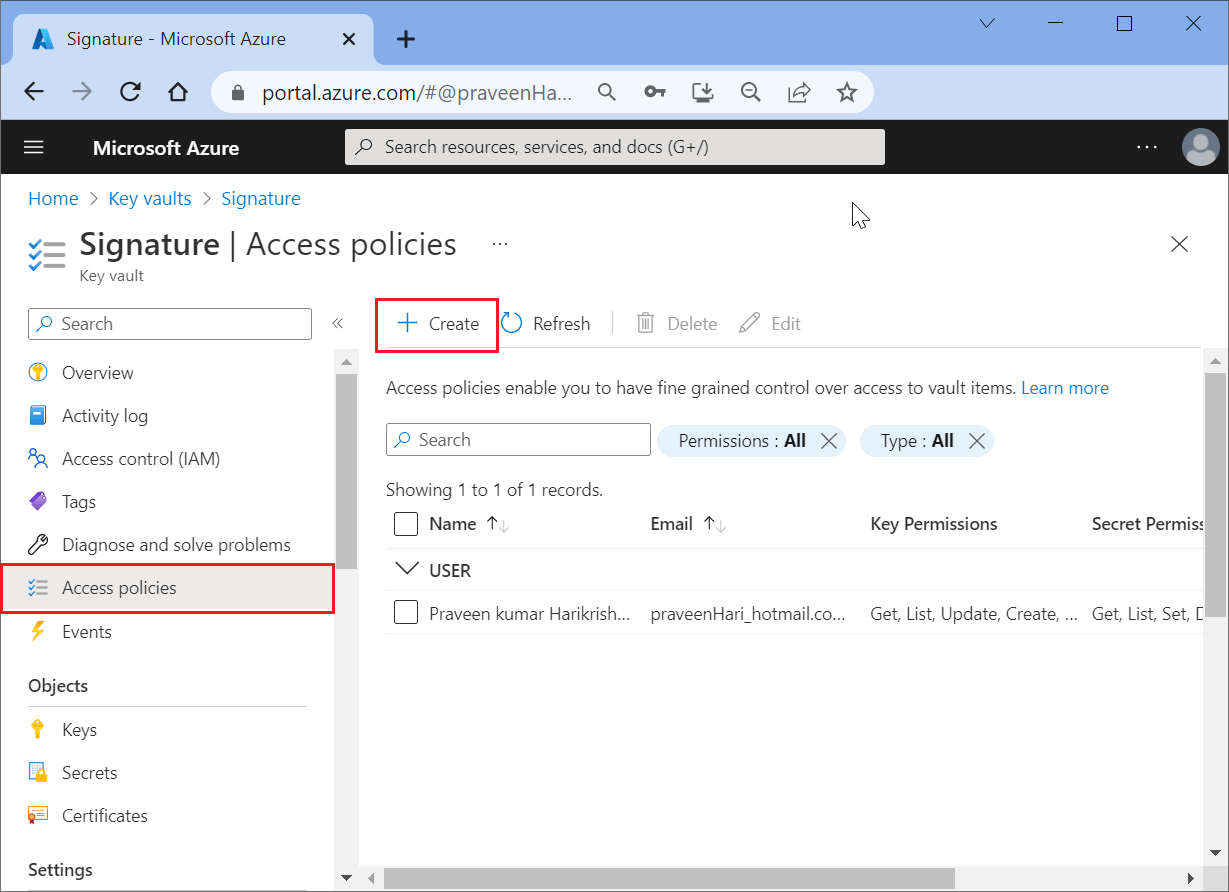
Step 2: Select the necessary permissions and click Next. 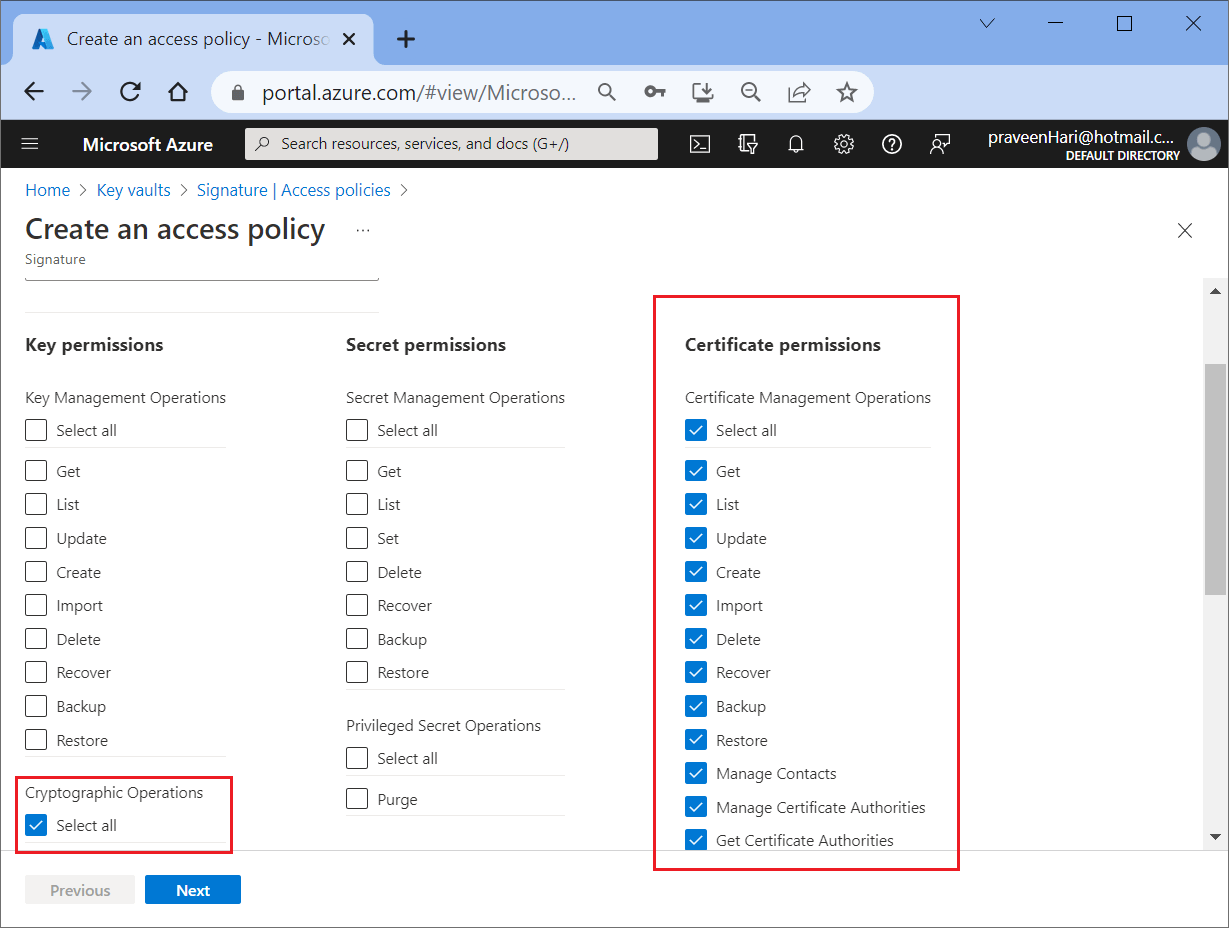
Step 3: In this window, select the application we created in the previous section, PDFDigitalSignatureService, and click Create.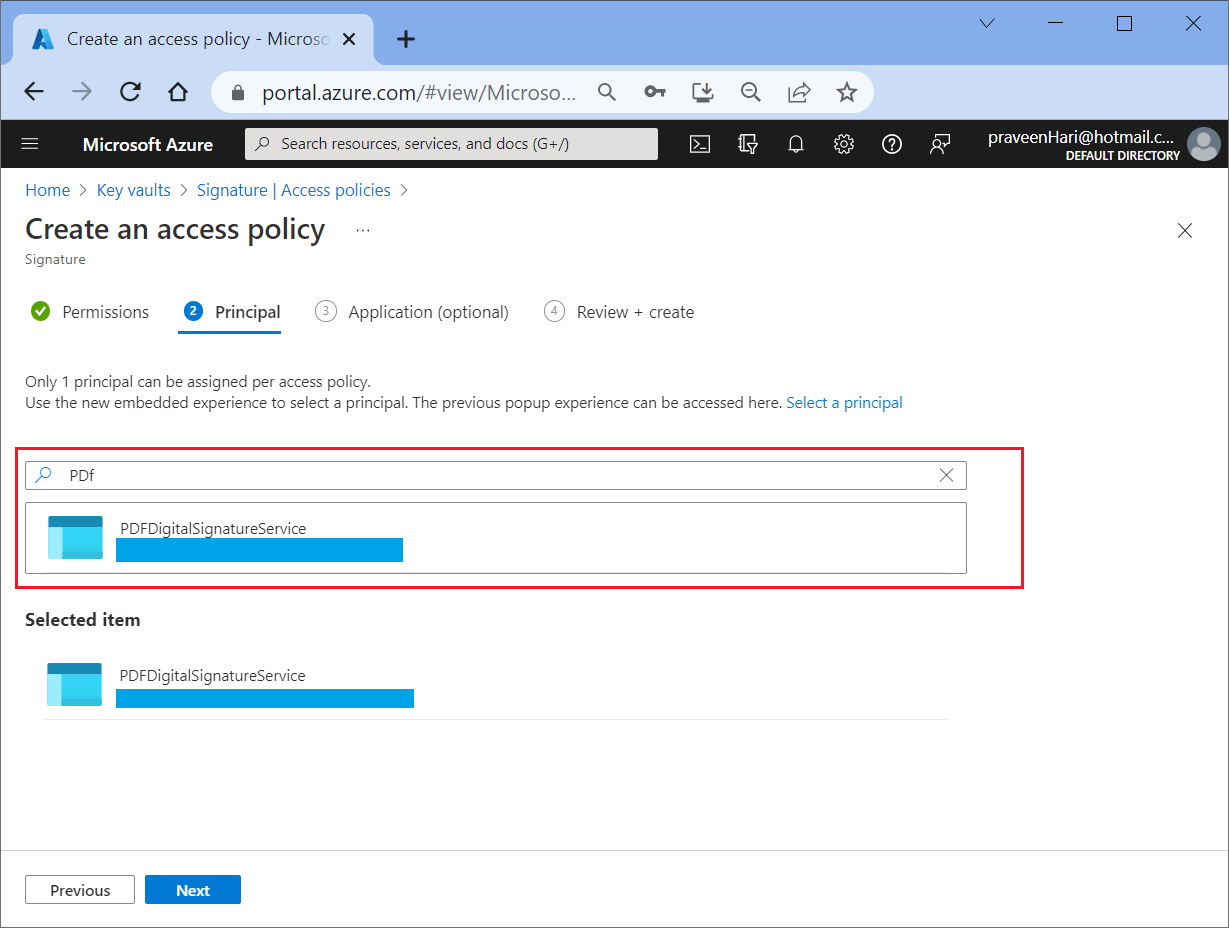

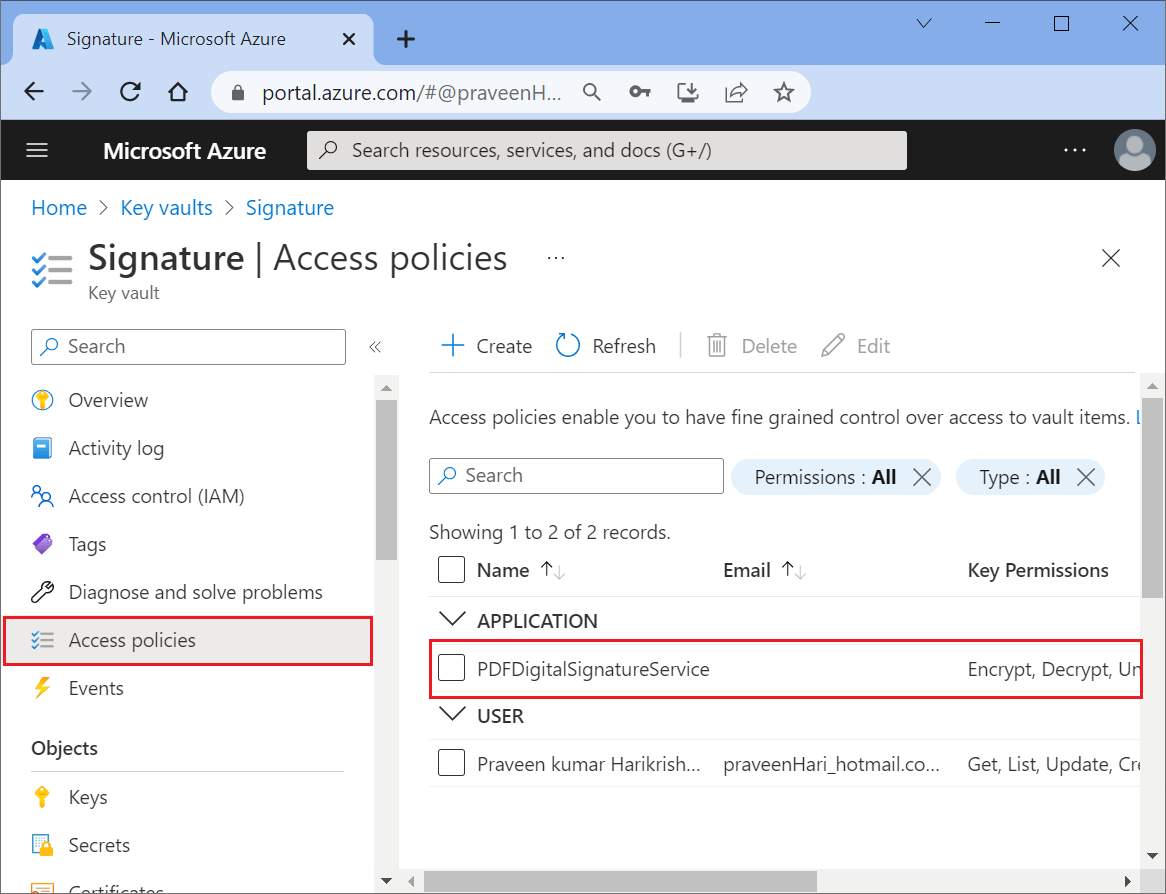
Now the application will be listed in the Access policies section.
Create a PDF digital signature Web API service
Now, we create a Web API to sign the PDF document digitally. To do this, create an ASP.NET Core minimal Web API. Refer to this link.
Once the project is created, install the following NuGet packages as a reference from NuGet.org:
- Azure.Security.KeyVault.Secrets
- Azure.Identity
- Azure.Security.KeyVault.Keys
- Azure.Security.KeyVault.Certificates
- Syncfusion.Pdf.Net.Core
Next, add a new API named signPDF in the Program.cs file.
app.MapPost("api/signPDF", async (HttpContext context) =>
{
});
The certificate generated in Azure Key Vault cannot be exported or copied. However, it is possible to obtain the public portion of the certificate. We can digitally sign a PDF document using this public certificate along with the Azure key.
The following code retrieves the public portion of the certificate.
X509Certificate2 GetPublicCertificate(ClientSecretCredential credential, String uri)
{
    //Create certificate client.
    CertificateClient certificateClient = new CertificateClient(new Uri(uri), credential);

    //Get the certificate with public key.
    KeyVaultCertificateWithPolicy certificate = certificateClient.GetCertificateAsync("PDFSigner").Result;

    //Create and return the X509Certificate2.
    return new X509Certificate2(certificate.Cer);
}
The following code is used to build the certificate chain if the certificate contains multiple certificates, such as root, intermediate, and issuer.
//Get the public certificate to sign the PDF document.
X509Certificate2 pubCertifciate = GetPublicCertificate(credential, vaultUri);

//Build the certificate chain.
X509Chain chain = new X509Chain();
chain.Build(pubCertifciate);

List<X509Certificate2> certificates = new List<X509Certificate2>();
for (int i = 0; i < chain.ChainElements.Count; i++)
{
   certificates.Add(chain.ChainElements[i].Certificate);
}
Afterward, the external signer interface should be integrated to utilize the Azure key to externally sign the hash of the PDF document. The interface is designed to allow the retrieval of the hash of the PDF document, which has been processed through public certificates, and subsequently enable the signing of the document using the Azure key.
//External signer to sign the PDF document using Azure Key Vault.
internal class ExternalSigner : IPdfExternalSigner
{
    public string HashAlgorithm => "SHA256";
    private CryptographyClient keyClient;

    public ExternalSigner(CryptographyClient client)
    {
        keyClient = client;
    }

    public byte[] Sign(byte[] message, out byte[] timeStampResponse)
    {
        var digest = SHA256.Create().ComputeHash(message);
        timeStampResponse = null;

        //Sign the hash of the PDF document
        return keyClient
            .SignAsync(
                SignatureAlgorithm.RS256,
                digest)
            .Result.Signature;
    }
}
The following complete code is used to sign the PDF document with the help of external signing.
app.MapPost("api/signPDF", async (HttpContext context) =>
{
    var request = await context.Request.ReadFormAsync();

    if (request.Files.Count>0)
    {

        var pdfFile = request.Files[0].OpenReadStream();
        //Provide your azure key vault details here
        String tenantId = "tenantID";
        String clientId = "clientID";
        String secret = "secret";
        String vaultUri = "vault URI”;

        ClientSecretCredential credential = new ClientSecretCredential(tenantId, clientId, secret);

        //Get the public certificate to sign the PDF document.
        X509Certificate2 pubCertifciate = GetPublicCertificate(credential, vaultUri);

        //Build the certificate chain.
        X509Chain chain = new X509Chain();
        chain.Build(pubCertifciate);

        List<X509Certificate2> certificates = new List<X509Certificate2>();
        for (int i = 0; i < chain.ChainElements.Count; i++)
        {
            certificates.Add(chain.ChainElements[i].Certificate);
        }

        //Load the PDF document.
        PdfLoadedDocument loadedDocument = new PdfLoadedDocument(pdfFile);

        //Load the existing page.
        PdfLoadedPage? page = loadedDocument.Pages[0] as PdfLoadedPage;

        //Create a new PDF signature object.
        PdfSignature signature = new PdfSignature(loadedDocument, page!, null, "Sig1");

        signature.Bounds = new Syncfusion.Drawing.RectangleF(0, 0, 200, 100);

        //Create CryptographyClient with key identifier.
        CryptographyClient client = new CryptographyClient(new Uri("https://signature.vault.azure.net/keys/PDFSigner/adb90908592644f69e0e61bcf7c69ff4"), credential);

        //Signg using external signer.
        signature.AddExternalSigner(new ExternalSigner(client), certificates, null);

        signature.Settings.DigestAlgorithm = DigestAlgorithm.SHA256;

        MemoryStream ms = new MemoryStream();

        //Save and close the document.
        loadedDocument.Save(ms);

        ms.Position = 0;

        loadedDocument.Close(true);

        context.Response.ContentType = "application/pdf";
        await context.Response.Body.WriteAsync(ms.ToArray());
    }
});
Now that the web service has been created, it can be utilized in any application. For this blog, a Blazor WebAssembly (WASM) application will be developed to showcase the capabilities of the Web API service.

Embark on a virtual tour of Syncfusion's PDF Library through interactive demos.
Create Blazor WebAssembly app with .NET 7
The client application in this implementation is a Blazor WebAssembly application built with .NET version 7.0. To create a new ASP.NET Core Blazor WebAssembly application using Visual Studio 2022, please follow the guidance provided in link. Within the application, we utilize the HttpClient.PostAsync method to send a POST request to the specified URI as an asynchronous operation.
@code {
    private async Task SignPDF()
    {
        //Create http HTTP client to send both files and json JSON data.
        using (var client = new HttpClient())
        {
            //Create multipart form data content.
            using (var content = new MultipartFormDataContent())
            {
                var document = await Http.GetByteArrayAsync("PDF_Succinctly.pdf");
                content.Add(CreateContent("document", "input.pdf", document));
                //Calling web Web API to sign the PDF document.
                var response = await client.PostAsync("https://localhost:7171/api/signPDF", content);
                if (response.StatusCode == HttpStatusCode.OK)
                {
                    //Downloading the PDF document.
                    var responseContent = await response.Content.ReadAsStreamAsync();
                    using var Content = new DotNetStreamReference(stream: responseContent);
                    await JS.InvokeVoidAsync("SubmitHTML", "HTMLToPDF.pdf", Content);
                }
            }
        }
    }
    private ByteArrayContent CreateContent(string name, string fileName, byte[] fileBytes)
    {
        var fileContent = new ByteArrayContent(fileBytes);
        fileContent.Headers.ContentType = new MediaTypeHeaderValue("application/octet-stream");
        fileContent.Headers.ContentDisposition = new ContentDispositionHeaderValue("form-data")
        {
            Name = name,
            FileName = fileName
        };
        return fileContent;
    }
}
Once the requested response status code is OK, invoke the JavaScript (JS) function in the index.html file to save the PDF document.
<script>
    window.SubmitHTML = async (fileName, contentStreamReference) => {
        const arrayBuffer = await contentStreamReference.arrayBuffer();
        const blob = new Blob([arrayBuffer]);
        const url = URL.createObjectURL(blob);
        const anchorElement = document.createElement('a');
        anchorElement.href = url;
        anchorElement.download = fileName ?? '';
        anchorElement.click();
        anchorElement.remove();
        URL.revokeObjectURL(url);
    }
</script>
While building and running the application, the website will open in your default browser.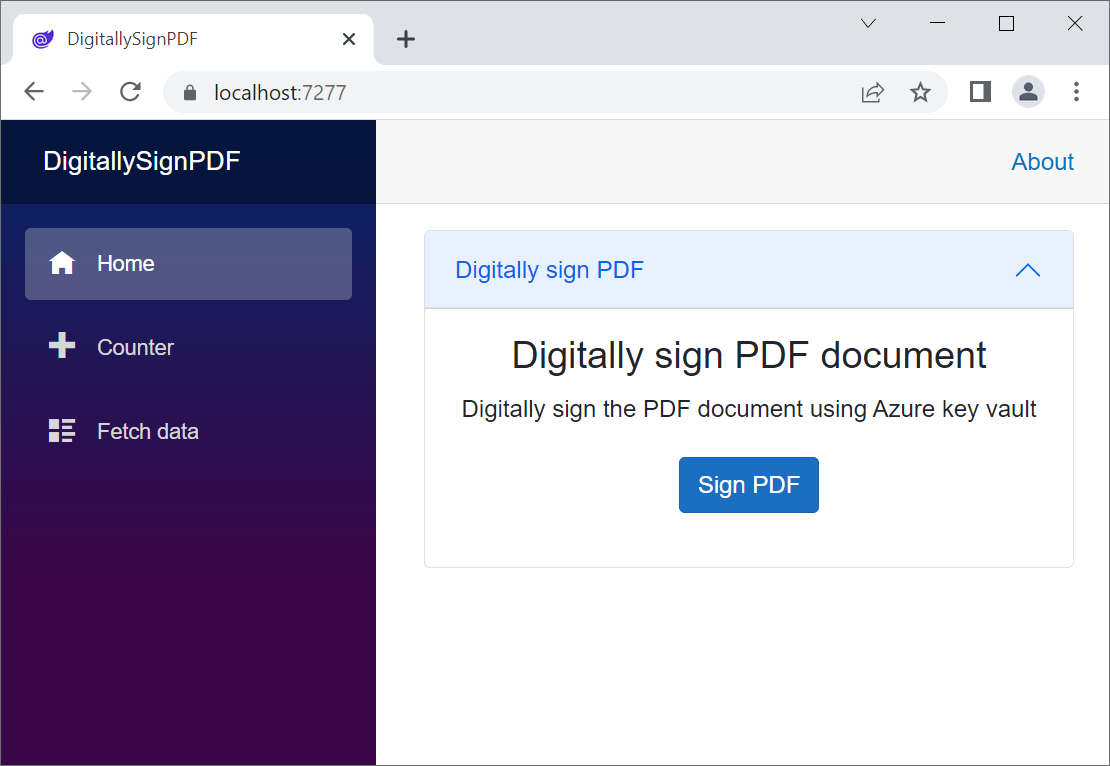
Launching the server and invoking the PDF digital signature service API from the client
Next, we launch the server and invoke the digital signature API from the client application.
Step 1: Run the Web API application to launch the published Web API in the browser.
Step 2: To sign a PDF document using the client application, send an asynchronous POST request to the specified URI (e.g., https://localhost:7171/api/signPDF) on the localhost. This will send the request to the server application, which will sign the PDF document using Azure Key Vault and send the response back to the client.
You will receive a PDF file upon successful signing, as illustrated in the following screenshot.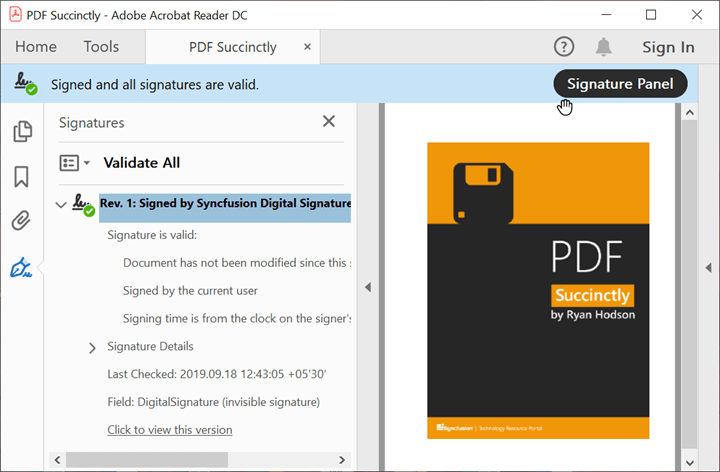
GitHub samples
For better understanding, we have committed the source for this project in the Sign PDFs using the Azure Key Vault GitHub repository.

Join thousands of developers who rely on Syncfusion for their PDF needs. Experience the difference today!
Conclusion
In this blog post, we have learned how to create our own PDF digital signature web service API to sign a PDF document using Azure Key Vault and the Syncfusion C# PDF Library. Now you can easily integrate this service into your application and customize it to add more features.
Take a moment to look at the documentation, where you will find other options and features, all with accompanying code samples.
For current Syncfusion customers, the newest version of Essential Studio® is available from the license and downloads page.
Please let us know in the comments below if you have any questions about these features. You can also contact us through our support forum, support portal, or feedback portal. We are happy to assist you!
Related blogs
If you liked this article, we think you would also like the following articles about PDF Library:
- Digitally Sign and Verify Signatures in PDF Files Using C#: A Complete Guide
- HTML-to-PDF Conversion in C# – A Complete Guide
- Generate Dynamic PDF Reports from HTML Using C#
- How to Find Corrupted PDF Files in C# Easily
- Create Accessible PDF Documents Using C#
- Easy Ways to Redact PDFs Using C#
- 7 Ways to Compress PDF Files in C#, VB.NET
