As you may know, since 2021, .NET MAUI Preview is updated in the middle of every month. On Jan. 19, 2022, Microsoft released the update .NET MAUI Preview 12. I was really surprised to get an update on the Shell application in .NET MAUI Preview 12. In this blog, let’s see how easy it is to integrate Shell in a .NET MAUI application (.NET MAUI Preview 12).
.NET MAUI Preview 12 Overview
.NET Multi-platform App UI (MAUI) released Preview 12 with many quality improvements and several new features:
- Documentation was added for apps (icons and lifecycle), brushes, and controls.
- RelativeLayout and AbsoluteLayout compatibility handlers.
- Z-index support for multiple-child layout.
- Windows extended toolbar—non-Shell.
The Shell feature is available in .NET MAUI Preview 12, so please ensure your Visual Studio 2022 is updated. For more details, please refer to the article, .NET MAUI Preview 12. Also, check the .NET MAUI Preview 12 release notes.

Easily build cross-platform mobile and desktop apps with the flexible and feature-rich controls of the Syncfusion .NET MAUI platform.
How to Use Shell in .NET MAUI Preview 12
Shell is basically an app scaffold designed with flyout menus and tabs. It is commonly named AppShell and can hold collections of pages. It will save you development time by reducing UI complexities, providing fundamental features like navigation and search.
Follow these steps to use Shell in .NET MAUI:
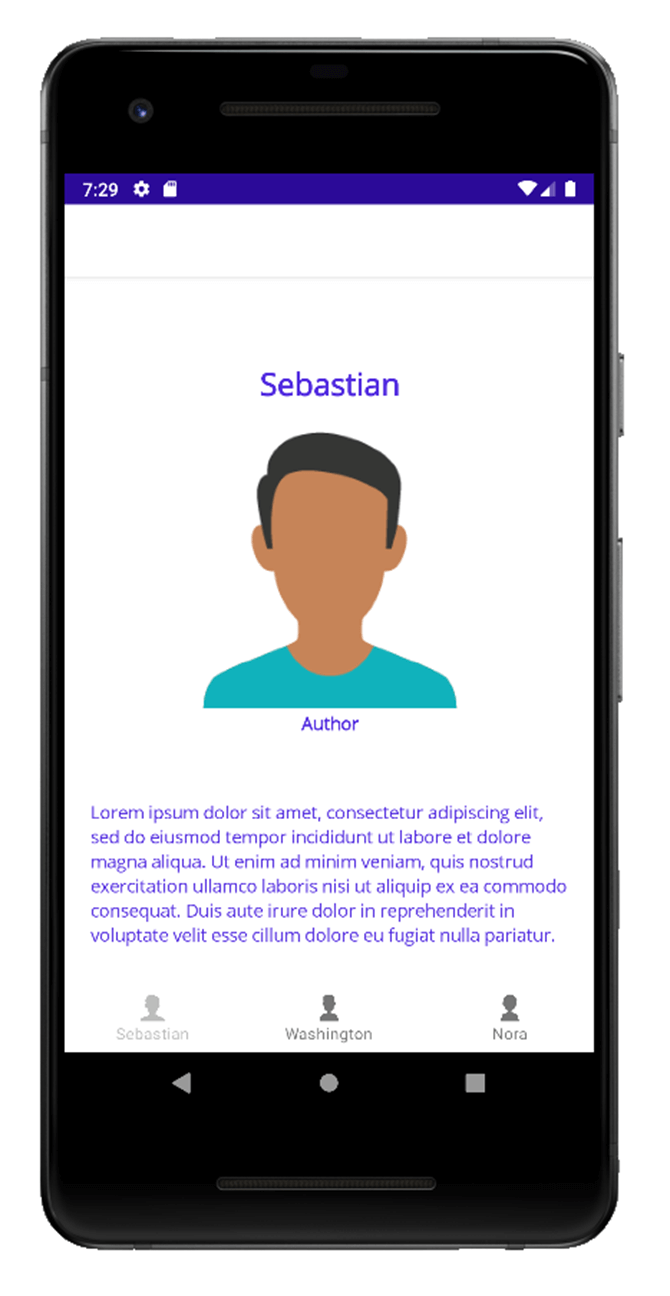
Step 1: First, create required content pages. I am going to show information for three authors on a tabbed page. To create a content page, right-click on the solution. Click Add, and then New Item. Select ContentPage or press Ctrl + Alt + a to create a new page. I am naming this content page SebastianInfoPage.
<ContentPage xmlns="http://schemas.microsoft.com/dotnet/2021/maui"
             xmlns:x="http://schemas.microsoft.com/winfx/2009/xaml"
             x:Class="MauiShell.SebastianInfoPage"
             Title="SebastianInfoPage"
             BackgroundColor="White">
  <StackLayout Orientation="Vertical" Margin="20">
    <Label Text="Sebastian"
           FontSize="24"
           FontAttributes="Bold"
           VerticalOptions="CenterAndExpand"
           HorizontalOptions="CenterAndExpand" />
    <Image Source="sebastian.png"
           HeightRequest="250"
           WidthRequest="250"
           VerticalOptions="CenterAndExpand"
           HorizontalOptions="CenterAndExpand" />
    <Label Text="Author"
           FontSize="12"
           FontAttributes="Bold"
           VerticalOptions="CenterAndExpand"
           HorizontalOptions="CenterAndExpand" />
    <Label Text="Lorem ipsum dolor sit amet, consectetur adipiscing elit, sed do eiusmod tempor incididunt ut labore et dolore magna aliqua. Ut enim ad minim veniam, quis nostrud exercitation ullamco laboris nisi ut aliquip ex ea commodo consequat. Duis aute irure dolor in reprehenderit in voluptate velit esse cillum dolore eu fugiat nulla pariatur."
           FontSize="12"
           VerticalOptions="CenterAndExpand"
           HorizontalOptions="CenterAndExpand" />
  </StackLayout>
</ContentPage>
Repeat this step twice to create two more author info pages, mine being NoraInfoPage and WashingtonInfoPage.
On each page, I have created a UI to show author details using labels (to show the name and description of the authors) and images (to show avatar images of the authors).
Step 2: Now, create another XAML content page by right-clicking the solution. Click Add, then New Item, and ContentPage. Name this content page AppShell.Xaml.
Step 3: Then, change the content page created in the previous step to a Shell page. Refer to the following code.
<Shell xmlns="http://schemas.microsoft.com/dotnet/2021/maui"
       xmlns:x="http://schemas.microsoft.com/winfx/2009/xaml"
       x:Class="MauiShell.AppShell"
       xmlns:Pages="clr-namespace:MauiShell"
       Title="AppShell"
       BackgroundColor="White"></Shell>
Change the content page into a Shell page in code behind, too.
public partial class AppShell : Shell
{
  public AppShell()
  {
    InitializeComponent();
  }
}
Step 4: In the Shell page, create a TabBar and add the required tabs with Title and Icon properties. Here, each tab is designed to hold one page.
<Shell xmlns="http://schemas.microsoft.com/dotnet/2021/maui"
       xmlns:x="http://schemas.microsoft.com/winfx/2009/xaml"
       x:Class="MauiShell.AppShell"
       xmlns:Pages="clr-namespace:MauiShell"
       Title="AppShell"
       BackgroundColor="White">
  <TabBar>
    <Tab Title="Sebastian"
         Icon="sebastian.png">
    </Tab>
    <Tab Title="Washington"
         Icon="washington.png">
    </Tab>
    <Tab Title="Nora"
         Icon="nora.png">
    </Tab>
  </TabBar>
</Shell>
Step 5: Then, add ShellContent inside each tab and set the ContentTemplate of the ShellContent to the info pages we created in Step 1.
<Shell xmlns="http://schemas.microsoft.com/dotnet/2021/maui"
       xmlns:x="http://schemas.microsoft.com/winfx/2009/xaml"
       x:Class="MauiShell.AppShell"
       xmlns:Pages="clr-namespace:MauiShell"
       Title="AppShell"
       BackgroundColor="White">
  <TabBar>
    <Tab Title="Sebastian"
         Icon="sebastian.png">
      <ShellContent ContentTemplate="{DataTemplate Pages:SebastianInfoPage}" />
    </Tab>
    <Tab Title="Washington"
         Icon="washington.png">
      <ShellContent ContentTemplate="{DataTemplate Pages:WashingtonInfoPage}" />
    </Tab>
    <Tab Title="Nora"
         Icon="nora.png">
      <ShellContent ContentTemplate="{DataTemplate Pages:NoraInfoPage}" />
    </Tab>
  </TabBar>
</Shell>
That’s it. Execute the project and you will see output like in the following screenshot.

Syncfusion .NET MAUI controls are well-documented, which helps to quickly get started and migrate your Xamarin apps.
Add Shell Flyout View
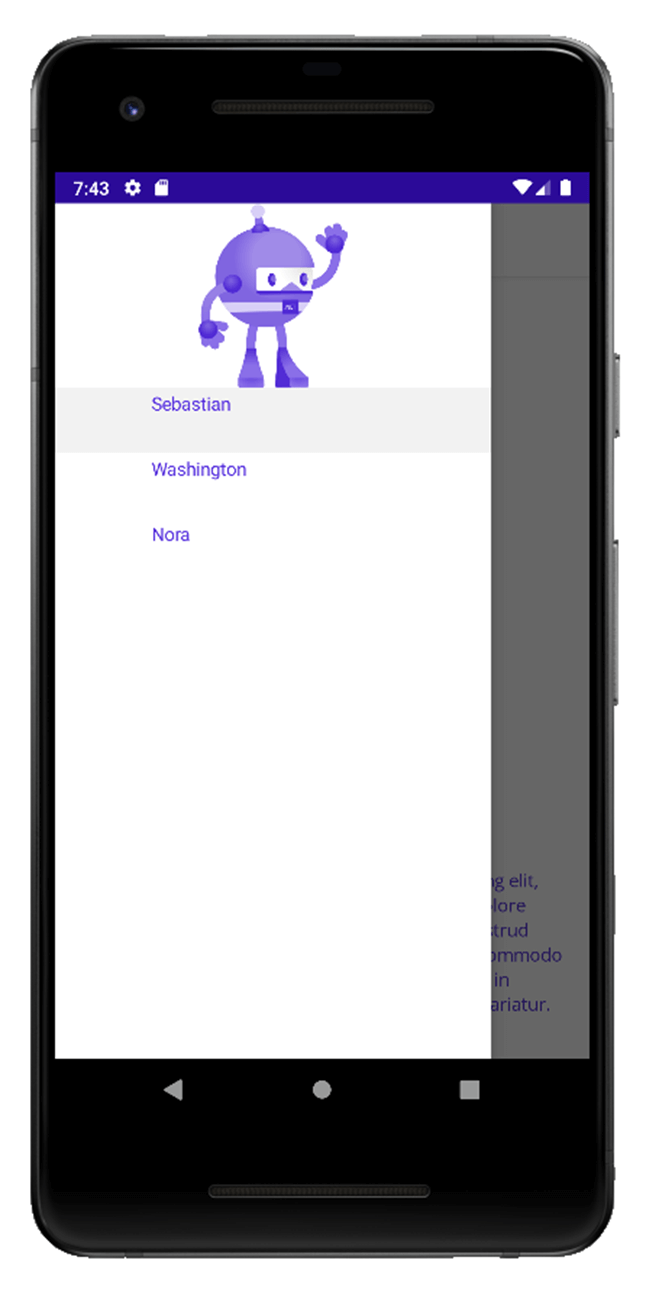
In MAUI Preview 12, you can show a page as a flyout menu. To do this, remove the TabBar and Tab. Then, add the ShellContent directly to the content of the Shell.
You need to provide a title for the ShellContent. The value provided to the title will be shown in the flyout menu. You can also add any view as the header of the flyout by using the FlyoutHeader property of the Shell.
Refer to the following code.
<Shell xmlns="http://schemas.microsoft.com/dotnet/2021/maui"
       xmlns:x="http://schemas.microsoft.com/winfx/2009/xaml"
       x:Class="MauiShell.AppShell"
       xmlns:Pages="clr-namespace:MauiShell"
       Title="AppShell"
       BackgroundColor="White">
  <Shell.FlyoutHeader>
    <Grid>
    <Image Source="dotnet_bot.png"
          HeightRequest="142"
          VerticalOptions="Center"
          WidthRequest="230"
          HorizontalOptions="Center" />
    </Grid>
  </Shell.FlyoutHeader>
  <ShellContent Title="Sebastian" ContentTemplate="{DataTemplate Pages:SebastianInfoPage}" />
  <ShellContent Title="Washington" ContentTemplate="{DataTemplate Pages:WashingtonInfoPage}" />
  <ShellContent Title="Nora" ContentTemplate="{DataTemplate Pages:NoraInfoPage}" />
</Shell>
Now, execute the project and you will see output like in the following screenshot.
Navigation in .NET MAUI Shell
You can use navigation support in Shell in .NET MAUI Preview 12. Navigation uses URI-based routing, and you need to register the routes to navigate among them. Along with URL, navigation progress in a Shell application also requires a:
- Route—The path to the content is determined by the Shell visual hierarchy.
- Page—Page can be pushed and popped onto the navigation stack of the Shell visual hierarchy.
- Parameters—Query parameters that can be passed to the destination page when you navigate from one page to another.
Registering routes in Shell navigation
In Shell, you can register the routes explicitly for any pages that are not actually presented in the Shell visual hierarchy. To achieve this, use the Routing.RegisterRoute method, as shown in the following code.
Routing.RegisterRoute(nameof(SebastianInfoPage), typeof(SebastianInfoPage));
Routing.RegisterRoute(nameof(WashingtonInfoPage), typeof(WashingtonInfoPage));
Routing.RegisterRoute(nameof(NoraInfoPage), typeof(NoraInfoPage));
Shell and Dependency Injection
To simplify accessing the ViewModels, you can inject the ViewModel in the main page using dependency injection. That way, an object receives other objects. Dependency injection is a version of the inversion of control pattern. The service class will inject dependencies into an object at runtime. You can learn how to use dependency injection in .NET MAUI here.

To make it easy for developers to include Syncfusion .NET MAUI controls in their projects, we have shared some working ones.
Syncfusion .NET MAUI Controls Compatible with .NET MAUI Preview 12
Syncfusion .NET MAUI controls are now compatible with .NET MAUI Preview 12. You can install our control package (latest version 19.4.48-preview) from nuget.org and use it in your application. Currently, Syncfusion offers nine controls: Cartesian Chart, Circular Chart, Scheduler, ListView, Tab View, Radial Gauge, Slider, RangeSlider, Badge View, and Effects View. The suite also supports file-format libraries for Excel, PDF, Word, and PowerPoint files. Check out our .NET MAUI controls road map for plans for our upcoming 2022 Volume 2 release and find more on our controls in their documentation. Supercharge your cross-platform apps with Syncfusion's robust .NET MAUI controls.

Conclusion
I hope you enjoyed this blog and thanks for reading! Now you know how easy it is to work on a .NET MAUI Shell application. For more details, please refer to the article, .NET MAUI Preview 12. Also, check out the .NET MAUI Preview 12 release notes.
As I said, our controls are compatible with .NET MAUI Preview 12, so you can use them in your .NET MAUI Shell application. We are working every quarter to deliver more .NET MAUI controls to replace our existing Xamarin.Forms controls, so you can use them if you migrate your Xamarin.Forms Shell projects to .NET MAUI projects. If you have any feedback, special requirements, or controls that you’d like to see in our .NET MAUI suite, please let us know in the comments section below.
Also, you can contact us through our support forum, support portal, or feedback portal. We are always happy to assist you!





Comments (2)
Do you have an example using the Syncfusion version of TabBar with shell?
Thanks
Hi K. CARTER,
Syncfusion .NET MAUI Tab view is a content view control and don’t have support to load page (Shell) as tab item content. As a result, Tab View is unable to meet your requirements at this time.