Syncfusion Blazor Charts component offers a wide range of functionalities, including data binding, over 50 chart types, animation, tooltip, zooming and panning, crosshair, selection, and highlighting.
With the 2023 volume 4 release, Blazor Charts component now supports a synchronization feature.
Synchronized Charts: An overview
A synchronized chart provides access and interaction with two or more charts at the same time. This means that actions performed on one chart, such as positioning a cursor, clicking on a specific point, or activating a tooltip, are reflected simultaneously on corresponding positions or data points across other synchronized charts based on their x- and y- coordinates.
Synchronized charts prove invaluable when navigating multiple datasets or diverse information simultaneously. By linking data across several graphs or charts, they empower users to effortlessly discern connections, identify trends, and recognize crucial patterns.
In this blog, we’ll explore the user-friendly features of the new Blazor Synchronized Chart and its uses!
Uses of Synchronized Charts
The use cases of Synchronized Charts include:
- Correlation analysis: Revealing interconnected relationships within data.
- Holistic view: Enabling comprehensive understanding by combining multiple perspectives.
- Real-time analysis: Empowering instantaneous insights into evolving trends.
- Comparative analysis: Facilitating side-by-side comparisons for insightful observations.
- Improved decision-making: Empowering informed and strategic choices.
- Enhanced user experience: Elevating the accessibility and usability of data.
Analyzing trade data using Blazor Synchronized Charts
When traders delve into a market, synchronized charts emerge as their closest allies. These charts enable traders to survey distinct facets of market data concurrently. This capability aids in making astute decisions while comprehending the comprehensive landscape of market dynamics.
In the following sections, we’ll see how easy it is to implement synchronization for different interactive chart features.
Synchronizing chart elements
Let’s seamlessly analyze stock market data by configuring the following elements using the Blazor Synchronized Chart:
Tooltip synchronization
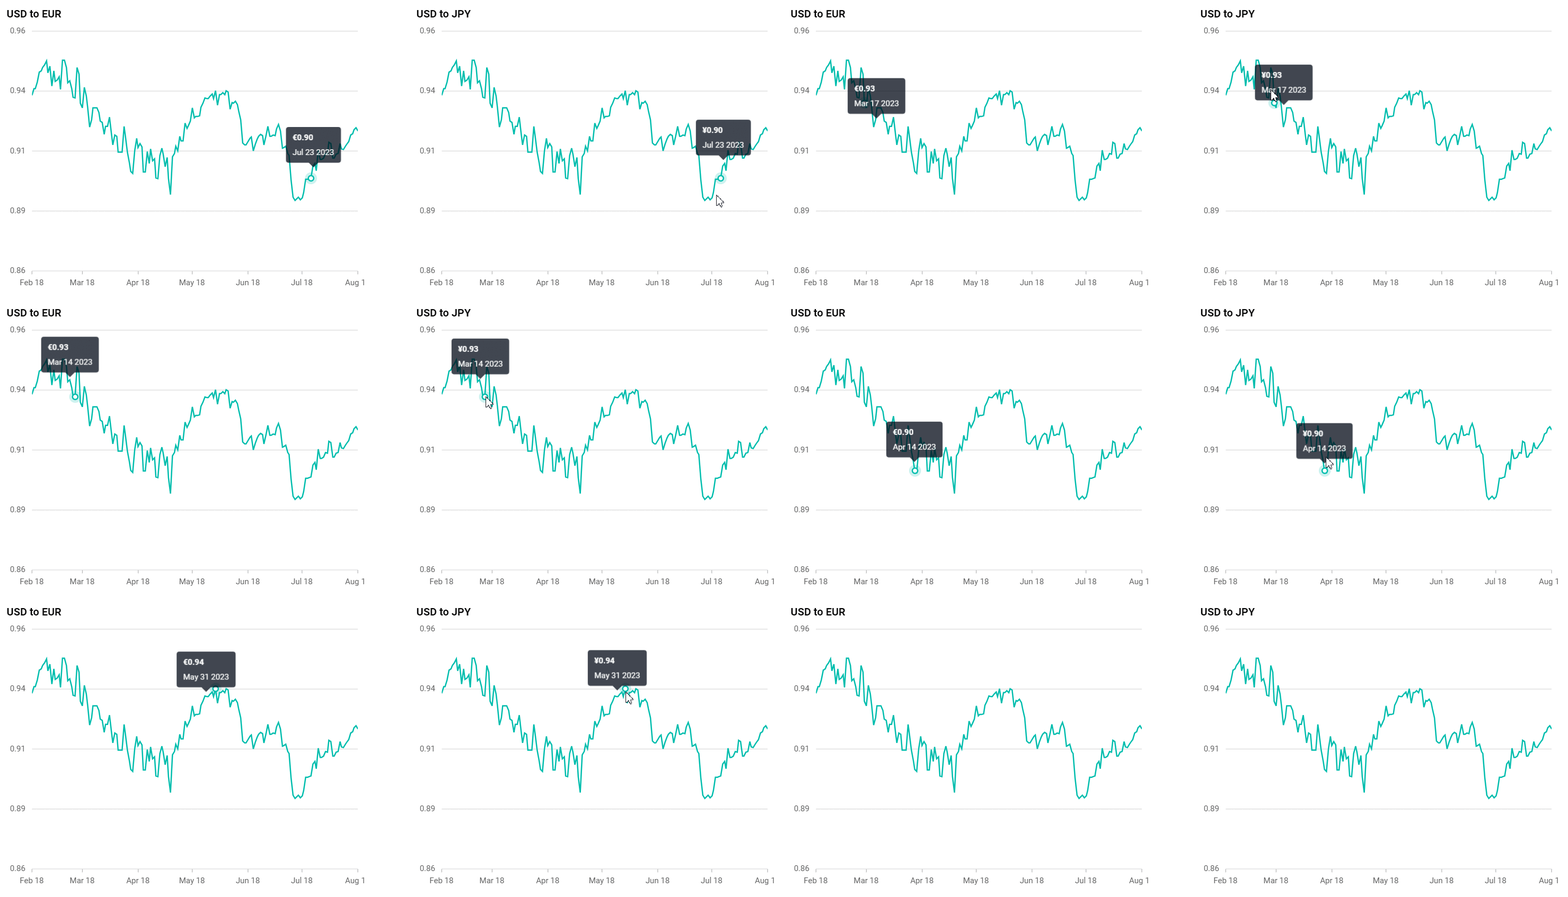
You can easily synchronize tooltips across multiple charts. This will enhance the user experience and comprehension of interconnected data. The process involves utilizing two essential methods: ShowTooltip and HideTooltip.
The ShowTooltip method allows the display of pertinent information across various charts when a user hovers over a data point in a chart. In synchronized charts, this functionality enables simultaneous showcasing of related data.
To implement the ShowTooltip method for a chart, specify the following parameters:
- x: Represents the x-value of the point or its x-coordinate value.
- y: Represents the y-value of the point or its y-coordinate value.
Refer to the following code example.
<div>
 <div class="row">
  <div class="col" @onmouseleave="OnMouseLeaveChart1">
   <SfChart Title="USD to EUR" @ref="_chart1" Width="550">
    <ChartEvents ChartMouseMove="OnMouseEventChart1" ChartMouseUp="OnMouseLeaveChart1"></ChartEvents>
    <ChartSeriesCollection>
     <ChartSeries DataSource="@ChartPoints" XName="USD" YName="EUR" Type="ChartSeriesType.Line" Width="2">
     </ChartSeries>
    </ChartSeriesCollection>
    <ChartTooltipSettings Enable="true" Shared="true" Header="" Format="<b>€${point.y}</b> <br> ${point.x} 2023" EnableMarker="false"></ChartTooltipSettings>
   </SfChart>
  </div>
  <div class="col" @onmouseleave="OnMouseLeaveChart2">
   <SfChart Title="USD to JPY" @ref="_chart2" Width="550">
    <ChartEvents ChartMouseMove="OnMouseEventChart2" ChartMouseUp="OnMouseLeaveChart2"></ChartEvents>
    <ChartSeriesCollection>
     <ChartSeries DataSource="@ChartPoints" XName="USD" YName="EUR" Type="ChartSeriesType.Line" Width="2">
     </ChartSeries>
    </ChartSeriesCollection>
    <ChartTooltipSettings Enable="true" Shared="true" Header="" Format="<b>¥${point.y}</b> <br> ${point.x} 2023" EnableMarker="false"></ChartTooltipSettings>
   </SfChart>
  </div>
 </div>
</div>
@code {
    SfChart? _chart1;
    SfChart? _chart2;
    public CurrencyRates[] ChartPoints { get; set; } = new CurrencyRates[] { };

    protected override async Task OnInitializedAsync()
    {
        ChartPoints = await Http.GetFromJsonAsync<CurrencyRates[]>(NavigationManager.BaseUri + "synchronized-data.json");
    }

    public class CurrencyRates
    {
        public DateTime USD { get; set; }
        public double EUR { get; set; }
        public double JPY { get; set; }
        public double SGD { get; set; }
        public double INR { get; set; }
    }

    public void OnMouseEventChart1(ChartMouseEventArgs args)
    {
        _chart2.ShowTooltip(args.MouseX, args.MouseY, false);
    }
    public void OnMouseEventChart2(ChartMouseEventArgs args)
    {
        _chart1.ShowTooltip(args.MouseX, args.MouseY, false);
    }

    public void OnMouseLeaveChart1()
    {
        _chart2.HideTooltip();
    }
    public void OnMouseLeaveChart2()
    {
        _chart1.HideTooltip();
    }

    public void OnMouseLeaveChart1(ChartMouseEventArgs args)
    {
        _chart2.HideTooltip();
    }
    public void OnMouseLeaveChart2(ChartMouseEventArgs args)
    {
        _chart1.HideTooltip();
    }
}
Refer to the following output image.
Crosshair synchronization
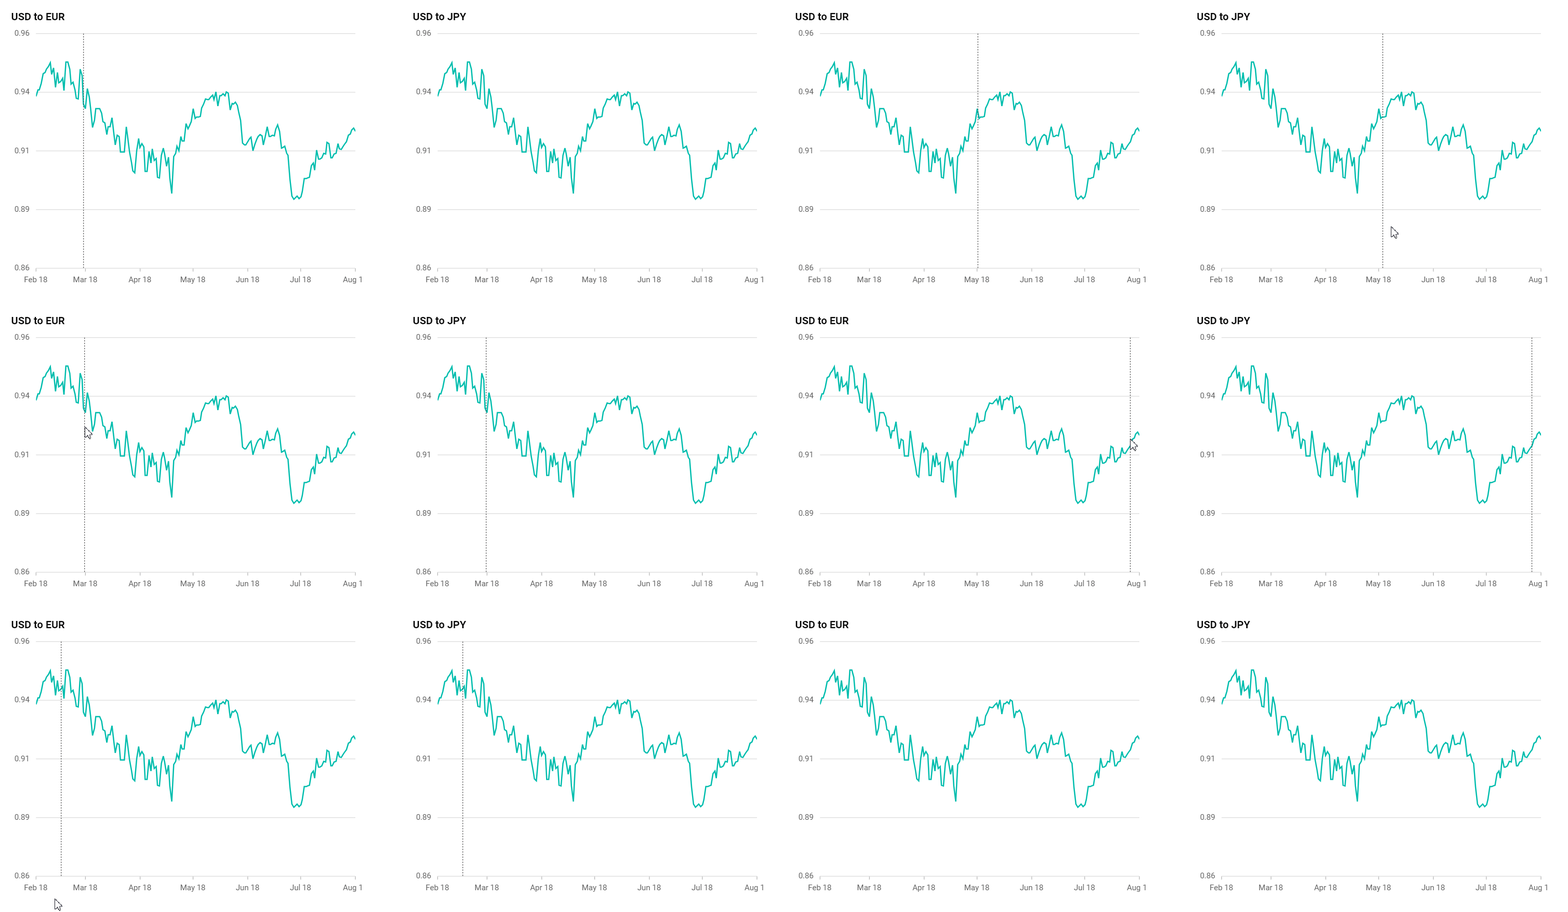
Synchronizing crosshairs across multiple charts can significantly enhance data analysis and comparison. The ShowCrosshair and HideCrosshair methods facilitate this synchronization.
When hovering over one chart, invoking the ShowCrosshair method for other connected charts aligns their data points, streamlining the process of comparing information across the charts.
To enable the crosshair for a specific chart using the ShowCrosshair method, specify the following parameters:
- x: The x-coordinate value.
- y: The y-coordinate value.
Refer to the following code example.
<div>
 <div class="row">
  <div class="col" @onmouseleave="OnMouseLeaveChart1">
   <SfChart Title="USD to EUR" @ref="_chart1" Width="550">
    <ChartEvents ChartMouseMove="OnMouseEventChart1" ChartMouseUp="OnMouseLeaveChart1"></ChartEvents>
    <ChartSeriesCollection>
     <ChartSeries DataSource="@ChartPoints" XName="USD" YName="EUR" Type="ChartSeriesType.Line" Width="2">
     </ChartSeries>
    </ChartSeriesCollection>
    <ChartCrosshairSettings Enable="true" DashArray="2,2" LineType="LineType.Vertical"></ChartCrosshairSettings>
   </SfChart>
  </div>
  <div class="col" @onmouseleave="OnMouseLeaveChart2">
   <SfChart Title="USD to JPY" @ref="_chart2" Width="550">
    <ChartEvents ChartMouseMove="OnMouseEventChart2" ChartMouseUp="OnMouseLeaveChart2"></ChartEvents>
    <ChartSeriesCollection>
     <ChartSeries DataSource="@ChartPoints" XName="USD" YName="EUR" Type="ChartSeriesType.Line" Width="2">
     </ChartSeries>
    </ChartSeriesCollection>
    <ChartCrosshairSettings Enable="true" DashArray="2,2" LineType="LineType.Vertical"></ChartCrosshairSettings>
   </SfChart>
  </div>
 </div>
</div>
@code {
    SfChart? _chart1;
    SfChart? _chart2;

    public void OnMouseEventChart1(ChartMouseEventArgs args)
    {
        _chart2.ShowCrosshair(args.MouseX, args.MouseY);
    }
    public void OnMouseEventChart2(ChartMouseEventArgs args)
    {
        _chart1.ShowCrosshair(args.MouseX, args.MouseY);
    }

    public void OnMouseLeaveChart1()
    {
        _chart2.HideCrosshair();
    }
    public void OnMouseLeaveChart2()
    {
        _chart1.HideCrosshair();
    }

    public void OnMouseLeaveChart1(ChartMouseEventArgs args)
    {
        _chart2.HideCrosshair();
    }
    public void OnMouseLeaveChart2(ChartMouseEventArgs args)
    {
        _chart1.HideCrosshair();
    }
}
Refer to the following output image.
Zooming synchronization
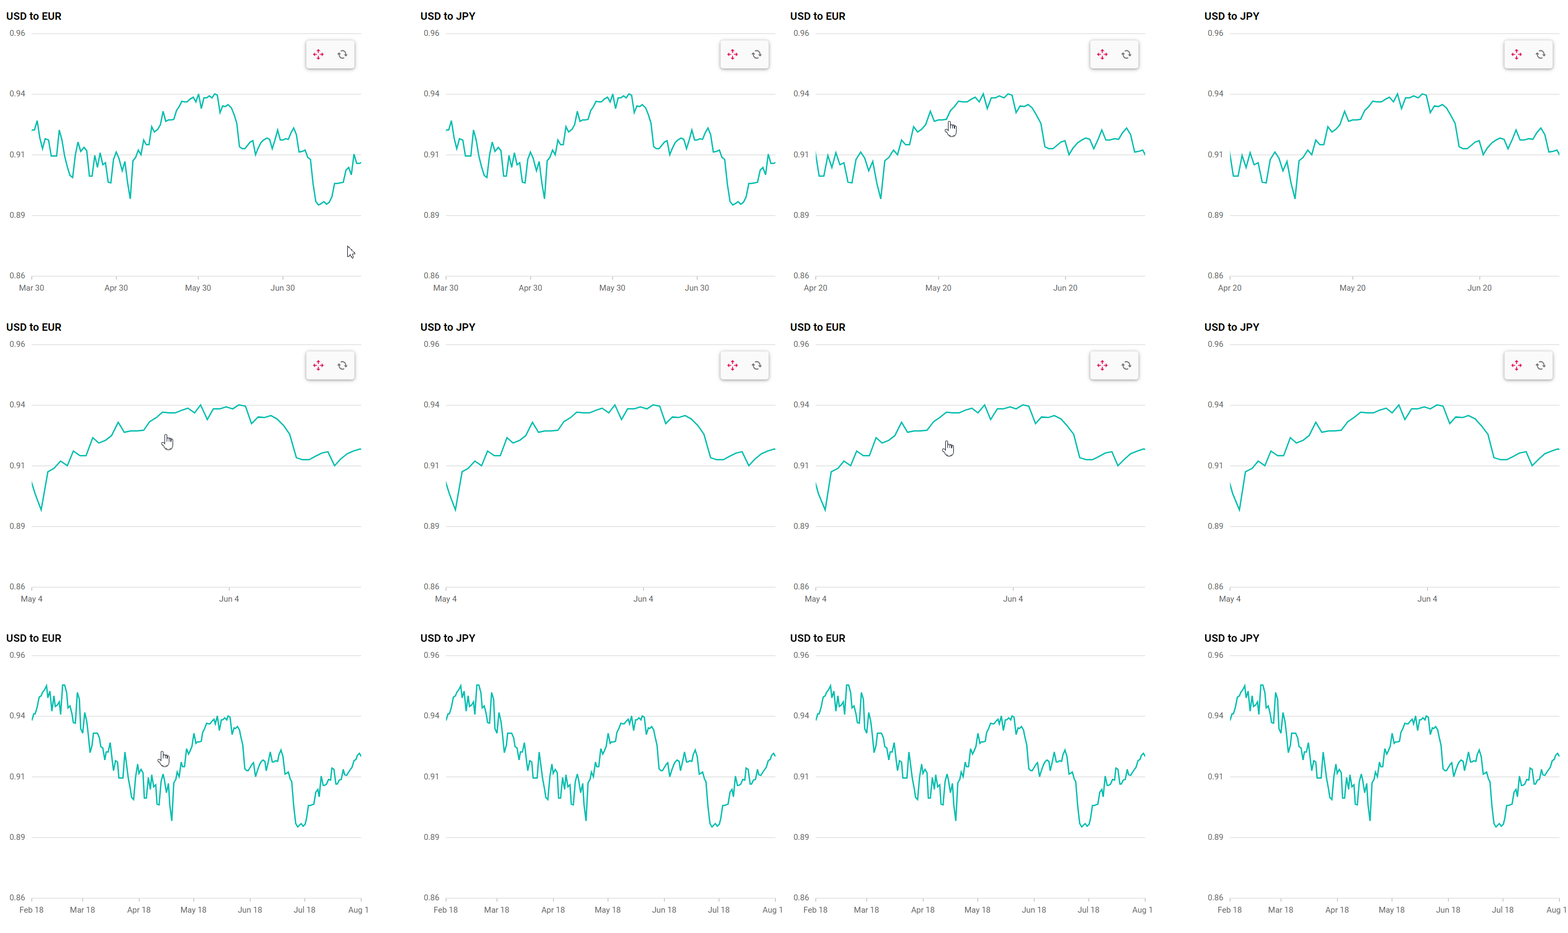
Ensuring uniform zoom levels across multiple charts significantly enhances the visualization experience. This synchronization is accomplished by using the OnZoomEnd and OnZooming events.
Within these events, you’ll retrieve the ZoomFactor and ZoomPosition values unique to each chart and then apply these values to ensure consistency across all charts. This not only streamlines the viewing experience and maintains coherence in data analysis across various visual representations.
Refer to the following code example.
<div>
 <div class="row">
  <div class="col">
   <SfChart Title="USD to EUR" @ref="_chart1" Width="550">
    <ChartEvents OnZoomEnd="ZoomEvent" OnZooming="ZoomEvent"></ChartEvents>
    <ChartSeriesCollection>
     <ChartSeries DataSource="@ChartPoints" XName="USD" YName="EUR" Type="ChartSeriesType.Line" Width="2">
     </ChartSeries>
    </ChartSeriesCollection>
    <ChartZoomSettings EnableMouseWheelZooming="true" EnablePinchZooming="true" EnableScrollbar="false" EnableDeferredZooming="false" EnablePan="true" Mode="ZoomMode.X" ToolbarItems="@toolbarItems"></ChartZoomSettings>
   </SfChart>
  </div>
  <div class="col">
   <SfChart Title="USD to JPY" @ref="_chart2" Width="550">
    <ChartEvents OnZoomEnd="ZoomEvent" OnZooming="ZoomEvent"></ChartEvents>

    <ChartSeriesCollection>
     <ChartSeries DataSource="@ChartPoints" XName="USD" YName="EUR" Type="ChartSeriesType.Line" Width="2">
     </ChartSeries>
    </ChartSeriesCollection>
    <ChartZoomSettings EnableMouseWheelZooming="true" EnablePinchZooming="true" EnableScrollbar="false" EnableDeferredZooming="false" EnablePan="true" Mode="ZoomMode.X" ToolbarItems="@toolbarItems"></ChartZoomSettings>
   </SfChart>
  </div>
 </div>
</div>
@code {
    SfChart? _chart1;
    SfChart? _chart2;
    List<ToolbarItems> toolbarItems = new List<ToolbarItems>() { ToolbarItems.Pan, ToolbarItems.Reset };

    public void ZoomEvent(ZoomingEventArgs args)
    {
        if (args.AxisCollection != null && args.AxisCollection.Count > 0)
        {
            zoomfactor = args.AxisCollection.Find(item => item.AxisName == "PrimaryXAxis").ZoomFactor;
            zoomPosition = args.AxisCollection.Find(item => item.AxisName == "PrimaryXAxis").ZoomPosition;
            InvokeAsync(StateHasChanged);
        }
    }
}
The following image shows zooming synchronized across charts.
Selection synchronization
You can sync up the selection of a data point across charts by using the OnSelectionChanged event. You can easily apply desired values to other charts in your app by copying and pasting the values directly from this event to the respective chart.
Refer to the following code example.
<div>
 <div class="row">
  <div class="col">
   <SfChart Title="USD to EUR" @ref="_chart1" Width="550" SelectionMode="SelectionMode.Point" SelectionPattern="SelectionPattern.Chessboard">
    <ChartEvents OnSelectionChanged="Selection"></ChartEvents>
    <ChartSelectedDataIndexes>
     <ChartSelectedDataIndex Series="@SelectedSeries" Point="@SelectedPoint">
     </ChartSelectedDataIndex>
    </ChartSelectedDataIndexes>
    <ChartSeriesCollection>
     <ChartSeries DataSource="@ChartPoints" XName="USD" YName="EUR" Type="ChartSeriesType.Column">
     </ChartSeries>
    </ChartSeriesCollection>
   </SfChart>
  </div>
  <div class="col">
   <SfChart Title="USD to JPY" @ref="_chart2" Width="550" SelectionMode="SelectionMode.Point" SelectionPattern="SelectionPattern.Chessboard">
    <ChartEvents OnSelectionChanged="Selection"></ChartEvents>
    <ChartSelectedDataIndexes>
     <ChartSelectedDataIndex Series="@SelectedSeries" Point="@SelectedPoint">
     </ChartSelectedDataIndex>
    </ChartSelectedDataIndexes>
    <ChartSeriesCollection>
     <ChartSeries DataSource="@ChartPoints" XName="USD" YName="EUR" Type="ChartSeriesType.Column">
     </ChartSeries>
    </ChartSeriesCollection>
   </SfChart>
  </div>
 </div>
</div>
@code {
    SfChart? _chart1;
    SfChart? _chart2;
    public int SelectedSeries = -1;
    public int SelectedPoint = -1;
    public void Selection(SelectionCompleteEventArgs args)
    {
        var selectedValues = args?.SelectedDataValues;
        if (selectedValues?.Count > 0)
        {
            var firstSelectedValue = selectedValues[0];
            var seriesIndex = firstSelectedValue.SeriesIndex ?? -1;
            var pointIndex = firstSelectedValue.PointIndex ?? -1;

            if (SelectedSeries != seriesIndex || SelectedPoint != pointIndex)
            {
                SelectedSeries = seriesIndex;
                SelectedPoint = pointIndex;
                InvokeAsync(StateHasChanged);
            }
        }

    }
}
The following image shows selection synchronized across charts.

References
For more details, refer to the Synchronized Charts in Blazor documentation and GitHub demos.
Conclusion
Thanks for reading! In this blog, we explored how to use the new Syncfusion Blazor Synchronized Charts for seamless trade analysis. This feature is available in our 2023 Volume 4 release. Try out this powerful tool and share your feedback in the comments section.
For a detailed overview of all the exciting updates in this release, we invite you to visit our Release Notes and What’s New pages
To our existing customers, the new version of Essential Studio® is available on the License and Downloads page. If you’re new to Syncfusion, we’re offering a 30-day free trial for you to experience the wide array of features we provide.
You can also reach us through our support forum, support portal, or feedback portal. We’re always happy to assist you!
