Syncfusion is excited to share details about the new features and enhancements for our file format libraries that have been included in the Essential Studio® 2018 Volume 3 release based on your valuable feedback. Syncfusion’s file format libraries allow users to create, edit, write, and convert Excel, PDF, Word, and PowerPoint files in .NET Framework, .NET Core, Xamarin, and UWP applications without the need of Microsoft Office or Adobe dependencies.
In this blog, let’s see the new items included in the 2018 Volume 3 release of our file format libraries.
Essential PDF
Complex script language support
Essential PDF allows you to add complex script language (Devanagari, Tamil, Hindi, Thai, etc.) text support in PDF documents in any .NET application.
The following code example shows how to draw complex script (Thai) text.
//Create a new PDF document.
PdfDocument doc = new PdfDocument();

//Add a page to the document.
PdfPage page = doc.Pages.Add();

//Create PDF graphics for the page.
PdfGraphics graphics = page.Graphics;

//Set the font with Unicode option.
Font font = new Font("Tahoma", 14);

PdfFont pdfFont = new PdfTrueTypeFont(font, true);

//Set the format for string
PdfStringFormat format = new PdfStringFormat();

//Set the format as complex script layout type.
format.ComplexScript = true;

//Draw the text.
graphics.DrawString("เอกสาร PDF มีการใช้อย่างแพร่หลายเป็นเวลาหลายปีและนับสิบ ๆ แถมฟรี ผู้อ่าน
PDF เชิงพาณิชย์บรรณาธิการและห้องสมุดพร้อมใช้งาน อย่างไรก็ตามแม้จะมี
ความนิยมนี้ก็ยังคงยากที่จะหาคำแนะนำกระชับรูปแบบ PDF พื้นเมือง
การทำความเข้าใจการทำงานภายในของ PDF ทำให้สามารถสร้างได้แบบไดนามิก
เอกสาร PDF ตัวอย่างเช่นเว็บเซิร์ฟเวอร์สามารถดึงข้อมูลจากฐานข้อมูล
ใช้เพื่อกำหนดใบกำกับสินค้าและให้บริการกับลูกค้าได้ทันที", pdfFont, PdfBrushes.Black, new RectangleF(0, 0, page.GetClientSize().Width, page.GetClientSize().Height), format);

//Save the document.
doc.Save("Output.pdf");

//Close the document.
doc.Close(true);
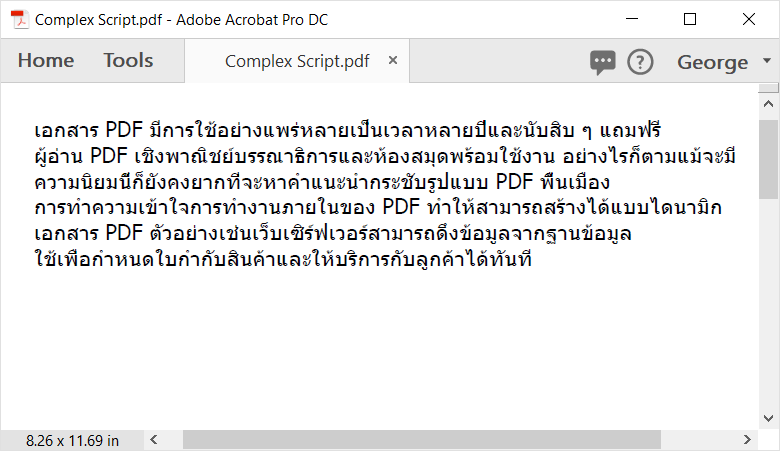
To learn more about adding complex script language text to an existing PDF, please refer to our documentation page, Drawing complex script text in PDF.
Redaction
Now you can redact text and images from a PDF document. Redaction is the process of removing sensitive or unwanted content from a document.
The following code example shows how to redact PDF documents.
//Load an existing PDF.
PdfLoadedDocument document = new PdfLoadedDocument(“input.pdf”);

//Get the first page from document.
PdfLoadedPage page = document.Pages[0] as PdfLoadedPage;

//Create PDF redactions for the page.
PdfRedaction redaction = new PdfRedaction(new RectangleF(343, 147, 60, 17), System.Drawing.Color.Black);

//Add the redaction to loaded page.
page.Redactions.Add(redaction);

//Save and close the PDF document.
document.Save("Redacted.pdf");
document.Close(true);
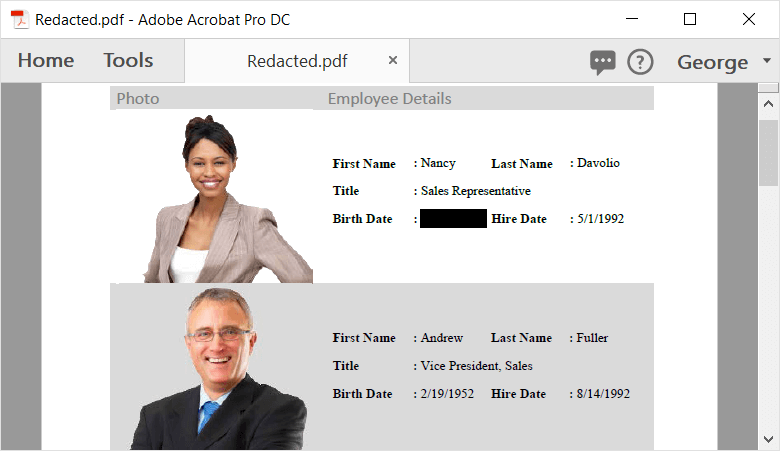
To learn more about PDF redaction, please refer to our PDF Redaction documentation page.
Signature appearance validation
Essential PDF now supports displaying a signature status based on the signature validation in a PDF document.
The following code example shows how to enable signature appearance validation.
//Create new document.
PdfDocument document = new PdfDocument();

PdfPageBase page = document.Pages.Add();

PdfGraphics graphics = page.Graphics;

PdfCertificate pdfCert = new PdfCertificate(@"PDF.pfx", "syncfusion");

PdfSignature signature = new PdfSignature(document, page, pdfCert, "Signature");

signature.Bounds = new Rectangle(10, 20, 400, 200);

signature.EnableValidationAppearance = true;

//Sets signature information.

signature.Appearance.Normal.Graphics.DrawString("Signature validation", new PdfStandardFont(PdfFontFamily.TimesRoman, 24), PdfBrushes.Black, 0, 50);

document.Save("Output.pdf");

document.Close(true);
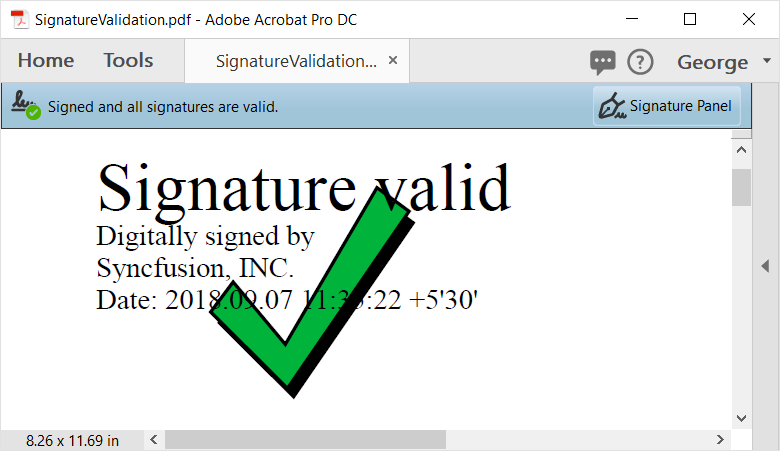
Long Term Validation
Long Term Validation (LTV) is now supported in our PDF library. This feature can be used for archiving digitally signed PDF documents and it contains all necessary certificates (a valid CRL and OCSPs) to validate the document.
The following code example shows how to enable LTV.
//Initialize the PDF document.
PdfDocument doc = new PdfDocument();

//Add page to PDF document.
PdfPage page = doc.Pages.Add();

//Initialize certificate.
PdfCertificate pdfCert = new PdfCertificate("PDF.pfx", "syncfusion");

//Initialize signature.
PdfSignature signature = new PdfSignature(page, pdfCert, "field");

//Adding TimeStamp to signature.
signature.TimeStampServer = new TimeStampServer(new Uri("https://”);

signature.EnableLtv = true;

//Sets the bounds of signature.
signature.Bounds = new RectangleF(new PointF(0, 0), new SizeF(100, 100));

signature.Reason = "I am author of this document.";

doc.Save("LTV.pdf");
doc.Close(true);
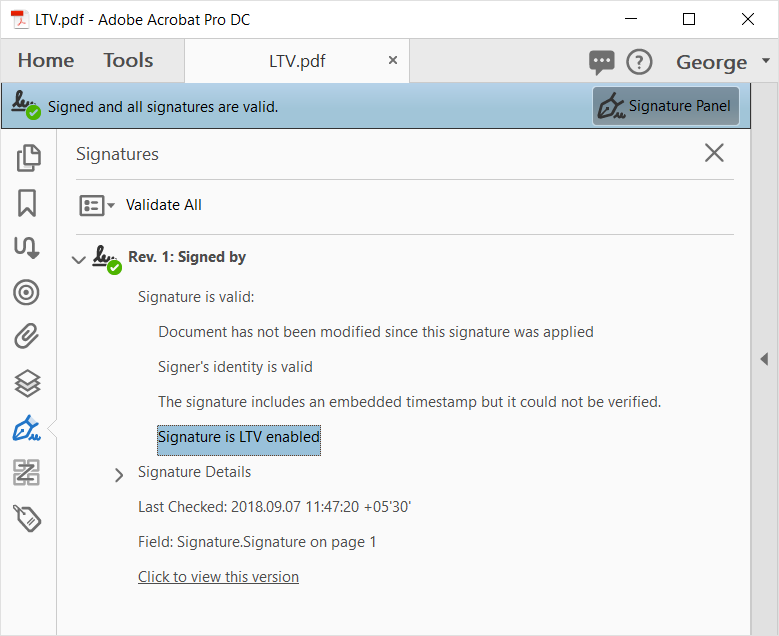
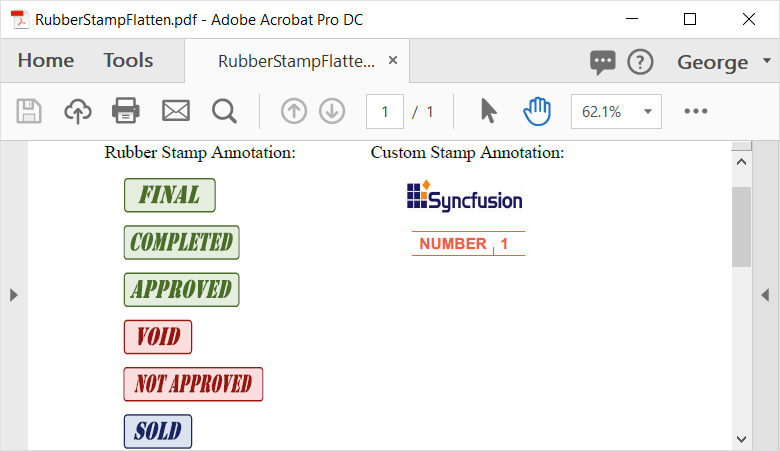
Rubber stamp annotation flattening
Now, you can flatten rubber stamp annotations in a PDF document to remove their editing capability.
The following code example shows how to flatten a rubber stamp annotation.
//Load the existing PDF document.
PdfLoadedDocument loadedDocument = new PdfLoadedDocument("input.pdf");
//Get all the pages.
foreach (PdfLoadedPage loadedPage in loadedDocument.Pages)
{
//Get all the annotations in the page.
foreach (PdfLoadedAnnotation annotation in loadedPage.Annotations)
{
//Check for the rubber stamp annotation.
if (annotation is PdfLoadedRubberStampAnnotation)
{
//Flatten the rubber stamp annotation.
annotation.Flatten = true;
}
}
}
//Save and close the PDF document instance.
loadedDocument.Save("Output.pdf");
loadedDocument.Close(true);
Measurement annotation
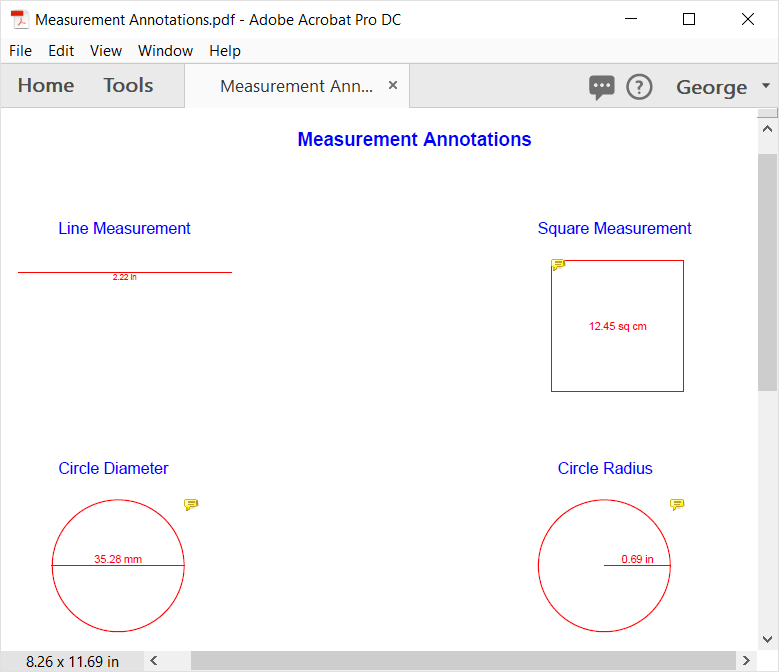
Essential PDF now supports adding measurement annotations (Line, Square, Circle and Angle) in a PDF document.
The following code example shows how to create measurement annotations.
//Initialize the PDF document.
PdfDocument doc = new PdfDocument();

//Add page to the document.
PdfPage page = doc.Pages.Add();

//Creates a new Line measurement annotation.
int[]  points = new int[] { 350, 750, 500, 750 };

//Initialize the Line measurement annotation.
PdfLineMeasurementAnnotation lineMeasureAnnot = new PdfLineMeasurementAnnotation(points);
lineMeasureAnnot.Author = "Syncfusion";
lineMeasureAnnot.Subject = "LineAnnotation";
lineMeasureAnnot.ModifiedDate = new DateTime(2015, 1, 18);

//Set the measurement Unit to display the length of Line.
lineMeasureAnnot.Unit = PdfMeasurementUnit.Inch;
lineMeasureAnnot.LineBorder.BorderWidth = 2;
lineMeasureAnnot.Font = new PdfStandardFont(PdfFontFamily.Helvetica, 10f, PdfFontStyle.Regular);
lineMeasureAnnot.Color = new PdfColor(Color.Red);

//Add annotation to the page.
page.Annotations.Add(lineMeasureAnnot);

doc.Save("MeasurementAnnotation.pdf");
doc.Close(true);
Timestamp existing PDF document
Already, Essential PDF supports timestamping PDF documents when creating them from scratch. Now, this is extended to timestamping existing PDF documents.
The following code example shows how to timestamp an existing PDF document.
//Load the existing PDF document
PdfLoadedDocument loadedDocument = new PdfLoadedDocument(@"Loaded.pdf");

//Add a new page.
PdfLoadedPage page = loadedDocument.Pages[0] as PdfLoadedPage;

//Creates a digital signature.
PdfSignature signature = new PdfSignature(page, "Timestamp");

//Add the time stamp by using the server URI.
signature.TimeStampServer = new TimeStampServer(new Uri("https:// "));

//Save and close the document
loadedDocument.Save("Timestamp.pdf");
loadedDocument.Close(true);

Essential XlsIO
External reference formulas
An external cell reference in Excel is a reference to a cell or a range of cells outside the current worksheet. The main benefit of using an Excel external reference is that whenever the referenced cell(s) in another worksheet changes, the value returned by the external cell reference is automatically updated.
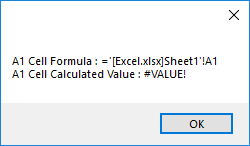
The following code returns the formula of the cell A1 and its calculated value. Here, the formula references another workbook, which is enclosed in square brackets [Excel.xlsx].
using (ExcelEngine excelEngine = new ExcelEngine())
{
    IApplication application = excelEngine.Excel;
    IWorkbook workbook = application.Workbooks.Open("../../Data/FormulaExcel.xlsx");
    IWorksheet worksheet = workbook.Worksheets[0];
    worksheet.EnableSheetCalculations();

    this.Hide();
    MessageBox.Show("A1 Cell Formula : " + worksheet.Range["A1"].Formula + "\n" +
    "A1 Cell Calculated Value : " + worksheet.Range["A1"].CalculatedValue);

    workbook.SaveAs("../../Output/FormulaExcel.xlsx");
    workbook.Close();
}
To learn more about working with Excel formulas, please refer to our Excel formula documentation.
Excel to image in .NET Core and Xamarin
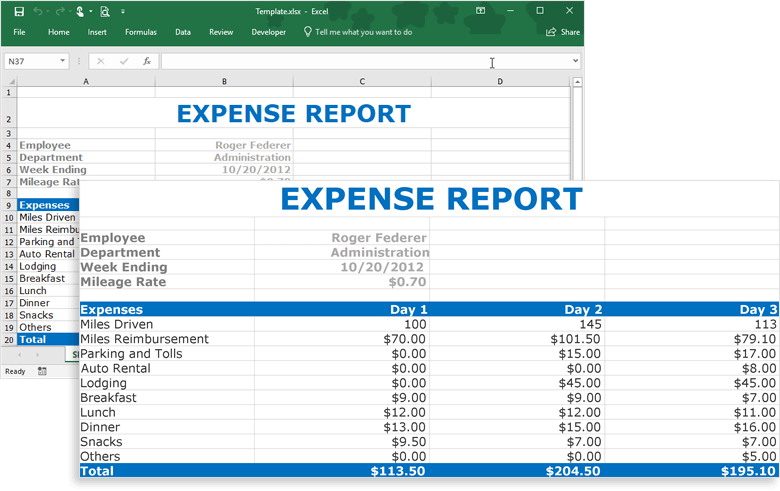
The Syncfusion Excel (XlsIO) library extends its support to convert Excel worksheets to images in .NET Core. With this feature, either a full worksheet or a specific range can be converted to an image as a JPEG or PNG. They can also be saved to a memory stream. Excel files can be converted to images with:
- Pivot tables
- Conditional formats
- Styles
- Rich text
- Text alignment
- Images
- Text boxes
- Unicode characters
The NuGet packages Syncfusion.XlsIORenderer.Net.Core for ASP.NET Core and Syncfusion.Xamarin.XlsIORenderer for Xamarin are available in NuGet.org.
The following code shows how to convert a worksheet to an image using XlsIORenderer.
using (ExcelEngine excelEngine = new ExcelEngine())
{
    IApplication application = excelEngine.Excel;

    //Open workbook from file stream.
    IWorkbook workbook = application.Workbooks.Open(new FileStream("/XlsIO/ExpenseReport.xlsx", FileMode.Open, FileAccess.Read));
    IWorksheet worksheet = workbook.Worksheets[0];

    //Initialize XlsIO renderer.
    IXlsIORenderer renderer = new XlsIORenderer();
    Stream stream = new FileStream("Image.png", FileMode.Create, FileAccess.ReadWrite);

    //Set image export options.
    ExportImageOptions imageOptions = new ExportImageOptions()
    {
        ScalingMode = ScalingMode.Best,
        ImageFormat = ExportImageFormat.Png,
    };

    //Convert worksheet to image.
    renderer.ConvertToImage(worksheet.UsedRange, imageOptions, stream);

    //Save and dispose.
    workbook.SaveAs(stream);
    workbook.Close();
}
To learn more about Excel-to-image conversion, please refer to our Excel to image conversion documentation.
Excel to HTML in .NET Core and Xamarin
The Syncfusion Excel (XlsIO) library extend its support to convert an Excel workbook or worksheet to an HTML file in .NET Core, available from .Net Standard 1.4 onwards. A single worksheet or an entire workbook can be converted to an HTML file.
Excel files can be converted to HTML with:
- Data
- Styles
- Conditional formats
- Rich text
- Text alignment
- Images
- Text boxes
The following code shows how to convert a workbook to HTML.
using (ExcelEngine excelEngine = new ExcelEngine())
{
IApplication application = excelEngine.Excel;
IWorkbook workbook = application.Workbooks.Open(File.Open("NorthwindTemplate.xlsx", FileMode.Open));
IWorksheet worksheet = workbook.Worksheets[0];

//Create stream to store an HTML file.
Stream stream = new FileStream("NorthwindTemplate.html", FileMode.Create, FileAccess.ReadWrite);

//Save and dispose.
workbook.SaveAsHtml(stream);
stream.Dispose();
workbook.Close();
}
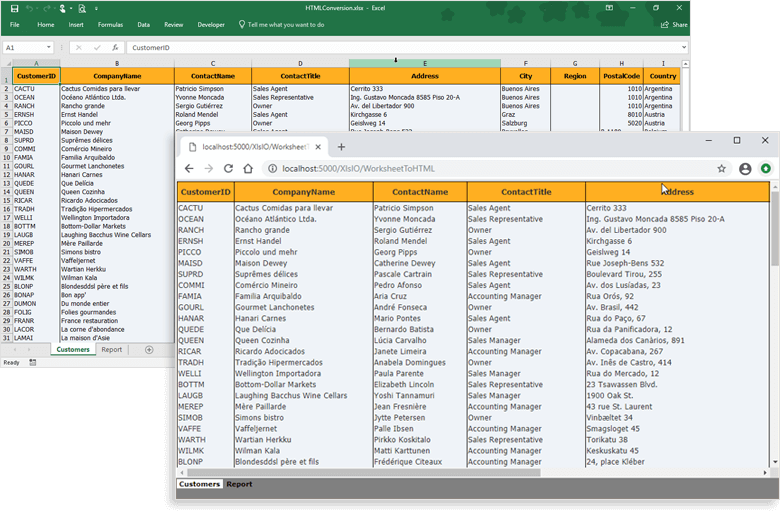
For more information about Excel-to-HTML conversion, please refer to our Worksheet to HTML documentation.
Sort by value in pivot table
Pivot table allows custom sorting in Excel that helps to sort values by a specific row or column. The Syncfusion Excel (XlsIO) library allows you to sort pivot values by row or column using the AutoSort() method in IPivotField interface. Here, the sorting can be done either top-to-bottom or left-to-right.
The following code shows how to sort by value in pivot table.
using (ExcelEngine excelEngine = new ExcelEngine())
{
IApplication application = excelEngine.Excel;

IWorkbook workbook = application.Workbooks.Open(fileStream);
IWorksheet sheet = workbook.Worksheets[1];
IPivotTable pivotTable = sheet.PivotTables[0];

//Pivot table top-to-bottom sorting.
IPivotField rowField = pivotTable.RowFields[0];
rowField.AutoSort(PivotFieldSortType.Ascending, 1);

//Pivot table left-to-right sorting.
IPivotField columnField = pivotTable.ColumnFields[0];
columnField.AutoSort(PivotFieldSortType.Ascending, 1);

string fileName = "PivotFieldAutoSort.xlsx";

//Save the workbook as stream.
FileStream stream = new FileStream(fileName, FileMode.Create, FileAccess.ReadWrite);
workbook.SaveAs(stream);
}
Excel-to-PDF enhancements
Now, Essential XlsIO provides the following two enhancements during Excel-to-PDF conversion in the .NET Framework:
- Grouped shapes with fill settings and line settings.
- Images that are recolored in Excel with the options: black and white, color change, duotone, and gray scale.
For more information, please refer to our Excel to PDF conversion documentation.
Data import enhancement
URLs and mail IDs from DataTable, Array, or CLR objects used to be imported as strings. With this new feature, these URLs and mail IDs are imported as hyperlinks, as shown in the following image.

It is now possible to add hyperlinks to images that are imported from CLR objects (collection).
For code examples, please refer to our Importing data to Excel documentation.
Essential Presentation
Right-to-left text during PPTX to PDF conversion
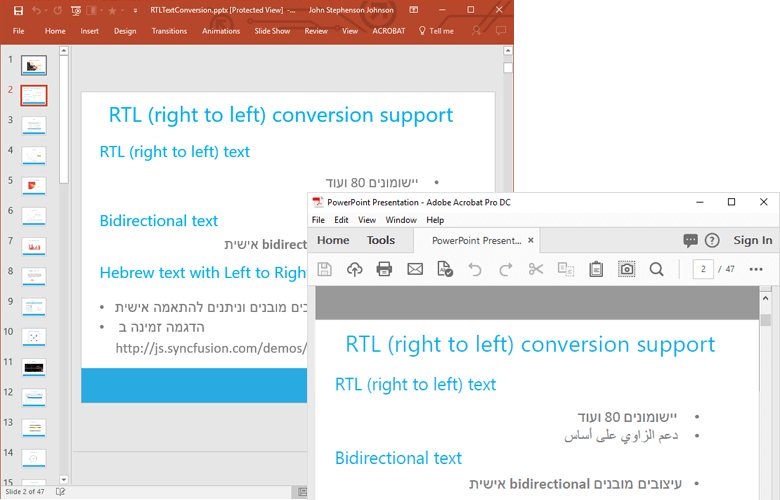
Essential Presentation now allows you to preserve the right-to-left (RTL) text (Arabic, Hebrew, Urdu) and bi-directional (bidi) text in PowerPoint documents while doing PDF-to-image conversions. Please refer to this PowerPoint to PDF conversion user guide for the code examples to convert a PowerPoint file to PDF or image formats.
Add or edit transitions in PowerPoint slides
Slide transitions are the motion effects that occur when you move from one slide to the next during a slide show presentation. A transition can be a simple push to the next slide or an eye-catching transition effect. You can control the speed, add sound, and customize the properties of transition effects. For more information, please refer to our user guide page, Applying or editing transitional effects in PowerPoint slides.
//Create a PowerPoint presentation.
using (IPresentation presentation = Presentation.Create())
{
//Add a slide to the presentation.
ISlide slide = presentation.Slides.Add();

//Add text to the slide.
Slide.Shapes.AddTextBox(10, 10, 100, 100).TextBody.AddParagraph("Hello world");

//Set the transition effect type.
slide.SlideTransition.TransitionEffect = TransitionEffect.PageCurlDouble;

//Set the transition effect option.
slide.SlideTransition.TransitionEffectOption = TransitionEffectOption.Right;

//Set the trigger mode for the transition as after a click.
slide.SlideTransition.TriggerOnClick = true;

//Set the transition duration value. This specifies the length of the transition.
slide.SlideTransition.Duration = 30;

//Set the time delay mode for the transition.
slide.SlideTransition.TriggerOnTimeDelay = true;

//Set the transition delay in seconds. Move to the next slide after this certain number of seconds.
slide.SlideTransition.TimeDelay = 30;

//Save the PowerPoint file.
presentation.Save("SlideTransition.pptx");
}

What’s Next
If you are an existing Syncfusion user, please download the new version from the License and Downloads page and try the new features for yourself. Our NuGet packages are available in NuGet.org, also. If you are a new customer, you can try our 30-day free trial to check out these features.
If you are new to Syncfusion’s file format libraries, we highly recommend that you follow our user guide. To get started quickly with your desired file format, please follow these links:
Create PDF file in C# without Adobe
Create Excel file in C# without Microsoft Office
Create Word file in C# without Microsoft Office
Create PowerPoint file in C# without Microsoft Office
If you have any questions or require clarification on these features, please let us know in the comments below. You can also contact us through our support forum or Direct-Trac. We are happy to assist you!
If you liked this post, we think you may also enjoy these other resources:
- [Blog Post] Adding Animation to PowerPoint Slide Elements in C#
- [Blog Post] Create Excel 2016 Chart Types in C#
- [Blog Post] 7 Ways to Compress PDF Files in C#, VB.NET
- [Ebook] Twilio with C# Succinctly
- [Ebook] Asynchronous Programming Succinctly
