The Blazor Gantt Chart is a project planning and management tool that provides a Microsoft Project-like interface to display and manage hierarchical tasks with timeline details. Its intuitive user interface lets you visually manage tasks, resources, and task relationships in a project.
In this blog, we will see how to customize the Blazor Gantt Chart component’s taskbar. The default representation of the taskbar is a horizontal bar chart that extends from the start date to the end date of a task in a Gantt chart timeline.
Syncfusion has multiple built-in themes: Material, Bootstrap, Fluent, etc. Yet, you may need to customize the theme uniquely to meet your app needs. In that case, you can change the default UI appearance of the Blazor Gantt Chart component’s taskbar in the following ways:
Through CSS
We can easily override the default CSS properties of taskbars in the Blazor Gantt Chart component to modify their appearance. There are three different taskbars available:
- Parent taskbar
- Child taskbar
- Milestone
We need to override the CSS for all these taskbars to apply customization.
Refer to the following example for how to use the CSS element selectors to override the corresponding taskbars.
<style>
    // Parent taskbar
    .e-gantt .e-gantt-parent-taskbar.e-gantt-parent-taskbar-inner-div {
        border-radius: 14px;
        background-color: forestgreen;
        border-color: forestgreen
    }

    .e-gantt .e-gantt-parent-taskbar .e-gantt-parent-progressbar-inner-div {
        border-top-right-radius: 14px !important;
        border-bottom-right-radius: 14px !important;
    }

    // Child taskbar
    .e-gantt .e-gantt-child-taskbar.e-gantt-child-taskbar-inner-div {
        border-radius: 14px;
        background-color: mediumpurple;
        border-color: mediumpurple
    }

    .e-gantt .e-gantt-child-taskbar .e-gantt-child-progressbar-inner-div {
        border-top-right-radius: 14px !important;
        border-bottom-right-radius: 14px !important;
        background-color: purple;
    }

    // Milestone
    .e-gantt .e-gantt-chart .e-milestone-top, .e-gantt .e-gantt-chart .e-milestone-bottom
    {
        border-bottom-color: forestgreen; border-top-color: forestgreen;
    }

    // Connector lines
    .e-gantt .e-gantt-chart .e-line {border-color: yellow;}
    .e-gantt .e-gantt-chart .e-connector-line-right-arrow, .e-gantt .e-gantt-chart .e-connector-line-left-arrow  { border-left-color: yellow; }

</style>
Through Gantt events
In some situations, we might need to customize the CSS conditionally. Use the QueryChartRowInfo Gantt event to add a CSS class based on a condition.
Refer to the following code example.
<SfGantt DataSource="@TaskCollection" ProjectStartDate="new DateTime(2022,4,1)" TreeColumnIndex=1>
…
<GanttEvents QueryChartRowInfo="QueryChartRowInfoHandler" TValue="TaskData"></GanttEvents>
</SfGantt>

public void QueryChartRowInfoHandler(Syncfusion.Blazor.Gantt.QueryChartRowInfoEventArgs<TaskData> args)
{
    if(args.Data.TaskId == 6)
    {
       String[] s1 = new String[1] { "criticaltask" };
       args.Row.AddClass(s1);

    }
}

<style>
.e-gantt .criticaltask .e-gantt-child-taskbar.e-gantt-child-taskbar-inner-div { background-color: crimson }
</style>
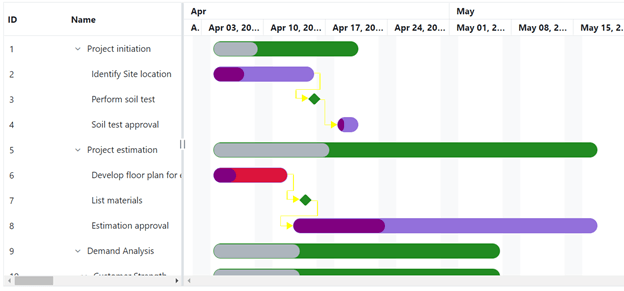
We have now learned to customize the CSS of the taskbar elements. Next, we will see how to customize the taskbar elements using templates.
With templated components
If you wish to entirely customize the taskbar elements, use the following template options available in the Blazor Gantt Chart component:
- ParentTaskbarTemplate: To customize the parent taskbars.
- TaskbarTemplate: To customize the child taskbars.
- Milestone: To customize the milestones in the Gantt timeline.
Refer to the following code example.
<SfGantt DataSource="@TaskCollection" ProjectStartDate="new DateTime(2022,4,1)" TreeColumnIndex=1>
…
   <GanttTemplates TValue="TaskData">

        <ParentTaskbarTemplate>
          <div class="e-gantt-parent-taskbar e-custom-parent" style="height:22px;border-radius:5px;text-overflow:ellipsis;">
            <span class="e-task-label" style="color:black;top:18px;font-size:9px;overflow: hidden;white-space: nowrap;">@totalHours((context as TaskData).TaskId)</span>
          </div>
        </ParentTaskbarTemplate>

        <TaskbarTemplate>
          <SfTooltip Target=".e-gantt-child-taskbar" CssClass="customtooltip" CloseDelay="1000" ShowTipPointer=false Position="Position.TopRight" OffsetX=-110 OffsetY=10 WindowCollision=true OpensOn="Hover">
             <TooltipTemplates>
                <Content>
                   <SfButton ID=".e-gantt-child-taskbar" IconCss="e-icons e-open-icon" CssClass="e-round" @onclick="ButtonClick1"></SfButton>
                   <SfButton ID=".e-gantt-child-taskbar" IconCss="e-icons e-refresh-icon" CssClass="e-round" @onclick="ButtonClick2"></SfButton>
                   <SfButton ID=".e-gantt-child-taskbar" IconCss="e-icons e-clear-icon" CssClass="e-round" @onclick="ButtonClick3"></SfButton>
                </Content>
              </TooltipTemplates>
              <div class="e-gantt-child-taskbar e-custom-moments" style="height:34px;border-radius:5px;">
                <div>
                   <p>Duration: 3 days</p>
                   <div style="position:absolute;top:13px">
                     @{
                        TaskData data = context as TaskData;
                     }

                     <SfProgressBar Value="(int.Parse(data.Duration) * (data.Progress)/100)" Height="10" Minimum="0" Maximum="int.Parse(data.Duration)" TrackThickness="10" ProgressThickness="6" ProgressColor="#FFA500" CornerRadius="CornerType.Round"></SfProgressBar>
                   </div>
                 </div>
              </div>
          </SfTooltip>
        </TaskbarTemplate>

        <MilestoneTemplate>
           <div style="margin-top:-7px;">
              <div class="e-gantt-milestone" style="position:absolute;">
                 <img class="moments" height="24" width="48" />
              </div>
           </div>
        </MilestoneTemplate>

    </GanttTemplates>TValue="TaskData"></GanttEvents>
</SfGantt>
We can also customize the timeline headers using the FormatterTemplate component of the GanttBottomTierSettings.
Refer to the following code example.
<SfGantt DataSource="@TaskCollection" ProjectStartDate="new DateTime(2022,4,1)" TreeColumnIndex=1>
…
<GanttBottomTierSettings Unit="TimelineViewMode.Week">
   <FormatterTemplate>
      @{
           @if (context.Tier == "bottom")
           {
              <div> @this.Formatter((context.Date)) </div>
           }
        }
   </FormatterTemplate>
</GanttBottomTierSettings>
</SfGantt>

public string Formatter(DateTime? date)
{
    DateTime dateTime = (DateTime)(date);
    if (Gantt.ProjectStartDate.Equals(dateTime))
    {
       return "1";
    }
    string bottomString =  dateTime.Day + "-" + ((dateTime.AddDays(6)).Day);
    return bottomString;
}
See the following output image. In it, we display the total duration of the parent task and its child tasks in the parent taskbar. We show progress bars in child tasks with three icons on the taskbar for event handlers. We have completely customized the appearance of the milestone.
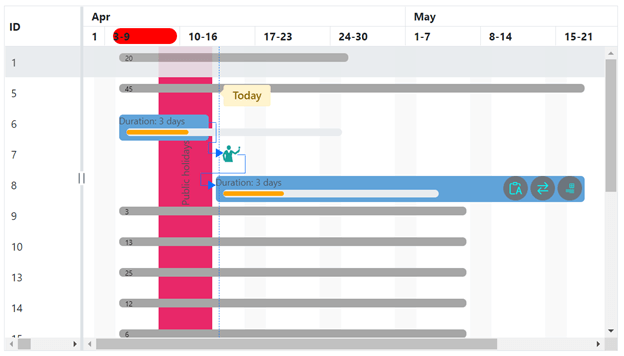
You can customize the taskbar appearance as you wish this way. Our Syncfusion Blazor Gantt Chart is a completely adaptable control.
GitHub reference
Also, I have uploaded a demo on customizing the Blazor Gantt Chart component’s taskbars in the GitHub repository.
Conclusion
Thanks for reading! In this blog, we have seen how to customize the Blazor Gantt Chart component’s taskbar. For more details, refer to the Blazor Gantt Chart documentation, online demos, and GitHub demo. Try out the steps in this blog post and visualize and manage your tasks like a pro!
If you want to try out this Syncfusion component, you can download our free trial.
For questions, you can contact us through our support forum, support portal, or feedback portal. We are always happy to assist you!
