
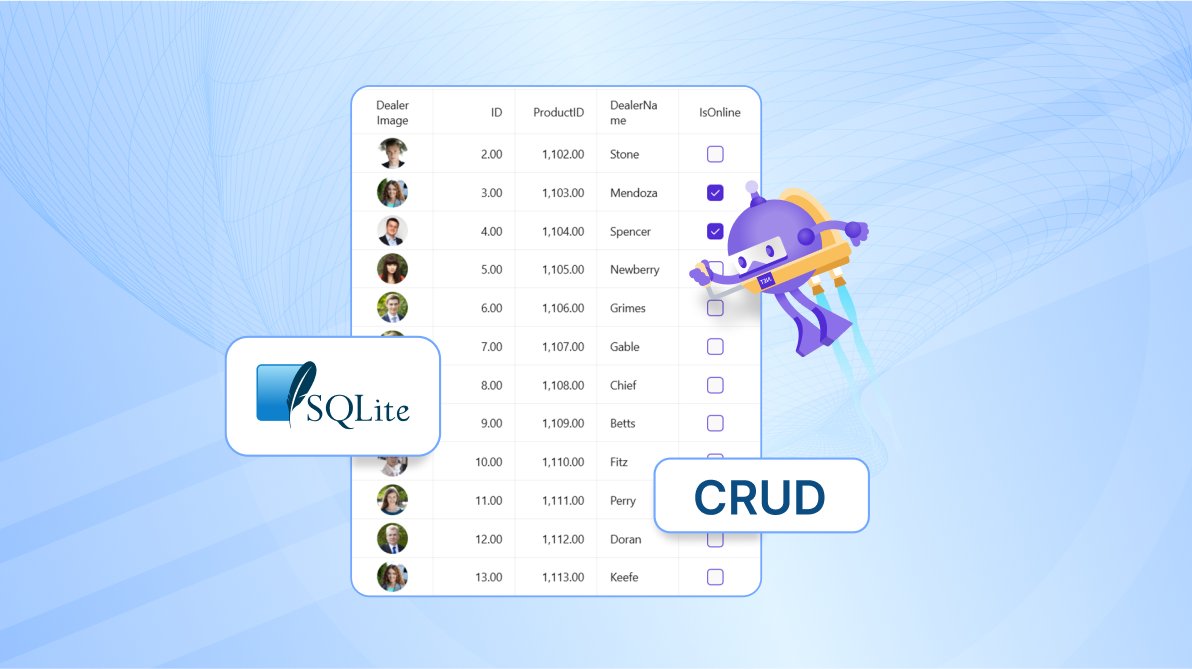
TL;DR: Let’s see how to bind the SQLite database to the .NET MAUI DataGrid and perform CRUD operations. The blog covers setting up SQLite, creating a database connection, and defining the DealerInfo model. You’ll learn how to populate data, bind it to the DataGrid, and keep it synchronized with updates.
Syncfusion .NET MAUI DataGrid control allows you to present a collection of data in a tabular format. Its rich feature set includes sorting, styling, auto-sizing, and different column types.
SQLite is a lightweight, open-source, self-contained relational database management system (RDBMS). It is known for its simplicity and efficiency. It is mostly used in embedded systems, mobile apps, and desktop software.
This blog explores how to connect an SQLite database to the .NET MAUI DataGrid and perform basic CURD operations. We will see how to create, read, update, and delete data in the SQLite database, ensuring the DataGrid remains synchronized with any changes.
Bind SQLite database to the .NET MAUI DataGrid
Here, we’ll integrate DealerInfo details stored in an SQLite database with the .NET MAUI DataGrid. We’ll guide you through setting up SQLite in a .NET MAUI app and binding the data to DataGrid for seamless data presentation.
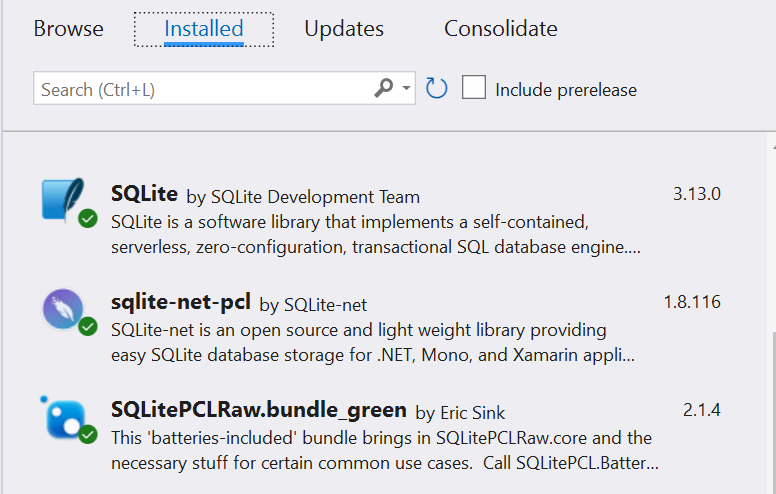
Step 1: Install the required packages
To begin, install the necessary NuGet packages to set up the SQLite database connection in your project.
Step 2: Define the class to access the SQLite database
Create a Constants class to encapsulate key properties related to the database.
public static class Constants
{
    public const string DatabaseFilename = "SQLiteDB.db";

    public const SQLite.SQLiteOpenFlags Flags =
        // Open the database in read/write mode
        SQLite.SQLiteOpenFlags.ReadWrite |
        // Create the database if it doesn't exist
        SQLite.SQLiteOpenFlags.Create |
        // Enable multi-threaded database access
        SQLite.SQLiteOpenFlags.SharedCache;

    public static string DatabasePath =>
        Path.Combine(Environment.GetFolderPath(Environment.SpecialFolder.LocalApplicationData), DatabaseFilename);
}
Next, establish an SQLite connection using the SQLiteAsyncConnection API, utilizing the database properties specified in the Constants class. Subsequently, instantiate a table named DealerInfo within the SQLite database.
public class SQLiteDatabase
{
    readonly SQLiteAsyncConnection _database;

    public SQLiteDatabase()
    {
        _database = new SQLiteAsyncConnection(Constants.DatabasePath, Constants.Flags);
        _database.CreateTableAsync<DealerInfo>();
    }
}
Step 3: Create an instance for the SQLite connection
We’ll create a singleton instance for the SQLite connection and initialize it in the App.xaml.cs file for use in the ViewModel class.
public partial class App : Application
{
    public App()
    {
        InitializeComponent();
            MainPage = new NavigationPage(new MainPage());
    }
    static SQLiteDatabase? database;

    // Create the database connection as a singleton.
    public static SQLiteDatabase Database
    {
        get
        {
            if (database == null)
            {
                database = new SQLiteDatabase();
            }
            return database;
        }
    }
}
Step 4: Create the DealerInfo class
Now, define a Model class named DealerInfo to hold the property values from the database table.
public class DealerInfo : INotifyPropertyChanged
{
    #region Fields

    private int productNo;

    private int productID;

    private string? dealerName;

    private bool isOnline;

    private int productprice;

    private string? dealerImage;

    private DateTime shippedDate;

    private string? shipCity;

    private string? shipCountry;

    #endregion

    [PrimaryKey, AutoIncrement]
    [Display(AutoGenerateField = false)]
    public int ID { get; set; }

    #region Public Properties

    /// <summary>
    /// Gets or sets the value of DealerImage and notifies the user when the value gets changed
    /// </summary>
    public string? DealerImage
    {
        get
        {
            return this.dealerImage;
        }

        set
        {
            this.dealerImage = value;
            this.RaisePropertyChanged("DealerImage");
        }
    }

    /// <summary>
    /// Gets or sets the value of ProductID and notifies the user when the value gets changed
    /// </summary>
    public int ProductID
    {
        get
        {
            return this.productID;
        }

        set
        {
            this.productID = value;
            this.RaisePropertyChanged("ProductID");
        }
    }

    /// <summary>
    /// Gets or sets the value of DealerName and notifies the user when the value gets changed
    /// </summary>
    public string? DealerName
    {
        get
        {
            return this.dealerName;
        }

        set
        {
            this.dealerName = value;
            this.RaisePropertyChanged("DealerName");
        }
    }

    /// <summary>
    /// Gets or sets a value indicating whether property value IsOnline was true or false and notifies the user when the value gets changed
    /// </summary>
    public bool IsOnline
    {
        get
        {
            return this.isOnline;
        }

        set
        {
            this.isOnline = value;
            this.RaisePropertyChanged("IsOnline");
        }
    }

    /// <summary>
    /// Gets or sets the value of ProductPrice and notifies the user when the value gets changed
    /// </summary>
    public int ProductPrice
    {
        get
        {
            return this.productprice;
        }

        set
        {
            this.productprice = value;
            this.RaisePropertyChanged("ProductPrice");
        }
    }

    /// <summary>
    /// Gets or sets the value of ProductNo and notifies the user when the value gets changed
    /// </summary>
    public int ProductNo
    {
        get
        {
            return this.productNo;
        }

        set
        {
            this.productNo = value;
            this.RaisePropertyChanged("ProductNo");
        }
    }

    /// <summary>
    /// Gets or sets the value of ShippedDate and notifies the user when the value gets changed
    /// </summary>
    public DateTime ShippedDate
    {
        get
        {
            return this.shippedDate;
        }

        set
        {
            this.shippedDate = value;
            this.RaisePropertyChanged("ShippedDate");
        }
    }

    /// <summary>
    /// Gets or sets the value of ShipCountry and notifies the user when the value gets changed
    /// </summary>
    public string? ShipCountry
    {
        get
        {
            return this.shipCountry;
        }

        set
        {
            this.shipCountry = value;
            this.RaisePropertyChanged("ShipCountry");
        }
    }

    /// <summary>
    /// Gets or sets the value of ShipCity and notifies the user when the value gets changed
    /// </summary>
    public string? ShipCity
    {
        get
        {
            return this.shipCity;
        }

        set
        {
            this.shipCity = value;
            this.RaisePropertyChanged("ShipCity");
        }
    }

    #endregion

    #region InotifyPropertyChanged implementation

    public event PropertyChangedEventHandler PropertyChanged;

    private void RaisePropertyChanged(String name)
    {
        if (PropertyChanged != null)
            this.PropertyChanged(this, new PropertyChangedEventArgs(name));
    }

    #endregion
}
Step 5: Populate SQLite database data in the ViewModel
In this step, we’ll populate data from the database into the DealerInfoViewModel class, as shown in the following code example.
public class DealerInfoViewModel : INotifyPropertyChanged
{
    #region Fields

    private ObservableCollection<DealerInfo> dealersInfo;
    private DealerInfo selectedDealerInfo;

    #endregion

    #region Properties
    public DealerInfo SelectedItem
    {
        get
        {
            return selectedDealerInfo;
        }
        set
        {
            selectedDealerInfo = value;
            OnPropertyChanged("SelectedItem");
        }
    }
    public ObservableCollection<DealerInfo> DealersInfo
    {
        get
        {
            return dealersInfo;
        }
        set
        {
            dealersInfo = value;
            OnPropertyChanged("DealersInfo");
        }
    }

    #endregion

    #region Constructor
    public DealerInfoViewModel()
    {
        GenerateContacts();
    }
    #endregion

    #region Methods

    private async void GenerateContacts()
    {
        DealersInfo = new ObservableCollection<DealerInfo>();
        DealersInfo = new DealerInfoRepository().GetDealerDetails(20);
        PopulateDB();
    }

    private async void PopulateDB()
    {
        foreach (DealerInfo dealerInfo in DealersInfo)
        {
            var item = await App.Database.GetDealerInfoAsync(dealerInfo);
            if (item == null)
                await App.Database.AddDealerInfoAsync(dealerInfo);
        }
    }

    #endregion

    #region Interface Member

    public event PropertyChangedEventHandler PropertyChanged;

    public void OnPropertyChanged(string name)
    {
        if (this.PropertyChanged != null)
            this.PropertyChanged(this, new PropertyChangedEventArgs(name));
    }

    #endregion
}
Step 6: Define and bind the SQLite database to the .NET MAUI DataGrid
Let’s bind the populated SQLite database to the .NET MAUI DataGrid control by setting the ItemsSource property.
Refer to the following code example to define the DataGrid.
<syncfusion:SfDataGrid x:Name="dataGrid"
                    NavigationMode="Cell"
                    GridLinesVisibility="Both"
                    SelectionMode="Single"
                    HeaderGridLinesVisibility="Both">
    <syncfusion:SfDataGrid.Behaviors>
        <local:SfDataGridBehavior/>
    </syncfusion:SfDataGrid.Behaviors>
    <syncfusion:SfDataGrid.Columns>
        <syncfusion:DataGridImageColumn MappingName="DealerImage"
                                HeaderText="Dealer Image" />
    </syncfusion:SfDataGrid.Columns>
</syncfusion:SfDataGrid>
Now, bind the ItemsSource property of the DataGrid with the data retrieved from the SQLite database using the OnAppearing method.
public partial class MainPage : ContentPage
{
    public MainPage()
    {
        InitializeComponent();

    }
    protected async override void OnAppearing()
    {
        base.OnAppearing();
        dataGrid.ItemsSource = await App.Database.GetDealerInfosAsync();
    }
}
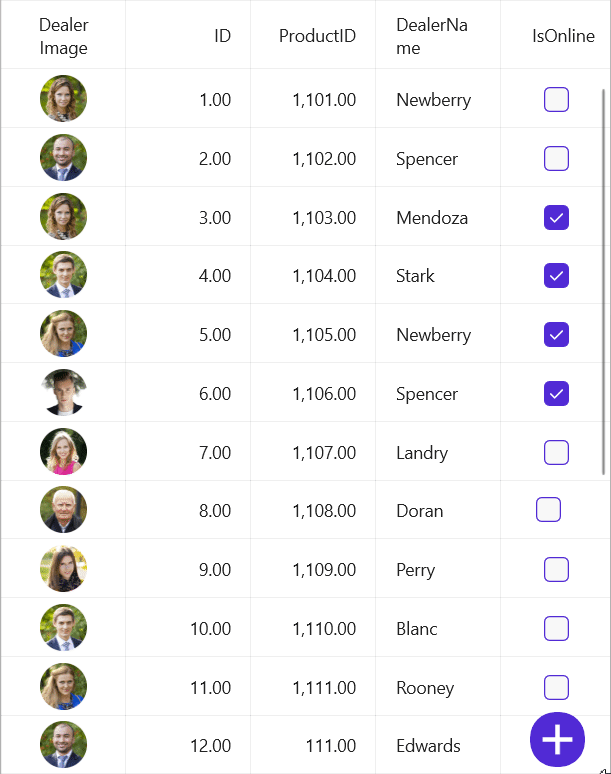
After completing these steps, the data from the database will be displayed in the SfDataGrid on the UI. Once the code is executed, the populated data will be visible within the grid, allowing for interaction and viewing of dealer information.

Perform CRUD operations with SQLite database and update in .NET MAUI DataGrid
This section will demonstrate how to perform CRUD (Create, Read, Update, Delete) operations on an SQLite database and synchronize these changes with the .NET MAUI DataGrid. To perform such actions on this page, we must implement the code for performing CRUD operations on the SQLite database and commands in the ViewModel class, as mentioned in the following sections.
Database implementation for CRUD operations
The SQLite-net-pcl assembly provides predefined methods for performing CRUD operations. Refer to the following code example to implement these database operations.
public class SQLiteDatabase
{
    readonly SQLiteAsyncConnection _database;

    public SQLiteDatabase()
    {
        _database = new SQLiteAsyncConnection(Constants.DatabasePath, Constants.Flags);
        _database.CreateTableAsync<DealerInfo>();
    }

    public async Task<List<DealerInfo>> GetDealerInfosAsync()
    {
        return await _database.Table<DealerInfo>().ToListAsync();
    }

    public async Task<DealerInfo> GetDealerInfoAsync(DealerInfo item)
    {
        return await _database.Table<DealerInfo>().Where(i => i.ID == item.ID).FirstOrDefaultAsync();
    }

    public async Task<int> AddDealerInfoAsync(DealerInfo item)
    {
        return await _database.InsertAsync(item);
    }

    public Task<int> DeleteDealerInfoAsync(DealerInfo item)
    {
        return _database.DeleteAsync(item);
    }

    public Task<int> UpdateDealerInfoAsync(DealerInfo item)
    {
        if (item.ID != 0)
            return _database.UpdateAsync(item);
        else
            return _database.InsertAsync(item);
    }
}
Implement CRUD commands in the ViewModel class
In the ViewModel.cs file, we define the necessary commands to create, edit, save, and delete DealerInfo entries. These commands are bound to the buttons on the EditPage to perform the respective operations.
Refer to the following code example.
public class DealerInfoViewModel : INotifyPropertyChanged
{
    public Command CreateDealerInfoCommand { get; set; }
    public Command<object> EditDealerInfoCommand { get; set; }
    public Command SaveItemCommand { get; set; }
    public Command DeleteItemCommand { get; set; }
    public Command AddItemCommand { get; set; }

    #region Constructor
    public DealerInfoViewModel()
    {
        CreateDealerInfoCommand = new Command(OnCreateDealerInfo);
        EditDealerInfoCommand = new Command<object>(OnEditDealerInfo);
        SaveItemCommand = new Command(OnSaveItem);
        DeleteItemCommand = new Command(OnDeleteItem);
        AddItemCommand = new Command(OnAddNewItem);
    }
    #endregion

    #region Methods
    private async void OnAddNewItem()
    {
        await App.Database.AddDealerInfoAsync(SelectedItem);
        DealersInfo.Add(SelectedItem);
        await App.Current.MainPage.Navigation.PopAsync();
    }

    private async void OnDeleteItem()
    {
        await App.Database.DeleteDealerInfoAsync(SelectedItem);
        DealersInfo.Remove(SelectedItem);
        await App.Current.MainPage.Navigation.PopAsync();
    }

    private async void OnSaveItem()
    {
        await App.Database.UpdateDealerInfoAsync(SelectedItem);
        await App.Current.MainPage.Navigation.PopAsync();
    }

    private void OnEditDealerInfo(object obj)
    {
        SelectedItem = (obj as Syncfusion.Maui.DataGrid.DataGridCellTappedEventArgs).RowData as DealerInfo;
        var editPage = new Views.EditPage();
        editPage.BindingContext = this;
        App.Current.MainPage.Navigation.PushAsync(editPage);
    }

    private void OnCreateDealerInfo()
    {
        SelectedItem = new DealerInfo() { DealerName = "", DealerImage = "" };
        var editPage = new Views.EditPage();
        editPage.BindingContext = this;
        App.Current.MainPage.Navigation.PushAsync(editPage);
    }

    #endregion

    #region Interface Member

    public event PropertyChangedEventHandler PropertyChanged;

    public void OnPropertyChanged(string name)
    {
        if (this.PropertyChanged != null)
            this.PropertyChanged(this, new PropertyChangedEventArgs(name));
    }

    #endregion
}
Binding ViewModel commands to the EditPage
We use the Syncfusion .NET MAUI DataForm control to design the EditPage for editing, saving, and deleting dealer information. The commands in the ViewModel are bound to the buttons in the EditPage. The CommitMode property is set to PropertyChanged to ensure data changes are saved in real time.
Refer to the following code example.
<?xml version="1.0" encoding="utf-8" ?>
<ContentPage xmlns="http://schemas.microsoft.com/dotnet/2021/maui"
             xmlns:x="http://schemas.microsoft.com/winfx/2009/xaml"
              xmlns:dataForm="clr-namespace:Syncfusion.Maui.DataForm;assembly=Syncfusion.Maui.DataForm"
             Title="Edit Page"
             x:Class="DataGridMAUI.Views.EditPage">
    <Grid RowDefinitions="0.9*, 1, 0.1*">
        <dataForm:SfDataForm DataObject="{Binding SelectedItem}" CommitMode="PropertyChanged" />
        <Border Grid.Row="1" Background="#F5F5F5"/>
        <Grid HeightRequest="50" Grid.Row="2" ColumnDefinitions="*,auto">
            <Button Text="Add" Grid.Column="0" Margin="15,0,5,0" Command="{Binding AddItemCommand}" HorizontalOptions="Start" VerticalOptions="Center"/>
            <HorizontalStackLayout  HorizontalOptions="End" Grid.Column="1">
                <Button Text="Save" Grid.Column="1" HorizontalOptions="Center" VerticalOptions="Center" Command="{Binding SaveItemCommand}" />
                <Button Text="Delete" Grid.Column="2" Command="{Binding DeleteItemCommand}"  VerticalOptions="Center"
            HorizontalOptions="Center" />
            </HorizontalStackLayout>
        </Grid>
    </Grid>
</ContentPage>
Refer to the following image.
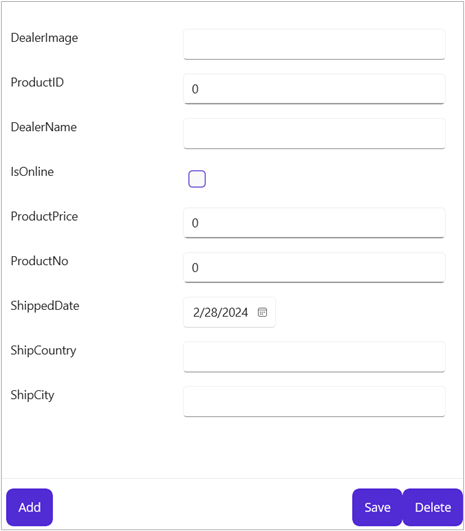
After executing all the previous code examples, you will get the following output. On tapping an item, you will get an edit page to change values or delete the tapped item. We’ve also added an icon (+) at the bottom-right corner of DataGrid to add a new item to the list.
GitHub reference
For more details, refer to the Bind SQLite database and perform CRUD actions in the .NET MAUI DataGrid GitHub demo.

Conclusion
Thank you for reading! In this blog, we’ve explored how to bind an SQLite database with the Syncfusion .NET MAUI DataGrid and perform CRUD operations. Feel free to try the steps outlined in this blog and share your thoughts in the comments below.
If you have any questions or need assistance, you can reach us through our support forum, support portal, or feedback portal. We’re always here to help!


 No spam, just valuable updates.