TL;DR: Discover how to create dynamic Excel charts using Syncfusion’s .NET Excel (XlsIO) Library in C#. This guide walks you through chart elements, step-by-step creation, customization techniques, and chart removal. Perfect for developers looking to elevate their Excel data visualization skills!
Charts in Excel are powerful visual tools that simplify complex data and make it easier to identify data trends, patterns, and relationships in a graphical format. They provide insights at a glance and come in various types, such as bar, line, and pie charts, each tailored to different analytical needs.
With the Syncfusion .NET Excel library (XlsIO), you can create, customize, and manipulate over 80 chart types, including those introduced in Excel 2016. The library lets you modify and format chart elements directly within Excel documents.
In this blog, we’ll see how to create, customize, and remove charts within an Excel worksheet using C#.

Enjoy a smooth experience with Syncfusion’s Excel Library! Get started with a few lines of code and without Microsoft or interop dependencies.
Understanding chart elements
Before creating charts in Excel, it’s essential to understand the key elements that comprise a chart:
- Chart title: A concise title that indicates what the chart represents.
- Axes: Most Excel charts include a horizontal x-axis (category axis) and a vertical y-axis (value axis). These axes provide context for the data points displayed, helping users interpret the values.
- Data series: A set of related data points plotted on the chart, often distinguished by colors or markers to make categories easily recognizable.
- Legend: The legend acts as a key, explaining the symbols, colors, or patterns used in each data series and clearly representing each data series.
- Data labels: These labels display specific information about individual data points, such as exact values or percentages, which can improve the chart’s readability and accuracy.
Understanding these elements will help you create clear, informative charts that effectively communicate your data in Excel.
Creating a chart in Excel with C#
To create a chart in Excel using C#, follow these steps that will guide you through the entire process.
Step 1: Set up your project
First, create a .NET Core Console app in Visual Studio. This is your workspace for developing the chart functionality.
Refer to the following image.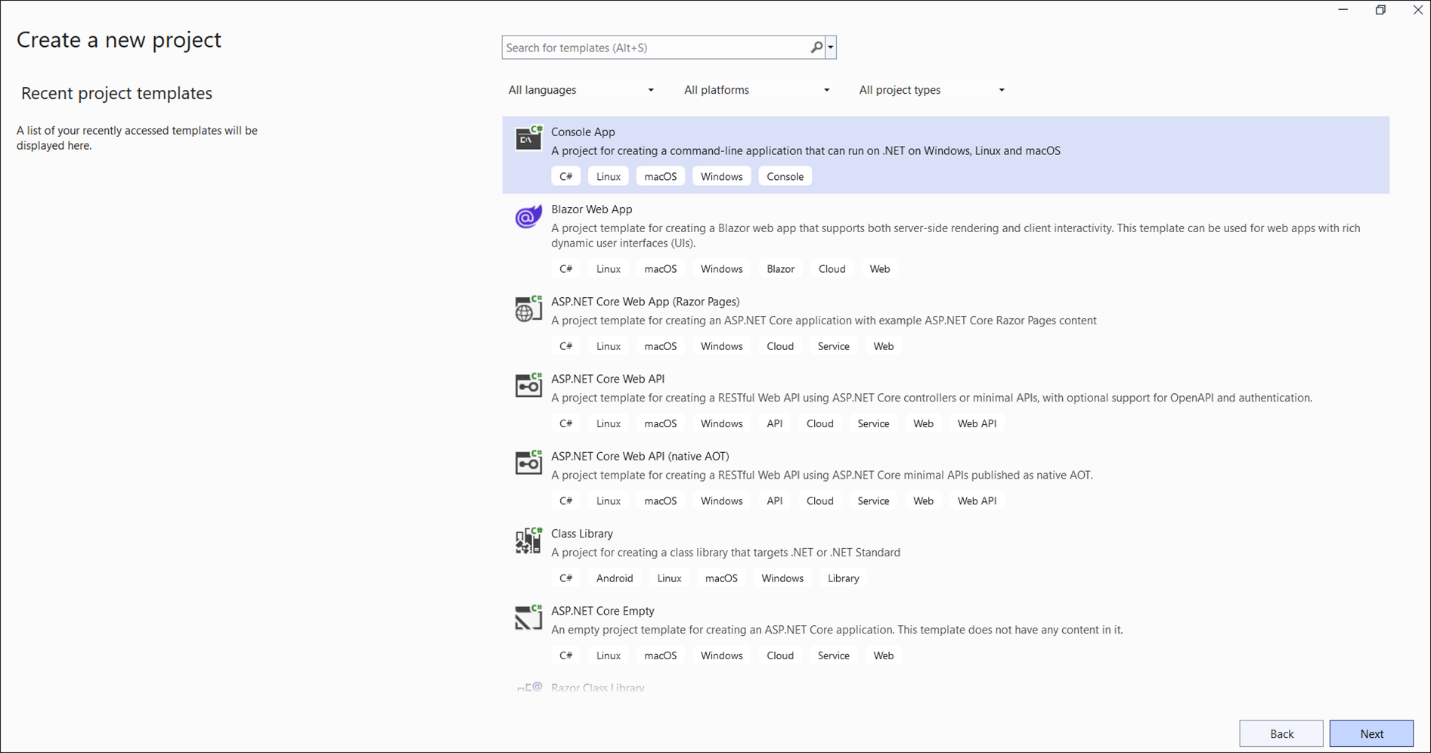
Step 2: Install the required packages
Next, add the latest version of the Syncfusion.XlsIO.NET.Core NuGet package to your app for your project. This library provides the necessary tools to manipulate Excel files and create charts.
Refer to the following image. 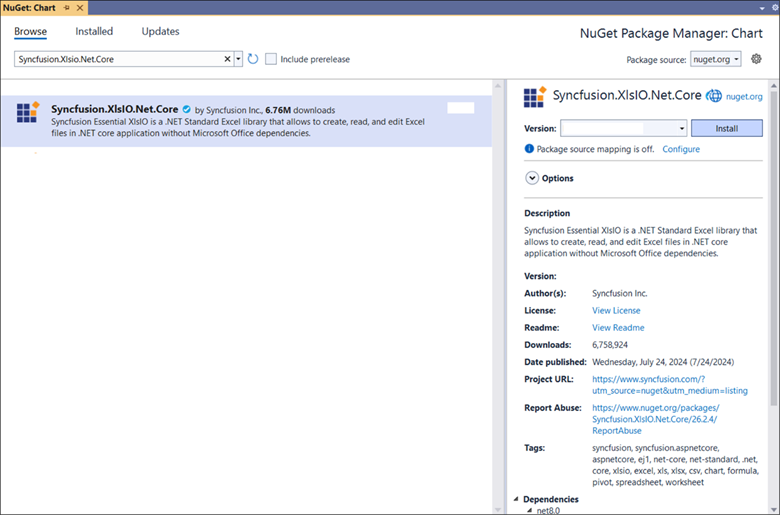
Step 3: Create a chart in Excel using C#
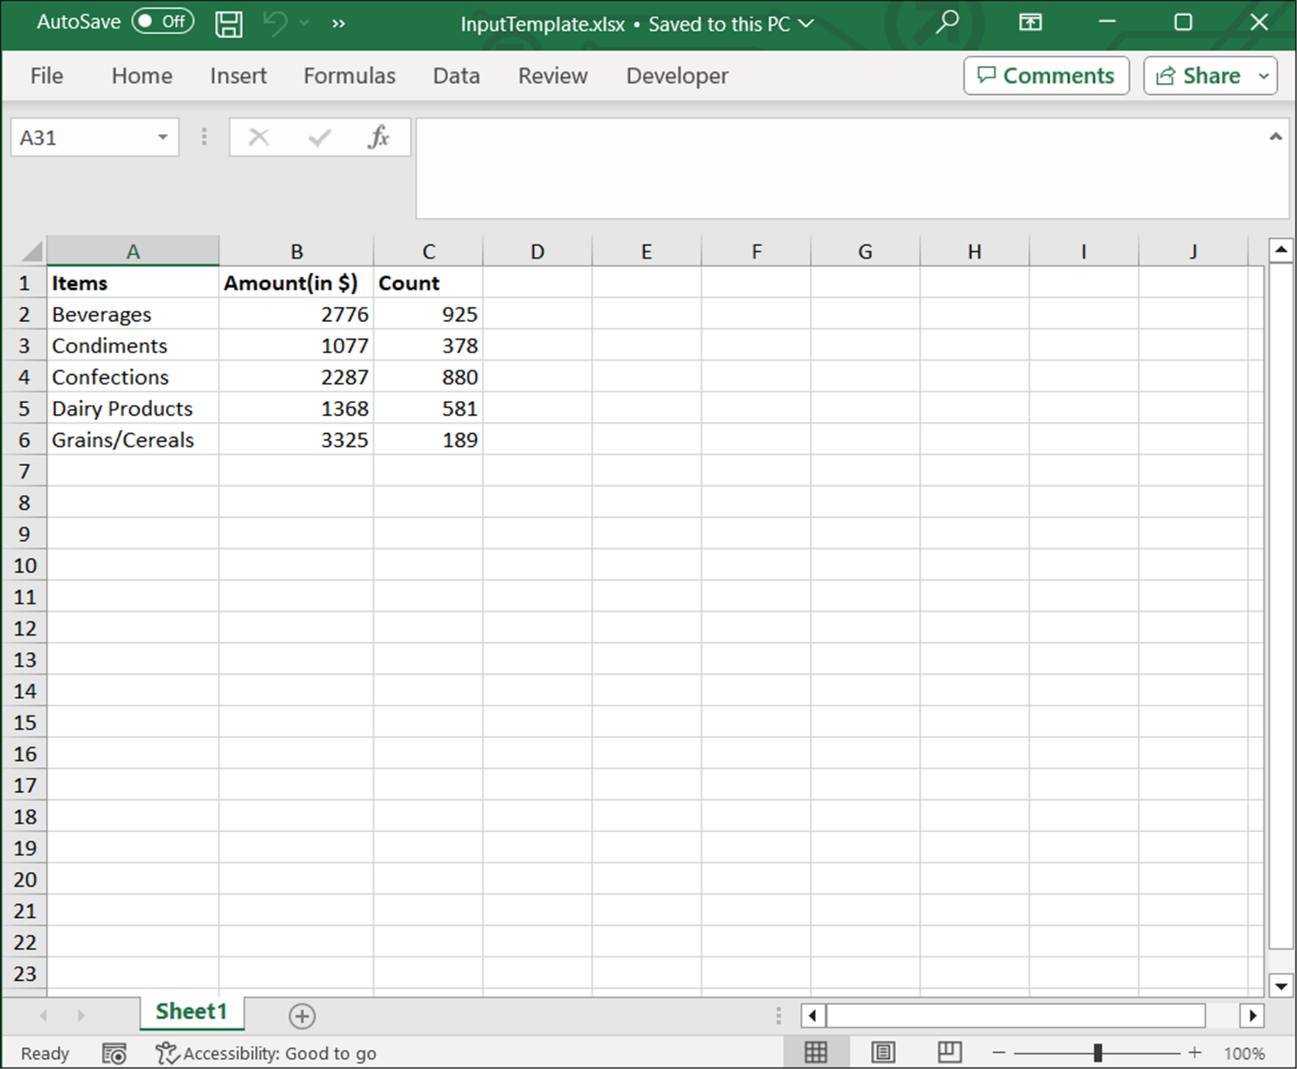
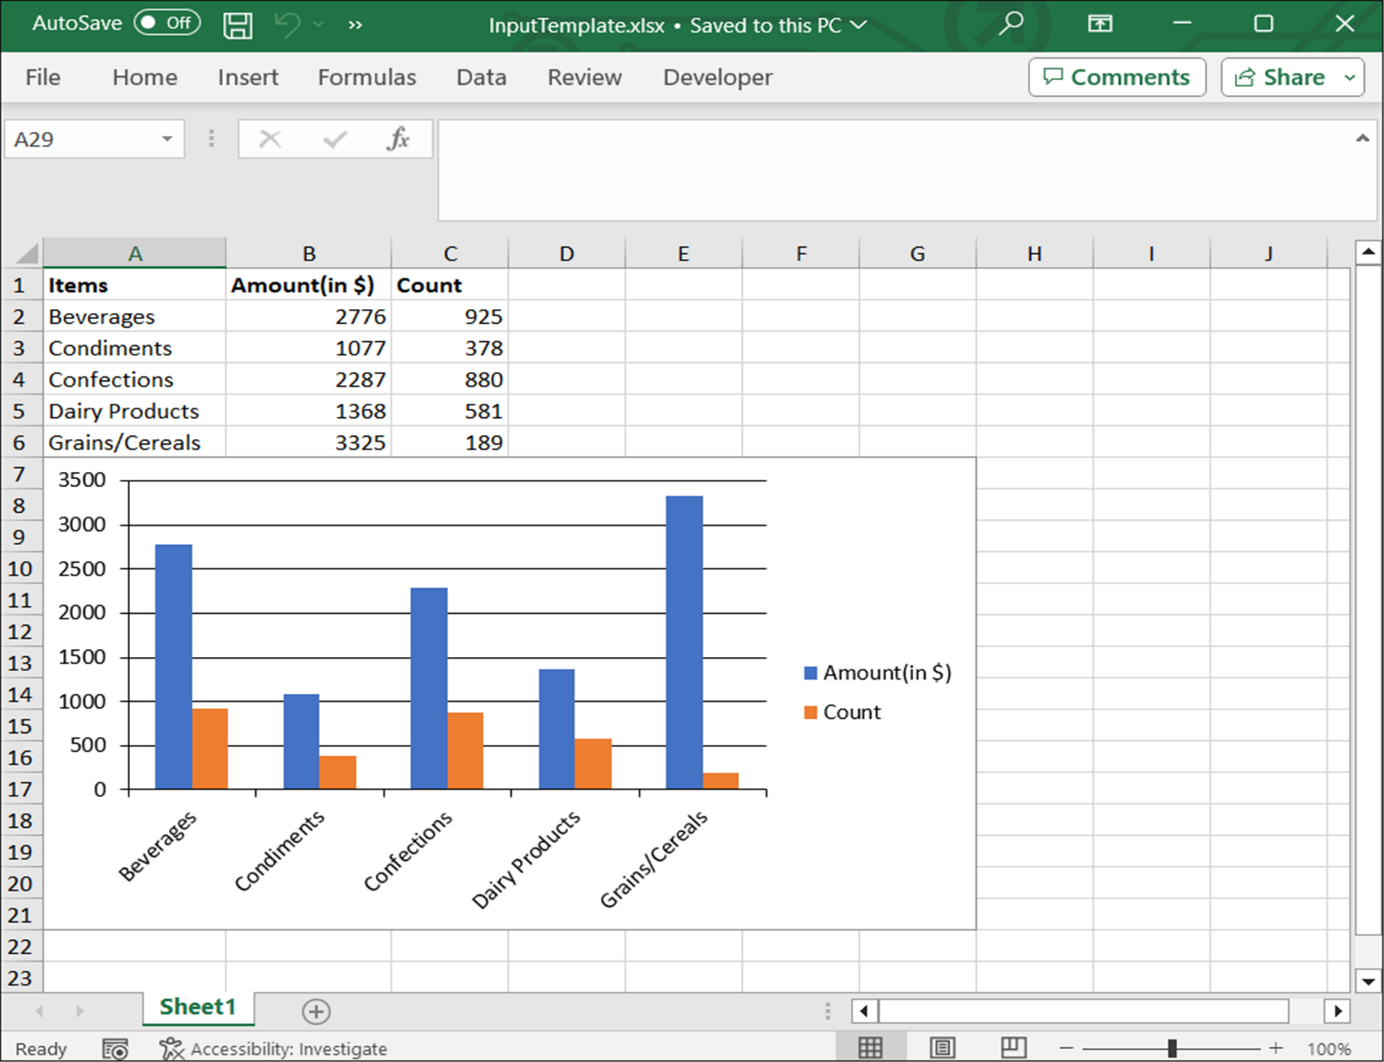
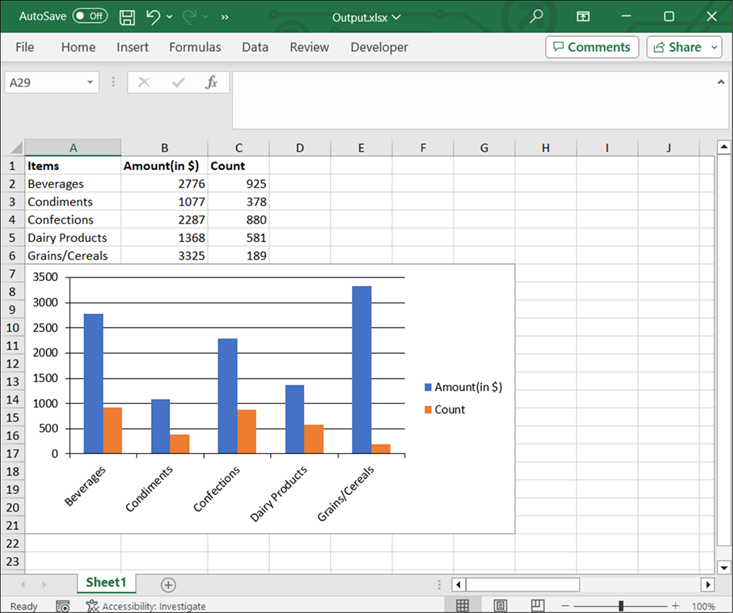
Now, add the following code to add a chart to an Excel document.
using Syncfusion.XlsIO;

namespace Chart
{
    class Program
    {
        public static void Main(string[] args)
        {
            using (ExcelEngine excelEngine = new ExcelEngine())
            {
                IApplication application = excelEngine.Excel;
                application.DefaultVersion = ExcelVersion.Xlsx;

                //Load an existing Excel file.
                FileStream inputStream = new FileStream("InputTemplate.xlsx", FileMode.Open, FileAccess.Read);
                IWorkbook workbook = application.Workbooks.Open(inputStream);
                IWorksheet worksheet = workbook.Worksheets[0];

                //Create a chart.
                IChartShape chart = worksheet.Charts.Add();

                //Set the chart type.
                chart.ChartType = ExcelChartType.Column_Clustered;

                //Set data range in the worksheet.
                chart.DataRange = worksheet.Range["A1:C6"];

                //Specify that the series are in columns.
                chart.IsSeriesInRows = false;

                //Positioning the chart in the worksheet.
                chart.TopRow = 8;
                chart.LeftColumn = 1;
                chart.BottomRow = 23;
                chart.RightColumn = 8;

                //Save the workbook as stream.
                FileStream outputStream = new FileStream("Output.xlsx",FileMode.Create,FileAccess.Write);
                workbook.SaveAs(outputStream);

                //Dispose stream.
                inputStream.Dispose();
                outputStream.Dispose();
            }
        }
    }
}
Refer to the following images.

Handle Excel files like a pro with Syncfusion’s C# Excel Library, offering well-documented APIs for each functionality.
Customizing the chart’s appearance
Customizing a chart in Excel allows you to enhance its readability, aesthetics, and overall impact by modifying various visual elements. This process involves adjusting standard components like:
- Chart area and plot area: The chart area includes the entire chart, while the plot area contains the actual data representation. Customizing these areas can set the overall style and background of the chart.
- Data series: Adjusting colors, styles, and markers for each data series makes it easier to differentiate data groups and improves visual clarity.
- Axis and titles: Formatting the axes and titles helps provide context, while font styles, colors, and sizes contribute to readability.
- Legend: Customizing the legend’s position, font, and color makes it more intuitive, enhancing users’ understanding of each data series.
- Data labels: Formatting data labels with colors, font sizes, and specific placement makes values more accessible, giving viewers key insights at a glance.
You can also use advanced customization options like Fill Settings, adding images, positioning and resizing elements, including a Data Table, and applying 3D formats to further refine the chart’s appearance.
Format chart title
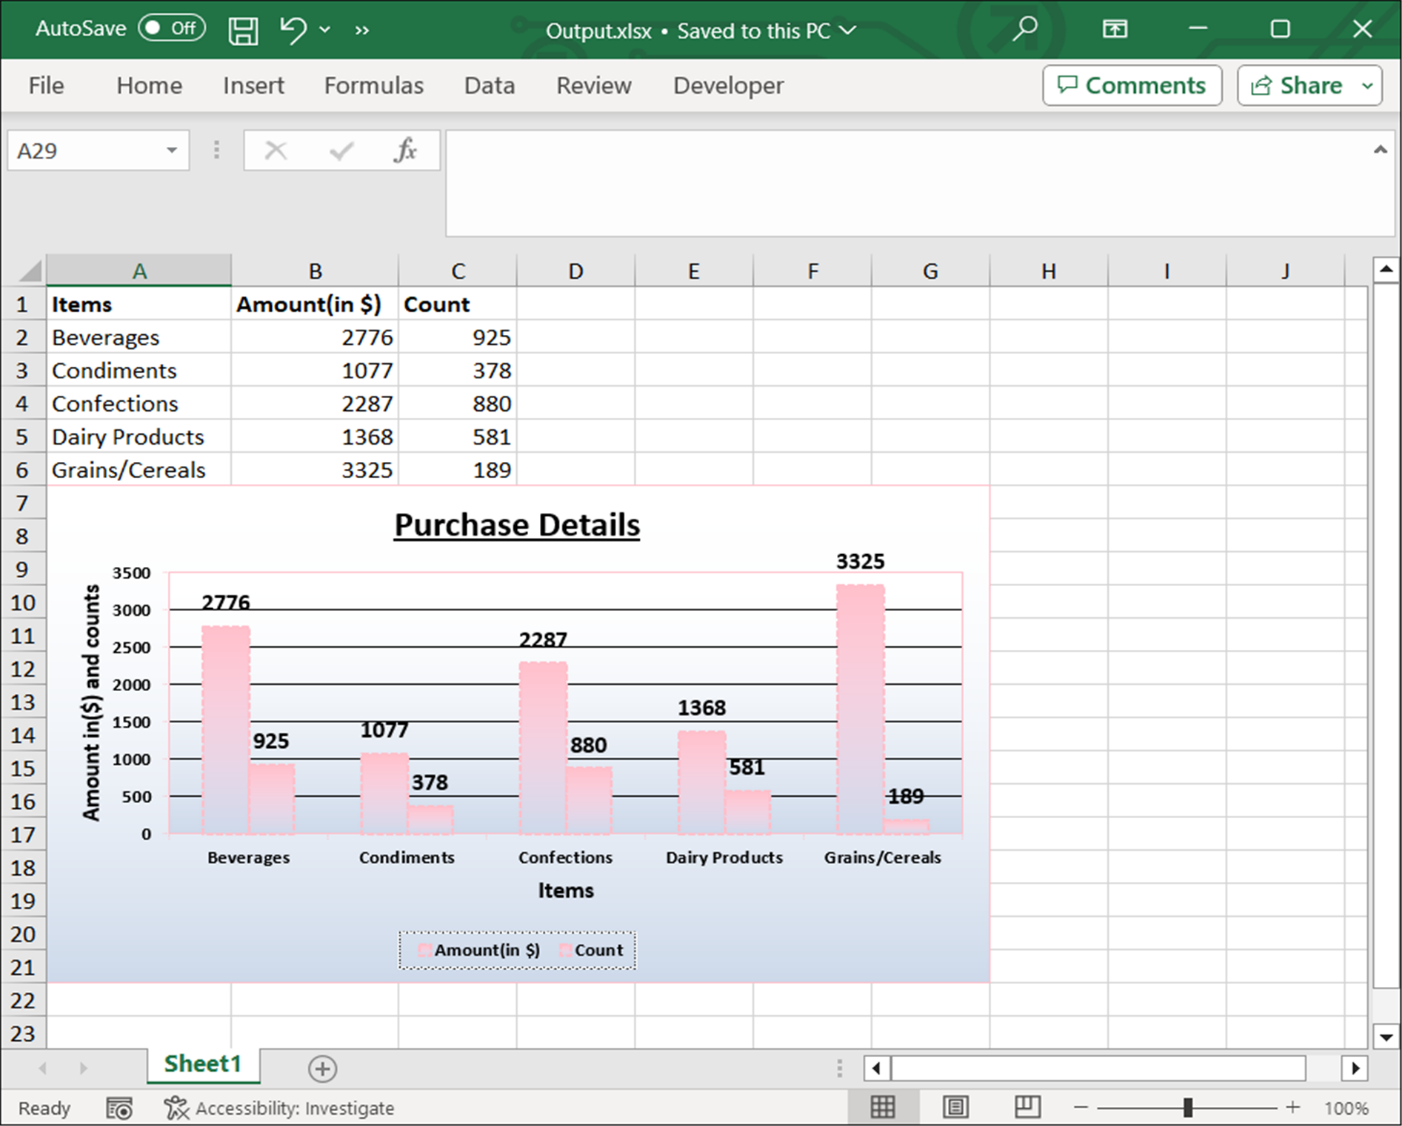
To customize the title of a chart, use ChartTitle to set the title text. Additionally, adjust the title area’s font, color, size, and style using the ChartTitleArea property.
For detailed steps and further customization options, refer to the Chart Title UG documentation.
Refer to the following code example to customize the chart title.
//Set the chart title.
chart.ChartTitle = "Purchase Details";

//Format chart title color and font.
chart.ChartTitleArea.Color = ExcelKnownColors.Black;

chart.ChartTitleArea.FontName = "Calibri";
chart.ChartTitleArea.Bold = true;
chart.ChartTitleArea.Underline = ExcelUnderline.Single;
chart.ChartTitleArea.Size = 15;
Format chart area
To customize the chart area’s appearance, use the ChartArea property of the chart. This lets you modify the border, fill color, gradient style, and more. For detailed steps and additional customization options, refer to the Chart Area documentation.
Refer to the following code example to customize the appearance of the chart area.
//Format chart area.
IChartFrameFormat chartArea = chart.ChartArea;

//Format chart area border and color.
chartArea.Border.LinePattern = ExcelChartLinePattern.Solid;
chartArea.Border.LineColor = Color.Pink;
chartArea.Border.LineWeight = ExcelChartLineWeight.Hairline;

chartArea.Fill.FillType = ExcelFillType.Gradient;
chartArea.Fill.GradientColorType = ExcelGradientColor.TwoColor;
chartArea.Fill.BackColor = Color.FromArgb(205, 217, 234);
chartArea.Fill.ForeColor = Color.White;
Format plot area
To customize the appearance of the plot area, use the PlotArea property of the chart. This enables you to modify elements such as the border, fill color, gradient style, and more. Refer to the Plot Area documentation for detailed steps and additional customization options.
Below is a code example demonstrating how to customize the plot area:
//Format plot area.
IChartFrameFormat chartPlotArea = chart.PlotArea;

//Format plot area border and color.
chartPlotArea.Border.LinePattern = ExcelChartLinePattern.Solid;
chartPlotArea.Border.LineColor = Color.Pink;
chartPlotArea.Border.LineWeight = ExcelChartLineWeight.Hairline;

chartPlotArea.Fill.FillType = ExcelFillType.Gradient;
chartPlotArea.Fill.GradientColorType = ExcelGradientColor.TwoColor;
chartPlotArea.Fill.BackColor = Color.FromArgb(205, 217, 234);
chartPlotArea.Fill.ForeColor = Color.White;
Format series
To customize the appearance of the chart series, use SerieFormat to adjust line properties, fill colors, and other formatting options for each series.
For detailed steps and additional customization options, refer to the Chart Series documentation.
Below is a code example demonstrating how to customize the appearance of chart series.
//Format series.
IChartSerie serie1 = chart.Series[0];
IChartSerie serie2 = chart.Series[1];

//Format series border and color.
serie1.SerieFormat.LineProperties.LineColor = Color.Pink;
serie1.SerieFormat.LineProperties.LinePattern = ExcelChartLinePattern.Dot;
serie1.SerieFormat.LineProperties.LineWeight = ExcelChartLineWeight.Narrow;

serie2.SerieFormat.LineProperties.LineColor = Color.Pink;
serie2.SerieFormat.LineProperties.LinePattern = ExcelChartLinePattern.Dot;
serie2.SerieFormat.LineProperties.LineWeight = ExcelChartLineWeight.Narrow;

serie1.SerieFormat.Fill.FillType = ExcelFillType.Gradient;
serie1.SerieFormat.Fill.GradientColorType = ExcelGradientColor.TwoColor;
serie1.SerieFormat.Fill.BackColor = Color.FromArgb(205, 217, 234);
serie1.SerieFormat.Fill.ForeColor = Color.Pink;

serie2.SerieFormat.Fill.FillType = ExcelFillType.Gradient;
serie2.SerieFormat.Fill.GradientColorType = ExcelGradientColor.TwoColor;
serie2.SerieFormat.Fill.BackColor = Color.FromArgb(205, 217, 234);
serie2.SerieFormat.Fill.ForeColor = Color.Pink;
Format data labels
To customize the appearance of data labels on a chart, use the DataLabels property to adjust visibility, position, font, and color. This enables clearer data presentation with tailored label styles. For detailed steps and further customization options, refer to the Data Labels documentation.
Below is a code example demonstrating how to customize chart data labels.
//Set Datalabel.
serie1.DataPoints.DefaultDataPoint.DataLabels.IsValue = true;
serie2.DataPoints.DefaultDataPoint.DataLabels.IsValue = true;
serie1.DataPoints.DefaultDataPoint.DataLabels.Position = ExcelDataLabelPosition.Outside;
serie2.DataPoints.DefaultDataPoint.DataLabels.Position = ExcelDataLabelPosition.Outside;

//Format data labels color and font.
serie1.DataPoints.DefaultDataPoint.DataLabels.Color = ExcelKnownColors.Black;
serie2.DataPoints.DefaultDataPoint.DataLabels.Color = ExcelKnownColors.Black;

serie1.DataPoints.DefaultDataPoint.DataLabels.Size = 10;
serie1.DataPoints.DefaultDataPoint.DataLabels.FontName = "calibri";
serie1.DataPoints.DefaultDataPoint.DataLabels.Bold = true;

serie2.DataPoints.DefaultDataPoint.DataLabels.Size = 10;
serie2.DataPoints.DefaultDataPoint.DataLabels.FontName = "calibri";
serie2.DataPoints.DefaultDataPoint.DataLabels.Bold = true;
Format legend
To customize the chart legend’s appearance, use the Legend property to adjust its position, border, font, and other visual elements. This allows you to refine the legend’s appearance and make it more readable or visually appealing.
For detailed steps and further customization options, refer to the Legend documentation.
Refer to the following code example to customize the chart legend.
//Set legend.
chart.HasLegend = true;
chart.Legend.Position = ExcelLegendPosition.Bottom;

//Format legend border, color, and font.
chart.Legend.FrameFormat.Border.AutoFormat = false;
chart.Legend.FrameFormat.Border.IsAutoLineColor = false;
chart.Legend.FrameFormat.Border.LineColor = Color.Black;
chart.Legend.FrameFormat.Border.LinePattern = ExcelChartLinePattern.LightGray;
chart.Legend.FrameFormat.Border.LineWeight = ExcelChartLineWeight.Narrow;

chart.Legend.TextArea.Color = ExcelKnownColors.Black;

chart.Legend.TextArea.Bold = true;
chart.Legend.TextArea.FontName = "Calibri";
chart.Legend.TextArea.Size = 8;
chart.Legend.TextArea.Strikethrough = false;
Format chart axis
Using PrimaryCategoryAxis and PrimaryValueAxis, customize the appearance of the primary category (X-axis) and primary value (Y-axis) axes, adjusting the title, border, font, and other properties.
Refer to the Chart Axis UG documentation for detailed steps and customization options.
Refer to the following code example to customize the chart axis.
//Set axis title.
chart.PrimaryCategoryAxis.Title = "Items";
chart.PrimaryValueAxis.Title = "Amount in($) and counts";

//Format chart axis border and font.
chart.PrimaryCategoryAxis.Border.LinePattern = ExcelChartLinePattern.CircleDot;
chart.PrimaryCategoryAxis.Border.LineColor = Color.Pink;
chart.PrimaryCategoryAxis.Border.LineWeight = ExcelChartLineWeight.Hairline;

chart.PrimaryValueAxis.Border.LinePattern = ExcelChartLinePattern.CircleDot;
chart.PrimaryValueAxis.Border.LineColor = Color.Pink;
chart.PrimaryValueAxis.Border.LineWeight = ExcelChartLineWeight.Hairline;

chart.PrimaryCategoryAxis.Font.Color = ExcelKnownColors.Black;
chart.PrimaryCategoryAxis.Font.FontName = "Calibri";
chart.PrimaryCategoryAxis.Font.Bold = true;
chart.PrimaryCategoryAxis.Font.Size = 8;

chart.PrimaryValueAxis.Font.Color = ExcelKnownColors.Black;
chart.PrimaryValueAxis.Font.FontName = "Calibri";
chart.PrimaryValueAxis.Font.Bold = true;
chart.PrimaryValueAxis.Font.Size = 8;
Refer to the following images.

Witness the possibilities in demos showcasing the robust features of Syncfusion’s C# Excel Library.
Remove a chart from Excel
If you need to remove a chart from your Excel worksheet. Refer to the following code example.
using (ExcelEngine excelEngine = new ExcelEngine())
{
  IApplication application = excelEngine.Excel;
  application.DefaultVersion = ExcelVersion.Xlsx;
  FileStream inputStream = new FileStream("InputTemplate.xlsx", FileMode.Open, FileAccess.Read);
  IWorkbook workbook = application.Workbooks.Open(inputStream, ExcelOpenType.Automatic);
  IWorksheet sheet = workbook.Worksheets[0];
  IChartShape chart = sheet.Charts[0];

  //Remove the chart from the worksheet.
  chart.Remove();

  //Saving the workbook as a stream.
  FileStream stream = new FileStream("Output.xlsx", FileMode.Create, FileAccess.ReadWrite);
  workbook.SaveAs(stream);

  //Dispose stream.
  stream.Dispose();
}
References
For more details, refer to working with charts in Excel using C# documentation and GitHub demo.

Don't settle for ordinary spreadsheet solutions. Switch to Syncfusion and upgrade the way you handle Excel files in your apps!
Conclusion
Thanks for reading! In this blog, we’ve seen how to add, customize, and remove a chart in an Excel document using C# and Syncfusion .NET Excel Library (XlsIO). The Excel Library also allows you to export Excel data to images, data tables, CSV, TSV, HTML, collections of objects, ODS, JSON, and other file formats.
Feel free to try out this versatile .NET Excel Library and share your feedback in the comments section of this blog post!
Our existing customers can check out these features on the License and Downloads page. If you are new to Syncfusion, you can try our 30-day free trial to explore these features.
You can also contact us through our support forums, support portal, or feedback portal. We are always happy to assist you!
