Gulp is a toolkit that helps web developers automate many development tasks such as minification and file conversion. We can create tasks using NPM gulp dependencies.
In this article, we are going to go cover the gulp integration. We’ll look at some of the most often required gulp tasks that help ease front-end web development challenges using Visual Studio.
You will learn:
- Prerequisites
- Useful gulp tasks to improve the web development process
- How to run gulp tasks
- How to automate gulp tasks (task binding)
Prerequisites
1. Install Node.js
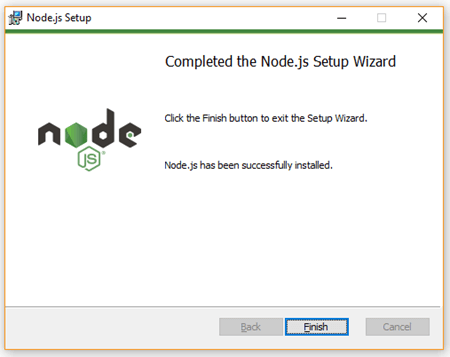
Node.js is an open-source and cross-platform runtime environment for creating server-side and networking apps. Node.js apps are written in JavaScript and can be run on macOS, Windows, and Linux.
We must install Node.js to execute our gulp tasks. So, download and install the recommended version of Node.js before implementing gulp.
Set Node.js path as an environment variable
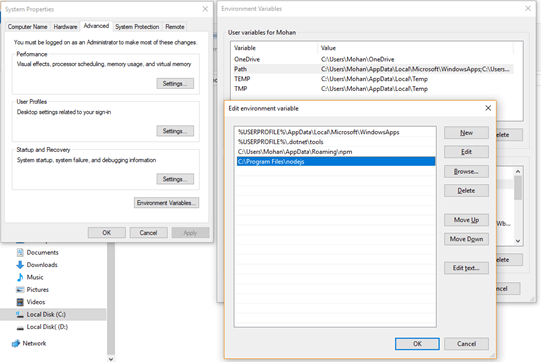
After installing Node.js, set its installed location as a path in an environment variable. To do so, open Run (Win + R) and execute “rundll32 sysdm.cpl,EditEnvironmentVariables”. This will open the environment variables dialog, in that open path by performing a double-click on the path. In the Edit environment variable dialog, click New and add the installed location of Node.js, which by default is C:\Program Files\nodejs.
2. Install NPM
Node Package Manager (NPM) is the default package manager for the JavaScript runtime environment Node.js. It is a command-line utility for installing, updating, and uninstalling Node.js packages in your app.
Install NPM using the following command in the command prompt.
npm install -g npm

To check whether Node.js or NPM are already installed, execute the following commands.
Node.js: node --version
NPM version: npm --version
3. Create package.json file
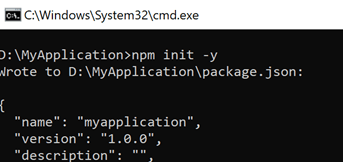
The package.json is a JSON file that contains information about the dependencies required in the project.
Create the package.json file by running the following command using the command prompt.
npm init -y
4. Add gulp.js file
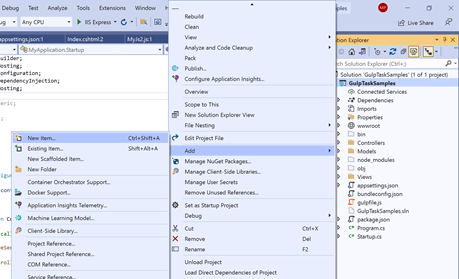
- Open your app on Visual Studio and right-click on the startup project. Add a new item (Add -> New Item).
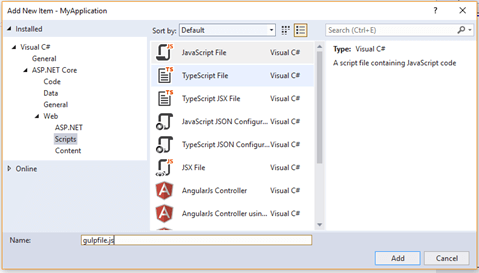
 Choose the scripts option (Installed -> Visual C# -> ASP.NET Core -> Web -> Scripts), set file name as js, and add it.
Note: The name of the gulp file must be gulpfile.js.
 To install gulp in your project, run the following command in the command prompt.
npm install -g gulp --global gulp-cli gulp –save-dev
Useful gulp tasks to improve the web development process
SCSS-to CSS converter
Sassy cascading style sheets (SCSS) is a CSS preprocessor, an extension of the syntax of CSS, and one of the syntaxes of syntactically awesome style sheets (Sass). It provides many features like variable creation, code nesting, and style file importing. It reduces CSS development time. But common browsers do not process SCSS files. So, we must convert the SCSS files to CSS to use them.
We are going to create a gulp task for SCSS-to-CSS conversion using the gulp-sass dependency. Run the following command using the command prompt to add this dependency.
npm install sass gulp-sass --save-dev
Note: After installing the dependencies, make sure to restore the packages.
Add the following code to the Gulpfile.js.
"use strict";
var gulp = require("gulp"),
sass = require('gulp-sass')(require('sass'));
gulp.task('sass-to-css', async function () {
  return gulp.src('./wwwroot/scss/**/*.scss')
    .pipe(sass().on('error', sass.logError))
    .pipe(gulp.dest('./wwwroot/css'));
});

Scss to css converter watch:
gulp.task('sass-to-css:watch', function () {
    gulp.watch('./wwwroot/scss/**/*.scss', gulp.series('sass-to-css'));
});
CSS and JS file minification
Usually, for app deployment, we have to add our CSS and JS files to the bundle config. Using the bundle config file, we will then minify the CSS and JS files.
We are going to create a gulp task for CSS and JS minification using the dependencies:
- gulp-cssmin
- gulp-terser
- gulp-concat
- gulp4-run-sequence
- merge-stream
Run the following command in the command prompt to add these dependencies.
npm install gulp-cssmin gulp-terser gulp-concat gulp4-run-sequence merge-stream --save-dev
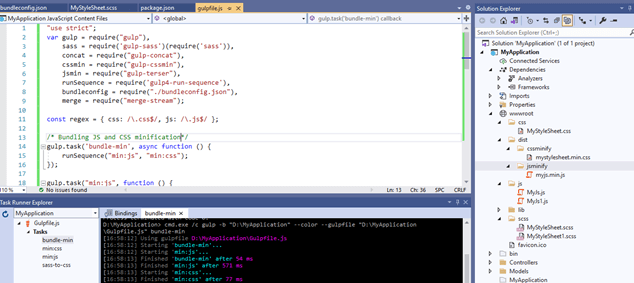
"use strict";
var gulp = require("gulp"),
concat = require("gulp-concat"),
cssmin = require("gulp-cssmin"),
jsmin = require("gulp-terser"),
runSequence = require('gulp4-run-sequence'),
bundleconfig = require("./bundleconfig.json"),
merge = require("merge-stream");

const regex = { css: /\.css$/, js: /\.js$/ };

gulp.task('bundle-min', async function () {
      runSequence("min:js", "min:css");
});

gulp.task("min:js", function () {
   var tasks = getBundles(regex.js).map(function (bundle) {
       return gulp.src(bundle.inputFiles, { base: ".", allowEmpty: true })
              .pipe(concat(bundle.outputFileName))
              .pipe(jsmin())
              .pipe(gulp.dest("."));
    });
    return merge(tasks);
});

gulp.task("min:css", function () {
    var tasks = getBundles(regex.css).map(function (bundle) {
        return gulp.src(bundle.inputFiles, { base: ".", allowEmpty: true })
              .pipe(concat(bundle.outputFileName))
              .pipe(cssmin())
              .pipe(gulp.dest("."));
     });
     return merge(tasks);
});

function getBundles(regexPattern) {
   return bundleconfig.filter(function (bundle) {
      return regexPattern.test(bundle.outputFileName);
   });
}
Clean the bundle
We can clean minified CSS and JS files using the Clean Bundle task.
Create a gulp task for bundle cleaning using the del dependency. Run the following command in the command prompt to add this dependency.
npm install del --save-dev
"use strict";
var gulp = require("gulp"),
    del = require("del");

gulp.task("clean-bundle", function () {
    var files = bundleconfig.map(function (bundle) {
       return bundle.outputFileName;
    });
    return del(files);
});
Images minification
Image size is one major factor that impacts webpage speed. We try to use images with minimum sizes.
You can compress large images using the image minify gulp task. Create a gulp task for bundle cleaning using the gulp-imagemin dependency. Run the following command in the command prompt to install this dependency.
npm install gulp-imagemin --save-dev
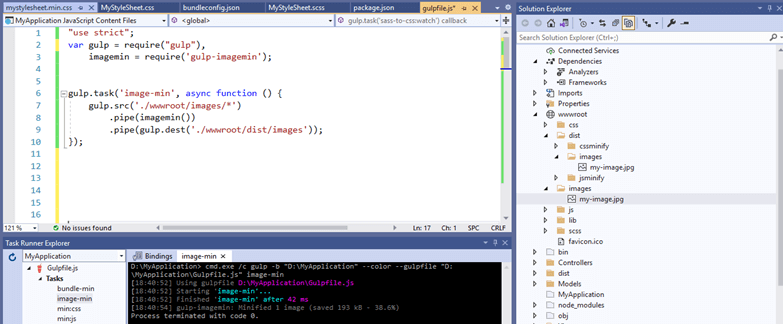
"use strict";
var gulp = require("gulp"),
   imagemin = require('gulp-imagemin');

gulp.task('image-min', async function () {
   gulp.src('./wwwroot/images/*')
       .pipe(imagemin())
       .pipe(gulp.dest('./wwwroot/dist/images'));
});
How to run gulp tasks
Open Solution Explorer, right-click gulpfile.js, and select Task Runner Explorer.
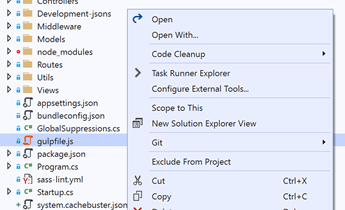
To run the gulp tasks, double-click the task or right-click the gulp task and choose Run.
How to automate the gulp tasks (task binding)
Visual Studio has a built-in task runner designed to run gulp tasks. It has an option to automate the gulp tasks so we can bind them based on task usage and their needs.
To configure the built-in task runner, use Ctrl + Alt + Backspace or select Task Runner from the Other Windows list from the Visual Studio View menu (View -> other windows).
The task runner window will appear at the bottom of Visual Studio. In the Task Runner Explorer, you can see the list of gulp tasks. Now, right-click on a gulp task and choose Bindings. Refer to the following screenshot.
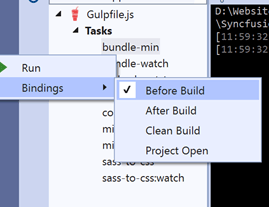
Choose one from the following binding options:
- After Build: The binding tasks will run after building our app.
- Before Build: The binding tasks will run before building our app. We can add the following tasks to this: “clean-bundle,” “sass-to-css,” “bundle-min.”
- Clean Build: The binding tasks will run while cleaning our app. We can add the “Clean-bundle” task to this.
- Project Open: The binding tasks will be run when opening the app. We can add the “sass-to-css:watch” task to this.
GitHub repository
For more information, refer to the samples to improve front-end development with gulp in an ASP.NET Core application.
Conclusion
Thank you for taking the time to read this article! I hope it was helpful for you to improve front-end development with gulp integration and implementation in your ASP.NET Core web app using Visual Studio. This article is based on my personal experience and knowledge.
Syncfusion has over 1,700 components and frameworks for WinForms, WPF, WinUI, .NET MAUI (Preview), ASP.NET (Web Forms, MVC, Core), UWP, Xamarin, Flutter, JavaScript, Angular, Blazor, Vue, and React. Use them to boost your app development speed.
For existing customers, the new Essential Studio® version is available for download from the License and Downloads page. If you are not yet a Syncfusion customer, you can try our 30-day free trial to check out our newest features.
If you have questions, you can reach us through our support forums, support portal, or feedback portal. As always, we are happy to assist you!
