
TL;DR: Learn to build an innovative AI-powered solution for smart redaction in PDF documents using the NET MAUI PDF Viewer control. By leveraging OpenAI’s GPT model, this app automatically identifies and redacts sensitive information such as names, addresses, and phone numbers, effectively enhancing document security.
Protecting sensitive information in documents is crucial for businesses and organizations in this digital age. This blog introduces an innovative solution that combines the power of AI with .NET MAUI to create a smart redaction tool for PDF documents.
Our smart redaction app leverages the Syncfusion .NET MAUI PDF Viewer control and OpenAI’s GPT model to identify and redact sensitive information in PDF files automatically.
Let’s get started!
How does it work?
The smart redaction using AI models works as follows:
- When a PDF document is loaded, the content is extracted as text.
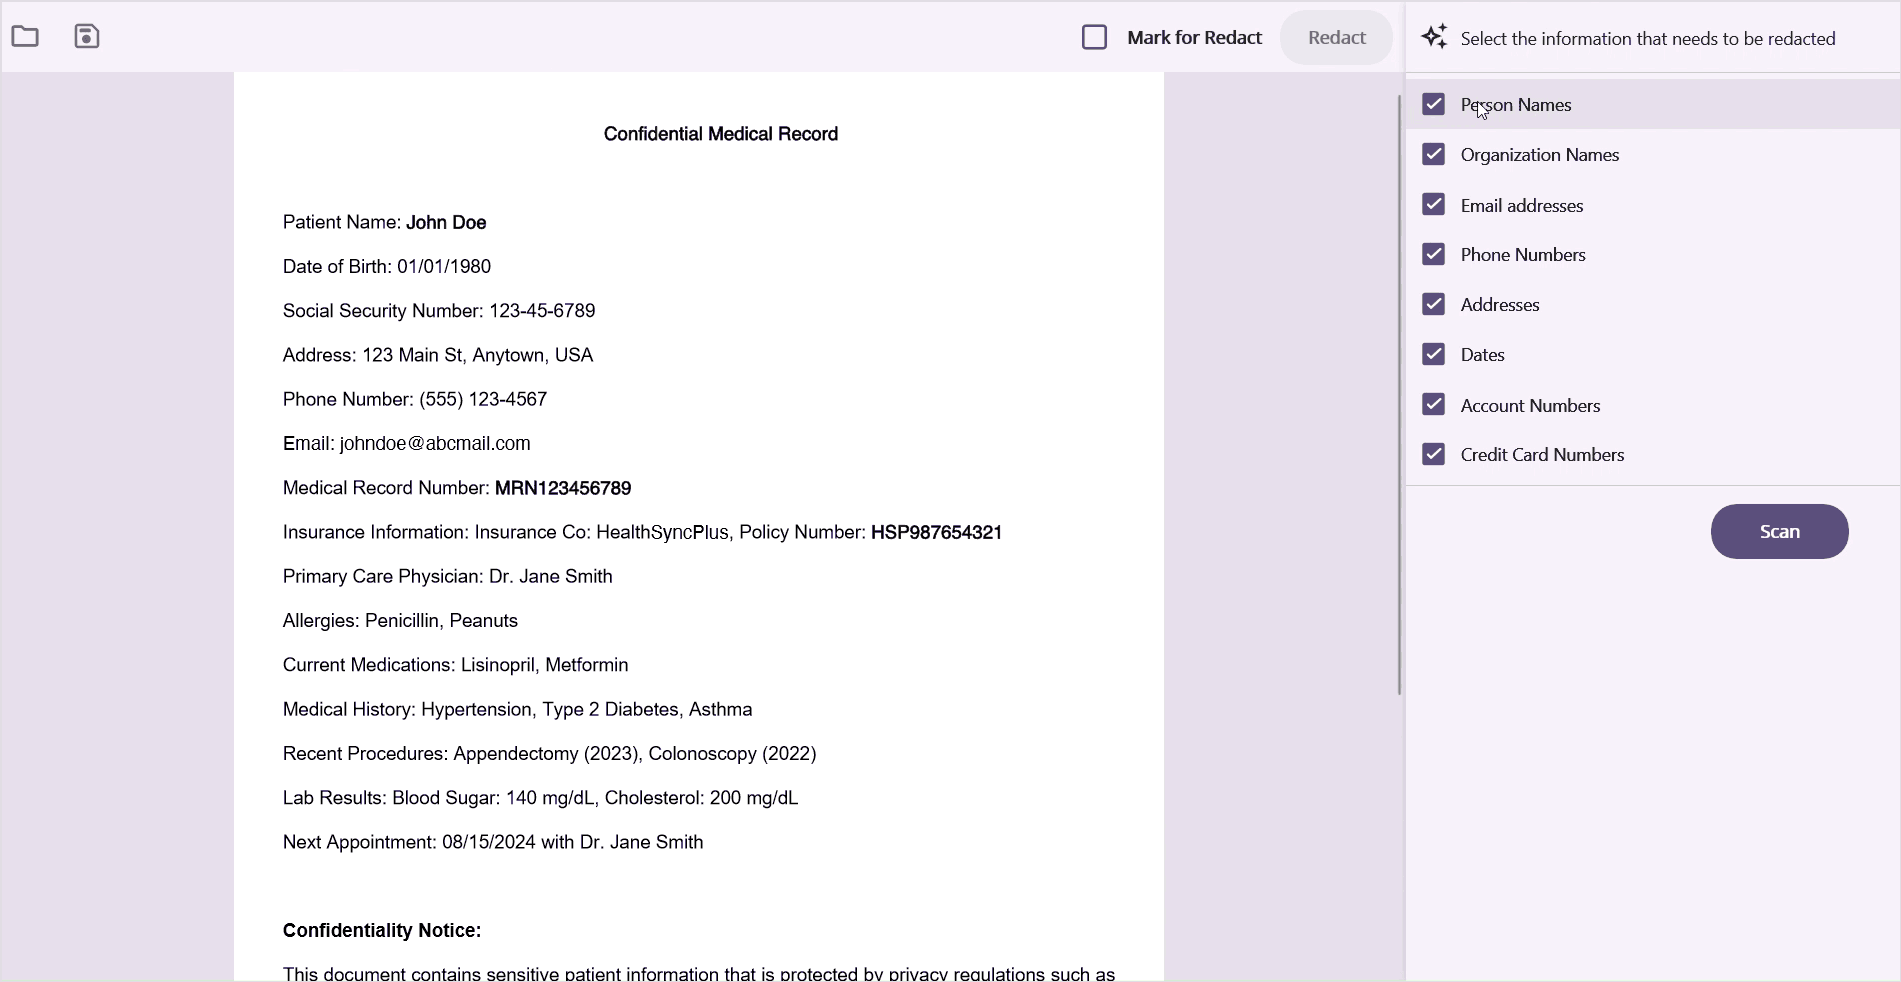
- Based on the types of sensitive information to be redacted (such as names, addresses, or phone numbers), the extracted text will be sent along with the specified information types to the OpenAI GPT model, which identifies potentially sensitive information within the text.
- This sensitive information is then marked for redaction in the .NET MAUI PDF Viewer by determining the bounds of the text and adding annotations over the content.
- Finally, once the marked areas are reviewed and verified, the redactions are applied, permanently removing the sensitive information from the PDF and saving the updated document.
It also allows users to preview and validate the highlighted areas marked for redaction before permanently removing the sensitive content.
Prerequisites
To build and run this app, you will need:
- Visual Studio with .NET MAUI workload.
- Syncfusion .NET MAUI PDF Viewer control.
- An OpenAI API key for accessing the GPT model.
Implementing smart redaction for PDFs using the .NET PDF Viewer
Let’s go through the main steps to create this smart redaction app for PDFs using the .NET PDF Library:
Step 1: Set up the project
First, create a new .NET MAUI project in Visual Studio. Then, install the necessary NuGet packages for the .NET MAUI PDF Viewer and any required OpenAI API libraries.
Step 2: Add the .NET MAUI PDF Viewer to the main page
Create the main page layout in your XAML file with the .NET MAUI PDF Viewer to display PDF documents and mark sensitive information that needs to be redacted. Refer to the following code example.
MainPage.xaml
<ContentPage xmlns="http://schemas.microsoft.com/dotnet/2021/maui"
             xmlns:x="http://schemas.microsoft.com/winfx/2009/xaml"
             xmlns:syncfusion="clr namespace:Syncfusion.Maui.PdfViewer;assembly=Syncfusion.Maui.PdfViewer"
             xmlns:local="clr-namespace:SmartRedaction"
             x:Class="SmartRedaction.MainPage">
 <!-- PDF Viewer -->
 <syncfusion:SfPdfViewer x:Name="PdfViewer"
                         ShowToolbars="False"
                         DocumentSource="{Binding PdfFile}" />
</ContentPage>
You can also implement additional settings in the layout to customize how the redaction should be performed.
Step 3: Implement the ViewModel
Now, create theSmartRedactionViewModel class to bind the PDF document to be loaded in the .NET MAUI PDF Viewer. You can further implement your app’s logic and data binding for the main page layout.
Refer to the following code example.
public class SmartRedactionViewModel : INotifyPropertyChanged
{
    private Stream _pdfFile;

    public Stream PdfFile
    {
        get => _pdfFile;
        set
        {
            _pdfFile = value;
            OnPropertyChanged();
        }
    }

    public event PropertyChangedEventHandler PropertyChanged;

    protected virtual void OnPropertyChanged([CallerMemberName] string propertyName = null)
    {
        PropertyChanged?.Invoke(this, new PropertyChangedEventArgs(propertyName));
    }
}
Step 4: Implement the AI service
Create an AIService class to act as the bridge between the .NET MAUI app and OpenAI’s GPT model. This service is responsible for communicating with the OpenAI API to identify sensitive information within the text extracted from PDF documents.
public class AIService
{
    private readonly OpenAIAPI _api;

    public AIService()
    {
        _api = new OpenAIAPI("YOUR_API_KEY_HERE");
    }

    public async Task<string> GetAnswerFromGPT(string prompt, string context)
    {
        var chat = _api.Chat.CreateConversation();
        chat.AppendSystemMessage("You are an AI assistant that helps identify sensitive information in text.");
        chat.AppendUserInput(prompt);
        chat.AppendUserInput(context);

        string response = await chat.GetResponseFromChatbotAsync();
        return response;
    }
}
Step 5: Extract text from PDF
Let’s extract text from the loaded PDF document using the ExtractTextFromPDF() method, which analyzes the content present in the document.
MainPage.xaml.cs
public partial class MainPage : ContentPage
{
    private string ExtractTextFromPDF()
    {
        var documentSource = PdfViewer.DocumentSource;
        if (documentSource != null)
        {
            Stream stream = (Stream)documentSource;
            PdfLoadedDocument loadedDocument = new PdfLoadedDocument(stream);

            // Loading page collections
            PdfLoadedPageCollection loadedPages = loadedDocument.Pages;

            // Extract text from existing PDF document pages
            for (int i = 0; i < loadedPages.Count; i++)
            {
                string text = $"... Page {i + 1} ...\n";
                text += loadedPages[i].ExtractText();
                extractedText.Add(text);
            }

            string result = string.Join(Environment.NewLine, extractedText);
            return result;
        }
        return "";
    }
}
Step 6: Send the extracted text to the AI model to identify sensitive information
In the MainPage.xaml.cs file, implement a method to send the extracted text to the AI model with the required prompt to identify sensitive information within the text. This method utilizes the AIService we created earlier to communicate with the OpenAI API.
public partial class MainPage : ContentPage
{
    private AIService openAIService;

    public MainPage()
    {
        InitializeComponent();
        openAIService = new AIService();
    }

        /// <summary>
        /// Returns the sensitive information present in the PDF document.
        /// </summary>
        /// <param name="text">The text present in the PDF document</param>
        /// <param name="sensitiveInformationTypes">The sensitive information types to identify, such as names, addresses, or phone numbers. </param>
        /// <returns></returns>
        internal async Task<List<string>> GetSensitiveDataFromPDF(string text, List<string> sensitiveInformationTypes)
        {
            StringBuilder stringBuilder = new StringBuilder();
            stringBuilder.AppendLine("I have a block of text containing various pieces of information. Please help me identify and extract any Personally Identifiable Information (PII) present in the text. The PII categories I am interested in are:");
            foreach (var item in sensitiveInformationTypes)
            {
                stringBuilder.AppendLine(item);
            }
            stringBuilder.AppendLine("Please provide the extracted information as a plain list, separated by commas, without any prefix or numbering or extra content.");
            string prompt = stringBuilder.ToString();
            var answer = await openAIService.GetAnswerFromGPT(prompt, ExtractTextFromPDF());
            if (answer != null)
            {
                var output = answer.Trim();
                // Use a HashSet to remove duplicates
                var namesSet = new HashSet<string>(output
                    ?.Split(new[] { '\n', ',' }, StringSplitOptions.RemoveEmptyEntries)
                    .Select(name => name.Trim())
                    .Where(name => !string.IsNullOrEmpty(name)) ?? Enumerable.Empty<string>());
                return namesSet.ToList();
            }
            return new List<string>();
        }
}
Step 7: Locate the sensitive information in the PDF and highlight it for redaction
Using the FindText functionality of the PdfLoadedDocument class, we can retrieve the bounds of the sensitive information within the PDF. Then, highlight the identified areas in the PDF by adding rectangle annotations using the .NET MAUI PDF Viewer to mark them for redaction.
Refer to the following code example.
///<summary>
/// Finds and returns the bounds of sensitive content within a PDF document.
///</summary>
///<param name="stream">The stream containing the PDF document.</param>
///<param name="sensitiveContents">A list of sensitive content strings to search for.</param>
///<returns>A dictionary where the key is the page number and the value is a list of TextBounds objects representing the sensitive content found on that page.</returns>
public Dictionary<int, List<TextBounds=>> FindSensitiveContentsBounds(Stream stream, List<string> sensitiveContents)
{
    Dictionary<int, List<TextBounds=>> sensitveContentsBounds = new Dictionary<int, list<TextBounds=>>();

    using (PdfLoadedDocument loadedDocument = new PdfLoadedDocument(stream))
    {
        foreach (var content in sensitiveContents)
        {
            if (!string.IsNullOrEmpty(content))
            {
                Dictionary<int, list<RectangleF=>> contentBounds;

                // Find the text bounds
                loadedDocument.FindText(content, out contentBounds);

                // Merge bounds into accumulatedBounds
                foreach (var bounds in contentBounds)
                {
                    if (!sensitveContentsBounds.ContainsKey(bounds.Key))
                    {
                        sensitveContentsBounds[bounds.Key] = new List<TextBounds>();
                    }

                    // Add the bounds with the corresponding sensitive information
                    sensitveContentsBounds[bounds.Key].AddRange(bounds.Value.Select(rect => new TextBounds
                    {
                        SensitiveInformation = content,
                        Bounds = rect
                    }));
                }
            }
        }
    }

    return sensitveContentsBounds;
}

///<summary>
/// Add annotation to mark areas for redaction
///</summary>
void AddAnnotation(RectF bounds, int pageNumber)
{
    SquareAnnotation annotation = new SquareAnnotation(bounds, pageNumber)
    {
        Color = Colors.Red,   // Set stroke color
        BorderWidth = 1       // Set stroke thickness
    };

    // Add the annotation to the PDF viewer
    PdfViewer.AddAnnotation(annotation);
}
Step 8: Apply redaction to remove the sensitive information from the PDF permanently
Finally, the sensitive information from the PDF must be redacted permanently and saved using PdfLoadedDocument. The areas to be redacted can be obtained from the annotations added using the PDF Viewer.
Refer to the following code example.
private void Redact()
{
    PdfLoadedDocument loadedDocument = new PdfLoadedDocument(stream);

    foreach (PdfLoadedPage page in loadedDocument.Pages)
    {
        foreach (PdfLoadedAnnotation annotation in page.Annotations)
        {
            // Iterate through the annotations that highlight the sensitive information and redact the content.
            if (annotation is PdfLoadedRectangleAnnotation)
            {
                PdfRedaction redaction = new PdfRedaction(annotation.Bounds, Syncfusion.Drawing.Color.Black);
                page.AddRedaction(redaction);
            }
        }
    }

    loadedDocument.Redact();

    // Reload the document to view the redaction
    MemoryStream stream = new MemoryStream();
    loadedDocument.Save(stream);
}
Refer to the following output image.
GitHub reference
Also, refer to the AI-powered smart redaction for PDFs using .NET MAUI PDF Viewer GitHub demo.
In the project directory, locate the AIService.cs file. Replace the default values in the following code with your specific AI endpoint, deployment name, and API key to ensure proper functionality.
private string aiEndpoint = "https://yourendpoint.com/";
private string deploymentName = "DEPLOYMENT_NAME";
private string apiKey = "AZURE_OPENAI_API_KEY";

Conclusion
Thanks for reading! The AI-powered smart redaction app for PDFs demonstrates the powerful combination of the Syncfusion .NET MAUI PDF Viewer and AI technologies to create a robust, cross-platform solution for document security. This app showcases how developers can leverage AI to enhance traditional document processing tasks, providing a more efficient and accurate way to protect sensitive information.
We encourage you to explore the provided source code, experiment with the app, and adapt it to your specific use cases. As always, ensure that you comply with relevant data protection regulations when handling sensitive information.
If you’re an existing customer, you can download the latest version of Essential Studio® from the License and Downloads page. For those new to Syncfusion, try our 30-day free trial to explore all our features.
For any questions or support, feel free to contact us through our support forum, support portal, or feedback portal. We are always happy to assist you!


 No spam, just valuable updates.