TL;DR: Syncfusion’s 2024 Volume 3 release introduces the .NET MAUI AI AssistView control, making it easy to integrate AI services into .NET MAUI apps. Key features include customizable content formats, templates, suggestions, and a seamless connection to Azure OpenAI.
We are excited to introduce a new AI AssistView control for the .NET MAUI platform in Syncfusion’s Essential Studio® 2024 Volume 3 release.
The .NET MAUI AI AssistView (SfAIAssistView) is a control designed to facilitate the integration of AI services into your .NET MAUI apps. It provides an intuitive and user-friendly interface that allows developers to create apps that interact seamlessly with AI services. This control simplifies building intelligent and responsive apps by offering easy customization options for its appearance and functionality. Developers can quickly adapt the control to match the design and requirements of their apps while leveraging AI capabilities to enhance user experiences.
In this blog, we’ll explore the features of the new .NET MAUI AI AssistView control and how to get started using the Azure OpenAI service.
Let’s explore the key features of the .NET MAUI AI AssistView control:
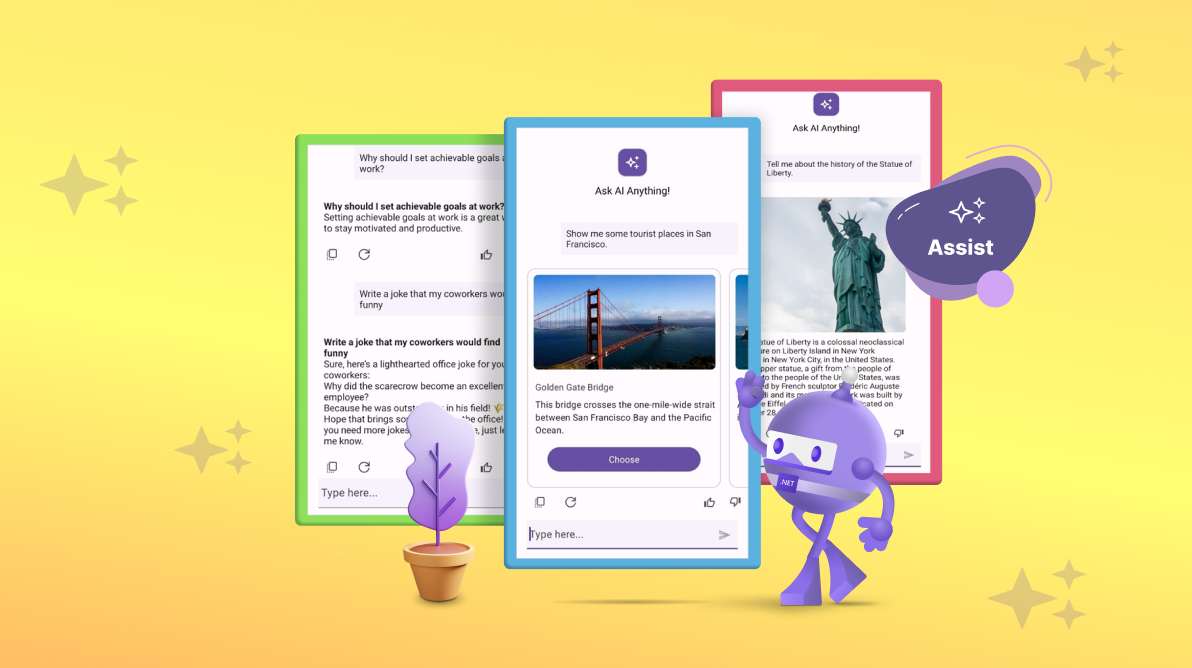
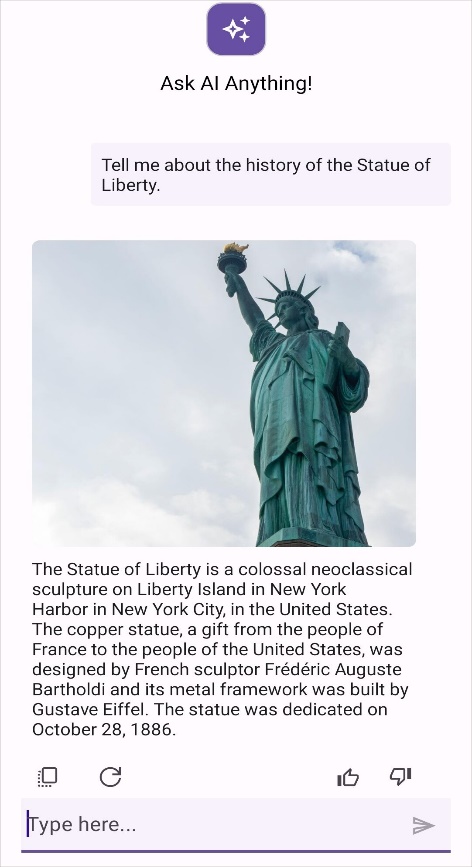
The .NET MAUI AI AssistView control lets users to display request and response items in different formats, such as text, image, hyperlink, and card.
Refer to the following image.
 |  |
| | |
Content types supported in .NET MAUI AI AssistView
The AI AssistView control enables developers to achieve the appearance and behavior they need by displaying any view or control using the ControlTemplate property.
Refer to the following image.
The AI AssistView control allows us to display a list of response suggestions below an item by creating an instance of AssistItemSuggestions and setting it to the desired assist item’s Suggestion property. Additionally, suggestions can be shown with images and arranged vertically or horizontally.
Refer to the following image.
The .NET MAUI AI AssistView control supports displaying a header at the top of the control and supports customizing the header appearance using the ShowHeader and HeaderTemplate properties.
Refer to the following image.
We have seen the key features of the .NET MAUI AI AssistView control. Let’s see how to add it to your app.
First, create a NET MAUI project.
Syncfusion .NET MAUI controls are available in the NuGet Gallery. To add the .NET MAUI AI AssistView control to your project, open the NuGet package manager in Visual Studio, search for Syncfusion.Maui.AIAssistView, and install it.
In the MauiProgram.cs file, register the handler for Syncfusion core. Refer to the following code.
using Syncfusion.Maui.Core.Hosting;
public static class MauiProgram
{
    public static MauiApp CreateMauiApp()
    {
        var builder = MauiApp.CreateBuilder();
        builder
            .UseMauiApp()
            .ConfigureSyncfusionCore();
        return builder.Build();
    }
} Now, add Syncfusion.Maui.AIAssistView namespace in your XAML page.
<xmlns:syncfusion ="clr-namespace:Syncfusion.Maui.AIAssistView;assembly=Syncfusion.Maui.AIAssistView"/>
Then, add the .NET MAUI AI AssistView control using the included namespace.
<syncfusion:SfAIAssistView x:Name="assistView" />
The Request event or RequestCommand will be raised or executed when the user sends or adds the requested item through the editor or clicks a suggestion. Create the AssistItemRequestCommand property and its ExecuteRequestCommand action in ViewModel.
public class ViewModel : INotifyPropertyChanged
{
        public GettingStartedViewModel()
        {

            this.AssistItemRequestCommand = new Command<object>(ExecuteRequestCommand);
        }
        public ICommand AssistItemRequestCommand { get; set; }
        private async void ExecuteRequestCommand(object obj)
        {
           . . .
           . . .
        }
}
Now, bind this AssistItemRequestCommand property to the RequestCommand property of SfAIAssistView control.
<syncfusion:SfAIAssistView x:Name="assistView"
                           AssistItems="{Binding AssistItems}"
                           RequestCommand="{Binding AssistViewRequestCommand}">
</syncfusion:SfAIAssistView> Install the Microsoft.SemanticKernel package in your app.
Create a helper class and declare the variables or fields to hold the Azure OpenAI deployment name, deployment URL, and API key details.
Also, include the ChatHistory, Kernel, and IChatCompletionService in that helper class. Create an Azure OpenAI chat completion service using the AddAzureOpenAIChatCompletion method, build the instance for Kernel, and get the IChatCompletionService from the Kernel service provider.
public abstract class AzureBaseService
{
    private const string endpoint = "https://YOUR_ACCOUNT.openai.azure.com/";
    internal const string deploymentName = "deployment name";
    private const string key = "API key";
    internal IChatCompletionService ChatCompletions
    {
        get
        {
            return chatCompletions;
        }
        set
        {
            chatCompletions = value;
        }
    }
    internal Kernel Kernel
    {
        get
        {
            return kernel;
        }
        set
        {
            kernel = value;
        }
    }
    internal ChatHistory ChatHistory
    {
        get
        {
            return chatHistory;
        }
        set
        {
            chatHistory = value;
        }
    }
    // Other methods and properties...
    private void GetAzureOpenAIKernal()
    {
        var builder = Kernel.CreateBuilder().AddAzureOpenAIChatCompletion(deploymentName, endpoint, key);
        // Get the kernel from build
        kernel = builder.Build();
        // Get the chat completions from kernel
        chatCompletions = kernel.GetRequiredService();
    }
}
Create a prompt request to AI based on your needs regarding how the AI should react, add this prompt request into the ChatHistory collection, and pass the ChatHistory and Kernel instances to the GetChatMessageContentAsync method of IChatCompletionService to get chat content for the prompt.
Now, you will get the response from AzureOpenAI service and can generate a response AssistItem using this AI response content.
var userAIPrompt = this.GetUserAIPrompt(request.Text);
var response = await azureAIService!.GetResultsFromAI(request.Text, userAIPrompt).ConfigureAwait(true);
AssistItem responseItem = new AssistItem() { Text = response };
this.AssistItems.Add(responseItem);
// Other code...
private string GetUserAIPrompt(string userPrompt)
{
    string userQuery = $"Given User query: {userPrompt}." +
                       $"\nSome conditions need to follow:" +
                       $"\nGive heading of the topic and simplified answer in 4 points with numbered format" +
                       $"\nGive as string alone" +
                       $"\nRemove ** and remove quotes if it is there in the string.";
    return userQuery;
}
internal async Task GetResultsFromAI(string userPrompt, string userAIPrompt)
{
    // Other code...
    ChatHistory.AddUserMessage(userAIPrompt);
    var response = await ChatCompletions.GetChatMessageContentAsync(chatHistory: ChatHistory, kernel: Kernel);

    return response.ToString();
} Then, create an AssistItem instance, set values for the Profile details, Text, and IsRequest properties, and add them to the ViewModel.AssistItems collection.
The IsRequest property is used to identify or differentiate whether an item is a request, an input item added by a user, or a response item generated by an AI service.
When the user sends the request through the editor and clicks suggestion, its IsRequest property value is set to True automatically.
If users want to add the requested item manually in the code behind, they need to set the IsRequest property to True.
To add other types of messages (hyperlinks, images, and cards), create instances for AssistHyperlinkItem, AssistImageItem, and AssistCardItem, respectively, and add them to the ViewModel.AssistItems collection.
public class ViewModel : INotifyPropertyChanged
{
    // Other code...
    public ObservableCollection AssistItems
    {
        get
        {
            return this.assistItems;
        }
        set
        {
            this.assistItems = value;
            RaisePropertyChanged("AssistItems");
        }
    }
    private async void ExecuteRequestCommand(object obj)
    {
        var request = (obj as Syncfusion.Maui.AIAssistView.RequestEventArgs).RequestItem;
        await this.GetResult(request).ConfigureAwait(true);
    }
    private async Task GetResult(object inputQuery)
    {
        await Task.Delay(1000).ConfigureAwait(true);
        AssistItem request = (AssistItem)inputQuery;
        if (request != null)
        {
            // Generating response from AI.
            var userAIPrompt = this.GetUserAIPrompt(request.Text);
            var response = await azureAIService!.GetResultsFromAI(request.Text, userAIPrompt).ConfigureAwait(true);
            // Creating response item using response received from AI.
            AssistItem responseItem = new AssistItem() { Text = response };
            responseItem.RequestItem = inputQuery;
            this.AssistItems.Add(responseItem);
        }
  }
        . . .
        . . .
        . . .
}
Finally, bind the data collection to the SfAIAssistView as demonstrated in the following code example.
<ContentPage.BindingContext>
    <local:ViewModel/>
</ContentPage.BindingContext>

<ContentPage.Content>

    <syncfusion:SfAIAssistView x:Name="assistView"
                               AssistItems ="{Binding AssistItems}"
                               RequestCommand="{Binding AssistViewRequestCommand}"/>
</ContentPage.Content>
Refer to the following output image.
For more details, refer to the .NET MAUI AI AssistView GitHub demo.
Thanks for reading! We hope you enjoyed learning about the new Syncfusion .NET MAUI AI AssistView control and its exciting features added in the 2024 Volume 3 release. Try out this user-friendly smart control and leave your feedback in the comments section given below!
If you’re already a Syncfusion user, the latest version of Essential Studio® is available on the License and Downloads page. We offer our new users a 30-day free trial to explore all our components’ features and capabilities.
If you need further assistance, contact us via our support forum, support portal, or feedback portal. We’re always here to help you!


