TL;DR: PDFs are vital for sharing information, and efficient navigation is key for lengthy documents. Learn five PDF navigation techniques using Syncfusion PDF Library in C#: links, bookmarks, named destinations, table of contents, and GoTo actions.
In today’s digital world, PDFs are a cornerstone for sharing and archiving information due to their consistent formatting and widespread compatibility. Navigating through PDF documents efficiently is essential, especially when working with business reports, academic papers, or user manuals that contain numerous pages. Implementing robust navigation mechanisms enhances the user experience, making it easier to locate and access relevant information swiftly.
With the Syncfusion PDF Library, navigating PDF pages programmatically in C# is straightforward and highly customizable. This powerful library provides various features to navigate using bookmarks, hyperlinks, form field actions, named destinations, and table of contents.
In this blog, we will explore five effective ways to navigate PDF pages using the Syncfusion PDF Library.
Let’s get started!
Getting started with app creation
- Create a .NET console application using Visual Studio
- Open Visual Studio and navigate to Tools -> NuGet Package Manager -> Package Manager Console.
- Run the following command in the Package Manager Console to install the Syncfusion.Pdf.Net.Core NuGet package.
Install-Package Syncfusion.Pdf.Net.Core
Document link annotation
Creating interactive links within a PDF document is essential for easy navigation between different sections or pages. With the Syncfusion .NET PDF Library, you can effortlessly add link annotations to your PDF, enabling users to jump to specific locations within the document with a single click. This powerful feature can be implemented with just a few lines of code, enhancing the overall usability of your PDF documents.

Experience a leap in PDF technology with Syncfusion's PDF Library, shaping the future of digital document processing.
Steps to create document link annotations in a PDF
Step 1: Initialize the PDF document
Create a new PdfDocument instance and add pages.
Step 2: Create and define the link annotation
Instantiate a PdfDocumentLinkAnnotation class object and define its bounds.
Step 3: Set the destination page and view
Configure a PdfDestination class object to specify the target page and view settings.
Step 4: Add the link annotation to the PDF page
Attach the link annotation to the appropriate PDF page.
Step 5: Finalize and save the PDF
Save and close the PdfDocument to apply the changes.
Here’s a detailed example to guide you:
using Syncfusion.Drawing;
using Syncfusion.Pdf;
using Syncfusion.Pdf.Graphics;
using Syncfusion.Pdf.Interactive;
//Create a PDF document
using (PdfDocument document = new PdfDocument())
{
    // Add the first page to the document
    PdfPage firstPage = document.Pages.Add();
    // Create font to draw text on the page
    PdfFont font = new PdfStandardFont(PdfFontFamily.Helvetica, 12);
    //Draw text on the page.
    firstPage.Graphics.DrawString("This is the first page.", font, PdfBrushes.Black, new PointF(10, 10));
    // Add the second page to the document
    PdfPage secondPage = document.Pages.Add();
    secondPage.Graphics.DrawString("This is the second page.", font, PdfBrushes.Black, new PointF(10, 10));
    // Define a destination for the second page
    PdfDestination destination = new PdfDestination(secondPage, new PointF(0, 0))
    {
        Mode = PdfDestinationMode.FitH, // Fit the page horizontally
    };
    // Create a link annotation on the first page
    PdfDocumentLinkAnnotation linkAnnotation = new PdfDocumentLinkAnnotation(new RectangleF(125, 10, 200, 20));
    //Set destination for the link annotation
    linkAnnotation.Destination = destination;
    //Set the border for the link annotation
    linkAnnotation.Border = new PdfAnnotationBorder(0, 0, 0); // No border
    // Add the link annotation to the first page
    firstPage.Annotations.Add(linkAnnotation);
    //Draw the text for the link annotation for better visualization
    firstPage.Graphics.DrawString("Click here to go to the second page.", font, PdfBrushes.Blue, new PointF(125, 10));
    // Save the PDF document
    using (FileStream outputStream = new FileStream("navigate-via-document-link.pdf", FileMode.Create, FileAccess.Write))
    {
        document.Save(outputStream);
    }
}
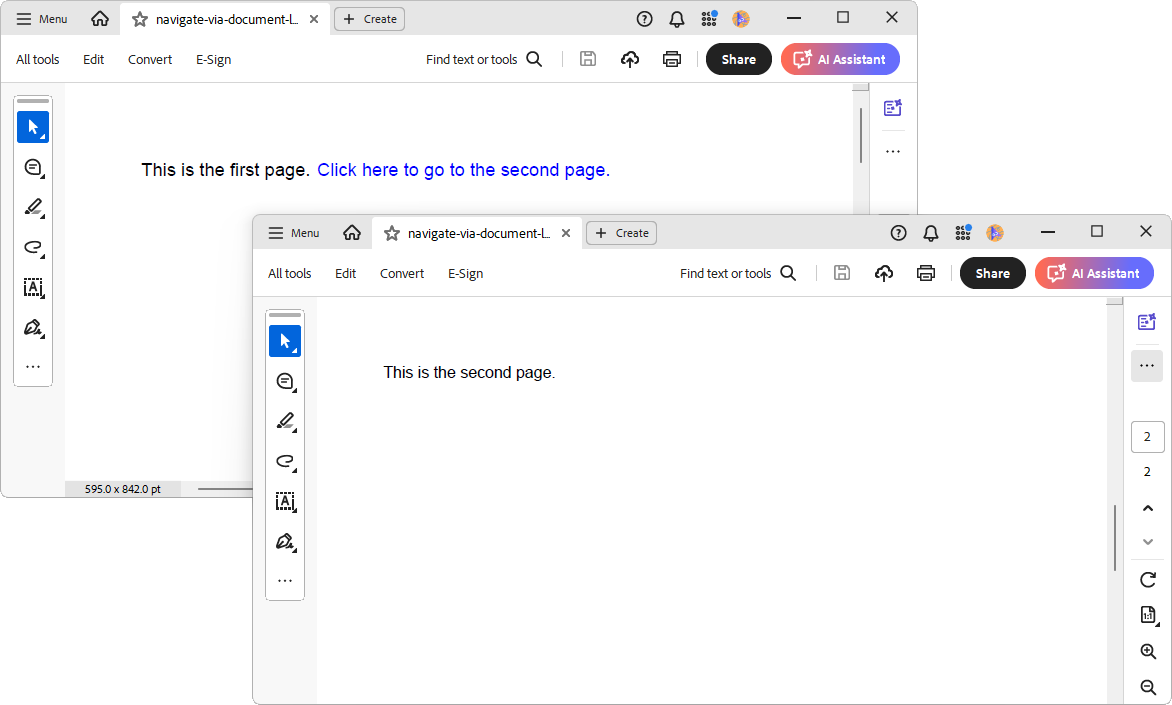
After executing the code, a PDF file will be generated with an internal navigation link on the first page. This clickable link allows users to jump directly to the second page with a single click, enhancing the document’s usability and making navigation more intuitive and user-friendly.
For more information about document link annotations, refer to our documentation.
Bookmarks
Implementing a hierarchical bookmark structure in your PDF documents is essential for providing readers with an organized overview and effective navigation options. The Syncfusion .NET PDF Library simplifies the process of adding and managing bookmarks in PDFs. With just a few lines of code, you can create a comprehensive bookmark tree that enables users to seamlessly navigate to specific sections, chapters, or pages within the document. This significantly enhances the navigation experience, particularly for large or complex PDFs.
Steps to create a PDF with nested bookmarks
Follow these steps to create a PDF document with a structured hierarchy of bookmarks for seamless navigation:
Step 1: Initialize the PDF document
Create a new instance of the PdfDocument class to represent your PDF file.
Step 2: Set up fonts and brushes
Create a PdfStandardFont class for the text and multiple PdfSolidBrush class instances to color different bookmark levels (e.g., red for chapters, green for sections, and blue for paragraphs).
Step 3: Add pages and bookmarks
For each chapter, add a new page to the document, create a chapter-level bookmark that points to the page, and position the corresponding text on the page.
Step 4: Add nested bookmarks
For each chapter, add child bookmarks to represent sections and paragraphs. Each section bookmark should be nested under its respective chapter bookmark, while paragraph bookmarks should be nested under their respective section bookmarks.
Step 5: Set bookmark properties
Assign a title, color, and destination to each bookmark to define its appearance and functionality.
Step 6: Save the document
Save the finalized PDF document to a file.
Here is the code implementation of the above steps:
using Syncfusion.Drawing;
using Syncfusion.Pdf;
using Syncfusion.Pdf.Graphics;
using Syncfusion.Pdf.Interactive;
//Create a new PDF document
using (PdfDocument document = new PdfDocument())
{
    //Create a new PdfStandardFont
    PdfFont font = new PdfStandardFont(PdfFontFamily.Helvetica, 10);
    //Create a red brush
    PdfSolidBrush redBrush = new PdfSolidBrush(Color.Red);
    //Create a blue brush
    PdfSolidBrush blueBrush = new PdfSolidBrush(Color.Blue);
    //Create a green brush
    PdfSolidBrush greenBrush = new PdfSolidBrush(Color.Green);
    for (int i = 1; i <= 3; i++)
    {
        //Add a new PDF page
        PdfPage page = document.Pages.Add();
        //Create a new PdfBookmark
        PdfBookmark chapterBookmark = AddBookmark(document, null, page, "Chapter " + i, new PointF(10, 10), font, redBrush);
        //Add child bookmark
        PdfBookmark sectionBookmark = AddBookmark(null, chapterBookmark, page, "Section " + i + ".1", new PointF(30, 30), font, greenBrush);
        //Add child bookmarks
        AddBookmark(null, sectionBookmark, page, "Paragraph " + i + ".1.1", new PointF(50, 50), font, blueBrush);
        AddBookmark(null, sectionBookmark, page, "Paragraph " + i + ".1.2", new PointF(50, 150), font, blueBrush);
        AddBookmark(null, sectionBookmark, page, "Paragraph " + i + ".1.3", new PointF(50, 250), font, blueBrush);
        //Add child bookmark
        PdfBookmark sectionBookmark2 = AddBookmark(null, chapterBookmark, page, "Section " + i + ".2", new PointF(30, 400), font, greenBrush);
        //Add child bookmarks
        AddBookmark(null, sectionBookmark2, page, "Paragraph " + i + ".2.1", new PointF(50, 420), font, blueBrush);
        AddBookmark(null, sectionBookmark2, page, "Paragraph " + i + ".2.2", new PointF(50, 560), font, blueBrush);
        AddBookmark(null, sectionBookmark2, page, "Paragraph " + i + ".2.3", new PointF(50, 680), font, blueBrush);
    }
    // Save the PDF document
    using (FileStream outputStream = new FileStream("navigate-via-bookmark.pdf", FileMode.Create, FileAccess.Write))
    {
        document.Save(outputStream);
    }
}
And the code example for creating bookmarks.
PdfBookmark AddBookmark(PdfDocument? document, PdfBookmark? parentBookmark, PdfPage page, string title, PointF location, PdfFont font, PdfSolidBrush brush)
{
    //Add a bookmark
    PdfBookmark bookmark = parentBookmark != null ? parentBookmark.Add(title) : document!.Bookmarks.Add(title);
    //Set bookmark destination
    bookmark.Destination = new PdfDestination(page);
    //Set the location
    bookmark.Destination.Location = location;
    //Set the bookmark color
    bookmark.Color = brush.Color;
    //Draw the bookmark content in the PDF page
    page.Graphics.DrawString(title, font, brush, location);
    return bookmark;
}
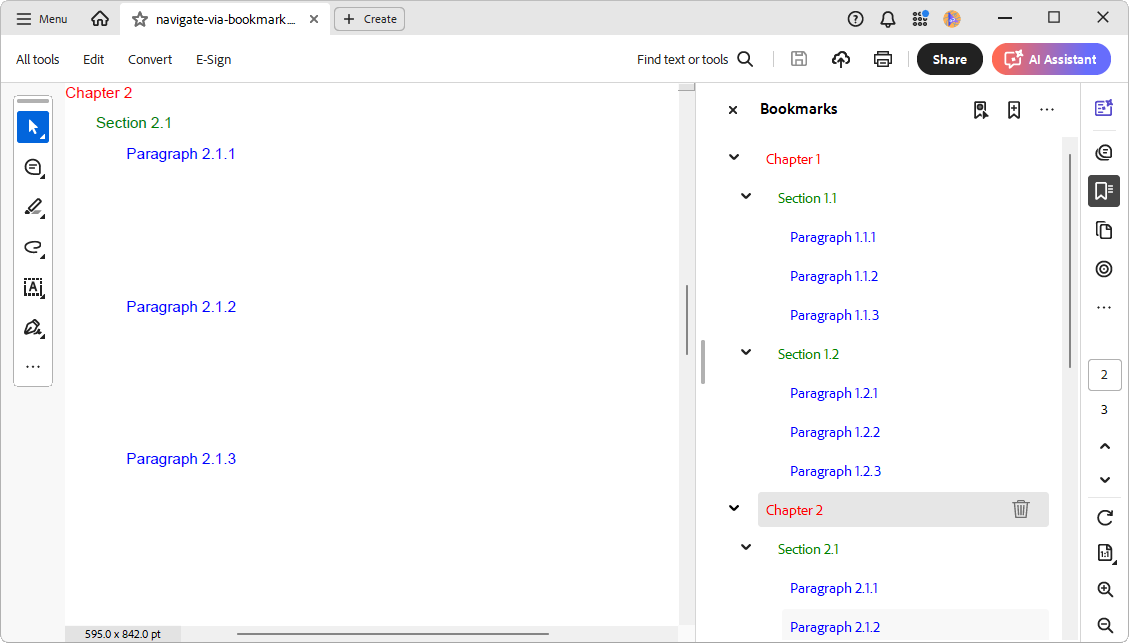
When you run this code, a PDF file is generated containing three chapters. Each chapter includes sections and paragraphs, all represented by nested bookmarks. Clicking any bookmark navigates directly to the corresponding content on the page, making the document highly interactive and user-friendly.
For more information about bookmarks, refer to our documentation and explore the online demo links.

Explore the wide array of rich features in Syncfusion's PDF Library through step-by-step instructions and best practices.
Named Destinations
Enhancing PDF navigation with predefined targets is made simple using named destinations. The Syncfusion .NET PDF Library allows you to create, retrieve, and navigate to these destinations programmatically with minimal effort. By implementing named destinations, you can establish precise navigation points within your PDF, enabling users to jump directly to specific content regardless of page numbers or document structure changes. This powerful feature can be set up with just a few lines of code, providing a flexible and maintainable way to improve document navigation and user experience.
Steps to add named destinations to a PDF
Follow these steps to create named destinations in an existing PDF document, allowing users to navigate directly to specific content within the document:
Step 1: Load the existing PDF document
Open the PDF file using a FileStream and load it into a PdfLoadedDocument class.
Step 2: Define named destinations
Use the PdfNamedDestination class to create named destinations, assigning a unique title to each destination. For each named destination, specify the target page and the location on the page using a PdfDestination class.
Step 3: Add named destinations to the document
Add each created named destination to the document’s NamedDestinationCollection property.
Step 4: Save the modified document
Save the updated PDF with the added named destinations to a new file.
Here is the code implementation of the above steps:
using Syncfusion.Drawing;
using Syncfusion.Pdf;
using Syncfusion.Pdf.Interactive;
using Syncfusion.Pdf.Parsing;
using (FileStream documentStream = new FileStream("input.pdf", FileMode.Open, FileAccess.Read))
{
    //Load the PDF file
    using (PdfLoadedDocument loadedDocument = new PdfLoadedDocument(documentStream))
    {
        //Create named destination and add to the document
        loadedDocument.NamedDestinationCollection.Add(CreateNamedDestination("Logo Page", loadedDocument.Pages[0], new PointF(0, 0)));
        loadedDocument.NamedDestinationCollection.Add(CreateNamedDestination("Author Page", loadedDocument.Pages[1], new PointF(0, 150)));
        loadedDocument.NamedDestinationCollection.Add(CreateNamedDestination("TOC Page", loadedDocument.Pages[2], new PointF(0, 0)));
        loadedDocument.NamedDestinationCollection.Add(CreateNamedDestination("Introduction", loadedDocument.Pages[3], new PointF(0, 0)));
        loadedDocument.NamedDestinationCollection.Add(CreateNamedDestination("Conceptual Overview", loadedDocument.Pages[3], new PointF(0, 450)));
        // Save the PDF document
        using (FileStream outputStream = new FileStream("named-destination.pdf", FileMode.Create, FileAccess.Write))
        {
            loadedDocument.Save(outputStream);
        }
    }
}
The code example for creating named destinations
PdfNamedDestination CreateNamedDestination(string title, PdfPageBase page, PointF location)
{
    //Create a named destination with title
    PdfNamedDestination namedDestination = new PdfNamedDestination(title);
    //Create and set destination
    PdfDestination destination = new PdfDestination(page, location);
    //Set the destination
    namedDestination.Destination = destination;
    return namedDestination;
}
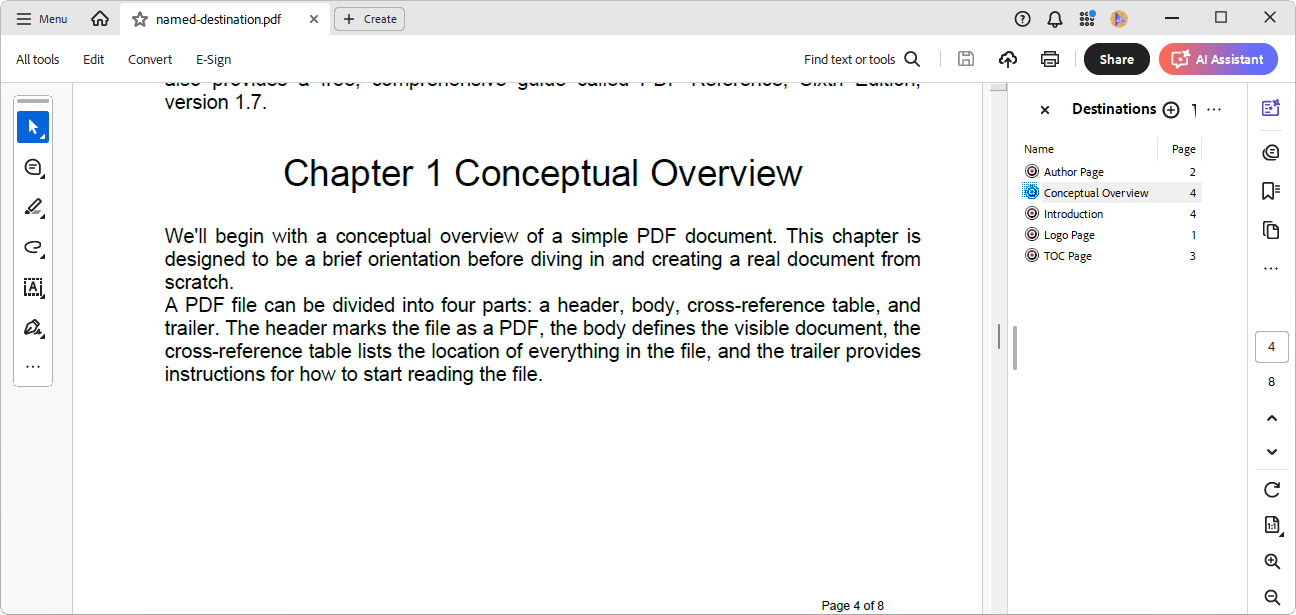
When you run this code, a PDF file will be generated with named destinations such as ‘Logo Page,’ ‘Author Page,’ ‘TOC Page,’ ‘Introduction,’ and ‘Conceptual Overview.’ Each named destination links to specific pages or locations within the document, enabling quick and seamless navigation. This functionality makes the PDF highly interactive and user-friendly, allowing efficient access to key sections.
For more information on named destinations, refer to our documentation and explore the online demo links.
Table Of Contents (TOC)
Creating an interactive Table of Contents (TOC) is crucial for improving navigation within large or complex PDF documents. Using the Syncfusion .NET PDF Library, you can easily generate a dynamic, clickable TOC programmatically. This feature enables you to automatically construct a structured outline of your document, complete with page numbers and hyperlinks to specific sections. Implementing a TOC requires only a few lines of code, yet it significantly enhances document usability by providing readers with a clear overview and instant access to different sections of your PDF.
Steps to create a table of contents (TOC) in a PDF
Step 1: Initialize the PDF document
Create a new PDF document using the PdfDocument class and define fonts for the TOC title, chapters, sections, and paragraphs.
Step 2: Add a section for the TOC
Add a new section and page to hold the TOC. Use the DrawString method to add a “Table of Contents” title to the page.
Step 3: Create a content section
Add another section and pages for the document’s content, such as chapters, sections, and paragraphs.
Step 4: Define text content and layout
Define a sample paragraph text and layout bounds to position text on the content pages.
Step 5: Loop to add content hierarchy
Iterate through the defined hierarchy (chapters, sections, and paragraphs).
For each chapter:
- Add an entry to the TOC using the DrawTableOfContent method, which adds the title, dots for alignment, and a link annotation pointing to the chapter’s location.
- Draw the chapter title and content on the page using the AddParagraph method.
- Repeat the process for sections and paragraphs within each chapter, ensuring proper indentation and navigation links.
Step 6: Save the PDF document
Save the completed PDF document (with TOC and content) to a file using a FileStream.
Step 7: Methods used
The AddParagraph method adds text to a specific page while managing text wrapping and pagination. The DrawTableOfContent method creates table of contents (TOC) entries, aligns text with dots, appends page numbers, and adds clickable links to the content.
Here is the code implementation of the above steps:
using Syncfusion.Drawing;
using Syncfusion.Pdf;
using Syncfusion.Pdf.Graphics;
using Syncfusion.Pdf.Interactive;

using (PdfDocument document = new PdfDocument())
{
    //Create the font to add the TOC title
    PdfStandardFont titleFont = new PdfStandardFont(PdfFontFamily.Helvetica, 20);

    //Add a section to create TOC
    PdfSection tocSection = document.Sections.Add();

    //Add a page for creating TOC
    PdfPage tocPage = tocSection.Pages.Add();

    tocPage.Graphics.DrawString("Table Of Contents", titleFont, PdfBrushes.Black,
        new RectangleF(0, 0, tocPage.GetClientSize().Width, tocPage.GetClientSize().Height), new PdfStringFormat(PdfTextAlignment.Center));

    //Add a separate section to draw the content
    PdfSection contentSection = document.Sections.Add();

    //Add page using the content section
    PdfPage contentPage = contentSection.Pages.Add();

    //Create necessary fonts
    PdfStandardFont paragraphFont = new PdfStandardFont(titleFont, 10);
    PdfStandardFont chapterFont = new PdfStandardFont(paragraphFont, 18, PdfFontStyle.Bold);
    PdfStandardFont sectionFont = new PdfStandardFont(paragraphFont, 14, PdfFontStyle.Bold);
    PdfStandardFont paragraphFontBold = new PdfStandardFont(paragraphFont, 10, PdfFontStyle.Bold);

    PdfLayoutResult result = null;

    //Get the page size
    SizeF pageSize = contentPage.GetClientSize();

    //initialize the TOC start height
    float y = 40;

    //Sample text to draw the paragraph
    string paragraphText = "Adobe Systems Incorporated's Portable Document Format (PDF)...";

    for (int i = 1; i <= 3; i++)
    {
        RectangleF bounds = new RectangleF(0, 0, pageSize.Width, pageSize.Height);

        if (result != null)
        {
            bounds = new RectangleF(0, result.Bounds.Bottom + 10, pageSize.Width, pageSize.Height - result.Bounds.Bottom + 10);
        }

        //Draw TOC
        y = DrawTableOfContent(tocPage, result == null ? contentPage : result.Page, document, "Chapter " + i, paragraphFontBold, bounds.Location, 0, y);

        //Draw content
        result = AddParagraph(result == null ? contentPage : result.Page, "Chapter " + i, bounds, chapterFont);

        for (int j = 1; j <= 3; j++)
        {
            y = DrawTableOfContent(tocPage, result.Page, document, "Section " + i + "." + j, paragraphFontBold, new PointF(0, result.Bounds.Bottom + 10), 10, y);
            result = AddParagraph(result.Page, "Section " + i + "." + j, new RectangleF(0, result.Bounds.Bottom + 10, pageSize.Width, pageSize.Height - result.Bounds.Bottom + 10), sectionFont);

            for (int k = 1; k <= 3; k++)
            {
                y = DrawTableOfContent(tocPage, result.Page, document, "Paragraph " + i + "." + j + "." + k, paragraphFont, new PointF(0, result.Bounds.Bottom + 10), 20, y);
                result = AddParagraph(result.Page, "Paragraph " + i + "." + j + "." + k, new RectangleF(0, result.Bounds.Bottom + 10, pageSize.Width, pageSize.Height - result.Bounds.Bottom + 10), paragraphFontBold);
                result = AddParagraph(result.Page, paragraphText, new RectangleF(0, result.Bounds.Bottom + 10, pageSize.Width, pageSize.Height - result.Bounds.Bottom + 10), paragraphFont);
            }
        }
    }

    // Save the PDF document
    using (FileStream outputStream = new FileStream("create-table-of-content.pdf", FileMode.Create, FileAccess.Write))
    {
        document.Save(outputStream);
    }
}
Below is the code for the AddParagraph method:
PdfLayoutResult AddParagraph(
    PdfPage page, string text, RectangleF bounds, PdfFont font)
{
    // Create the text element
    PdfTextElement textElement = new PdfTextElement(text, font);

    PdfLayoutFormat format = new PdfLayoutFormat();

    format.Layout = PdfLayoutType.Paginate;

    format.PaginateBounds = new RectangleF (0,0, page.GetClientSize().Width, page.GetClientSize().Height);

    // Draw the text on the page
    return textElement.Draw(page, bounds, format);
}
Below is the code for the DrawTableOfContent method:
float DrawTableOfContent(PdfPage tocPage, PdfPage destPage, PdfDocument document, string text, PdfFont font,  PointF location, int indent, float y)
{
    float textSize = font.MeasureString(text).Width;
    float pageWidth = tocPage.GetClientSize().Width;
    float dotSize = pageWidth - (30 + textSize + indent);


    string textToDraw = text;
    float dotWidth = font.MeasureString(".").Width;
    float n = 0;
    while (n < dotSize)
    {
        textToDraw += ".";
        n += dotWidth; // Dot spacing
    }
    textToDraw += document.Pages.IndexOf(destPage).ToString();
    // Draw the page number on the page
    tocPage.Graphics.DrawString(textToDraw, font, PdfBrushes.Black, new PointF(indent, y));

    // Create a link annotation
    RectangleF annotationBounds = new RectangleF(indent, y, pageWidth - (25 +indent), font.Height);

    PdfDocumentLinkAnnotation annotation = new PdfDocumentLinkAnnotation(
        annotationBounds,
        new PdfDestination(destPage, location))
    {
        Border = { Width = 0 }
    };
    tocPage.Annotations.Add(annotation);

    return y += font. Height + 2;
}
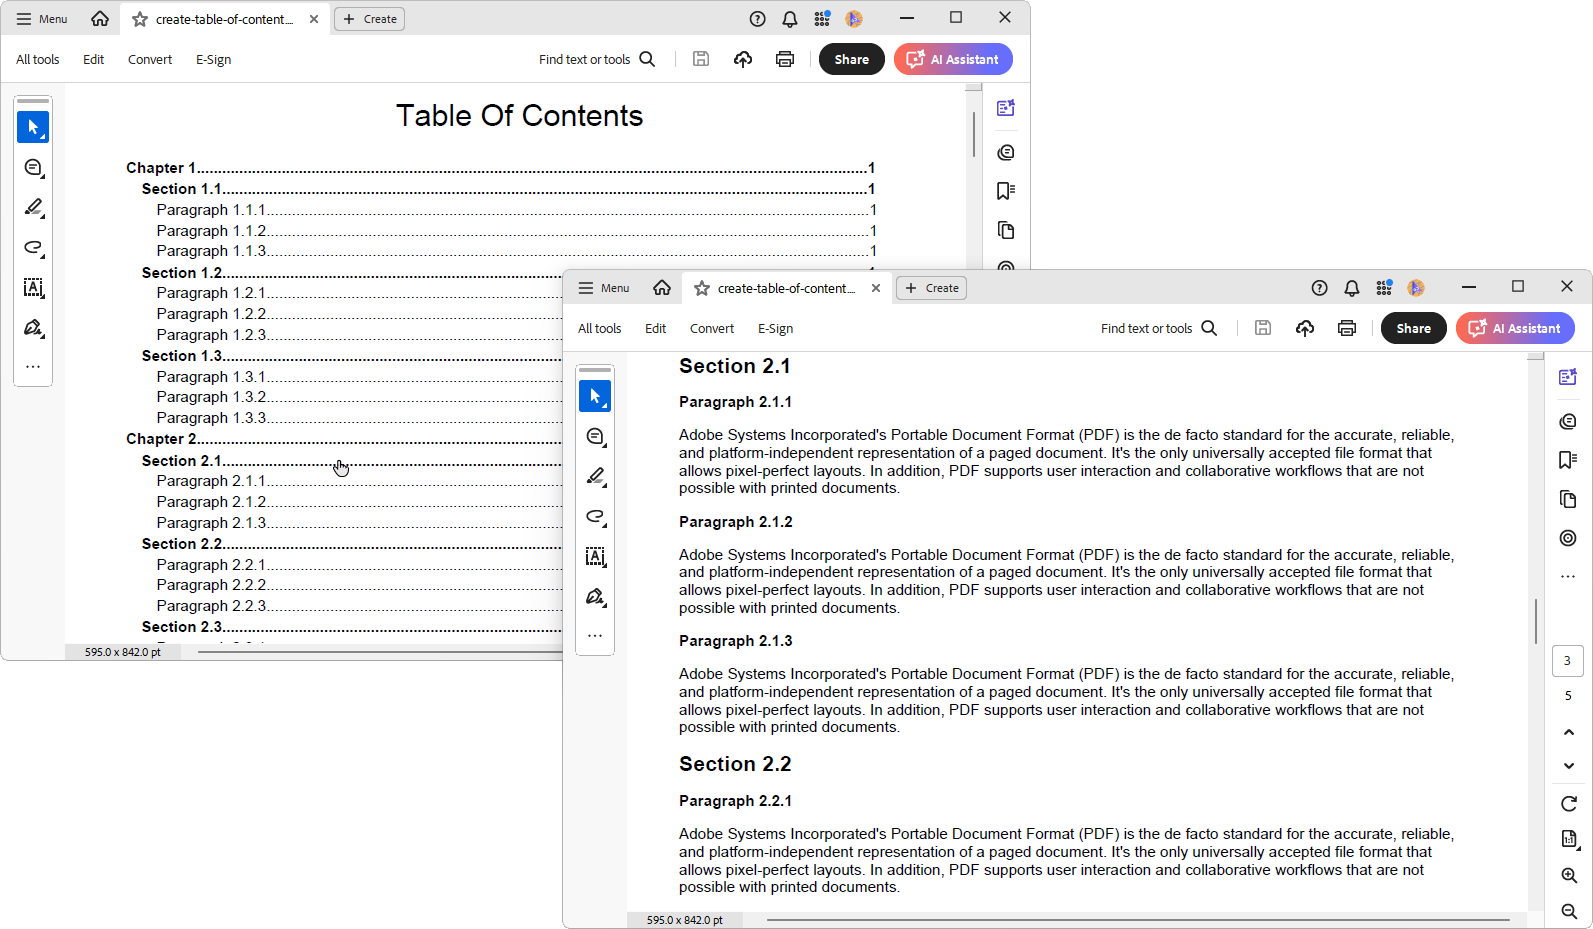
When you run this code, a PDF file will be generated, containing a detailed Table of Contents (TOC) that links to the respective chapters, sections, and paragraphs within the document. The TOC entries are clickable, providing an interactive navigation experience, and the content is well-organized with proper hierarchy and formatting.

Witness the advanced capabilities of Syncfusion's PDF Library with feature showcases.
GoTo Actions
Adding GoTo actions to PDF documents enhances navigation by allowing users to jump directly to specific locations within the document. With the Syncfusion .NET PDF Library, you can programmatically create GoTo actions that link to specific pages or locations within the same PDF. These actions are particularly useful for creating interactive elements, such as hyperlinks, buttons, or bookmarks, which significantly improve the overall user experience. Implementing a GoTo action is straightforward and requires minimal code, making it easy to create dynamic, reader-friendly PDFs with seamless navigation.
Step 1: Load the existing PDF document
Open the existing PDF document using a file stream and load it into a PdfLoadedDocument class object to modify its content.
Step 2: Ensure the PDF form exists
Check if the Form object in the loaded PDF is null. If it is, create a form using loadedDocument.CreateForm() to add interactive form fields.
Step 3: Iterate through PDF pages
Loop through each page in the PDF document using the Pages collection.
Step 4: Add navigation buttons
For all pages except the last, create a Next button and set its properties, such as text, background color, and bounds. Define a PdfDestination class that points to the next page, then create a PdfGoToAction class using this destination. Assign the action to the button’s MouseUp event and add the button to the form’s fields. Similarly, for all pages except the first, create a Previous button and follow the same process, but set the destination to the previous page instead.
Step 5: Finalize form appearance
Call loadedDocument.Form.SetDefaultAppearance(false) to ensure the form fields are rendered properly.
Step 6: Save the modified PDF document
Save the updated document to a new file using a file stream.
Here is the code implementation of the above steps:
using Syncfusion.Drawing;
using Syncfusion.Pdf;
using Syncfusion.Pdf.Interactive;
using Syncfusion.Pdf.Parsing;

using (FileStream documentStream = new FileStream("input.pdf", FileMode.Open, FileAccess.Read))
{
    //Load the existing PDF document
    using (PdfLoadedDocument loadedDocument = new PdfLoadedDocument(documentStream))
    {
        //Check if document form is null then create it.
        if (loadedDocument.Form == null)
        {
            loadedDocument.CreateForm();
        }
        //Iterate PDF pages
        for (int i = 0; i < loadedDocument.Pages.Count; i++)
        {
            PdfLoadedPage lPage = loadedDocument.Pages[i] as PdfLoadedPage;

            if (i != loadedDocument.Pages.Count - 1)
            {
                //Create a button field to add goto action
                PdfButtonField next = new PdfButtonField(lPage, "next" + i);
                //Set button text
                next.Text = "Next";
                //Set the back color
                next.BackColor = Color.LightGray;
                //Set the button bounds
                next.Bounds = new RectangleF(40, lPage.Size.Height - 40, 50, 20);

                //Create a destination
                PdfDestination nextDest = new PdfDestination(loadedDocument.Pages[i + 1]);

                //Create the GoTo action
                PdfGoToAction gotoActionNext = new PdfGoToAction(nextDest);

                //Set action to the button
                next.Actions.MouseUp = gotoActionNext;

                loadedDocument.Form.Fields.Add(next);
            }
            if (i != 0)
            {
                //Create a button field to add goto action
                PdfButtonField previous = new PdfButtonField(lPage, "previous" + i);
                //Set button text
                previous.Text = "Previous";
                //Set the back color
                previous.BackColor = Color.LightGray;
                //Set the button bounds
                previous.Bounds = new RectangleF(100, lPage.Size.Height - 40, 50, 20);

                //Create a destination
                PdfDestination previousDest = new PdfDestination(loadedDocument.Pages[i - 1]);

                //Create the GoTo action
                PdfGoToAction gotoActionPrevious = new PdfGoToAction(previousDest);

                //Set action to the button
                previous.Actions.MouseUp = gotoActionPrevious;

                loadedDocument.Form.Fields.Add(previous);
            }

        }
        loadedDocument.Form.SetDefaultAppearance(false);
        // Save the PDF document
        using (FileStream outputStream = new FileStream("navigate-via-goto-actions.pdf", FileMode.Create, FileAccess.Write))
        {
            loadedDocument.Save(outputStream);
        }
    }
}
When you run this code, a PDF file will be generated with interactive navigation buttons on each page. The Next button allows users to navigate to the next page (except on the last page), and the ‘Previous’ button enables navigation to the previous page (except on the first page). These buttons are fully functional, providing a seamless and user-friendly navigation experience within the PDF document.
For more information about GoTo actions, refer to the documentation
GitHub Reference
For more details, refer to the 5 ways to navigate PDF pages using the C# GitHub demo.

Join thousands of developers who rely on Syncfusion for their PDF needs. Experience the difference today!
Conclusion
Thank you for reading! In this blog, we explored five effective methods for navigating PDF pages within a document using the Syncfusion .NET PDF Library in C#. By following the provided steps and examples, you can effortlessly add interactive navigation links to your PDFs and enhance the user experience.
We encourage you to explore the library’s documentation further to discover additional functionalities and features that can help you manipulate PDFs effectively. If you have any questions or need assistance with these features, please feel free to leave a comment below or contact us through our support forum, support portal, or feedback portal. We are always here to assist you!
Related blogs
- Easily Create, Update, and Remove Bookmarks in PDFs Using C#
- Easily Add and Remove Attachments in Your PDF Documents Using C#
- Step-by-Step Guide to Adding and Removing Watermarks in PDF using C#
- Add, Remove, Extract, and Replace Images in PDF using C#
