

Entity Framework Core
Entity Framework (EF) Core is the latest version of Entity Framework from Microsoft. It is an open-source, lightweight, extensible, and cross-platform version of Entity Framework. It runs on Windows, Mac, and Linux.
Entity Framework is an object/relational mapping (O/RM) framework. It is an enhancement of ADO.NET that gives developers an automated mechanism for accessing and storing data in a database.
Every web app needs a data source, and EF Core is a great way to interact with a SQL database. So, let’s walk through the process of adding EF Core to a Blazor app.
Blazor
In the past, JavaScript was the only programming language available for client-side web applications. Now, we have different choices of client frameworks, such as Angular, React, and others, but in the end, it always runs as JavaScript in the browser.
Recently, WebAssembly (wasm) changes all of that.
According to the WebAssembly.org website:
WebAssembly (abbreviated Wasm) is a binary instruction format for a stack-based virtual machine. Wasm is designed as a portable target for the compilation of high-level languages like C/C++/Rust, enabling deployment on the web for client and server applications.
Blazor is a UI web framework built on .NET. It runs on browsers using WebAssembly, and it provides a choice of client-side programming language—C# rather than JavaScript.
Now, we will see how to do CRUD operations using a Blazor app with EF Core.
Prerequisites
In this blog, I am using Visual Studio to build the application. I have the following software installed:
- Visual Studio 2019 16.3.0 Preview 2.0
- .NET Core 3.0
- SQL Server 2017

Create database
Let’s create a database on our local SQL Server.
- Open SQL Server 2017.
- Create a new database named Management. Now we have the database in place.
- Click on our database and choose New Query.
- For this application, I am going to create a table with the name Employee with some basic attributes. Paste the following SQL query into the Query window to create the Employee table.
Create Table Employee(
EmployeeId BigInt Identity(1,1) Primary Key,
Name Varchar(100) Not Null,
Designation Varchar(100),
Email Varchar(20),
Location Varchar(50) Not Null,
PhoneNumber bigint Not Null)
Create Blazor application
Follow these steps to create a Blazor application:
- In Visual Studio 2019, go to File > New > Project.
- Choose to Create a new project.
- Select the Blazor App.
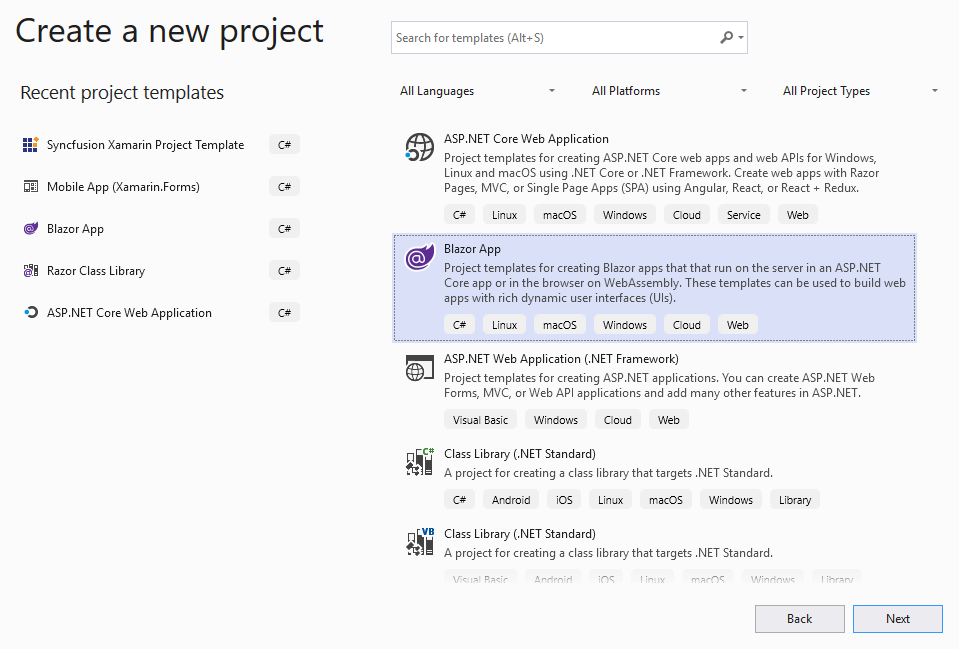
Selecting a Project Template in Visual Studio - Enter a project name and click Create. In my example, I used the name BlazorCrud.
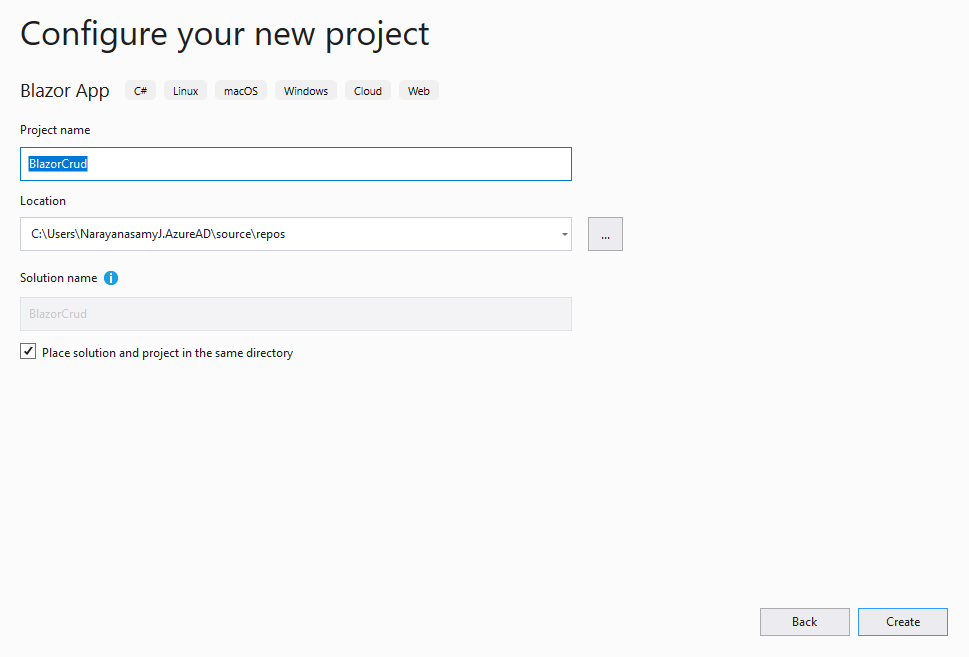
Configuring the New Project in Visual Studio - Select Blazor WebAssembly App, choose the ASP.NET Core Hosted template, and then click Create. The sample Blazor application will be created.
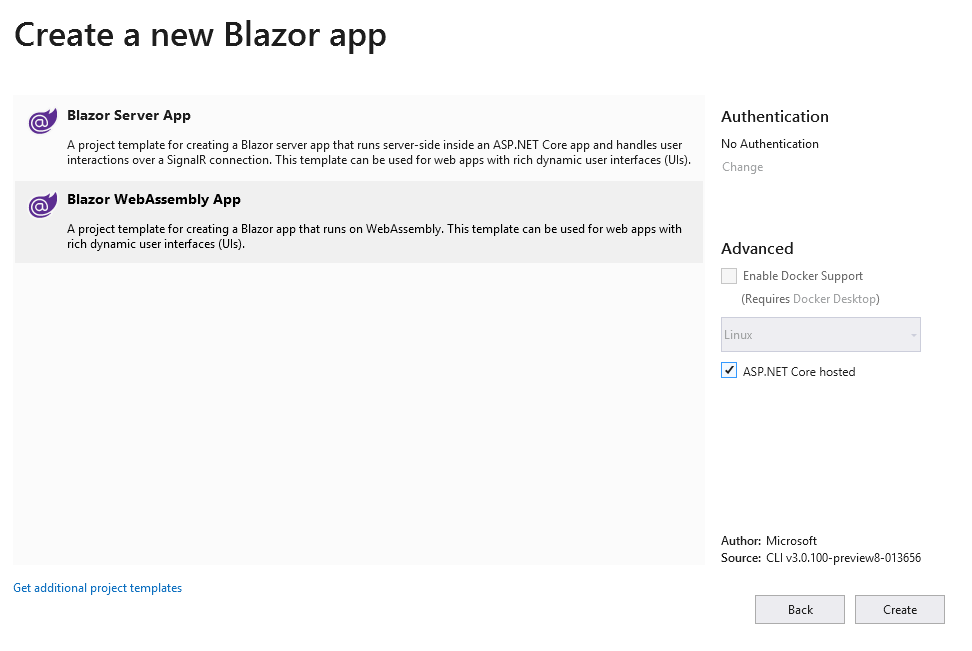
Selecting a Blazor WebAssembly App
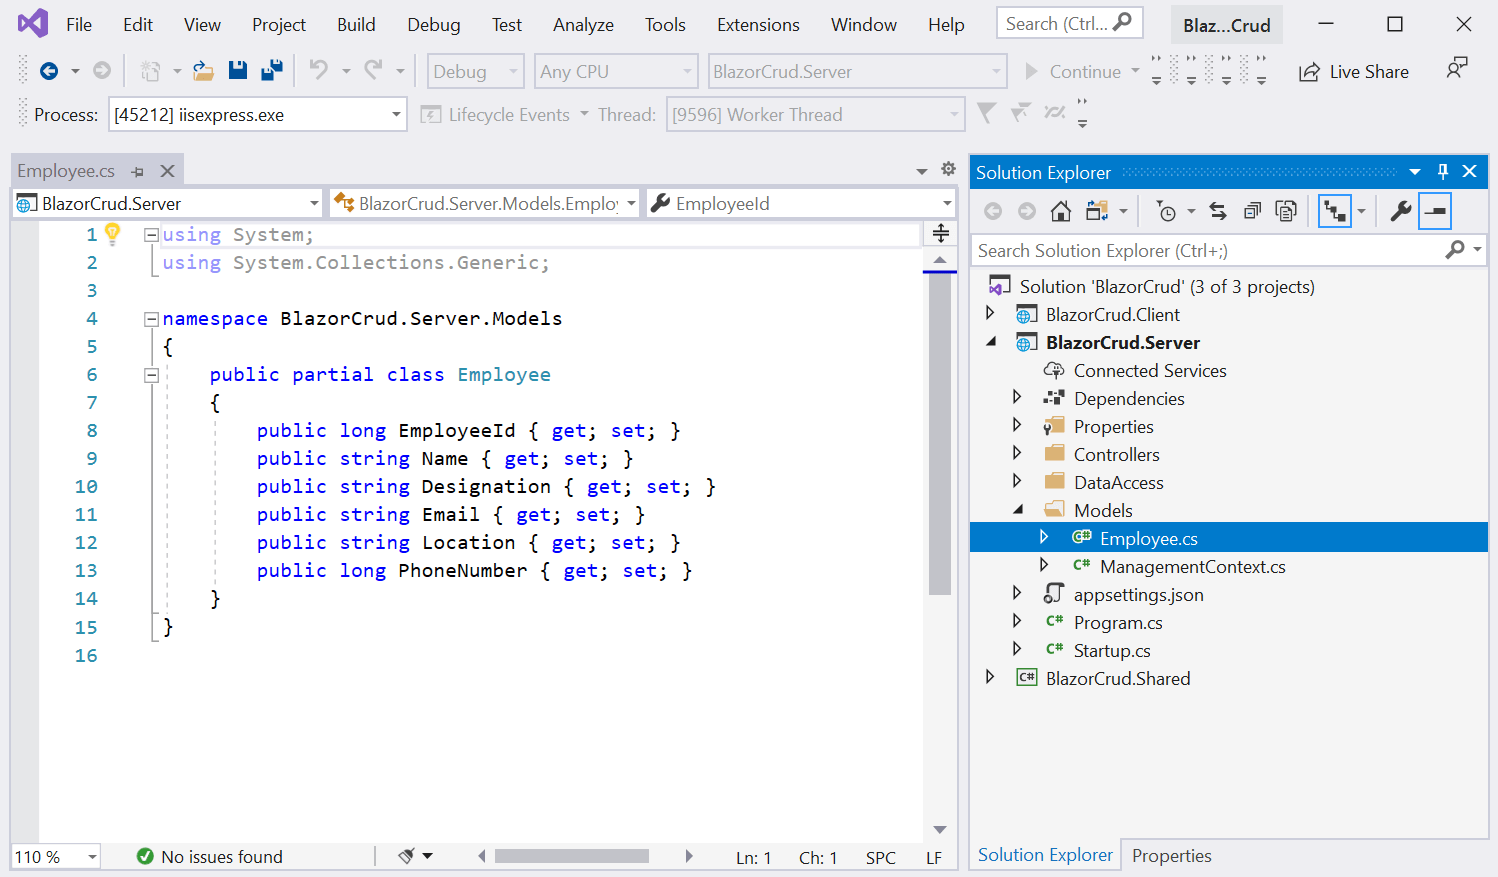
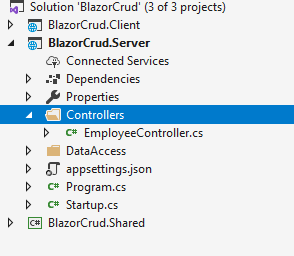
Now, we have three project files created inside this solution:
- Client: Contains the client-side code and the pages that will be rendered on the browser.
- Server: Contains the server-side code such as DB-related operations and web API.
- Shared: Contains the shared code that can be accessed by both client and server.
Install NuGet packages
The following NuGet packages should be added to work with the SQL Server database and scaffolding. Run these commands in the Package Manager Console:
- Install-Package Microsoft.EntityFrameworkCore.Tools -Version 3.0.0: This package creates database context and model classes from the database.
- Install-Package Microsoft.EntityFrameworkCore.SqlServer -Version 3.0.0: The database provider that allows Entity Framework Core to work with SQL Server.
Creating a model for an existing database
Let’s create entity and context classes for the Management database in the local SQL server.
Run the following scaffold command in the Package Manager Console to reverse engineer the database to create database context and entity classes from any tables. The Scaffold command will create a class for the tables that have a primary key.
Scaffold-DbContext “Server=.\\;Database=Management;Integrated Security=True” Microsoft.EntityFrameworkCore.SqlServer -OutputDir Models
- Connection: Sets the connection string of the database.
- Provider: Sets the provider to use to connect the database.
- OutputDir: Sets the directory where the POCO classes are to be generated.
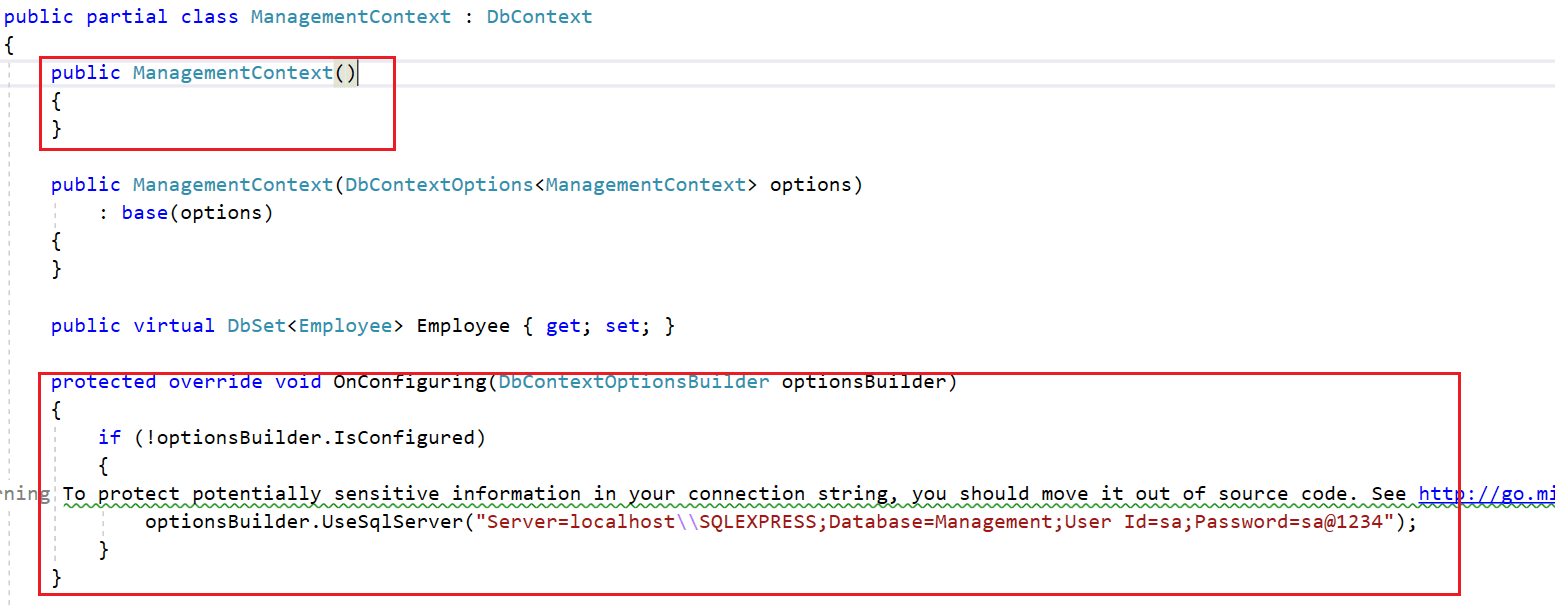
After running the command, the Employee class and Management Context class will be created as shown in the following screenshot.
In the auto-generated EmployeeContext class file, the database credentials you can see are hard coded in the OnConfiguring method. It is not a good practice to have SQL Server credentials in C# class, considering the security issues. So, remove the following OnConfiguring method and parameterless constructor from context file.
 Then add the connection string into the appsetting.json file, as shown in the following screenshot.
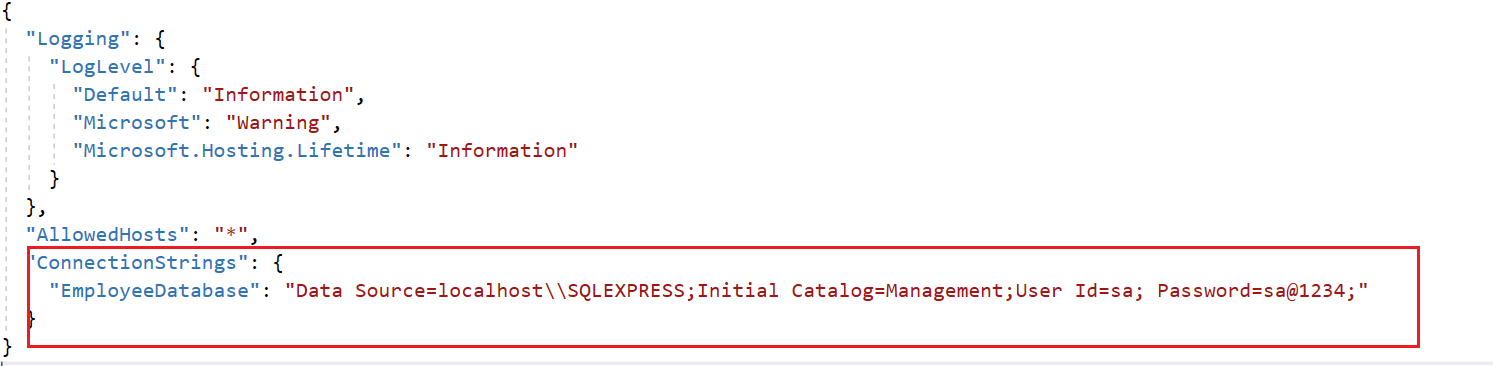 Then, register the database context service (EmployeeContext) during application startup. In the following code, the connection string is read from the appsetting file and is passed to the context service.
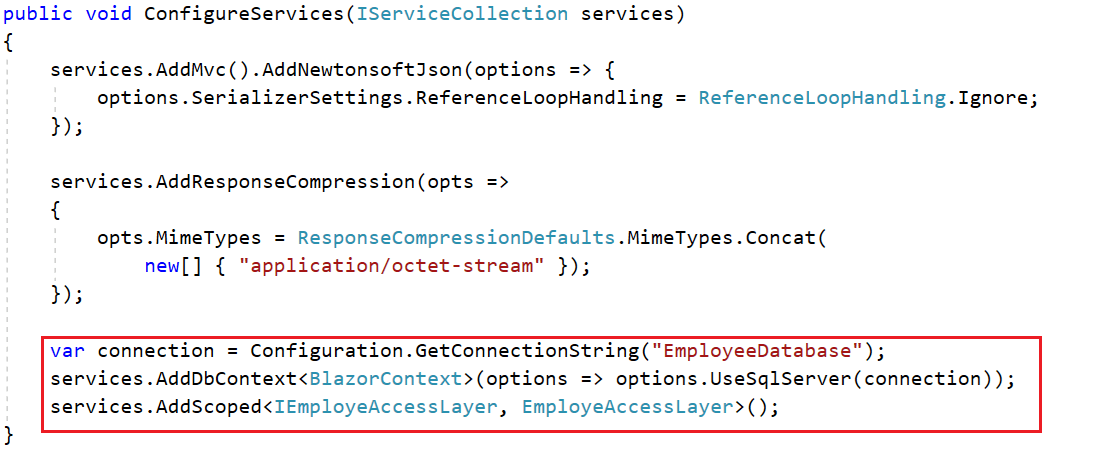 Whenever a new context is requested, it will be returned from the context pool if it is available, otherwise a new context will be created and returned.
Creating Data Access Layer for the Application
Right-click the BlazorCrud.Server and then select Add >> New Folder and named as DataAccess.
Create a class EmployeAccessLayer in DataAccess Folder. This class will handle the CRUD related DB operations. Paste the following code into it.
using BlazorCrud.Server.Models;
using Microsoft.EntityFrameworkCore;
using System;
using System.Collections.Generic;
using System.Linq;
using System.Threading.Tasks;

namespace BlazorCrud.Server.DataAccess
{
    public interface IEmployeAccessLayer
    {
        IEnumerable GetAllEmployees();
        void AddEmployee(Employee employee);
        void UpdateEmployee(Employee employee);
        Employee GetEmployeeData(long id);
        void DeleteEmployee(long id);
    }

    public class EmployeAccessLayer : IEmployeAccessLayer
    {
        private ManagementContext _context;
        public EmployeAccessLayer(ManagementContext context)
        {
            _context = context;
        }

        //To Get all employees details
        public IEnumerable GetAllEmployees()
        {
            try
            {
                return _context.Employee.ToList();
            }
            catch(Exception ex)
            {
                throw;
            }
        }

        //To Add new employee record
        public void AddEmployee(Employee employee)
        {
            try
            {
                _context.Employee.Add(employee);
                _context.SaveChanges();
            }
            catch
            {
                throw;
            }
        }

        //To Update the records of a particluar employee
        public void UpdateEmployee(Employee employee)
        {
            try
            {
                _context.Entry(employee).State = EntityState.Modified;
                _context.SaveChanges();
            }
            catch
            {
                throw;
            }
        }

        //Get the details of a particular employee
        public Employee GetEmployeeData(long id)
        {
            try
            {
                Employee employee = _context.Employee.Find(id);
                return employee;
            }
            catch
            {
                throw;
            }
        }

        //To Delete the record of a particular employee
        public void DeleteEmployee(long id)
        {
            try
            {
                Employee emp = _context.Employee.Find(id);
                _context.Employee.Remove(emp);
                _context.SaveChanges();
            }
            catch
            {
                throw;
            }
        }
    }
}
Add the web API controller to the application
- Right-click the Server/Controllers folder and select the controller.
Selecting the File to Add a Controller - An Add New Scaffolded Item dialog box will open. Select API Controller – Empty.
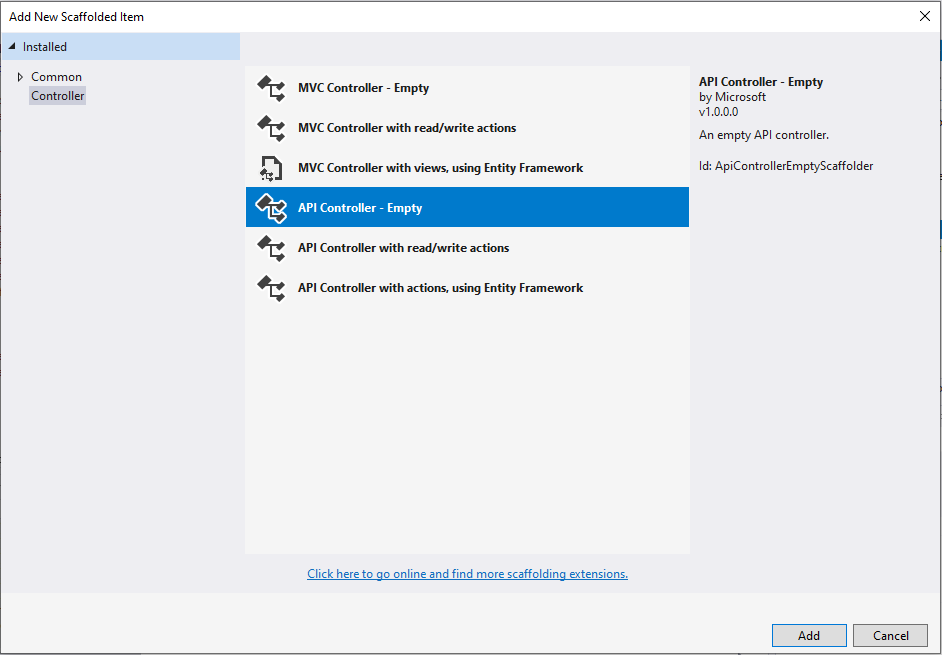
Adding an API Controller - An Add Empty API Controller dialog box will open. Enter the name EmployeeController.cs and click Add.
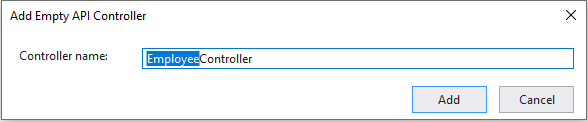
Naming the Controller
Perform CRUD operations
Now, we will modify the controller actions to perform CRUD operations.
Add controller action
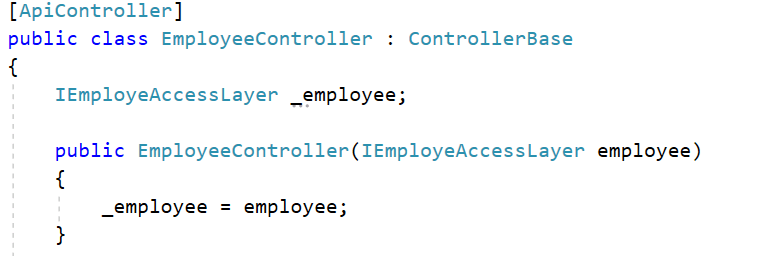
Step 1: Inject IEmployeeAccessLayer with the employee controller’s constructor, as shown in the following screenshot.
 Step 2: Replace the controller with the following code.
using System;
using System.Collections.Generic;
using System.Linq;
using System.Threading.Tasks;
using BlazorCrud.Server.DataAccess;
using BlazorCrud.Server.Models;
using Microsoft.AspNetCore.Http;
using Microsoft.AspNetCore.Mvc;

namespace BlazorCrud.Server.Controllers
{
    [ApiController]
    public class EmployeeController : ControllerBase
    {
        IEmployeAccessLayer _employee;

        public EmployeeController(IEmployeAccessLayer employee)
        {
            _employee = employee;
        }

        [HttpGet]
        [Route("api/Employee/Index")]
        public IEnumerable<Employee> Index()
        {
            return _employee.GetAllEmployees();
        }

        [HttpPost]
        [Route("api/Employee/Create")]
        public void Create([FromBody] Employee employee)
        {
            if (ModelState.IsValid)
                this._employee.AddEmployee(employee);
        }

        [HttpGet]
        [Route("api/Employee/Details/{id}")]
        public Employee Details(int id)
        {
            return _employee.GetEmployeeData(id);
        }

        [HttpPut]
        [Route("api/Employee/Edit")]
        public void Edit([FromBody]Employee employee)
        {
            if (ModelState.IsValid)
                this._employee.UpdateEmployee(employee);
        }

        [HttpDelete]
        [Route("api/Employee/Delete/{id}")]
        public void Delete(int id)
        {
            _employee.DeleteEmployee(id);
        }
    }
}
The actions and their purposes are explained:
Index: Returns all the employees from the database and returns to view.
Details: Returns the employee details from the employee table by employee id. If the employee is not found, then it will return a Not Found result.
Create: Accepts employee details as input and creates a new employee in the database.
Edit: Accepts the employee ID and details as input and, if the employee is found, then it updates the new details in the database.
Delete: Gets the employee ID as input, requests confirmation, and deletes that employee from database.
Add a Razor view to the application
Let’s see how to create Razor pages for CRUD operations.
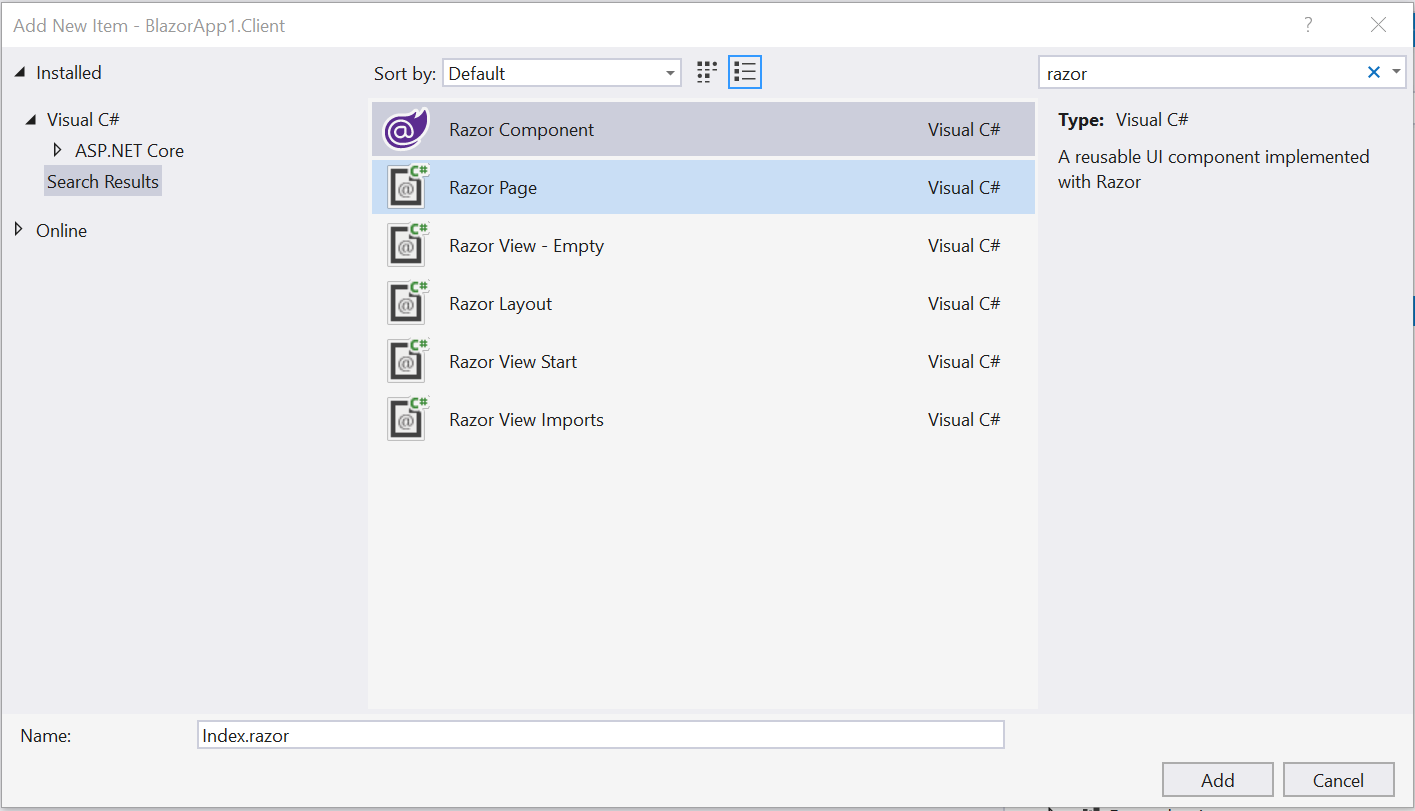
- Right-click the Client/Pages/Employee folder, and then select Add> New Item.
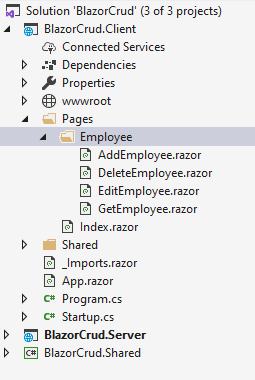
- An Add New Item dialog box will open. Select Web from the left panel, and then select Razor View from templates listed. Name it GetEmployee.razor.
- Follow the above steps and create below other razor files.
-
-
- AddEmployee.razor
- EditEmployee.razor
- DeleteEmployee.razor

-
Let’s add the code in the Razor files and web API controller to display, create, update, and delete.
Read
An HTTP GET request can be sent to get a resource from the API using the GetJsonAsync() method provided by the HttpClient class.
Open GetEmployee.razor and add the following code to it.
@page "/employee"
@inject HttpClient Http

<h1>Employee Data</h1>

<p>
    <a href="/employee/add">Create</a>
</p>

@if (empList == null)
{
    <p><em>Loading...</em></p>
}
else
{
    <table class='table'>
        <thead>
            <tr>
                <th>ID</th>
                <th>Name</th>
                <th>Designation</th>
                <th>Email</th>
                <th>Location</th>
                <th>Phone</th>
                <th>Action</th>
            </tr>
        </thead>
        <tbody>
            @foreach (var emp in empList)
            {
                <tr>
                    <td>@emp.EmployeeId</td>
                    <td>@emp.Name</td>
                    <td>@emp.Designation</td>
                    <td>@emp.Email</td>
                    <td>@emp.Location</td>
                    <td>@emp.PhoneNumber</td>
                    <td>
                        <a href='/employee/edit/@emp.EmployeeId'>Edit</a>  |
                        <a href='/employee/delete/@emp.EmployeeId'>Delete</a>
                    </td>
                </tr>
            }
        </tbody>
    </table>
}

@code {
    Employee[] empList;

    protected override async Task OnInitializedAsync()
    {
        empList = await Http.GetJsonAsync<Employee[]>("/api/Employee/Index");
    }
}
[HttpGet]
[Route("api/Employee/Index")]
public IEnumerable Index()
{
    return _employee.GetAllEmployees();
}
Create
An HTTP POST request can be sent to add new data in the API using the SendJsonAsync() method provided by the HttpClient class.
Open AddEmployee.razor and add the following code to it.
@page "/employee/add"
@inject HttpClient Http
@inject Microsoft.AspNetCore.Components.NavigationManager navigation

<h1>Create</h1>

<hr />
<div class="row">
    <div class="col-md-4">
        <form>
            <div class="form-group">
                <label for="Name" class="control-label">Name</label>
                <input for="Name" class="form-control" @bind="@emp.Name" />
            </div>
            <div class="form-group">
                <label asp-for="Designation" class="control-label">Designation</label>
                <input for="Designation" class="form-control" @bind="@emp.Designation" />
            </div>
            <div class="form-group">
                <label asp-for="Email" class="control-label">Email</label>
                <input asp-for="Email" class="form-control" @bind="emp.Email" />
            </div>
            <div class="form-group">
                <label asp-for="Location" class="control-label">Location</label>
                <input asp-for="Location" class="form-control" @bind="@emp.Location" />
            </div>
            <div class="form-group">
                <label asp-for="Phone" class="control-label">Phone</label>
                <input asp-for="Phone" class="form-control" @bind="emp.PhoneNumber" />
            </div>
            <div class="form-group">
                <button type="submit" class="btn btn-default" @onclick="@(async () => await CreateEmployee())">Save</button>
                <button class="btn" @onclick="@cancel">Cancel</button>
            </div>
        </form>
    </div>
</div>

@code {

    Employee emp = new Employee();

    protected async Task CreateEmployee()
    {
        await Http.SendJsonAsync(HttpMethod.Post, "/api/Employee/Create", emp);
        navigation.NavigateTo("/employee");
    }

    void cancel()
    {
        navigation.NavigateTo("/employee");
    }
}
[HttpPost]
[Route("api/Employee/Create")]
public void Create([FromBody] Employee employee)
{
    if (ModelState.IsValid)
        this.employee.AddEmployee(employee);
}
Update
The HTTP PUT method is used to completely replace a resource on the server. We can use the HttpClient to send a PUT request to an API using the SendJsonAsync() method.
Open EditEmployee.razor and add the following code to it.
@page "/employee/edit/{empID}"
@inject HttpClient Http
@inject Microsoft.AspNetCore.Components.NavigationManager navigation

<h2>Edit</h2>
<h4>Employees</h4>
<hr />
<div class="row">
    <div class="col-md-4">
        <form>
            <div class="form-group">
                <label for="Name" class="control-label">Name</label>
                <input for="Name" class="form-control" @bind="@emp.Name" />
            </div>
            <div class="form-group">
                <label asp-for="Designation" class="control-label">Designation</label>
                <input for="Designation" class="form-control" @bind="@emp.Designation" />
            </div>
            <div class="form-group">
                <label asp-for="Email" class="control-label">Email</label>
                <input asp-for="Email" class="form-control" @bind="@emp.Email" />
            </div>
            <div class="form-group">
                <label asp-for="Location" class="control-label">Location</label>
                <input asp-for="Location" class="form-control" @bind="@emp.Location" />
            </div>
            <div class=" form-group">
                <label asp-for="Phone" class="control-label">Phone</label>
                <input asp-for="Phone" class="form-control" @bind="@emp.PhoneNumber" />
            </div>
            <div class="form-group">
                <input type="submit" value="Save" @onclick="@(async () => await UpdateEmployee())" class="btn btn-default" />
                <input type="submit" value="Cancel" @onclick="@cancel" class="btn" />
            </div>
        </form>
    </div>
</div>

@code {

    [Parameter]
    public string empId { get; set; }

    Employee emp = new Employee();

    protected override async Task OnInitializedAsync()
    {
        emp = await Http.GetJsonAsync<Employee>("/api/Employee/Details/" + Convert.ToInt64(empId));
    }

    protected async Task UpdateEmployee()
    {
        await Http.SendJsonAsync(HttpMethod.Put, "api/Employee/Edit", emp);
        navigation.NavigateTo("/employee");

    }

    void cancel()
    {
        navigation.NavigateTo("/employee");

    }
}
[HttpPut]
[Route("api/Employee/Edit")]
public void Edit([FromBody]Employee employee)
{
    if (ModelState.IsValid)
        this.employee.UpdateEmployee(employee);
}
Delete
An HTTP DELETE request can be sent to delete a resource from the server using the DeleteAsync() method provided by the HttpClient class.
Open DeleteEmployee.razor and add the following code in it.
@page "/employee/delete/{empId}"
@inject HttpClient Http
@inject Microsoft.AspNetCore.Components.NavigationManager navigation


<h2>Delete</h2>
<h3>Are you sure you want to delete employee with id : @empId</h3>
<br />

<div class="col-md-4">
    <table class="table">
        <tr>
            <td>Name</td>
            <td>@emp.Name</td>
        </tr>
        <tr>
            <td>Designation</td>
            <td>@emp.Designation</td>
        </tr>
        <tr>
            <td>Email</td>
            <td>@emp.Email</td>
        </tr>
        <tr>
            <td>Location</td>
            <td>@emp.Location</td>
        </tr>
        <tr>
            <td>Phone</td>
            <td>@emp.PhoneNumber</td>
        </tr>
    </table>
    <div class="form-group">
        <input type="submit" value="Delete" @onclick="@(async () => await Delete())" class="btn btn-default" />
        <input type="submit" value="Cancel" @onclick="@cancel" class="btn" />
    </div>
</div>

@code {

    [Parameter]
    public string empId { get; set; }

    Employee emp = new Employee();

    protected override async Task OnInitializedAsync()
    {
        emp = await Http.GetJsonAsync<Employee>
        ("/api/Employee/Details/" + Convert.ToInt64(empId));
    }

    protected async Task Delete()
    {
        await Http.DeleteAsync("api/Employee/Delete/" + Convert.ToInt64(empId));
        navigation.NavigateTo("/employee");
    }

    void cancel()
    {
        navigation.NavigateTo("/employee");
    }

}
[HttpDelete]
[Route("api/Employee/Delete/{id}")]
public void Delete(int id)
{
    employee.DeleteEmployee(id);
}
Run the application
- Click Run to view the application. The page will be opened in a new browser window.
- Click Employee in the navigation menu. This will direct you to the Employee page. Initially, this page will be empty.
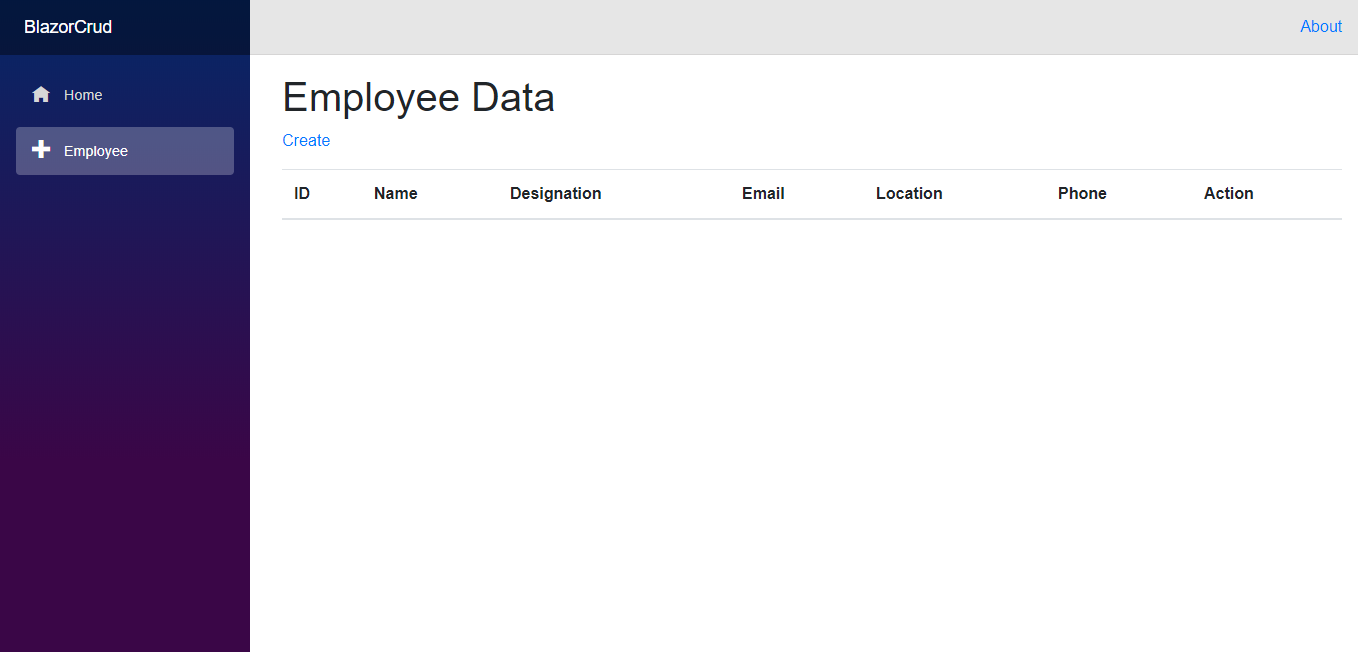
Empty Employee Page - Click the Create link to create a new employee entry. Enter the employee details and click Save.
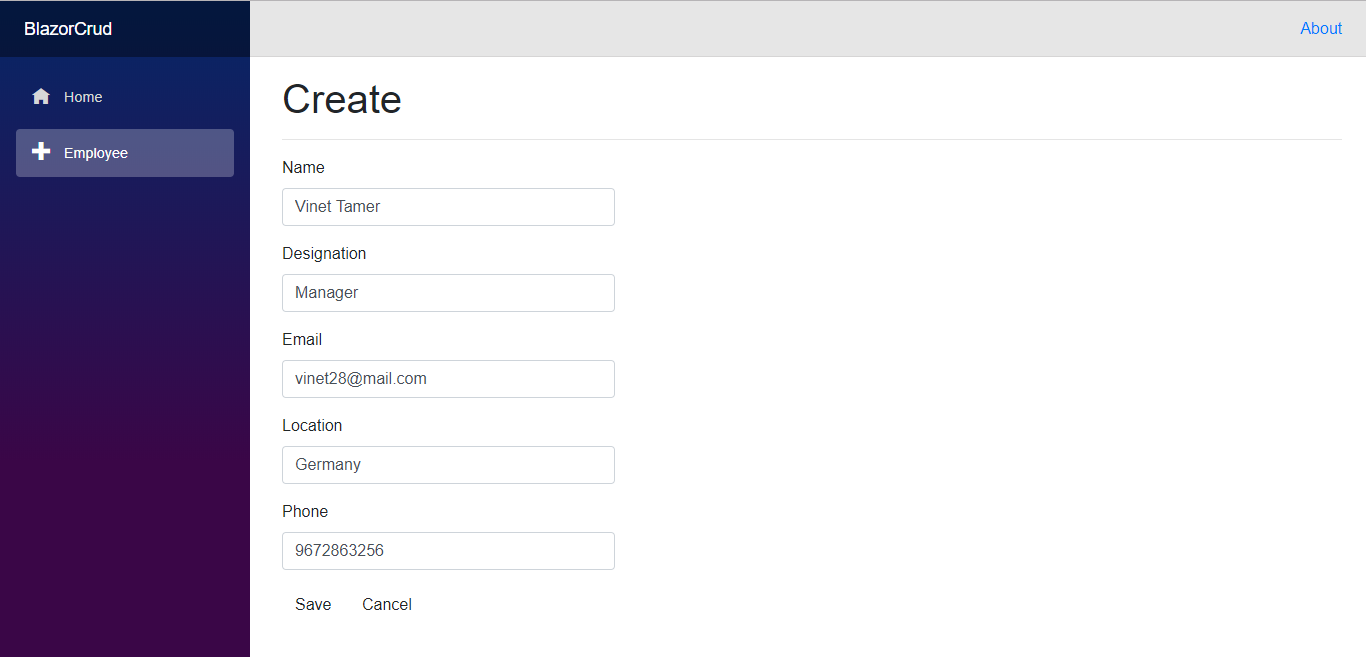
Employee Page with a New Employee Entry - Now, the created employee details are displayed as shown in the following screenshot.
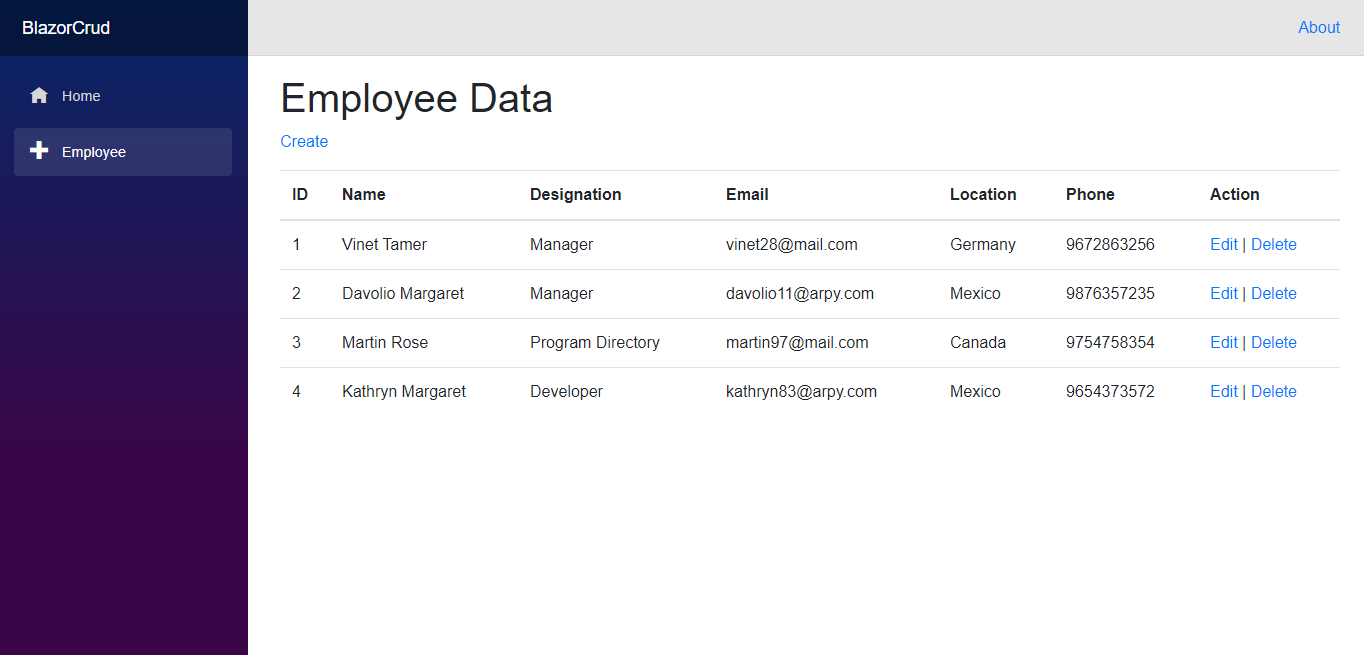
Application with Employees Added - Click Edit to update the employee details.
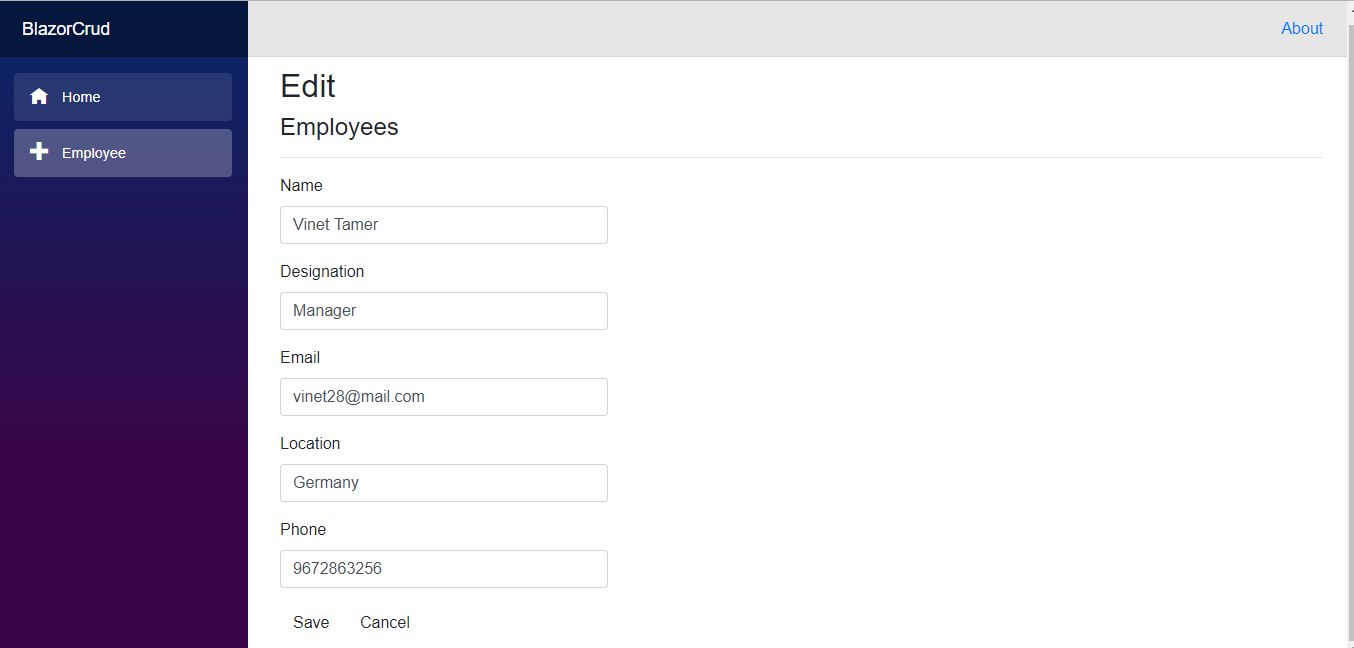
Updating Employee Information - Click Delete to delete a product. A confirmation alert will appear before it is deleted from the database.
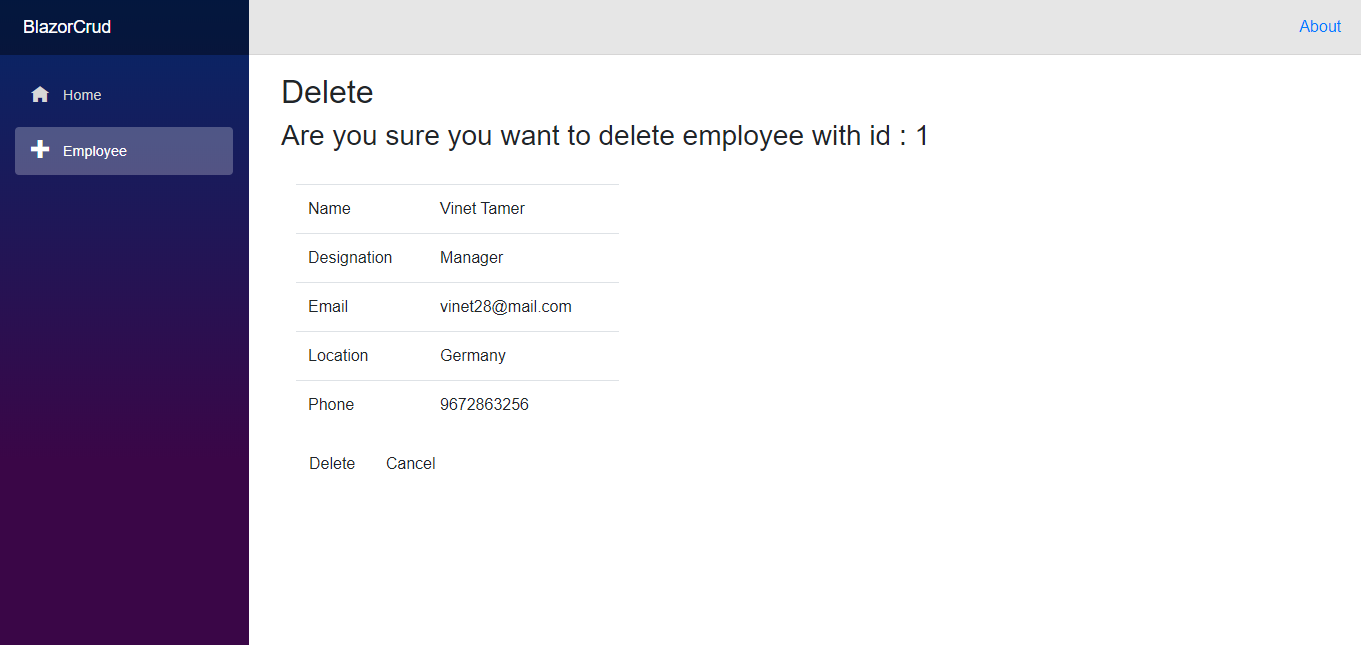
Deleting an Employee Record
You can also fork this application on GitHub.
Conclusion
In this blog, we have learned how to create a Blazor application and perform basic CRUD operations using Entity framework Core 3.0.
Syncfusion provides more than 65 high-performance, lightweight, modular, and responsive Blazor UI controls such as DataGrid, Charts, and Scheduler to ease the work of developers.
If you have any questions, please let us know in the comments section below. You can also contact us through our support forum, Direct-Trac, or feedback portal. We are always happy to assist you!


 No spam, just valuable updates.
Comments (11)
Where does the ‘api/…’ come from?
Web API routing is very similar to MVC routing. The main difference is that Web API uses the HTTP verb and not the URI path, to select the action. We can also use MVC-style routing in Web API.
Web API controller is a class that handles HTTP requests. The public methods of the controller are called action methods or simply actions. When the Web API framework receives a request, it routes the request to an action. To determine which action to invoke the framework uses a routing table.
Each entry in the routing table contains a route template. The default route template for Web API is “api/{controller}/{action}/{id}”. In this template, “api” is a literal path segment, and {controller}, {action} and {id} are placeholder variables.
For example, the following URIs match the default route:
[Route(“api/Employee/Create”)]
[Route(“api/Employee/Delete/{id}”)]
The reason for using “api” in the route is to avoid collisions with MVC routing. That’s way, we can have “/Employee/Create ” go to an MVC controller, and “/api/Employee/Create ” go to a Web API controller. Of course, if we don’t like this convention, we can change the default route table.
To know more about Web API refer the below article,
https://docs.microsoft.com/en-us/aspnet/web-api/overview/web-api-routing-and-actions/routing-in-aspnet-web-api
https://docs.microsoft.com/en-us/aspnet/core/tutorials/first-web-api?view=aspnetcore-3.1&tabs=visual-studio
https://docs.microsoft.com/en-us/aspnet/core/mvc/controllers/routing?view=aspnetcore-3.1#attribute-routing-for-rest-apis
You’re repo works pretty well, but unfortunately you where very superficial in your explanation for me to grasp this. I cannot build this from scratch because i don’t understand some parts of the project. Do you know anyone that explains something like this in a detailed way for newbies? Maybe you can recommend some youtube video, preferably one of yours because you seem to know a lot!!!
Either way, thank you for sharing
Hi RICARDO ARAÚJO
Please find the below links which explain in detail.
https://www.youtube.com/watch?v=hYAOWoL3mmA
https://www.youtube.com/watch?v=TMiFNM_1oZI
Regards
Narayanasamy
Thank u very much
I appreciate your blog hear and the intent but … being a newby at this, you totally lost me at:
Add a Razor view to the application
e.g., you say 2) use the Add New Item dialog box … select Razor View … and name it razor
yet your diagram shows you naming it ‘index.cshtml’ (not razor and why is the extension .cshtml and not .razor is shown in your next diagram) ???
then you go on to say ‘Replace the code in the views with the following code.’ yet it’s not at all clear which code to place in which views???
I suggest you should get someone to proofread your blog before posting…
Hi LEN HANNAM
Thank you for your feedback.
The diagram is updated with extension .razor and content for replacing code is also updated.
Please find details below to replace code in view,
1. Open GetEmployee.razor and add the “Read” code in it.
2. Open AddEmployee.razor and add the “Create” code in it.
3. Open EditEmployee.razor and add the “Update” code in it.
4. Open DeleteEmployee.razor and add the “Delete” code in it.
Thanks,
Narayanasamy
Great tutorial. But why do you wire the code up to a standard HTML table and not Syncfusions datagrid?
This makes no sense since Syncfusions grid is way superior.
Hi LUKE
This blog is only focused on CRUD operation using entity framework in Blazor application. So that we have used simple html table for this.
Please check below blog for CRUD operation with Syncfusion datagrid in Blazor application.
https://www.syncfusion.com/blogs/post/how-to-build-a-blazor-wasm-crud-application-with-entity-framework.aspx
Regards
Narayanasamy
Thanks for your reply Narayanasamy.
I had a look at that tutorial. None of them use Identity, so when I try to add that in, the project fails. Almost all websites require security. It would be most helpful if this could be included in the demo’s.
Kind regards
Lue
Hi Luke,
For accessing protected Web API using Syncfusion data grid, you need to pass the access token in the Headers property of the SfDataManager. Now the access token is used by the HttpClient while requesting Web API service.
Similar approach is followed in the below forum.
https://www.syncfusion.com/forums/154946/
If you find difficulties in achieving this please create support ticket and we will do our best to help you.
Regards,
Madhu