Paging is an essential feature that helps us effectively load large volumes of data. Our Syncfusion Flutter DataPager widget provides built-in options to page data on demand. It can be placed at either the top or bottom of the page.
In our previous blog, we learned the steps to integrate the DataPager with the Syncfusion Flutter DataGrid. In this blog, we are going to discuss how to integrate the DataPager with the Flutter ListView to replicate a simple online shopping app to order fruit.
Note: In this blog, we use static data for the examples, not data from the web.
Let’s get started!
Steps to integrate DataPager with a Flutter ListView
Please follow the four simple steps given in this blog to enable pagination in the Flutter ListView with our Syncfusion DataPager.
Step 1:
Include the Syncfusion Flutter DataGrid package dependency in the pubspec.yaml file of your project with the following code.
syncfusion_flutter_datagrid: ^18.4.30-beta
Step 2:
Import the DataGrid package in the main.dart file using the following code example.
import 'package:syncfusion_flutter_datagrid/datagrid.dart';
import 'package:syncfusion_flutter_core/theme.dart';
Step: 3
- Create a common delegate for both the DataPager and ListView.
- Extend the SliverChildBuilderDelegate with the DataPagerDelegate and ChangeNotifier to notify the DataPager to refresh the pager when a CRUD operation is performed.
- Override the childCount property from the SliverChildBuilderDelegate to set the defined length for the child.
- Override the rowCount property from the DataPagerDelegate and set the total length of the data source.
- Now, override the handlePageChange method to segment the data and load the segmented data to the data pager. Then, the handlePageChange method will be called for every navigation between the pages.
Refer to the following code example.
class CustomSliverChildBuilderDelegate extends SliverChildBuilderDelegate
    with DataPagerDelegate, ChangeNotifier {
  CustomSliverChildBuilderDelegate(builder) : super(builder);

  @override
  int get childCount => _paginatedProductData.length;

  @override
  int get rowCount => _products.length;

  @override
  Future<bool> handlePageChange(int oldPageIndex, int newPageIndex,
      int startRowIndex, int rowsPerPage) async {
    int endIndex = startRowIndex + rowsPerPage;

    if (endIndex > _products.length) {
      endIndex = _products.length - 1;
    }

    await Future.delayed(Duration(milliseconds: 2000));
    _paginatedProductData = _products
        .getRange(startRowIndex, endIndex)
        .toList(growable: false);

    notifyListeners();
    return true;
  }

  @override
  bool shouldRebuild(covariant CustomSliverChildBuilderDelegate oldDelegate) {
    return true;
  }
}
Step 4:
Finally, create an instance of the CustomSliverChildBuilderDelegate and assign that to both the ListView’s childrenDelegate and the DataPager’s delegate properties.
Refer to the following code example.
List<PagingProduct> _paginatedProductData = [];

List<PagingProduct> _products = [];

bool showLoadingIndicator = false;

static const double dataPagerHeight = 70.0;

@override
void initState() {
  super.initState();
  _products = List.from(populateData());
}

void rebuildList() {
  setState(() {});
}

Widget loadListView(BoxConstraints constraints) {
  List<Widget> _getChildren() {
    final List<Widget> stackChildren = [];

    if (_products.isNotEmpty) {
      stackChildren.add(ListView.custom(
          childrenDelegate: CustomSliverChildBuilderDelegate(indexBuilder)));
    }

    if (showLoadingIndicator) {
      stackChildren.add(Container(
        color: Colors.black12,
        width: constraints.maxWidth,
        height: constraints.maxHeight,
        child: Align(
          alignment: Alignment.center,
          child: CircularProgressIndicator(
            strokeWidth: 3,
          ),
        ),
      ));
    }
    return stackChildren;
  }

  return Stack(
    children: _getChildren(),
  );
}

@override
Widget build(BuildContext context) {
  return MaterialApp(
    theme: ThemeData(
      primarySwatch: Colors.blue,
      visualDensity: VisualDensity.adaptivePlatformDensity,
    ),
    home: Scaffold(
      appBar: AppBar(
        title: Text('Fruits'),
      ),
      body: LayoutBuilder(builder: (context, constraint) {
        return Column(
          children: [
            Container(
              height: constraint.maxHeight - dataPagerHeight,
              child: loadListView(constraint),
            ),
            Container(
              height: dataPagerHeight,
              child: SfDataPagerTheme(
                  data: SfDataPagerThemeData(
                    itemBorderRadius: BorderRadius.circular(5),
                  ),
                  child: SfDataPager(
                      rowsPerPage: 10,
                     onPageNavigationStart: (pageIndex) {
                         setState(() {
                            showLoadingIndicator = true;
                         });
                       },
                      onPageNavigationEnd: (pageIndex) {
                        setState(() {
                          showLoadingIndicator = false;
                        });
                       },
                      delegate: CustomSliverChildBuilderDelegate(indexBuilder)
                        ..addListener(rebuildList))),
            )
          ],
        );
      }),
    ),
  );
}

Widget indexBuilder(BuildContext context, int index) {
  final PagingProduct data = _paginatedProductData[index];
  return ListTile(
    shape: RoundedRectangleBorder(borderRadius: BorderRadius.circular(10)),
    title: LayoutBuilder(
      builder: (context, constraint) {
        return Container(
            width: constraint.maxWidth,
            height: 100,
            child: Row(
              children: [
                Align(
                  alignment: Alignment.centerRight,
                  child: Container(
                    clipBehavior: Clip.antiAlias,
                    decoration: BoxDecoration(
                        borderRadius: BorderRadius.circular(10)),
                    child: Image.asset(data.image, width: 100, height: 100),
                  ),
                ),
                Container(
                  padding: EdgeInsets.fromLTRB(20, 10, 5, 5),
                  child: Column(
                    mainAxisAlignment: MainAxisAlignment.spaceEvenly,
                    children: [
                      Container(
                        width: constraint.maxWidth - 130,
                        child: Text(data.name,
                            style: TextStyle(
                                fontWeight: FontWeight.w600,
                                color: Colors.black87,
                                fontSize: 15)),
                      ),
                      Container(
                        width: constraint.maxWidth - 130,
                        child: Text(data.weight,
                            style: TextStyle(
                                color: Colors.black87, fontSize: 10)),
                      ),
                      Container(
                        width: constraint.maxWidth - 130,
                        child: Row(
                          children: [
                            Container(
                              color: Colors.green.shade900,
                              padding: EdgeInsets.all(3),
                              child: Row(
                                children: [
                                  Text('${data.reviewValue}',
                                      textAlign: TextAlign.end,
                                      style: TextStyle(
                                          color: Colors.white, fontSize: 13)),
                                  SizedBox(width: 2),
                                  Icon(
                                    Icons.star,
                                    color: Colors.white,
                                    size: 15,
                                  )
                                ],
                              ),
                            ),
                            SizedBox(width: 5),
                            Text('${data.ratings}',
                                textAlign: TextAlign.end,
                                style: TextStyle(
                                    color: Colors.black87, fontSize: 11))
                          ],
                        ),
                      ),
                      Container(
                        width: constraint.maxWidth - 130,
                        child: Row(
                          children: [
                            Container(
                              child: Text('\${data.price}',
                                  style: TextStyle(
                                      color: Colors.green.shade800,
                                      fontSize: 13)),
                            ),
                            SizedBox(width: 8),
                            Text('${data.offer}',
                                style: TextStyle(
                                    color: Colors.black87, fontSize: 10))
                          ],
                        ),
                      ),
                    ],
                  ),
                ),
              ],
            ));
      },
    ),
  );
}
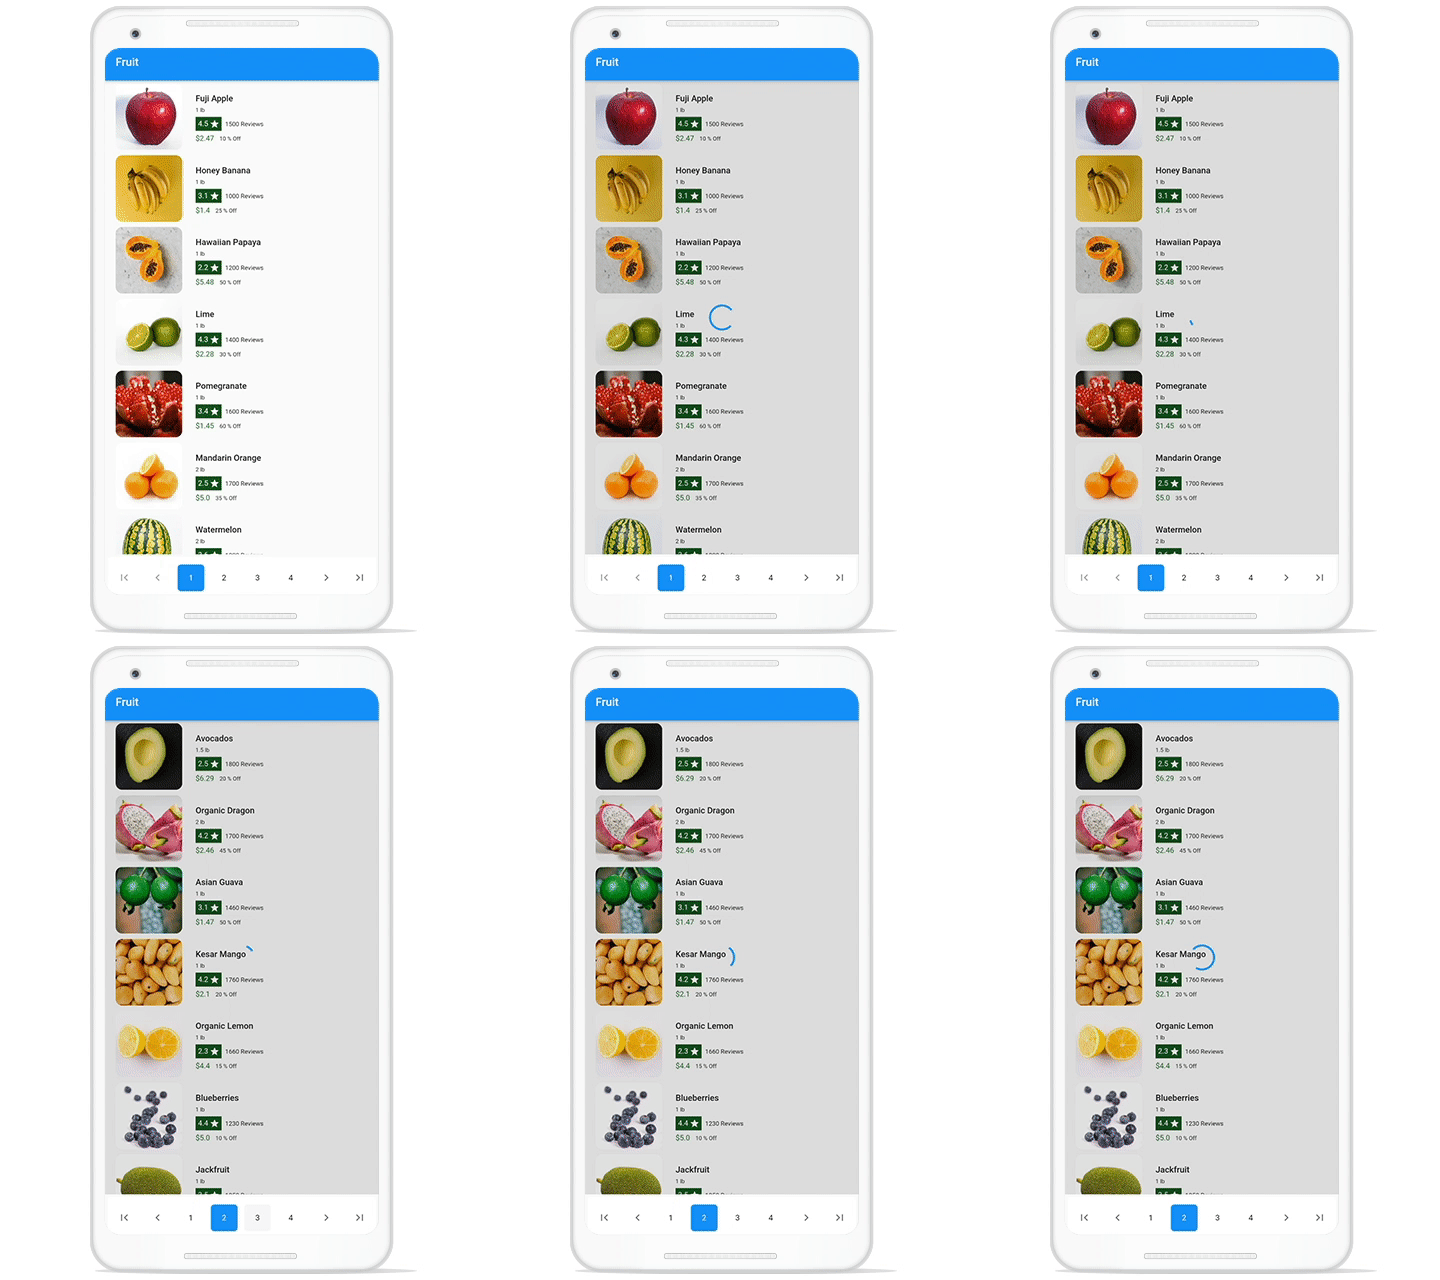
After executing the previous code example, we will get output like in the following GIF image.

GitHub reference
You can get the complete source code for the example used in this blog in this GitHub repository.

Unlock the power of Syncfusion’s highly customizable Flutter widgets.
Conclusion
In this blog, we have covered how to integrate the Syncfusion Flutter DataPager widget with the Flutter ListView widget to replicate a fruit ordering app. Follow these four simple steps and you will definitely say, “This is easy!”
The Syncfusion Flutter suite offers fast, fluid, and flexible widgets for creating high-quality apps for iOS, Android, and the web. Use them to build beautiful applications!
For existing customers, the new version is available for download from the License and Downloads page. If you are not yet a Syncfusion customer, you can try our 30-day free trial to check out our available features. Also, try our samples from this GitHub location.
You can also reach us through our support forums, support portal, or feedback portal. We are always happy to assist you!


Comments (1)
yar itni mushkil blog ur document ka kuch bhi samajh nh araha ha. please isko thora easy karo