
TL;DR: Create an engaging music track UI using .NET MAUI ListView control. This blog covers building an audio player for Android and iOS, managing audio data, and designing a user-friendly track list with play/pause controls.
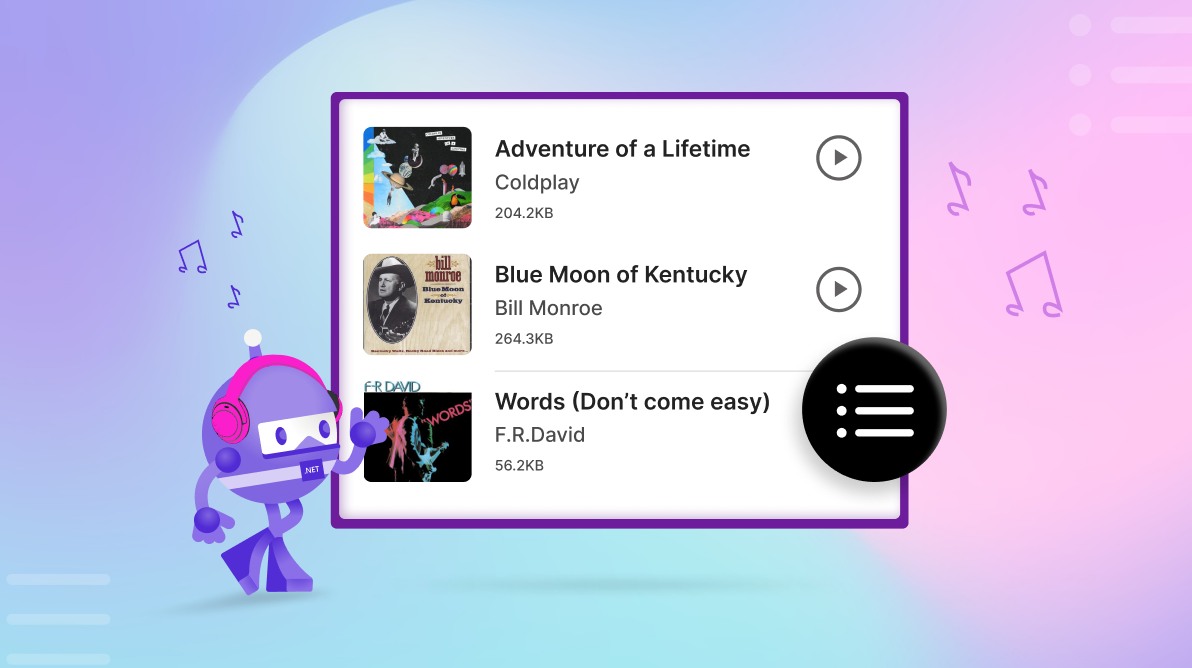
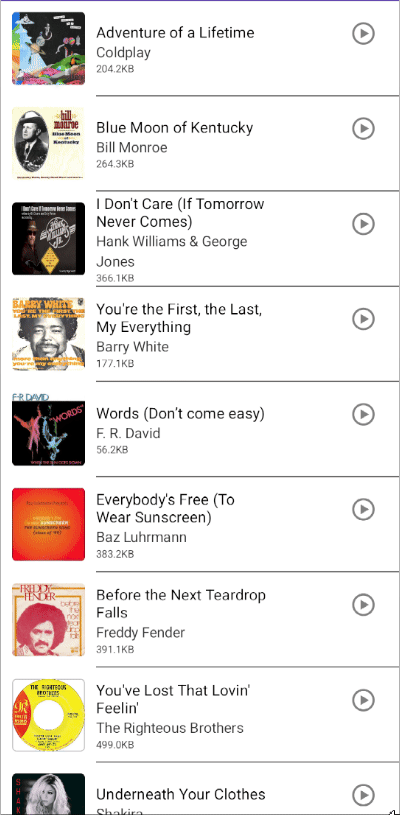
A music track UI can be designed as a list of tracks, each featuring a play button that allows users to play the corresponding music file when the play icon is clicked. This user-friendly interface can significantly enhance the overall experience of a music app by making it more intuitive, efficient, and enjoyable for users.
Syncfusion .NET MAUI ListView makes it easier to develop apps for iOS and Android. This blog aims to guide you through the process of creating an engaging music track UI using the .NETMAUI ListView control.
This tutorial will cover everything from preparing the audio player service and designing the music track UI by following three steps:
- Developing audio player service.
- Implementing Model and ViewModel.
- Designing the UI.
Note: Before proceeding, refer to the getting started with .NET MAUI ListView documentation.
Creating a music track UI using .NET MAUI ListView
Follow these steps to create the music track UI using our .NET MAUI ListView control:
Step 1: Develop an audio player service
As there is no direct support for playing audio in .NET MAUI, we need to create a service on native platforms that plays audio files. This can be done using dependency injection.
Note: Audio service is supported only on Android and iOS platforms.
Create a service to play the audio
Before writing a service class for native platforms, we need to create an interface with methods for invoking actions like playing, pausing, or stopping audio files.
Refer to the following code example.
public interface IAudioPlayerService
{
    void PlayAudio(string filePath);
    void Pause();
    void Stop();
    string GetCurrentPlayTime();
    bool CheckFinishedPlayingAudio();
}
Then, create a service class to play music on both Android and iOS platforms.
Audio player service for Android
Follow these steps to create a music-playing service for Android:
- Create an instance of the MediaPlayer class to play an audio file.
- Assign the audio file path to the MediaPlayer using the SetDataSource method.
- Prepare the media player by calling the Prepare method after setting the data source.
- Once prepared, use the Start method to begin playing the audio.
Refer to the following code example.
public partial class AudioPlayerService : IAudioPlayerService
{
    …
    #region Methods
    public async void PlayAudio(string filePath)
    {
        if (mediaPlayer != null && !mediaPlayer.IsPlaying)
        {
            mediaPlayer.SeekTo(currentPositionLength);
            currentPositionLength = 0;
            mediaPlayer.Start();
        }

        else if (mediaPlayer == null || !mediaPlayer.IsPlaying)
        {
            try
            {
                isCompleted = false;
                mediaPlayer = new MediaPlayer();
                System.IO.Stream fileStream = GetStreamFromFile(filePath);

                var tempFile = System.IO.Path.Combine(System.IO.Path.GetTempPath(), "tempAudio.mp3");
                using (var file = System.IO.File.Create(tempFile))
                {
                    fileStream.CopyTo(file);
                }

                mediaPlayer.SetDataSource(tempFile);

                mediaPlayer.Prepare();
                mediaPlayer.Prepared += (sender, args) =>
                {
                    isPrepared = true;
                    mediaPlayer.Start();
                };
                mediaPlayer.Completion += (sender, args) =>
                {
                    isCompleted = true;
                };
            }
            catch (Exception e)
            {
                mediaPlayer = null;
            }
        }
    }
    #endregion
    …………………
}
Audio player service for iOS
Follow these steps to implement an audio playback service in iOS using the AVPlayer class:
- Initialize the audio file with the AVPlayerItem class.
- Begin playback by calling the Play method on the AVPlayer.
Refer to the following code example.
public partial class AudioPlayerService : IAudioPlayerService
{
       ………………………………
        #region Methods

        /// <summary>
        /// This method is used to play the recorder audio.
        /// </summary>
        public void PlayAudio(string filePath)
        {
            isFinishedPlaying = false;
            if (player == null)
            {
                AVAsset asset = AVAsset.FromUrl(NSUrl.CreateFileUrl(new[] { filePath }));
                AVPlayerItem avPlayerItem = new AVPlayerItem(asset);
                player = new AVPlayer(avPlayerItem);
                player.AutomaticallyWaitsToMinimizeStalling = false;
                player.Volume = 1;

                player.Play();
                IsPlaying = true;
                isFinishedPlaying = false;
            }
            else if (player != null && !IsPlaying)
            {
                player.Play();
                IsPlaying = true;
                isFinishedPlaying = false;
            }
        }
        #endregion
        ………………………
}
Register dependency injection to access the objects in the constructor
Dependency injection allows an object (the client) to receive other objects (services) on which it depends. For more details, check out the blog Learn How to Use Dependency Injection in .NET MAUI.
To implement dependency injection with the AudioInfoViewModel, register the ViewModel in the dependency injection container and inject it into the MainPage constructor. This approach allows for cleaner, more maintainable code where the framework manages dependencies.
public static class MauiProgram
{
    public static MauiApp CreateMauiApp()
    {
        var builder = MauiApp.CreateBuilder();
        builder
            .UseMauiApp<App>()
            .ConfigureFonts(fonts =>
            {
                fonts.AddFont("OpenSans-Regular.ttf", "OpenSansRegular");
                fonts.AddFont("OpenSans-Semibold.ttf", "OpenSansSemibold");
            });

        #if DEBUG
    	builder.Logging.AddDebug();
        #endif


        builder.Services.AddTransient<App>();
        builder.Services.AddTransient<MainPage>();
        builder.Services.AddTransient<AudioInfoViewModel>();

        builder.Services.AddSingleton<IAudioPlayerService, AudioPlayerService>();

        builder.ConfigureSyncfusionCore();

        return builder.Build();
    }
}
In the MauiProgram class, we have registered the AudioInfoViewModel with the dependency injection container using services.AddTransient<AudioInfoViewModel>();. This allows the framework to automatically create an instance of the ViewModel when needed.
Step 2: Implement Model and ViewModel
Now, include the model class to handle the audio info properties and the view model class to populate the binding collection property to show the audio info list in the ListView.
Creating a model
Let’s create a data model and bind it to the .NET MAUI ListView control. Create a simple data source in a new class file, as shown in the following code example, and save it as AudioInfo.cs.
public class AudioInfo : INotifyPropertyChanged
{
    #region Fields

    private string title;
    private string author;
    private string? image;
    private string size;

    private bool isPlayVisible;
    private bool isPauseVisible;
    private string currentAudioPostion;

    #endregion

    #region Properties

    /// <summary>
    /// Gets or sets a value that indicates the song title.
    /// </summary>
    public string Title
    {
        get
        {
            return title;
        }
        set
        {
            title = value;
            this.RaisePropertyChanged("Title");
        }
    }

    /// <summary>
    /// Gets or sets the value that indicates the song author.
    /// </summary>
    public string Author
    {
        get
        {
            return author;
        }
        set
        {
            author = value;
            this.RaisePropertyChanged("Author");
        }
    }

    /// <summary>
    /// Gets or sets the value that indicates the song author.
    /// </summary>
    public string Image
    {
        get
        {
            return image;
        }
        set
        {
            image = value;
            this.RaisePropertyChanged("Image");
        }
    }

    /// <summary>
    /// Gets or sets a value that indicates song size.
    /// </summary>
    public string Size
    {
        get
        {
            return size;
        }
        set
        {
            size = value;
            this.RaisePropertyChanged("Size");
        }
    }

    public bool IsPlayVisible
    {
        get { return isPlayVisible; }
        set
        {
            isPlayVisible = value;
            this.RaisePropertyChanged("IsPlayVisible");
            IsPauseVisble = !value;
        }
    }
    public bool IsPauseVisble
    {
        get { return isPauseVisible; }
        set
        {
            isPauseVisible = value;
            this.RaisePropertyChanged("IsPauseVisble") ;
        }
    }
    public string CurrentAudioPosition
    {
        get { return currentAudioPostion; }
        set
        {
            if (string.IsNullOrEmpty(currentAudioPostion))
            {
                currentAudioPostion = string.Format("{0:mm\\:ss}", new TimeSpan());
            }
            else
            {
                currentAudioPostion = value;
            }
            this.RaisePropertyChanged("CurrentAudioPosition");
        }
    }
    public string AudioURL { get; set; }


    #endregion

    public AudioInfo()
    {
    }

    #region INotifyPropertyChanged implementation

    public event PropertyChangedEventHandler PropertyChanged;

    private void RaisePropertyChanged(String name)
    {
        if (PropertyChanged != null)
            this.PropertyChanged(this, new PropertyChangedEventArgs(name));
    }

    #endregion
}
Creating a View Model
Now, create a model repository class with the AudioInfo collection property initialized with the required number of data objects in a new class file. Then, save it as an AudioInfoViewModel.cs file.
public class AudioInfoViewModel : INotifyPropertyChanged
{
   private ObservableCollection<AudioInfo> audioCollection;

   public AudioInfoViewModel(IAudioPlayerService audioPlayerService)
   {
        GenerateSource();
   }

   #region Generate Source

   private void GenerateSource()
   {
        AudioCollection = audioInfoRepository.GetSongs();
   }

   #endregion

   #region Properties

   public ObservableCollection<AudioInfo> AudioCollection
   {
        get { return audioCollection; }
        set { this.audioCollection = value; }
   }

   #endregion

   #region INotifyPropertyChanged

   public event PropertyChangedEventHandler PropertyChanged;

   private void OnPropertyChanged(string name)
   {
        if (PropertyChanged != null)
            PropertyChanged(this, new PropertyChangedEventArgs(name));
   }

   #endregion
}
Additionally, the AudioInfoViewModel includes the audio player service commands to manage audio files and handle playback-related implementations. The audioPlayerService will be defined by dependency injection, invoking the platform-specific code for playing audio files.
The PlayAudioCommand and PauseAudioCommand properties will be used to invoke the dependency service methods to play the audio with the help of audioPlayerService.
public class AudioInfoViewModel : INotifyPropertyChanged
{
    IAudioPlayerService audioPlayerService;

    public AudioInfoViewModel(IAudioPlayerService audioPlayerService)
    {
        this.audioPlayerService = audioPlayerService;
        PauseAudioCommand = new Command(PauseAudio);
        PlayAudioCommand = new Command(StartPlayingAudio);
    }

    #region Properties

    public ICommand PlayAudioCommand { get; set; }
    public ICommand PauseAudioCommand { get; set; }


    #endregion

    #region INotifyPropertyChanged

    public event PropertyChangedEventHandler PropertyChanged;

    private void OnPropertyChanged(string name)
    {
        if (PropertyChanged != null)
            PropertyChanged(this, new PropertyChangedEventArgs(name));
    }

    #endregion

    #region Player command

    private void StartPlayingAudio(object obj)
    {
        if (audioFile != null && audioFile != (AudioInfo)obj)
        {
            AudioFile.IsPlayVisible = true;
            StopAudio();
        }
        if (obj is AudioInfo)
        {
            audioFile = (AudioInfo)obj;
            audioFile.IsPlayVisible = false;
            string audioFilePath = AudioFile.AudioURL;
            audioPlayerService.PlayAudio(audioFilePath);
            SetCurrentAudioPosition();
        }
    }

    public void StopAudio()
    {
        if (AudioFile != null)
        {
            audioPlayerService.Stop();
            playTimer.Stop();
        }
    }
    #endregion
}
Step 3: Designing the UI
Now, we will create the UI to show the audio collection using the .NET MAUI ListView. Install the necessary package to use the .NET MAUI ListView control in the app.
Binding data to the .NET MAUI ListView
The MainPage constructor accepts an AudioInfoViewModel parameter injected by the dependency injection container. The BindingContext for the MainPage is set to the injected AudioInfoViewModel, enabling property binding between the page and the ViewModel.
public partial class MainPage : ContentPage
{
    public MainPage(AudioInfoViewModel audioInfoViewModel)
    {
        InitializeComponent();
        BindingContext = audioInfoViewModel;
    }
}
To populate the ListView, bind the item collection from the BindingContext to the SfListView.ItemsSource property.
<syncfusion:SfListView x:Name="listView"
           ItemsSource="{Binding AudioCollection}"/>
Define the item template
Finally, define the ItemTemplate for the .NET MAUI ListView to display audio information along with the Play and Pause buttons. You can also create a custom template that includes controls like labels for displaying audio details and buttons for handling play and pause actions.
<syncfusion:SfListView x:Name="listView"
ItemsSource="{Binding AudioCollection}">
<syncfusion:SfListView.ItemTemplate>
<DataTemplate>
……………………
<Image Grid.Column="0" Grid.Row="0" Source="{Binding Image}" HorizontalOptions="Center" VerticalOptions="FillAndExpand" HeightRequest="72" WidthRequest="72" Aspect="Fill"/>
<Label Grid.Row="0" Text="{Binding Title}" LineBreakMode="WordWrap" FontFamily="Roboto-Regular" FontSize="{OnPlatform Android={OnIdiom Phone=15, Tablet=22}, iOS=16, WinUI=14,MacCatalyst=16}" CharacterSpacing="0.1"/>
<Label Grid.Row="1" LineBreakMode="WordWrap" LineHeight="{OnPlatform iOS={OnIdiom Tablet=1.2, Default=1.025}, Default=1.2}" Text="{Binding Author}" FontFamily="Roboto-Regular" FontSize="14" CharacterSpacing="0.1" Opacity="0.8" />
<Label Grid.Row="2" Text="{Binding Size}" FontSize="{OnPlatform Default=10,WinUI=12,MacCatalyst=12}" FontFamily="Roboto-Regular" CharacterSpacing="0.15" Margin="0,0,11,0" Opacity="0.8"/>
………………………
<Button
Grid.Row="1"
Command="{Binding Path=BindingContext.PlayAudioCommand, Source={x:Reference listView}}"
CommandParameter="{Binding .}"
IsVisible="{Binding IsPlayVisible}"
Text=""
VerticalOptions="End"/>
<Button
Grid.Row="1"
Command="{Binding Path=BindingContext.PauseAudioCommand, Source={x:Reference listView}}"
CommandParameter="{Binding .}"
IsVisible="{Binding IsPauseVisble}"
VerticalOptions="Center"
Text="" />
<Label
Grid.Row="2"
FontSize="14"
IsVisible="{Binding IsPauseVisble}"
Text="{Binding CurrentAudioPosition}"
TextColor="Black"
HorizontalOptions="Center"
VerticalTextAlignment="Center" />
<BoxView Grid.Row="1" Grid.Column="1" Grid.ColumnSpan="2" HeightRequest="1" VerticalOptions="End" />
</DataTemplate>
</syncfusion:SfListView.ItemTemplate>
</syncfusion:SfListView>
You can get the following output when executing the above codes cumulatively.
GitHub reference
For more details, refer to the creating a music track UI using the .NET MAUI ListView GitHub demo.

Conclusion
In conclusion, the blog presents a comprehensive guide on constructing an interactive music track UI, leveraging the capabilities of Syncfusion’s .NET MAUI ListView control.
If you’re already a Syncfusion user, you can download the product setup from our website. Otherwise, you can download a free 30-day trial.
Please let us know in the comments section below if you have any questions. You can also contact us through our support forum, support portal, or feedback portal. We are always happy to assist you!


![Integrating Semantic Kernel and Syncfusion Controls [Webinar Show Notes]](https://www.syncfusion.com/blogs/wp-content/uploads/2024/11/Integrating-Semantic-Kernel-and-Syncfusion-Controls-Webinar-Show-Notes-1.png)
 No spam, just valuable updates.