TL;DR: Learn to load appointments on demand in Syncfusion’s Blazor Scheduler using Entity Framework. This blog covers setting up the project, creating model classes, implementing a custom data adapter, and filtering appointments on the server-side based on start and end dates.
Syncfusion’s Blazor Scheduler provides all the common scheduling functionalities to create and manage day-to-day business and personal appointments and events. The Scheduler takes events or appointments from the data source collections and validates all the available data during load time.
By default, Blazor Scheduler loads data on demand to reduce the transfer and load time. When loading a large number of resources and events, the virtual scrolling (load on demand) support has been added to the Blazor Scheduler’s timeline views so you can load them instantly as you scroll.
This blog provides a step-by-step guide on handling a huge volume of appointments in Syncfusion’s Blazor Scheduler using Entity Framework. We’ll see how to filter appointments on the server side based on the specified start and end dates.
Let’s get started!
Project setup
First, create a Blazor server-side Scheduler app using the Getting Started with Blazor Scheduler Component documentation.
Then, we’ll add model classes to represent the data structure and implement a custom adapter to handle database interactions instead of controllers.
This custom adapter will enable the Blazor Scheduler component to communicate with your data source and perform operations such as querying, creating, updating, and deleting data.
Defining the model
Create an AppointmentData model class for the database with the equivalent fields in the Scheduler. It should contain the appointment subject, start and end times, and other related information.
NOTE: While binding remote data to the Scheduler, the Id field becomes mandatory to process the CRUD (Create, Read, Update, and Delete) actions on appropriate events.
    public class AppointmentData
    {
        [Key]
        public int Id { get; set; }
        public string? Subject { get; set; }
        public DateTime StartTime { get; set; }
        public DateTime EndTime { get; set; }
        public string? StartTimezone { get; set; }
        public string? EndTimezone { get; set; }
        public string? Location { get; set; }
        public string? Description { get; set; }
        public bool? IsReadOnly { get; set; }
        public bool IsAllDay { get; set; } = false;
        public int? RecurrenceID { get; set; }
        public string? RecurrenceRule { get; set; }
        public string? RecurrenceException { get; set; }
        public bool? IsBlock { get; set; }
    }
Creating an entity context file and establishing a database connection
To communicate between our Blazor Scheduler app and the database, we’ll create an AppointmentDataContext context, which inherits from the DbContext class provided by the Entity Framework.
Additionally, we will create an AppointmentDataContext constructor that supports configuration parameters so that users can customize the context’s behavior.
Within the AppointmentDataContext class, we will define a property called AppointmentDataSet to simplify data operations. This property represents a collection of AppointmentData entities in the database, enabling seamless querying, insertion, updating, and deletion of AppointmentData records.
public class AppointmentDataContext: DbContext
    {
        public AppointmentDataContext(DbContextOptions<AppointmentDataContext> options) : base(options)
        {
        }
        public DbSet<AppointmentData> AppointmentDataSet { get; set; }
    }
Next, we will use a connection string to specify the database connection in the appsettings.json file. This connection string contains details like the server, database name, and security credentials necessary for establishing the connection.
{
  "Logging": {
    "LogLevel": {
      "Default": "Information",
      "Microsoft.AspNetCore": "Warning"
    }
  },
  "AllowedHosts": "*",
  "ConnectionStrings": {
    "AppointmentDataDB": "Server=(localdb)\\mssqllocaldb;Database=AppointmentData;Trusted_Connection=True;MultipleActiveResultSets=true"
  }
}
To use the AppointmentDataContext, we should install the Microsoft Entity Framework package in our app. Let’s install the package and register our context in the Program.cs file.
var connectionString = builder.Configuration.GetConnectionString("AppointmentDataDB");
builder.Services.AddDbContext<AppointmentDataContext>(opts => opts.UseSqlServer(connectionString));
Generating the database from code using migrations
Let’s add Code-First Migrations. Migrations automate the database creation based on our model. When the Microsoft.EntityFrameworkCore.Tools package is installed, and the necessary Entity Framework packages for migration are added to the .NET Core project setup automatically.
Run the following command in the Package Manager console. This will create classes to support migrations.
PM> Add-Migration SchedulerLoadOnDemand.Data.AppointmentDataContext
Then, run the following command to apply those changes to the database. This will update the database based on our models.
PM> update-database
Now, let’s verify that the database and tables are created by opening the Visual Studio SQL Server Object Explorer window.
Refer to the following image.
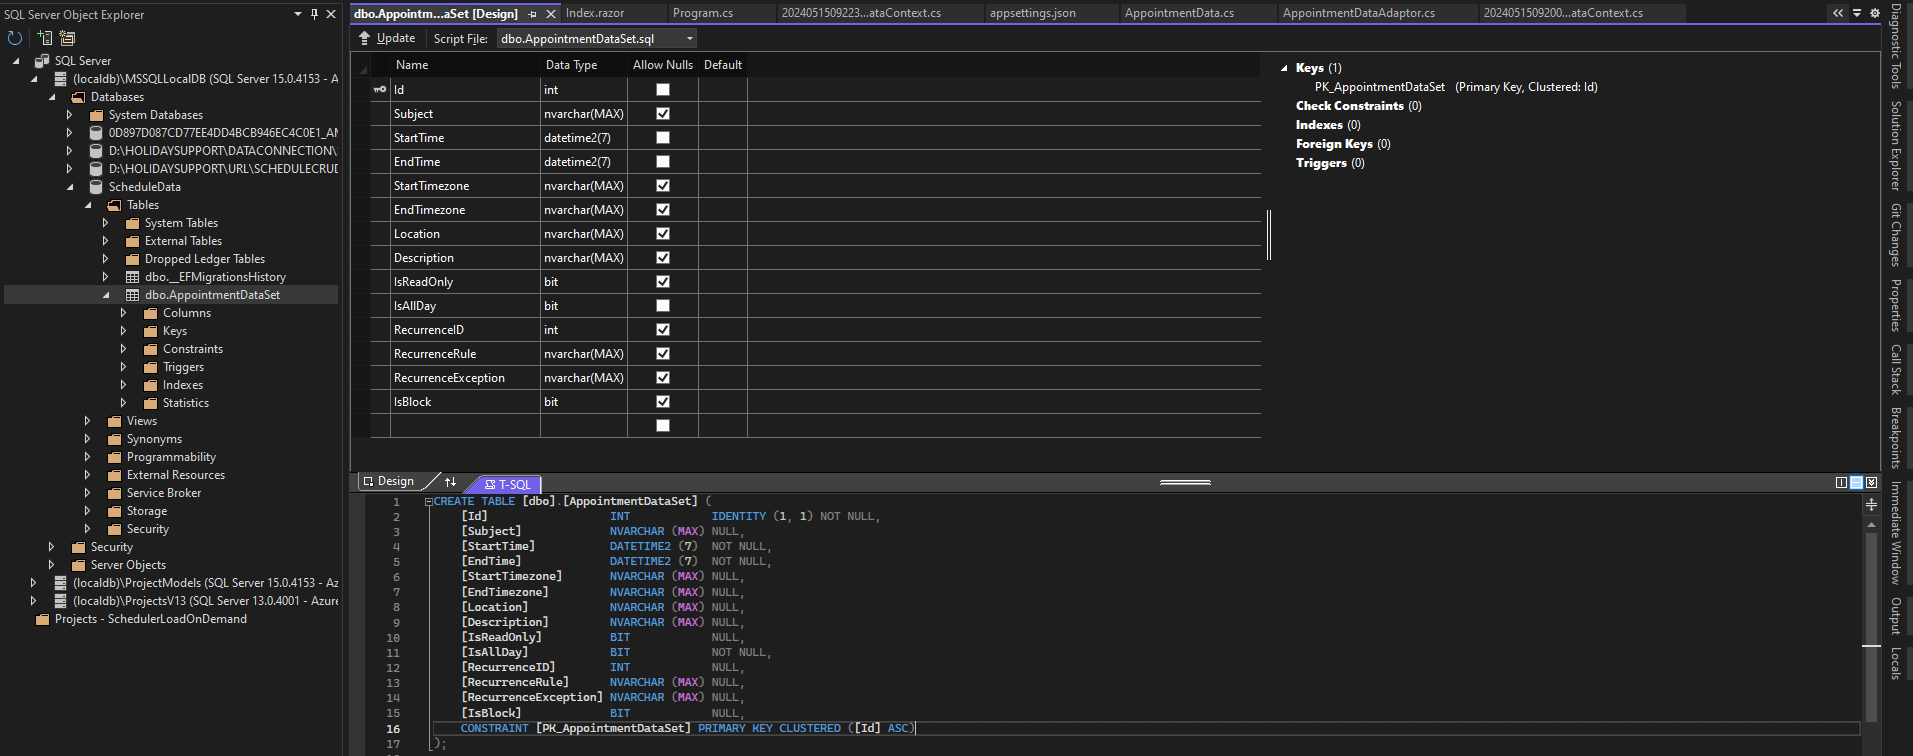
You can see that the database AppointmentData is created with a table AppointmentDataSet, which contains the columns based on the fields we defined in our Model.
When we update our entities and run migrations, new migration files are generated in our solution, and new entries appear in the table __EFMigrationsHistory.
Seeding data
Data seeding is used to provide initial data while creating a database. Then, Entity Framework migrations will automatically determine the insert, update, or delete operations that need to be applied when upgrading the database to the latest version of the model.
Here, we’ll override the OnModelCreating method in the AppointmentDataContext class to specify the structure and initial data for the AppointmentData entity.
This method is called during the model creation process and allows us to configure our entity using the ModelBuilder object. We can specify the initial data for this entity by invoking the HasData method on the AppointmentData entity.
Refer to the following code example.
public class AppointmentDataContext: DbContext
    {
        public AppointmentDataContext(DbContextOptions<AppointmentDataContext> options) : base(options)
        {
        }
        protected override void OnModelCreating(ModelBuilder modelBuilder)
        {
            modelBuilder.Entity<AppointmentData>().HasData(
                new AppointmentData
                {
                    Id = 1,
                    Subject = "India",
                    StartTime = new DateTime(2023, 6, 10, 11, 0, 0),
                    EndTime = new DateTime(2023, 6, 10, 12, 0, 0),
                    Location = "India"
                 }
            );
        }
        public DbSet<AppointmentData> AppointmentDataSet { get; set; }
    }
Let’s run the migration commands once again.
PM> Add-Migration SchedulerLoadOnDemand.Data.AppointmentDataContextSeed
PM> update-database
Creating a data access layer
Let’s create a new class by right-clicking on the Data folder and choosing Class. We’ll name it AppointmentDataService.cs. Now, replace the code in this Class with the following code to handle CRUD operations in the AppointmentDataSet table.
public class AppointmentDataService
    {
        private readonly AppointmentDataContext _appointmentDataContext;

        public AppointmentDataService(AppointmentDataContext appDBContext)
        {
            _appointmentDataContext = appDBContext;
        }

        public async Task<List<AppointmentData>> Get(DateTime StartDate, DateTime EndDate)
        {
            return await _appointmentDataContext.AppointmentDataSet.Where(evt => evt.StartTime >= StartDate && evt.EndTime <= EndDate || evt.RecurrenceRule != null).ToListAsync();
        }

        public async Task Insert(AppointmentData appointment)
        {
            var app = new AppointmentData();
            app.Id = appointment.Id;
            app.UserID = appointment.UserID;
            app.Subject = appointment.Subject;
            app.StartTime = appointment.StartTime;
            app.EndTime = appointment.EndTime;
            app.IsAllDay = appointment.IsAllDay;
            app.Location = appointment.Location;
            app.Description = appointment.Description;
            app.RecurrenceRule = appointment.RecurrenceRule;
            app.RecurrenceID = appointment.RecurrenceID;
            app.RecurrenceException = appointment.RecurrenceException;
            app.StartTimezone = appointment.StartTimezone;
            app.EndTimezone = appointment.EndTimezone;
            app.IsReadOnly = appointment.IsReadOnly;
            await _appointmentDataContext.AppointmentDataSet.AddAsync(app);
            await _appointmentDataContext.SaveChangesAsync();
        }

        public async Task Update(AppointmentData appointment)
        {
            var app = await _appointmentDataContext.AppointmentDataSet.FirstAsync(c => c.Id == appointment.Id);

            if (app != null)
            {
                app.UserID = appointment.UserID;
                app.Subject = appointment.Subject;
                app.StartTime = appointment.StartTime;
                app.EndTime = appointment.EndTime;
                app.IsAllDay = appointment.IsAllDay;
                app.Location = appointment.Location;
                app.Description = appointment.Description;
                app.RecurrenceRule = appointment.RecurrenceRule;
                app.RecurrenceID = appointment.RecurrenceID;
                app.RecurrenceException = appointment.RecurrenceException;
                app.StartTimezone = appointment.StartTimezone;
                app.EndTimezone = appointment.EndTimezone;
                app.IsReadOnly = appointment.IsReadOnly;

                _appointmentDataContext.AppointmentDataSet?.Update(app);
                await _appointmentDataContext.SaveChangesAsync();
            }
        }

        public async Task Delete(AppointmentData appointment)
        {
            var app = await _appointmentDataContext.AppointmentDataSet.FirstAsync(c => c.Id == appointment.Id);

            if (app != null)
            {
                _appointmentDataContext.AppointmentDataSet?.Remove(app);
                await _appointmentDataContext.SaveChangesAsync();
            }
        }
    }
Now, register the AppointmentDataService as a scoped service in the Program.cs file as follows.
// Add services to the container.
builder.Services.AddRazorPages();
builder.Services.AddServerSideBlazor();
builder.Services.AddSingleton();
builder.Services.AddSyncfusionBlazor();
builder.Services.AddScoped();
builder.Services.AddScoped();
Creating the custom adaptor
One notable feature of the Blazor Scheduler is its flexible data-binding capability using the API Reference: SfDataManager component. It acts as an interface between the data source and the Scheduler to handle data requests and responses.
The Data Manager provides various built-in data adapters to interact with data sources such as OData services, web APIs (Application Programming Interface), and more. If the built-in adaptors do not match our needs, we can use our custom adaptor to handle the data operations manually.
We will use the custom data binding feature to bind the AppointmentDataSet table to the Syncfusion Blazor Scheduler.
Follow these steps to create and use a custom adaptor:
- Create a class that extends from the DataAdaptor class, which will act as the base class for your custom adaptor.
- Then, override the available CRUD methods to handle data querying and manipulation.
- Assign the custom adaptor class to the AdaptorInstance property of the SfDataManager component.
- Register our custom adaptor class as a service in the Program.cs file.
Now, let’s create a new class named AppointmentDataAdaptor.cs in the Data folder and replace the code in the class with the following code.
public class AppointmentDataAdaptor : DataAdaptor
    {
        private readonly AppointmentDataService _appService;
        public AppointmentDataAdaptor(AppointmentDataService appService)
        {
            _appService = appService;
        }
        List<AppointmentData>? EventData;
        //Performs Read operation
        public override async Task<object> ReadAsync(DataManagerRequest dataManagerRequest, string key = null)
        {
            System.Collections.Generic.IDictionary<string, object> Params = dataManagerRequest.Params;
            DateTime start = DateTime.Parse((string)Params["StartDate"]);
            DateTime end = DateTime.Parse((string)Params["EndDate"]);
            EventData = await _appService.Get(start, end);
            return dataManagerRequest.RequiresCounts ? new DataResult() { Result = EventData, Count = EventData.Count() } : EventData;
        }
        //Performs Insert operation
        public async override Task<object> InsertAsync(DataManager dataManager, object data, string key)
        {
            await _appService.Insert(data as AppointmentData);
            return data;
        }
        //Performs Update operation
        public async override Task<object> UpdateAsync(DataManager dataManager, object data, string keyField, string key)
        {
            await _appService.Update(data as AppointmentData);
            return data;
        }
        //Performs Delete operation
        public async override Task<object> RemoveAsync(DataManager dataManager, object data, string keyField, string key)
        {
            await _appService.Delete(data as AppointmentData);
            return data;
        }
        //Performs Batch update operations
        public async override Task<object> BatchUpdateAsync(DataManager dataManager, object changedRecords, object addedRecords, object deletedRecords, string keyField, string key, int? dropIndex)
        {
            object records = deletedRecords;
            List<AppointmentData>? deleteData = deletedRecords as List<AppointmentData>;
            if (deleteData != null)
            {
                foreach (var data in deleteData)
                {
                    await _appService.Delete(data as AppointmentData);
                }
            }
            List<AppointmentData>? addData = addedRecords as List<AppointmentData>;
            if (addData != null)
            {
                foreach (var data in addData)
                {
                    await _appService.Insert(data as AppointmentData);
                    records = addedRecords;
                }
            }
            List<AppointmentData>? updateData = changedRecords as List<AppointmentData>;
            if (updateData != null)
            {
                foreach (var data in updateData)
                {
                    await _appService.Update(data as AppointmentData);
                    records = changedRecords;
                }
            }
            return records;
        }
    }
In the above code example, we have:
- Extended the AppointmentDataAdaptor class from the DataAdaptor class.
- Injected an AppointmentDataService instance to perform data operations.
- Handled the CRUD methods.
Adding the Syncfusion Blazor Scheduler component
Now, the application is configured to use Syncfusion Blazor components. Let’s add the Blazor Scheduler component code to the Index.razor page.
@using Syncfusion.Blazor.Schedule
@using Syncfusion.Blazor.Data
@using SchedulerLoadOnDemand.Data
<SfSchedule TValue="AppointmentData" Width="100%" Height="600px" @bind-SelectedDate="@SelectedDate">
    <ScheduleViews>
        <ScheduleView Option="View.Day"></ScheduleView>
        <ScheduleView Option="View.Week"></ScheduleView>
        <ScheduleView Option="View.WorkWeek"></ScheduleView>
        <ScheduleView Option="View.Month"></ScheduleView>
        <ScheduleView Option="View.Agenda"></ScheduleView>
    </ScheduleViews>
    <ScheduleEventSettings TValue="AppointmentData">
        <SfDataManager AdaptorInstance="@typeof(AppointmentDataAdaptor)" Adaptor="Adaptors.CustomAdaptor">
        </SfDataManager>
    </ScheduleEventSettings>
</SfSchedule>
@code {
    DateTime SelectedDate { get; set; } = new DateTime(2023, 6, 10);
}
In the above code example, we have:
- Defined the SfDataManager component to provide a data source to the Blazor Scheduler. You can notice that we have specified the AdaptorInstance property with the AppointmentDataAdaptor class and mentioned the Adaptor property as Adaptors.CustomAdaptor.
- Specified the TValue as AppointmentData.
After executing the above code examples, we will get the following output.
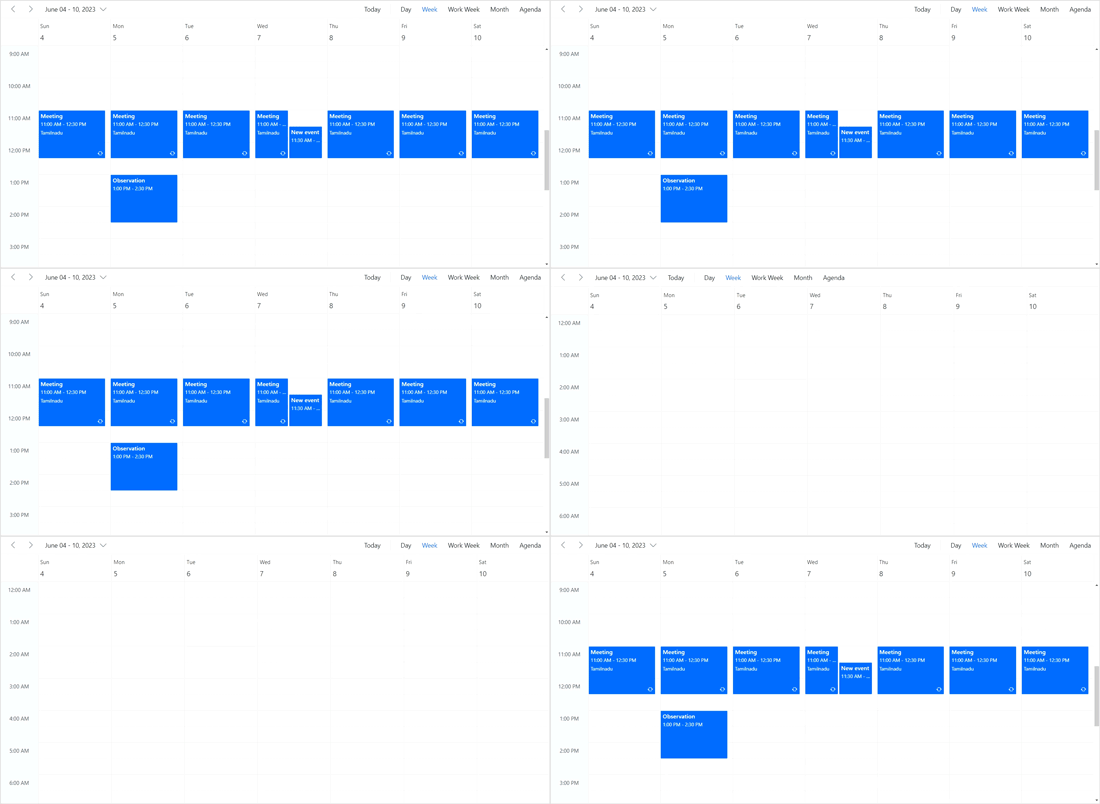
Here, appointments are filtered using the Get method as shown below.
public async Task<List<Appointment>> Get(DateTime startDate, DateTime endDate)
{
    return await _appointmentDataContext.AppointmentDataSet
        .Where(evt => evt.StartTime >= startDate && evt.EndTime <= endDate || evt.RecurrenceRule != null)
        .ToListAsync();
}
The Blazor Scheduler component displays appointments between the specified start and end dates.
The Get method filters appointments to show only those within the specified dates, improving loading times and responsiveness. You can also perform CRUD actions (Create, Read, Update, Delete) on appointments within the Scheduler, providing flexibility in managing scheduled events.
To experience the load-on-demand functionality, populate the database with numerous appointments during the initial load. This will allow you to see how the filtering method effectively retrieves and displays only the relevant appointments based on the specified date range.
GitHub reference
Also, check out the example for Loading appointments on demand in the Blazor Scheduler on GitHub.

Syncfusion Blazor components can be transformed into stunning and efficient web apps.
Summary
Thank you for reading! In this blog, we’ve seen how to load appointments on demand in the Blazor Scheduler and filter the required data using Entity Framework. By selectively loading the required data, this approach optimizes the Scheduler application, minimizes resource consumption, and provides a smooth and efficient user experience.
If you’re not a Syncfusion customer, you can download a free trial of Essential Studio® for Blazor to start exploring its controls immediately.
For any questions or concerns, you can contact us through our support forums, support portal, or feedback portal. Our team is always ready to assist you!
