TL;DR: Learn to create AI-powered mind maps by combining OpenAI’s language features with the Blazor Diagram Library. Discover how to automatically create dynamic and interactive mind maps from text descriptions.
Structuring ideas efficiently is key to successful brainstorming and project planning in our fast-moving world. Mind maps provide a clear visual layout, helping users easily grasp complex relationships and hierarchies. By combining OpenAI’s advanced language processing with Syncfusion’s Blazor Diagram Library, developers can automate the generation of interactive mind maps from simple text inputs.
This blog walks you through building an AI-powered mind-mapping app, showcasing how OpenAI and the Blazor Diagram library work together to streamline the process.
Let’s dive in!
Before you begin, ensure your environment is ready with the following:
The workflow for creating an AI-assisted mind map involves the following key steps:
This seamless integration allows users to effortlessly transform their ideas into visually appealing mind maps.
You can create a Blazor server app using Visual Studio via Microsoft Templates or the Syncfusion Blazor Extension.
To add the Blazor Diagram component to your app, open the NuGet package manager in Visual Studio (Tools → NuGet Package Manager → Manage NuGet Packages for Solution). Then, search and install the Syncfusion.Blazor.Diagram and Syncfusion.Blazor.Themes packages.
Alternatively, you can use the following package manager command to achieve the same.
Install-Package Syncfusion.Blazor.Diagram -Version 27.1.48
Install-Package Syncfusion.Blazor.Themes -Version 27.1.48
Register the Syncfusion Blazor Service in the ~/Program.cs file of your Blazor app.
using Microsoft.AspNetCore.Components;
using Microsoft.AspNetCore.Components.Web;
using Syncfusion.Blazor;

var builder = WebApplication.CreateBuilder(args);

// Add services to the container.
builder.Services.AddRazorPages();
builder.Services.AddServerSideBlazor();
builder.Services.AddSyncfusionBlazor();

var app = builder.Build();
....
Now, create a service to handle interactions with OpenAI.
public class DiagramOpenAIService
{
    private readonly HttpClient _httpClient;
    private readonly string _apiKey;
    private readonly string _deploymentName;

    /// <summary>
    /// Initializes a new instance of the <see cref="DiagramOpenAIService"/> class with the specified HTTP client, API key, and Deployment details.
    /// </summary>
    public DiagramOpenAIService(HttpClient httpClient, string apiKey, string deploymentName)
    {
        _httpClient = httpClient;
        _apiKey = apiKey;
        _deploymentName = deploymentName;
    }
}
To configure the AI service, add the following settings to the ~/Program.cs file in your Blazor app.
using Microsoft.AspNetCore.Components;
using Microsoft.AspNetCore.Components.Web;
using Syncfusion.Blazor;

var builder = WebApplication.CreateBuilder(args);

....

builder.Services.AddSyncfusionBlazor();

string apiKey = "api-key";
string deploymentName = "deployment-name";
string endpoint = "end point url";

builder.Services.AddTransient<DiagramOpenAIService>(service =>
{
    var httpClientFactory = new HttpClient { BaseAddress = new Uri(endpoint) };
    return new DiagramOpenAIService(httpClientFactory, apiKey, deploymentName);
});

var app = builder.Build();
....
Refer to the configuration details below.
For Azure OpenAI, first, we need to deploy an Azure OpenAI service resource and model. After deployment, you will receive values for apiKey, deploymentName, and endpoint.
If you are using OpenAI, create an API key and place it at apiKey, and then leave the endpoint as “”. The value for deploymentName is the model you wish to use (e.g., gpt-3.5-turbo, gpt-4, etc.).
The theme stylesheet and script can be accessed from NuGet through Static Web Assets. Reference the stylesheet and script in the <head> and <body> of the main page as follows:
<head>
 ....
 <link href="_content/Syncfusion.Blazor.Themes/tailwind.css" rel="stylesheet" />
</head>

….
<body>
 ....
 <script src="_content/Syncfusion.Blazor.Core/scripts/syncfusion-blazor.min.js" type="text/javascript"></script>
</body>
The Blazor Diagram is a feature-rich architecture diagram library for visualizing, creating, and editing interactive diagrams. Its intuitive API and rich feature set make it easy to create, style, and manage mind maps.
In the Index.razor file, define and configure the Blazor Diagram component, which will be the core of our mind map generator.
@using Syncfusion.Blazor.Diagram

<SfDiagramComponent
 @ref="@Diagram"
 @bind-InteractionController="@interactionController"
 @bind-Nodes="@nodes"
 @bind-Connectors="@connectors"
 ScrollChanged="ScrollChanged"
 CollectionChanging="CollectionChanging"
 Height="700px"
 Width="100%"
 GetCustomTool="@GetCustomTool"
 NodeCreating="@NodeCreating"
 ConnectorCreating="@ConnectorCreating"
 @bind-SelectionSettings="@selectionSettings"
 SelectionChanging="OnSelectionChanging"
 Created="OnCreated"
 SelectionChanged="@SelectionChanged"
 HistoryChanged="@HistoryChange">

 <ScrollSettings
  @bind-ScrollLimit="@scrollLimit"
  @bind-CurrentZoom="@CurrentZoom"
  @bind-MaxZoom="@maxZoom"
  @bind-MinZoom="@minZoom">
 </ScrollSettings>

 <Layout
  @bind-HorizontalSpacing="@HorizontalSpacing"
  @bind-VerticalSpacing="@VerticalSpacing"
  Type="LayoutType.MindMap"
  GetBranch="@getbranch">

 </Layout>

 <SnapSettings @bind-Constraints="@SnapConstraint">
 </SnapSettings>

 <PageSettings MultiplePage="true">
 </PageSettings>

 <CommandManager
  @bind-Commands="@commands"
  Execute="@ExecuteCommand"
  CanExecute="@CanExecute" />

 <RulerSettings>
  <HorizontalRuler></HorizontalRuler>
  <VerticalRuler></VerticalRuler>
 </RulerSettings>

</SfDiagramComponent>
This configuration creates a responsive diagram with a mind map layout, ruler settings, snap settings, scroll settings, and some event bindings.
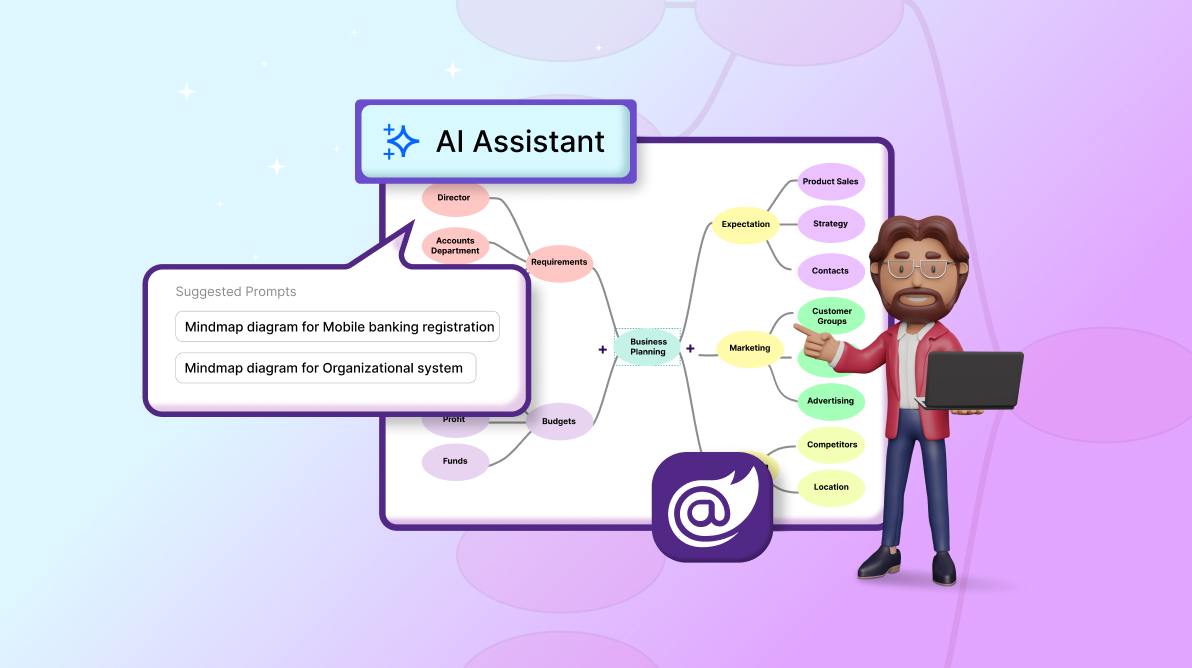
Let’s create a dialog for AI-assisted mind map generation with suggested prompts, a text box to receive user input, and a button to send the user input to OpenAI.
@using Syncfusion.Blazor.Popups
@using Syncfusion.Blazor.Buttons
@using Syncfusion.Blazor.Inputs
@namespace TextToMindMapDiagram
@inject DiagramOpenAIService ChatGptService

<SfFab IconCss="e-icons e-ai-chat" Content="AI Assist" OnClick="OnFabClicked"></SfFab>

<SfDialog
 Width="570px"
 IsModal="true"
 ShowCloseIcon="true"
 CssClass="custom-dialog"
 Visible="@ShowAIAssistDialog">

 <DialogTemplates>
  <Header>
   <span class="e-icons e-ai-chat" style="color: black; font-size: 16px;"></span> AI Assist
  </Header>

  <Content>
   <p style="margin-bottom: 10px;">Suggested Prompts</p>

   <SfButton
    style="flex: 1; overflow: visible; border-radius: 8px;margin-bottom: 10px;"
    @>    Mindmap diagram for Mobile banking registration
   </SfButton>

   <SfButton
    style="flex: 1; overflow: visible; border-radius: 8px;margin-bottom: 10px;"
    @>    Mindmap diagram for Organizational research
   </SfButton>

   <SfButton
    style="flex: 1; overflow: visible; border-radius: 8px;margin-bottom: 10px;"
    @>    Mindmap diagram for Meeting agenda
   </SfButton>

   <div style="display: flex; flex: 95%; margin-top:20px;">
    <SfTextBox
     @bind-Value="@OpenAIPrompt"
     CssClass="db-openai-textbox"
     Height="32px"
     Placeholder="Please enter your prompt for generating a mindmap diagram..."
     autofocus
     style="font-size: 14px;">
    </SfTextBox>

    <SfButton
     @>     CssClass="e-icons e-flat e-send"
     IsPrimary="true"
     style="height: 38px; width: 38px; margin-left: 5px; padding: 0;">
    </SfButton>
   </div>
  </Content>
 </DialogTemplates>

 <DialogEvents Closed="@DialogClose"></DialogEvents>

</SfDialog>
Then, set up the event callbacks and handlers to manage user interactions, such as entering a prompt and triggering the conversion of text to a mind map.
public bool ShowAIAssistDialog;
public string OpenAIPrompt;

public void OnFabClicked()
{
    ShowAIAssistDialog = !ShowAIAssistDialog;
}
private void DialogClose(Object args)
{
    ShowAIAssistDialog = false;
}
public async void GenerateMindMap(string value)
{
    OpenAIPrompt = value;
    await GenerateTextToMindmap();
}
public async Task GenerateTextToMindmap()
{
    ShowAIAssistDialog = false;
    await ChatGptService.ConvertTextToMindMap(OpenAIPrompt, Diagram);
} Finally, implement the ConvertTextToMindMap method in the DiagramOpenAIService, which acts as the main driver for transforming AI-generated text into a mind map using our Blazor Diagram API.
public class DiagramOpenAIService
{
    /// <summary>
    /// Gets the response from OpenAI for the provided prompt and generates the mindmap diagram.
    /// </summary>
    public async Task ConvertTextToMindMap(string prompt, SfDiagramComponent Diagram)
    {
        var requestContent = new
        {
            messages = new[]
            {
                new { role = "system", content = "You are an expert in creating mind map diagram data sources. Generate a structured data source for a mind map based on the user's query, using tab indentation to indicate hierarchy. The root parent should have no indentation, while each subsequent child level should be indented by one tab space. Avoid using any symbols such as '+' or '-' before any level of data." },
                new { role = "user", content = $"Generate the mindmap diagram data source for the following prompt: {prompt}." },
            },
            max_tokens = 500,
            temperature = 0.9
        };

        var requestBody = new StringContent(JsonSerializer.Serialize(requestContent), Encoding.UTF8, "application/json");
        var requestMessage = new HttpRequestMessage(HttpMethod.Post, $"openai/deployments/{_deploymentName}/chat/completions?api-version=2023-05-15")
        {
            Content = requestBody
        };
        // Add the API key to the request headers.
        requestMessage.Headers.Add("api-key", _apiKey);
        var response = await _httpClient.SendAsync(requestMessage);

        // Ensure the response is valid.
        response.EnsureSuccessStatusCode();

        // Parse the response content.
        var responseContent = await response.Content.ReadAsStringAsync();
        var jsonResponse = JsonDocument.Parse(responseContent);
        var mermaidData = jsonResponse.RootElement.GetProperty("choices")[0].GetProperty("message").GetProperty("content").GetString();
        // Load the diagram from mermaid text
        await Diagram.LoadDiagramFromMermaidAsync(mermaidData);
    }
}
The core function ConvertTextToMindMap sends a request to the OpenAI API with a user-entered prompt to generate Mermaid structured mind map data from text descriptions. Then, it uses our Blazor Diagram’s LoadDiagramFromMermaidAsync method to render the mind map.
After executing the above code examples, we’ll get the output that resembles the following image.
For more details, refer to the AI-powered smart mind map creation using OpenAI and Blazor Diagram Library GitHub demo.
Thanks for reading! In this blog, we’ve explored how to create an AI-powered smart mind map creation app using openAI and Syncfusion Blazor Diagram Library. Try it out today and leave your feedback in the comments below!
Existing customers can download the latest version of Essential Studio® from the License and Downloads page. If you are not a customer, try our 30-day free trial to check out these new features.
If you have questions, contact us through our support forum, support portal, or feedback portal. We are always happy to assist you!


