
TL;DR: Let’s build an AI-powered smart scheduler in .NET MAUI for seamless appointment booking and availability checks. This blog covers integrating Azure OpenAI, designing a chatbot, and configuring the .NET MAUI Scheduler to manage appointments efficiently. We’ll also demonstrate how to use the AI AssistView control to automate scheduling tasks.
Syncfusion .NET MAUI Scheduler (SfScheduler) has nine built-in configurable view modes that provide basic functionality for scheduling, managing, and representing appointments efficiently. It has been redesigned with a clean and convenient user interface for custom working days and hours and basic calendar operations such as date navigation and selection.
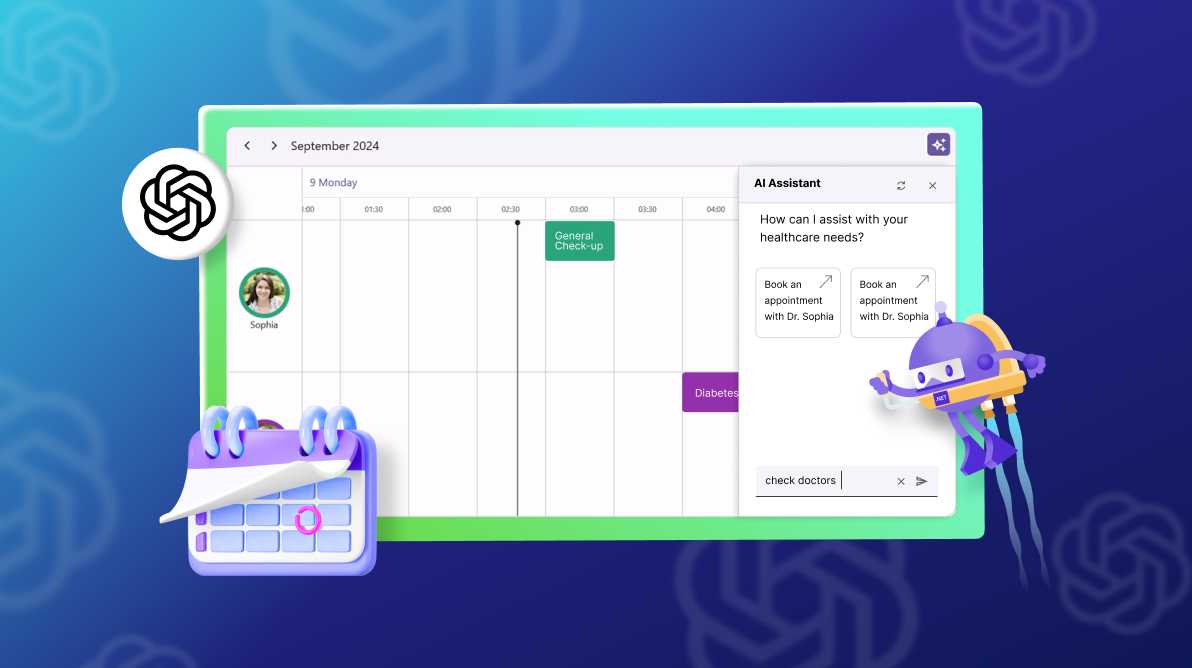
The AI-powered smart Scheduler simplifies appointment booking through AI service. It automatically suggests resource availability and schedules without direct interaction with the .NET MAUI Scheduler using Azure OpenAI.
In this blog, we’ll demonstrate how to design a Chatbot with the .NET MAUI Scheduler for smart appointment scheduling and checking doctors’ availability using Azure OpenAI. At the same time, the user enters a prompt or input in the .NET MAUI AI AssistView (SfAIAssistView) and book the appointment using the .NET MAUI Scheduler.
Let’s get started!
Integrating Azure OpenAI with the .NET MAUI app
First, open Visual Studio and create a new .NET MAUI app.
Before integrating the power of the AI AssistView feature, ensure that you have access to Azure OpenAI and have set up a deployment in the Azure portal. You can find the Azure.AI.OpenAI NuGet package in the NuGet Gallery and install it in the sample.
Once you get your key and endpoint, we can configure Azure OpenAI by assuming you’ll use the GPT-35 model deployed under the name GPT35Turbo. Let’s start by creating the OpenAIService, as shown in the following code example.
internal class AzureOpenAIService
{
    const string endpoint = "https://{YOUR_END_POINT}.openai.azure.com";
    const string deploymentName = "GPT35Turbo";
    string key = "API key";

    OpenAIClient? client;
    ChatCompletionsOptions? chatCompletions;

    internal AzureOpenAIService()
    {
    }
}
Connect to the Azure OpenAI
In the .NET MAUI app, set up a connection to the Azure OpenAI service, as shown in the following code example.
// At the time of required.
this.client = new OpenAIClient(new Uri(endpoint), new AzureKeyCredential(key));
This connection allows you to send prompts to the AI service and receive responses.
Implement a method to send a prompt to OpenAI
Now, implement the GetResponseFromGPT method to send a prompt to the OpenAI API and retrieve the completion result.
internal class AzureOpenAIService
{
    const string endpoint = "https://{YOUR_END_POINT}.openai.azure.com";
    const string deploymentName = "GPT35Turbo";
    string key = "API key";

    OpenAIClient? client;
    ChatCompletionsOptions? chatCompletions;

    internal AzureOpenAIService()
    {

    }

    internal async Task<string> GetResponseFromGPT(string userPrompt)
    {
        this.chatCompletions = new ChatCompletionsOptions
        {
            DeploymentName = deploymentName,
            Temperature = (float)0.5f,
            MaxTokens = 800,
            NucleusSamplingFactor = (float)0.95f,
            FrequencyPenalty = 0,
            PresencePenalty = 0,
        };

        this.client = new OpenAIClient(new Uri(endpoint), new AzureKeyCredential(key));
        if (this.client != null)
        {
            // Add the user's prompt as a user message to the conversation.
            this.chatCompletions?.Messages.Add(new ChatRequestSystemMessage("You are a predictive analytics assistant."));

            // Add the user's prompt as a user message to the conversation.
            this.chatCompletions?.Messages.Add(new ChatRequestUserMessage(userPrompt));
            try
            {
                // Send the chat completion request to the OpenAI API and await the response.
                var response = await this.client.GetChatCompletionsAsync(this.chatCompletions);

                // Return the content of the first choice in the response, which contains the AI's answer.
                return response.Value.Choices[0].Message.Content;
            }
            catch
            {
                // If an exception occurs (e.g., network issues, API errors), return an empty string.
                return "";
            }
        }
        return "";
    }
}
That’s it! The AzureOpenAIService class will now provide a convenient way to interact with the OpenAI API and retrieve completion results based on the prompt given in the SfAIAssistView control.
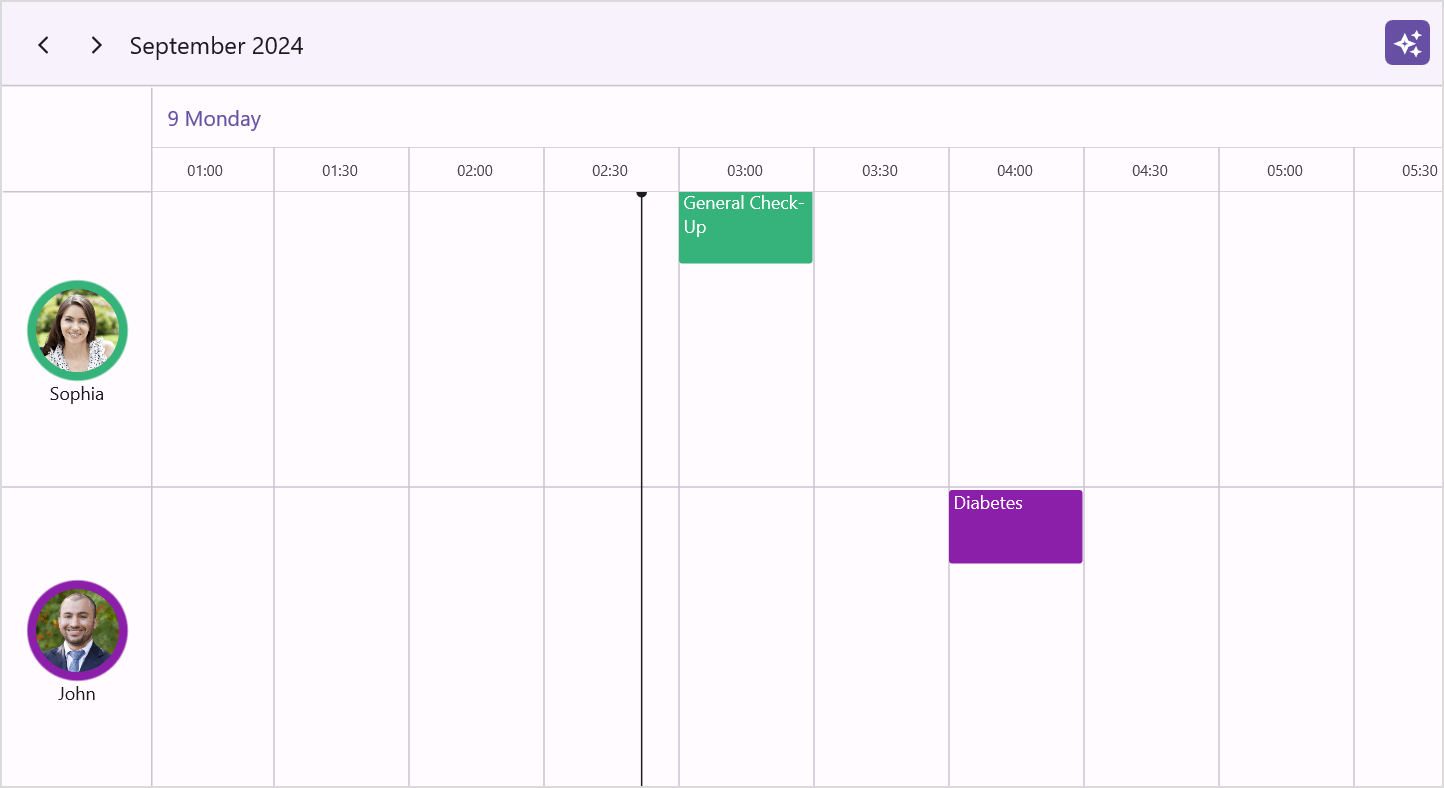
Designing the AI-powered smart .NET MAUI Scheduler for doctors
We can add multiple doctors and group appointments based on them in a single calendar, simplifying organization without needing multiple calendars. The .NET MAUI Scheduler allows you to manage resources in timeline views. Before proceeding, please refer to the getting started with the .NET MAUI Scheduler documentation.
Step 1: Create a scheduler resource model
Define a resource or doctor model with the following fields: Name, Id, Background, Foreground and ImageName.
ResourceViewModel.cs
public class ResourceViewModel
{
    public string Name { get; set; }
    public string? Id { get; set; }
    public Brush Background { get; set; }
    public Brush Foreground { get; set; }
    public string ImageName { get; set; }
}
Step 2: Create resources for the scheduler
In the ViewModel class, create the resource or doctor collection bound to the .NET MAUI Scheduler.
SchedulerViewModel.cs
public class SchedulerViewModel
{
  public ObservableCollection<object>? Resources { get; set; }
  public SchedulerViewModel()
  {

      InitializeResources();
  }
  /// <summary>
  /// Method to initialize the resources.
  /// </summary>
  private void InitializeResources()
  {
     this.Resources = new ObservableCollection<object>();
     for (int i = 0; i < 2; i++)
     {
         ResourceViewModel resourceViewModel = new ResourceViewModel();
         if (i == 0)
         {
             resourceViewModel.Name = "Sophia";
             resourceViewModel.ImageName = "people_circle1.png";
             resourceViewModel.Id = "1000";
             resourceViewModel.Background = new SolidColorBrush(Color.FromArgb("#36B37B"));
         }
         else
         {
             resourceViewModel.Name = "John";
             resourceViewModel.ImageName = "people_circle8.png";
             resourceViewModel.Id = "1001";
             resourceViewModel.Background = new SolidColorBrush(Color.FromArgb("#8B1FA9"));
         }

         Resources?.Add(resourceViewModel);
     }
  }
}
Step 3: Create the Scheduler for doctors
Then, create the Timeline Day Scheduler view and bind the resources from the ViewModel class to the SchedulerResourceView class’s Resources property. Then, map the custom ResourceViewModel properties to the Mapping properties of the SchedulerResourceView class.
Also, customize the resource header template to improve visualization.
xmlns:scheduler="clr-namespace:Syncfusion.Maui.Scheduler;assembly=Syncfusion.Maui.Scheduler"

<Grid.BindingContext>
  <local:SchedulerViewModel />
</Grid.BindingContext>

<scheduler:SfScheduler x:Name="scheduler" View="TimelineDay">
  <scheduler:SfScheduler.TimelineView>
    <scheduler:SchedulerTimelineView StartHour="9"
                                     TimeInterval="0:30:0"
                                     TimeIntervalWidth="90"
                                     TimeFormat="hh:mm"
                                     EndHour="18" />
  </scheduler:SfScheduler.TimelineView>

  <scheduler:SfScheduler.ResourceView>
    <scheduler:SchedulerResourceView Resources="{Binding Resources}">
      <scheduler:SchedulerResourceView.Mapping>
        <scheduler:SchedulerResourceMapping Name="Name"
                                            Id="Id"
                                            Background="Background"
                                            Foreground="Foreground" />
      </scheduler:SchedulerResourceView.Mapping>

      <scheduler:SchedulerResourceView.HeaderTemplate>
        <DataTemplate>
          <StackLayout Padding="5"
                       Orientation="Vertical"
                       VerticalOptions="Center"
                       HorizontalOptions="Fill">
            <Grid>
              <Border StrokeThickness="2"
                      Background="{Binding Background}"
                      HorizontalOptions="Center"
                      HeightRequest="{OnPlatform WinUI=70, MacCatalyst=70, Android=65, iOS=65}"
                      WidthRequest="{OnPlatform WinUI=70, MacCatalyst=70, Android=65, iOS=65}">
                <Border.StrokeShape>
                  <RoundRectangle CornerRadius="150" />
                </Border.StrokeShape>
              </Border>

              <Image WidthRequest="{OnPlatform WinUI=55, MacCatalyst=55, Android=50, iOS=50}"
                     HeightRequest="{OnPlatform WinUI=55, MacCatalyst=55, Android=50, iOS=50}"
                     HorizontalOptions="Center"
                     VerticalOptions="Center"
                     Source="{Binding DataItem.ImageName, Converter={StaticResource imageConverter}}"
                     Aspect="Fill" />
            </Grid>

            <Label Text="{Binding Name}"
                   FontSize="{OnPlatform WinUI=12, MacCatalyst=12, Android=10, iOS=10}"
                   VerticalTextAlignment="Center"
                   HorizontalTextAlignment="Center" />
          </StackLayout>
        </DataTemplate>
      </scheduler:SchedulerResourceView.HeaderTemplate>
    </scheduler:SchedulerResourceView>
  </scheduler:SfScheduler.ResourceView>
</scheduler:SfScheduler>
Refer to the following image.
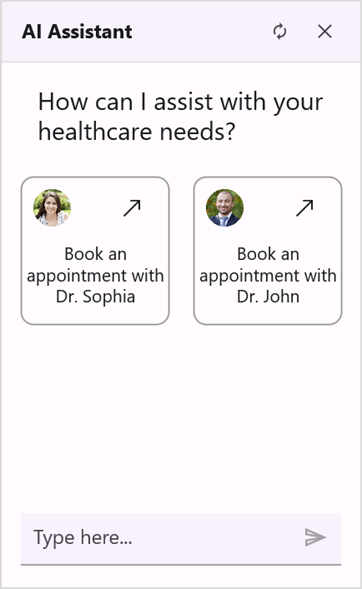
Step 4: Design an AI assistant chat view
Now, create an AI assistant chat view in which the user enters a prompt or input using the .NET MAUI SfAIAssistView to check the doctor’s availability and use Chatbot with Scheduler.
xmlns:aiassistview="clr-namespace:Syncfusion.Maui.AIAssistView;assembly=Syncfusion.Maui.AIAssistView"

<Grid.BindingContext>
 <local:SchedulerViewModel />
</Grid.BindingContext>

<aiassistview:SfAIAssistView Grid.Column="{OnPlatform Android='0',iOS='0', Default='1'}"
                             Margin="0,100,0,0"
                             IsVisible="{Binding ShowAssistView, Mode=TwoWay}"
                             HorizontalOptions="{OnPlatform Android=Fill, iOS=Fill, Default=End}"
                             MaximumWidthRequest="{OnPlatform WinUI=700}"
                             x:Name="aiAssistView"
                             ShowHeader="{Binding ShowHeader}"
                             AssistItems="{Binding Messages}">
 <aiassistview:SfAIAssistView.Shadow>
   <Shadow Brush="Black" Offset="0,0" Radius="1" Opacity="0.5" />
 </aiassistview:SfAIAssistView.Shadow>
</aiassistview:SfAIAssistView>
Refer to the following image.
Step 5: Check the doctor’s availability using AI service
When the user inputs texts into the SfAIAssistView chat, the prompt is sent to the AI service, and the doctor’s availability times are listed in the SfAIAssistView smart component.
AssistViewBehavior.cs
this.assistView.Request += this.OnAssistViewRequest;

private async void OnAssistViewRequest(object? sender, RequestEventArgs e)
{
    if (azureAIServices.Client != null)
    {
        if (string.IsNullOrEmpty(e.RequestItem.Text))
        {
            return;
        }

        string pattern = @"\b\d{2}:\d{2} (AM|PM)\b";
        bool isValidPattern = Regex.IsMatch(requeststring, pattern);
        if (!isValidPattern)
        {
            await this.SchedulerViewModel.GetAIResults(e.RequestItem.Text).ConfigureAwait(true);
        }
    }
}
SchedulerViewModel.cs
///<summary>
/// Method to get the AI response.
///</summary>
///<param name="query">The query</param>
///<returns></returns>
public async Task GetAIResults(string query)
{
    await Task.Delay(1000).ConfigureAwait(true);
    var reply = await this.GetRecommendation(query);
    AssistItem botMessage = new AssistItem() { Text = reply, ShowAssistItemFooter = false };
    this.Messages.Add(botMessage);
}
After the user enters the appointment booking details, the AI service lists the doctor’s availability, which is then parsed as a JObject object.
SchedulerViewModel.cs
///<summary>
/// Method to contain AI response and updates.
///</summary>
///<param name="userInput">The user input</param>
///<returns></returns>
private async Task<string> GetRecommendation(string userInput)
{
    DateTime todayDate = DateTime.Today;
    string prompt = $"Given data: {userInput}. Based on the given data, provide 10 appointment time details for Doctor1 and Doctor2 on {todayDate}." +
                    $"Availability time is 9AM to 6PM." +
                    $"In 10 appointments, split the time details as 5 for Doctor1 and 5 for Doctor2." +
                    $"Provide complete appointment time details for both Doctor1 and Doctor2 without missing any fields." +
                    $"It should be 30 minutes appointment duration." +
                    $"Doctor1 time details should not collide with Doctor2." +
                    $"Provide ResourceID for Doctor1 as 1000 and for Doctor2 as 1001." +
                    $"Do not repeat the same time. Generate the following fields: StartDate, EndDate, Subject, Location, and ResourceID." +
                    $"The return format should be the following JSON format: Doctor1[StartDate, EndDate, Subject, Location, ResourceID], Doctor2[StartDate, EndDate, Subject, Location, ResourceID]." +
                    $"Condition: provide details without any explanation. Don't include any special characters like ```";

    returnMessage = await azureAIServices.GetResultsFromAI(prompt);
    var jsonObj = JObject.Parse(returnMessage);

    var doctorAppointments = new Dictionary<string, (List<DateTime> StartTimes, List<DateTime> EndTimes, List<string> Subjects, List<string> Locations, List<string> ResourceIDs)>
    {
      { "Doctor1", (new List<DateTime>(), new List<DateTime>(), new List<string>(), new List<string>(), new List<string<()) },
      { "Doctor2", (new List<DateTime>(), new List<DateTime>(), new List<string>(), new List<string>(), new List<string>()) }
   };

   foreach (var doctor in doctorAppointments.Keys)
    {
        foreach (var appointment in jsonObj[doctor])
        {
            if (DateTime.TryParse((string)appointment["StartDate"], out DateTime startTime) && DateTime.TryParse((string)appointment["EndDate"], out DateTime endTime))
            {
                doctorAppointments[doctor].StartTimes.Add(startTime);
                doctorAppointments[doctor].EndTimes.Add(endTime);
            }

            doctorAppointments[doctor].Subjects.Add((string)appointment["Subject"]);
            doctorAppointments[doctor].Locations.Add((string)appointment["Location"]);
            doctorAppointments[doctor].ResourceIDs.Add((string)appointment["ResourceID"]);
        }
    }
    this.SophiaStartTimeCollection = doctorAppointments["Doctor1"].StartTimes;
    this.SophiaEndTimeCollection = doctorAppointments["Doctor1"].EndTimes;
    this.SophiaSubjectCollection = doctorAppointments["Doctor1"].Subjects;
    this.SophiaLocationCollection = doctorAppointments["Doctor1"].Locations;
    this.SophiaResourceIDCollection = doctorAppointments["Doctor1"].ResourceIDs;
    this.JohnStartTimeCollection = doctorAppointments["Doctor2"].StartTimes;
    this.JohnEndTimeCollection = doctorAppointments["Doctor2"].EndTimes;
    this.JohnSubjectCollection = doctorAppointments["Doctor2"].Subjects;
    this.JohnLocationCollection = doctorAppointments["Doctor2"].Locations;
    this.JohnResourceIDCollection = doctorAppointments["Doctor2"].ResourceIDs;
    this.SophiaAvailableTimeSlots = GenerateTimeSlots(SophiaStartTimeCollection);
    this.JohnAvailableTimeSlots = GenerateTimeSlots(JohnStartTimeCollection);
    return GenerateFinalTimeSlots(userInput);
}
///<summary>
/// Method to generate the final time slots.
///<summary>
///<param name="userInput">The user input</param>
///<returns></returns>
private string GenerateFinalTimeSlots(string userInput)
{
    string sophiaAvailedTimeSlots = string.Join(" \n ", this.SophiaAvailableTimeSlots);
    string johnAvailedTimeSlots = string.Join(" \n ", this.JohnAvailableTimeSlots);
    if (userInput.Contains("Sophia"))
    {
        return $"Doctor Sophia available appointment slots are\n {sophiaAvailedTimeSlots} \nEnter the time (hh:mm tt) to book an appointment.";
    }
    else if (userInput.Contains("John"))
    {
        return $"Doctor John available appointment slots are\n {johnAvailedTimeSlots} \nEnter the time (hh:mm tt) to book an appointment.";
    }
    else
    {
        return $"Doctor Sophia available appointment slots are\n {sophiaAvailedTimeSlots}\nDoctor John available appointment slots are\n {johnAvailedTimeSlots}\nEnter the time (hh:mm tt) to book an appointment.";
    }
}
////<summary>
/// Retrieves an answer from the deployment name model using the provided user prompt.
////</summary>
////<param name="userPrompt">The user prompt.</param>
////<returns>The AI response.<returns>
public async Task<string> GetResultsFromAI(string userPrompt)
{
    if (this.Client != null && this.chatCompletions != null)
    {
        // Add the system message and user message to the options
        this.chatCompletions.Messages.Add(new ChatRequestSystemMessage("You are a predictive analytics assistant."));
        this.chatCompletions.Messages.Add(new ChatRequestUserMessage(userPrompt));
        try
        {
            var response = await Client.GetChatCompletionsAsync(this.chatCompletions);
            return response.Value.Choices[0].Message.Content;
        }
        catch
        {
            return string.Empty;
        }
    }

    return string.Empty;
}
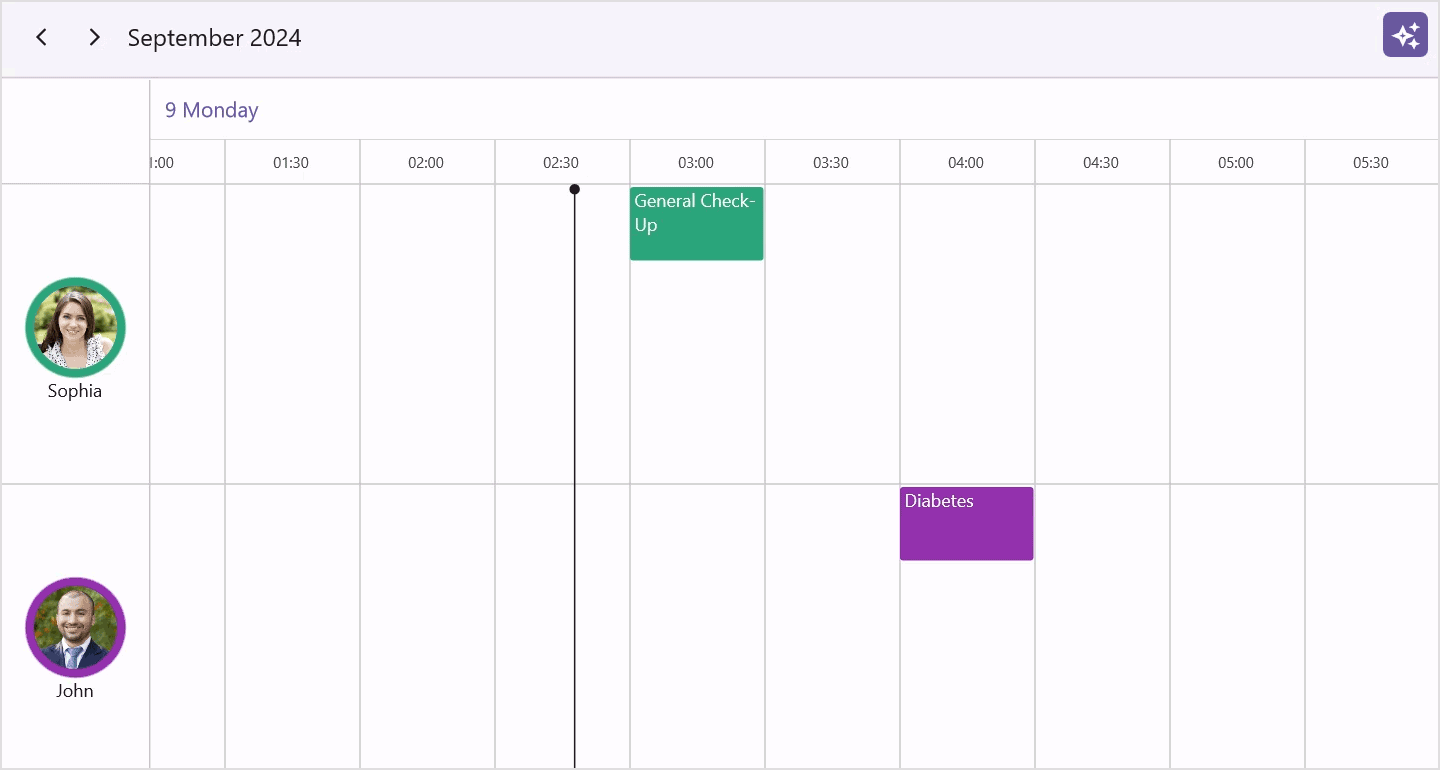
Step 6: Book the appointment with a doctor
Once the user enters the booking time, based on the doctor’s availability listed from the AI service, booking details are converted to scheduler appointments and appointments without interacting with the .NET MAUI Scheduler.
AssistViewBehavior.cs
private async void OnAssistViewRequest(object? sender, RequestEventArgs e)
{
    string requeststring = e.RequestItem.Text;
    DateTime sophiaStartTime;
    DateTime sophiaEndTime;
    string sophiaSubject = string.Empty;
    string sophiaLocation = string.Empty;
    string sophiaResourceID = string.Empty;
    DateTime johnStartTime;
    DateTime johnEndTime;
    string johnSubject = string.Empty;
    string johnLocation = string.Empty;
    string johnResourceID = string.Empty;

    if (azureAIServices.Client != null)
    {
        if (string.IsNullOrEmpty(e.RequestItem.Text))
        {
            return;
        }

        string pattern = @"\b\d{2}:\d{2} (AM|PM)\b";
        bool isValidPattern = Regex.IsMatch(requeststring, pattern);

        if (!isValidPattern)
        {
            await this.SchedulerViewModel.GetAIResults(e.RequestItem.Text).ConfigureAwait(true);
        }
        else
        {
            for (int i = 0; i < this.SchedulerViewModel.SophiaAvailableTimeSlots?.Count; i++)
            {
                if (requeststring == this.SchedulerViewModel.SophiaAvailableTimeSlots[i].ToString())
                {
                    sophiaStartTime = this.SchedulerViewModel.SophiaStartTimeCollection[i];
                    sophiaEndTime = this.SchedulerViewModel.SophiaEndTimeCollection[i];
                    sophiaSubject = this.SchedulerViewModel.SophiaSubjectCollection[i];
                    sophiaLocation = this.SchedulerViewModel.SophiaLocationCollection[i];
                    sophiaResourceID = this.SchedulerViewModel.SophiaResourceIDCollection[i];
                    this.AppointmentBooking(sophiaStartTime, sophiaEndTime, sophiaSubject, sophiaLocation, sophiaResourceID);
                    await Task.Delay(1000);
                    AssistItem botMessage = new AssistItem() { Text = "Doctor Sophia appointment successfully booked.\nThank you!", ShowAssistItemFooter = false };
                    this.SchedulerViewModel.Messages.Add(botMessage);
                }
            }

            for (int j = 0; j < this.SchedulerViewModel.JohnAvailableTimeSlots?.Count; j++)
            {
                if (requeststring == this.SchedulerViewModel.JohnAvailableTimeSlots[j].ToString())
                {
                    johnStartTime = this.SchedulerViewModel.JohnStartTimeCollection[j];
                    johnEndTime = this.SchedulerViewModel.JohnEndTimeCollection[j];
                    johnSubject = this.SchedulerViewModel.JohnSubjectCollection[j];
                    johnLocation = this.SchedulerViewModel.JohnLocationCollection[j];
                    johnResourceID = this.SchedulerViewModel.JohnResourceIDCollection[j];
                    this.AppointmentBooking(johnStartTime, johnEndTime, johnSubject, johnLocation, johnResourceID);
                    await Task.Delay(1000);
                    AssistItem botMessage = new AssistItem() { Text = "Doctor John appointment successfully booked.\nThank you!", ShowAssistItemFooter = false };
                    this.SchedulerViewModel.Messages.Add(botMessage);
                }
            }
        }
    }
}
Now, refer to the following code example to add appointments in the .NET MAUI Scheduler.
AssistViewBehavior.cs
private void AppointmentBooking(DateTime startTime, DateTime endTime, string subject, string location, string resourceID)
{
    this.Scheduler!.DisplayDate = startTime;
    this.SchedulerViewModel?.Appointments?.Add(new SchedulerAppointment()
    {
        StartTime = startTime,
        EndTime = endTime,
        Subject = subject,
        Location = location,
        ResourceIds = new ObservableCollection
        Background = resourceID == "1000" ? new SolidColorBrush(Color.FromArgb("#36B37B")) : new SolidColorBrush(Color.FromArgb("#8B1FA9")),
    });

    (this.Scheduler.AppointmentsSource as ObservableCollection<schedulerappointment>)?.addrange(this.schedulerviewmodel?.appointments);
}
Refer to the following output image.

GitHub reference
Also, refer to the AI-powered smart .NET MAUI Scheduler GitHub demo.
Conclusion
Thanks for reading! In this blog, we’ve seen how to easily book appointments by integrating AI-powered smart features in the Syncfusion .NET MAUI Scheduler control. Try out the steps in this blog and share your feedback in the comments section below.
This feature is included in the latest 2024 Volume 3 release. For additional details, visit our Release Notes and What’s New pages.
The existing customers can download the latest version of Essential Studio®® from the License and Downloads page. If you are new, try our 30-day free trial to explore our incredible features.
If you have questions, you can contact us through our support forum, feedback portal, or support portal. We are always happy to assist you!


 No spam, just valuable updates.