TL;DR: Let’s see how to integrate AI with Syncfusion .NET MAUI DataGrid for predictive data entry. This guide covers setting up Azure OpenAI, configuring the DataGrid, and updating columns with AI-generated predictions. Boost your app’s efficiency with AI-driven automation!
Artificial intelligence (AI) is a game-changer across various sectors in today’s competitive world. This article delves into the integration of AI with Syncfusion .NET MAUI DataGrid. You’ll see how to use the .NET MAUI DataGrid to generate predictive data from previous inputs. Our detailed guide will take you through the setup and configuration process, ensuring you can customize the DataGrid to meet your requirements.
Let’s get started!
Step 1: Integrate Azure OpenAI with .NET MAUI app
First, open Visual Studio and create a new .NET MAUI app.
Then, install the latest version of Azure.AI.OpenAI and Newtonsoft.Json NuGet packages to facilitate AI operations.
Step 2: Create the AzureOpenAI class
Create a new class for OpenAI. This class is designed to interact with OpenAI’s API to generate responses based on user prompts. You can create an instance of OpenAI and call the GetResponseFromOpenAI method with a prompt. This will return the AI-generated response based on the provided prompt.
public class OpenAi
{
    private readonly HttpClient _httpClientFactory;
    const string endpoint = "YOUR-AI-ENDPOINT";
    const string deploymentName = "YOUR-DEPLOYMENT-NAME";
    const string key = "YOUR-KEY";

    public OpenAi() {

    }
    public async Task<string> GetResponseFromOpenAI(string prompt)
    {
        try
        {
            var client = new OpenAIClient(new Uri(endpoint), new AzureKeyCredential(key));
            var chatCompletionsOptions = new ChatCompletionsOptions
            {

                DeploymentName = deploymentName,
                Temperature = (float)0.5,
                MaxTokens = 800,
                NucleusSamplingFactor = (float)0.95,
                FrequencyPenalty = 0,
                PresencePenalty = 0,

            };

            // Add the system message and user message to the options.
            chatCompletionsOptions.Messages.Add(new ChatRequestSystemMessage("You are a predictive analytics assistant"));
            chatCompletionsOptions.Messages.Add(new ChatRequestUserMessage(prompt));

            var response = await client.GetChatCompletionsAsync(chatCompletionsOptions);
            var message = response.Value.Choices[0].Message.Content;
            return message;
        }
        catch (Exception ex)
        {
            return null;
        }
    }
}
Step 3: Design the DataGrid page
Install the Syncfusion.Maui.DataGrid package from NuGet Gallery. Here, we’ll create the .NET MAUI DataGrid to display the student data and their marks with the required columns.
<syncfusion:SfDataGrid ItemsSource="{Binding PredictiveDatas}">
 <syncfusion:SfDataGrid.Columns>
  <syncfusion:DataGridTextColumn MappingName="StudentID" />
  <syncfusion:DataGridTextColumn MappingName="StudentName" />
  <syncfusion:DataGridNumericColumn MappingName="FirstYearGPA" />
  <syncfusion:DataGridNumericColumn MappingName="SecondYearGPA" />
  <syncfusion:DataGridNumericColumn MappingName="ThirdYearGPA" />
 </syncfusion:SfDataGrid.Columns>
</syncfusion:SfDataGrid>
Now, add the Syncfusion .NET MAUI Button control to the XAML page for predictive calculations of each student’s final marks using OpenAI.
<button:SfButton x:Name="button" Clicked="Button_Clicked"/>
Step 4: Enable predictive data integration
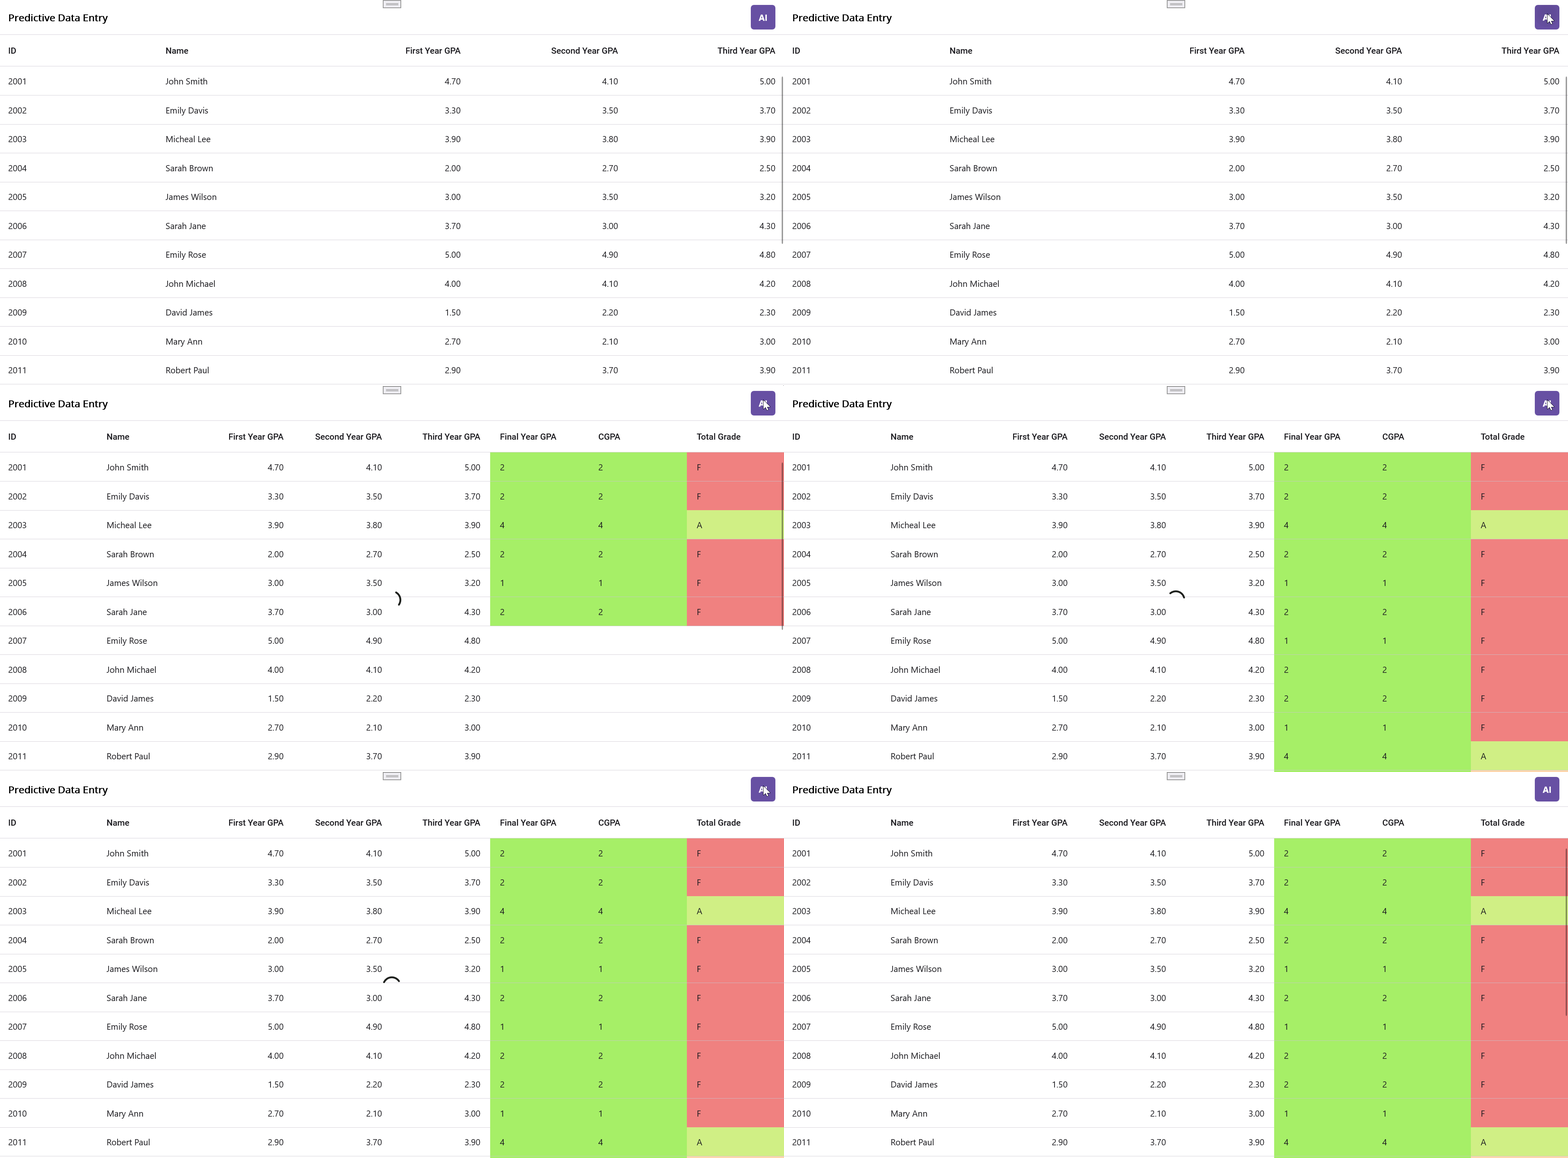
In the button click event, we’ll update the DataGrid in your .NET MAUI app with the calculated values for Final Year GPA, Total GPA, and Total Grade based on previous year GPAs.
- Define the prompt: Create a string prompt to specify the criteria for updating the Final Year GPA, Total GPA, and Total Grade.
- Initialize GenerateGridReport: Create an instance of GenerateGridReport and initialize it with the data source from the DataGrid’s binding context.
- Generate user input for OpenAI: Serialize the data source into JSON format, validate the prompt, and combine it with the serialized data to generate the user input.
- Fetch response from OpenAI: Call the GetResponseFromOpenAI method with the generated user input. If a response is received, deserialize it into a GenerateGridReport object.
- Update DataGrid columns: Add new columns for Final Year GPA, Total GPA, and Total Grade to the DataGrid.
- Update DataGrid rows: The DataGrid rows are updated with the new values for Final Year GPA, Total GPA, and Total Grade based on the response from OpenAI. The DataGrid is refreshed after each update with a slight delay.
Refer to the following code example.
async private void Button_Clicked(object sender, EventArgs e)
{
     string prompt = "Final year GPA column should be updated based on GPA of FirstYearGPA, SecondYearGPA and ThirdYearGPA columns. Total GPA should be updated based on average of all years GPA. Total Grade update based on total GPA. Updated the grade based on following details, 0 - 2.5 = F, 2.6 - 2.9 = C, 3.0 - 3.4 = B, 3.5 - 3.9 = B+, 4.0 - 4.4 = A, 4.5 - 5 = A+. average value decimal should not exceed 1 digit";
    GenerateGridReport gridReport = new GenerateGridReport()
    {
        GenerateDataSource = (this.datagrid?.BindingContext as GenerateDataCollection)!.PredictiveDatas,
    };
    var gridReportJson = GetSerializedGridReport(gridReport);
    string userInput = ValidateAndGeneratePrompt(gridReportJson, prompt);
    var result = await openAi.GetResponseFromOpenAI(userInput);
    if (result != null)
    {
        GenerateGridReport deserializeResult = new GenerateGridReport();
        try
        {
            result = result.Replace("```json", "").Replace("```", "").Trim();
            deserializeResult = DeserializeResult(result);
            var FinalYearGPA = new DataGridTextColumn() { HeaderText = "Final Year GPA", MappingName = "FinalYearGPA", MinimumWidth = 150 };
            var TotalCgpa = new DataGridTextColumn() { HeaderText = "CGPA", MappingName = "TotalGPA", MinimumWidth = 150 };
            var TotalGrade = new DataGridTextColumn() { HeaderText = "Total Grade", MappingName = "TotalGrade", MinimumWidth = 150 };
            this.datagrid.Columns.Add(FinalYearGPA);
            this.datagrid.Columns.Add(TotalCgpa);
            this.datagrid.Columns.Add(TotalGrade);
            int index = 0;
            if (DeviceInfo.Platform == DevicePlatform.Android)
            {
                if (datagrid != null)
                {
                    await datagrid.ScrollToColumnIndex(5);
                }
            }
            foreach (var item in gridReport.GenerateDataSource)
            {
                if (item != null)
                {
                    if (item.StudentID == gridReport.GenerateDataSource[index].StudentID)
                    {
                        if (deserializeResult != null && deserializeResult.GenerateDataSource != null)
                        {
                            gridReport.GenerateDataSource[index].FinalYearGPA = deserializeResult.GenerateDataSource[index].FinalYearGPA;
                            gridReport.GenerateDataSource[index].TotalGrade = deserializeResult.GenerateDataSource[index].TotalGrade;
                            gridReport.GenerateDataSource[index].TotalGPA = deserializeResult.GenerateDataSource[index].TotalGPA;
                        }
                    }
                }
                index++;
                datagrid!.Refresh();
                await Task.Delay(250);
            }
        }
    }
    }
}
Refer to the following output image.
GitHub reference
For more details, refer to the AI-powered smart .NET MAUI DataGrid for predictive data entry GitHub demo.

Supercharge your cross-platform apps with Syncfusion's robust .NET MAUI controls.
Conclusion
Thank you for reading! In this blog, we’ve explored how to integrate AI with Syncfusion .NET MAUI DataGrid for predictive data integration. This guide provides a clear path to set up and configure your apps effectively. With minimal setup, you can automate data entry tasks, allowing you to focus on more critical aspects of your projects.
This feature is included in the latest 2024 Volume 3 release. For additional details, visit our Release Notes and What’s New pages.
Existing customers can access the new version of Essential Studio® on the License and Downloads page. If you aren’t a Syncfusion customer, try our 30-day free trial to experience our fantastic features.
Feel free to reach out via our support forum, support portal, or feedback portal. We’re here to help!

